
Engine bay pictures of my racer after 6 years evolution
 01-24-2009, 05:27 AM
#1
Pro
Thread Starter
Join Date: Aug 2002
Location: Netherlands
Posts: 589
Likes: 0
Received 0 Likes
on
0 Posts
As some of you know my racer is in the workshop to be prepared for the coming season.
Lots of the panels are off, have been freshly repainted, and are not remounted jet.
Just thought I would take the opportunity to take some pictures and show you some of the
modifications done over the years.
I always get inspired and steal lots of ideas, like recently from Landjet�s car. I believe strongly
in that it is better to copy then to invent, which I admit, is an untypical attitude if you are an
engineer like I am.
I bought my car 88 Turbo S end of 2002, and have been busy with it ever since.
It is very much an evolutionary project:
I estimate that I have spend about 10 K EUR on it every year from my yearly bonus.
The only thing standard is the long block. Most of the rest got changed over the years.
All a result of trial and error: Learning how to drive a bit better, and deciding what changes
to the car would be benificial.
And I spend some money every now and then to make it look good.
The result is a pretty light 1050kg, 310-320 RWHP car, that still keeps up with pre-2004 911
GT3RS and GT3 Cups. I have written what a have done with the suspension in earlier
threads.
Well, to the engine bay then. I will describe all the off-standard parts
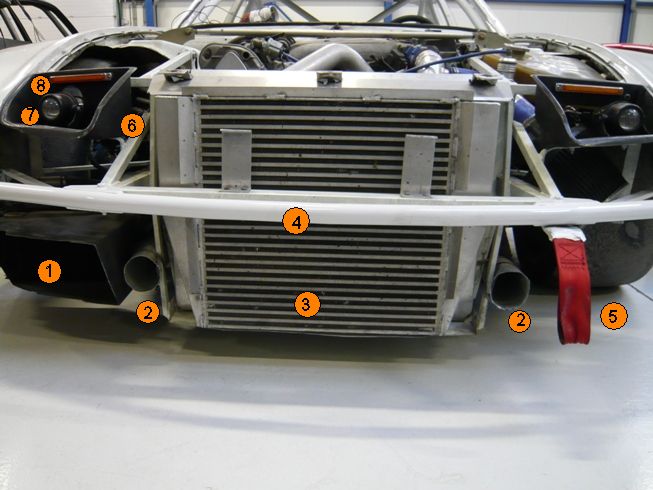
1. Forced oil cooling. Oil temperatures went up to the critical level (130C). So we have put a
standard MOCAL cooler into a custom made carbon box , that forces the air through it.
Very effective. Originally we planned to install two, but with one cooler temperatures remains stable at 100C.
2. Brake cooling ducts. I have Big Red brakes with Pagid Yellow pads. Without cooling they
last about 2 track hours. With cooling 20. So brake cooling is a worthwile investment.
Additional complexity was that due to the Low ride height, the bumper shell needs to be detachable.
The hose used for the ducts not stiff enough. This was solved by welding two alu receptables.
3. Custom build intercooler. I have heard from a lot af people that the OEM cooling is good
enough for a 350HP engine. No, it is not if you track the car.
On what we consider a hot day 30C. after driving 2 laps the engine completely heat soaked,
we measured inlet temps of 80C.
I got a reasonably priced standard core from the US, and a local NL company made me a
custom intercooler. I have not seen inlet temperatures over 45 C even on the hottest days.
The OEM radiator is fitted behind it. Water temperatures run quickly to 105 C, with fans
running 95C. I have made a switch that controls them manually. I still have to wire it up to the
DTA S60 ecu, to switch them on a bit lower temperatures as the relay does.
The combo intercooler / radiator is moved 1.5" to the front, in order to give the hot air space to
vent to the grill we mounted in the hood. There is still the idea to do some ducting, to force the
air, but for the moment the grill creates sufficient vacuum to pull the hot air form the engine
compartment
4. Custom chrome moly bumper beam. Bumper shell with U profile slides over it .
5. Tow band. More flexible then a steel eye.
6. Custom carbon headlight bucket. Even though this is a track car, venues like Spa
Francorchamps require lights to be lit if it rains. Which it almost always does there.
It has a lexan cover that is not shown.
7. Hella wide beam.. For Dutch amateur standards this is a fast car, faster then 90%.
Especially on track days, it is nice to be seen. The Hellas are an inexpensive solution, the
widebeam does not blind, and it can be seen from a wide angle.
8. LED turn signals. Because I wanted the bumper shell to be easily detachable, the turn
signal lights had to go. I a motorcycle shop I found these very bright LED lights.
Because of the lower current, this meant that also the blinker relay needed to be changed for a
LED enabled one.
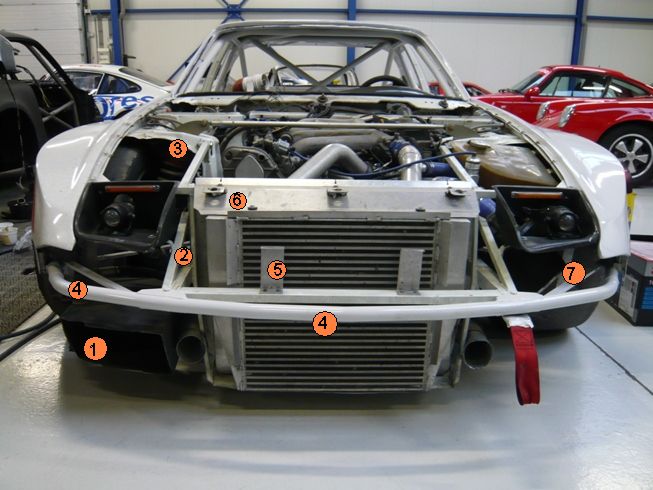
1. Oil cooler duct. Not the clearest of views, but here you could have seen that it is about half
a C shape: curved back, exit to the side
2. The front of the chassis been cut of to the struts. Originally I planned to have the plastic mud
thingies in there, never happened and I do not really miss them.
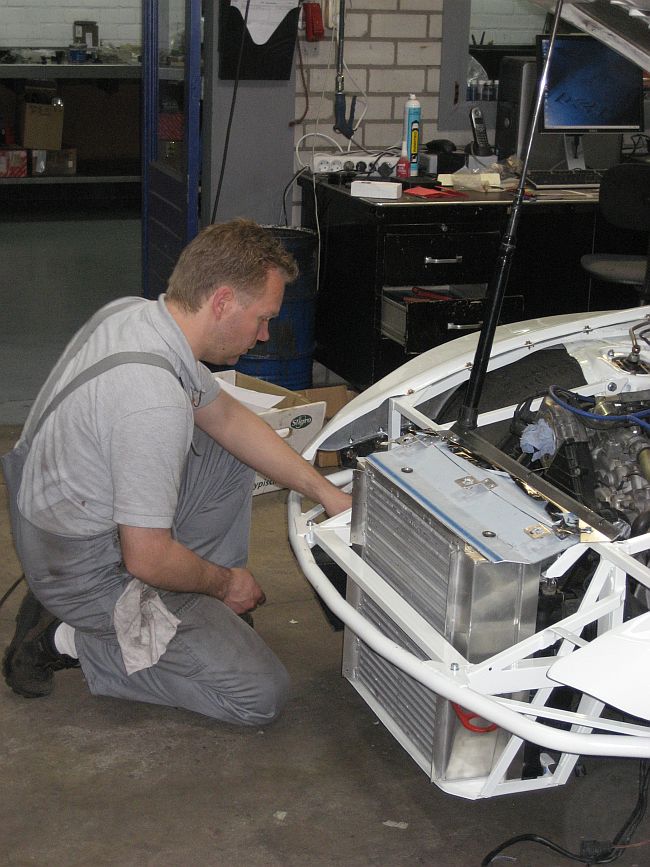
3. Subframe to mount radiator and intercooler. Made from 40x40mm and 20x20 tubes.
I have had it made originally because repairing the car even after a mild crash is a pain.
With all of the custom stuff it also makes life a lot easier.
Saved 6 kg weight in a spot that you really do not want it. It is bolted tho the chassis beams
and the strut tower for easy replacement and easy access to the front of the engine.
In fact the engine can now be removed to the front
4. Chrome moly bumper beam extended to the front of the wheels.
I wanted some protection against the "wheel banging" that often happens in W2W racing.
This bumper beam protects both the intercooler and the F wheel.
It is illegal in rallycross, but allowed in racing.
I had a running into another car he last time in Francorchamps, and it proved to work very well.
5. Header panel clamps and
6. Header panel quick release locks. Originally we only had the quick release locks on top of
the panel, proofed not to be stable enough. We made two clamps which "grab" the vent in the
header panel
7. Air filter, partly in headlight bucket. The big air filter did not fit behind the headlight buckets.
We just cut out part of the bucket to make it fit.
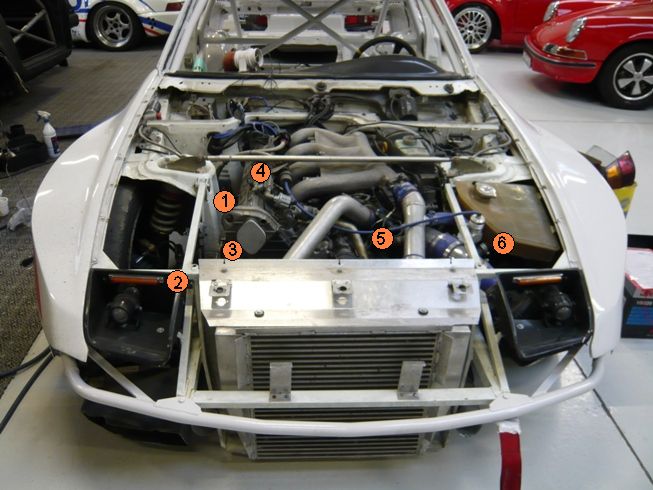
1. Bolted on subframe from another angle.
2. Hoodpin support. Two receptables welded in. We are currently changing the hood to be
removable in stead of hinged, with three more hoodpins on the top of the hood.
3. Custom milled distribitor cap delete.
4. Strut brace. We have tried a number of different ones, this KLA unit is adjustable and
always fits. Light, very stiff and easy to tighten.
5. Custom hard intercooler pipes. I had already in my old setup bought LR hard pipes.
We cut and rewelded them to make them fit.
6. Blow off valve. It was quite hard to find a spot for the blow-off valve.
This was about the only place we could fit it.

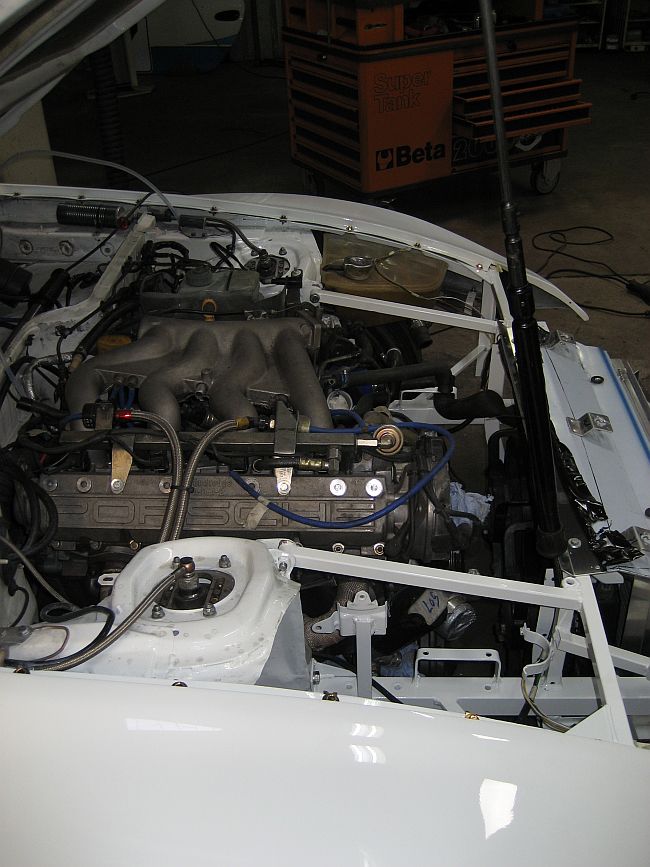
1. Relocated ABS pump. When we built this car, we wanted to equip it with air jacks.
We never did, but it required relocating the ABS pump.
We wanted to redo the complete brake lines anyway.
This position makes a lot of sense, it simplified the brake lines considerably
2. Electronic Boost Control Valve.
3. Electronic Ignition
Came with the DTA S60 ECU
4. No fuse box, relocated to the inside of the car
5. Defogger (Work In Process) We deleted the original blower unit. Phase one I gutted it to remove all the A/C and heater stuff.
After that it kept on blowing fuses, possibly because of the reduced air resistance.
We used a cheap solution used in yachts. Works pretty well, looks kind of sloppy.
We also need to get a heater in somewhere.
6. Powervamp dry cell. We relocated the standard battery to the back seat. With the new fuel
cell, that did not fit anymore, so now we put in a dry cell.
We will make a connector to the outside of the car, to easily connect a booster pack
7. Top mount camber plates
8. Damper adjustment cannister
9. Braided steel fuel lines. The fuel lines run through the driver compartment.
At first we had one piece lines, running directly to the fuel pump. Later we fitted bulkhead
connectors, to keep the barrier gas tight.
10. LR Steam vent. Even with MLS headgasket, the corner of cylinder 4 kept giving us problems.
We fitted the steam vent, since then it seems ok.
11. Electrical brake out box. A fuse box from a high end audio store was used to connect the
new electrical power lines to the original wiring after the battery relocation. I wanted this to be
detachable, to be able to remove the engine.
Feel free to comment or ask Q's.
Lots of the panels are off, have been freshly repainted, and are not remounted jet.
Just thought I would take the opportunity to take some pictures and show you some of the
modifications done over the years.
I always get inspired and steal lots of ideas, like recently from Landjet�s car. I believe strongly
in that it is better to copy then to invent, which I admit, is an untypical attitude if you are an
engineer like I am.
I bought my car 88 Turbo S end of 2002, and have been busy with it ever since.
It is very much an evolutionary project:
I estimate that I have spend about 10 K EUR on it every year from my yearly bonus.
The only thing standard is the long block. Most of the rest got changed over the years.
All a result of trial and error: Learning how to drive a bit better, and deciding what changes
to the car would be benificial.
And I spend some money every now and then to make it look good.
The result is a pretty light 1050kg, 310-320 RWHP car, that still keeps up with pre-2004 911
GT3RS and GT3 Cups. I have written what a have done with the suspension in earlier
threads.
Well, to the engine bay then. I will describe all the off-standard parts
1. Forced oil cooling. Oil temperatures went up to the critical level (130C). So we have put a
standard MOCAL cooler into a custom made carbon box , that forces the air through it.
Very effective. Originally we planned to install two, but with one cooler temperatures remains stable at 100C.
2. Brake cooling ducts. I have Big Red brakes with Pagid Yellow pads. Without cooling they
last about 2 track hours. With cooling 20. So brake cooling is a worthwile investment.
Additional complexity was that due to the Low ride height, the bumper shell needs to be detachable.
The hose used for the ducts not stiff enough. This was solved by welding two alu receptables.
3. Custom build intercooler. I have heard from a lot af people that the OEM cooling is good
enough for a 350HP engine. No, it is not if you track the car.
On what we consider a hot day 30C. after driving 2 laps the engine completely heat soaked,
we measured inlet temps of 80C.
I got a reasonably priced standard core from the US, and a local NL company made me a
custom intercooler. I have not seen inlet temperatures over 45 C even on the hottest days.
The OEM radiator is fitted behind it. Water temperatures run quickly to 105 C, with fans
running 95C. I have made a switch that controls them manually. I still have to wire it up to the
DTA S60 ecu, to switch them on a bit lower temperatures as the relay does.
The combo intercooler / radiator is moved 1.5" to the front, in order to give the hot air space to
vent to the grill we mounted in the hood. There is still the idea to do some ducting, to force the
air, but for the moment the grill creates sufficient vacuum to pull the hot air form the engine
compartment
4. Custom chrome moly bumper beam. Bumper shell with U profile slides over it .
5. Tow band. More flexible then a steel eye.
6. Custom carbon headlight bucket. Even though this is a track car, venues like Spa
Francorchamps require lights to be lit if it rains. Which it almost always does there.
It has a lexan cover that is not shown.
7. Hella wide beam.. For Dutch amateur standards this is a fast car, faster then 90%.
Especially on track days, it is nice to be seen. The Hellas are an inexpensive solution, the
widebeam does not blind, and it can be seen from a wide angle.
8. LED turn signals. Because I wanted the bumper shell to be easily detachable, the turn
signal lights had to go. I a motorcycle shop I found these very bright LED lights.
Because of the lower current, this meant that also the blinker relay needed to be changed for a
LED enabled one.
1. Oil cooler duct. Not the clearest of views, but here you could have seen that it is about half
a C shape: curved back, exit to the side
2. The front of the chassis been cut of to the struts. Originally I planned to have the plastic mud
thingies in there, never happened and I do not really miss them.
3. Subframe to mount radiator and intercooler. Made from 40x40mm and 20x20 tubes.
I have had it made originally because repairing the car even after a mild crash is a pain.
With all of the custom stuff it also makes life a lot easier.
Saved 6 kg weight in a spot that you really do not want it. It is bolted tho the chassis beams
and the strut tower for easy replacement and easy access to the front of the engine.
In fact the engine can now be removed to the front
4. Chrome moly bumper beam extended to the front of the wheels.
I wanted some protection against the "wheel banging" that often happens in W2W racing.
This bumper beam protects both the intercooler and the F wheel.
It is illegal in rallycross, but allowed in racing.
I had a running into another car he last time in Francorchamps, and it proved to work very well.
5. Header panel clamps and
6. Header panel quick release locks. Originally we only had the quick release locks on top of
the panel, proofed not to be stable enough. We made two clamps which "grab" the vent in the
header panel
7. Air filter, partly in headlight bucket. The big air filter did not fit behind the headlight buckets.
We just cut out part of the bucket to make it fit.
1. Bolted on subframe from another angle.
2. Hoodpin support. Two receptables welded in. We are currently changing the hood to be
removable in stead of hinged, with three more hoodpins on the top of the hood.
3. Custom milled distribitor cap delete.
4. Strut brace. We have tried a number of different ones, this KLA unit is adjustable and
always fits. Light, very stiff and easy to tighten.
5. Custom hard intercooler pipes. I had already in my old setup bought LR hard pipes.
We cut and rewelded them to make them fit.
6. Blow off valve. It was quite hard to find a spot for the blow-off valve.
This was about the only place we could fit it.
1. Relocated ABS pump. When we built this car, we wanted to equip it with air jacks.
We never did, but it required relocating the ABS pump.
We wanted to redo the complete brake lines anyway.
This position makes a lot of sense, it simplified the brake lines considerably
2. Electronic Boost Control Valve.
3. Electronic Ignition
Came with the DTA S60 ECU
4. No fuse box, relocated to the inside of the car
5. Defogger (Work In Process) We deleted the original blower unit. Phase one I gutted it to remove all the A/C and heater stuff.
After that it kept on blowing fuses, possibly because of the reduced air resistance.
We used a cheap solution used in yachts. Works pretty well, looks kind of sloppy.
We also need to get a heater in somewhere.
6. Powervamp dry cell. We relocated the standard battery to the back seat. With the new fuel
cell, that did not fit anymore, so now we put in a dry cell.
We will make a connector to the outside of the car, to easily connect a booster pack
7. Top mount camber plates
8. Damper adjustment cannister
9. Braided steel fuel lines. The fuel lines run through the driver compartment.
At first we had one piece lines, running directly to the fuel pump. Later we fitted bulkhead
connectors, to keep the barrier gas tight.
10. LR Steam vent. Even with MLS headgasket, the corner of cylinder 4 kept giving us problems.
We fitted the steam vent, since then it seems ok.
11. Electrical brake out box. A fuse box from a high end audio store was used to connect the
new electrical power lines to the original wiring after the battery relocation. I wanted this to be
detachable, to be able to remove the engine.
Feel free to comment or ask Q's.
 01-24-2009, 06:56 AM
#2
Rennlist Member
Very interesting Hans, how much distance between the radiator and the intercooler?Would think the hood vent would help a lot with the cooling.
You dont seem to have much structure in front of the front struts?
You dont seem to have much structure in front of the front struts?
01-24-2009, 07:06 AM
#3
Rennlist Member
As always, your car is an inspiration for those of us who dream of putting together a track car someday.
If you had to start over again, do you think it would cost you less from the mistakes you've learned from? I need to keep working on my "bonus" so I can make it happen!
If you had to start over again, do you think it would cost you less from the mistakes you've learned from? I need to keep working on my "bonus" so I can make it happen!
01-24-2009, 07:27 AM
#4
Drifting

Join Date: May 2006
Location: Melbourne
Posts: 3,481
Likes: 0
Received 0 Likes
on
0 Posts
I'm considering the cutting the front off option like that is it a big wieght saving or is it just the freedom of a clean slate for lay out thats most effective .
I'm getting new FG front I have big front mount cooler loosing the lights . I'm asking is it much more work making it from scratch or is it more work trying to get waht what you want from the front sheet metal ?
when are you going to tie the struts into the cage ?
more pics please doors hood in the back
01-24-2009, 12:28 PM
#7
Pro
Thread Starter
Join Date: Aug 2002
Location: Netherlands
Posts: 589
Likes: 0
Received 0 Likes
on
0 Posts
The guy who made the structure claims that it is not a lot weaker than the original one. Since it is connected to both the chassis beam and the strut tower it should be ok. We also did not want to make it too strong, otherwise a mild crash might ruin the whole car.
Trending Topics
01-24-2009, 12:31 PM
#8
Pro
Thread Starter
Join Date: Aug 2002
Location: Netherlands
Posts: 589
Likes: 0
Received 0 Likes
on
0 Posts
 01-24-2009, 02:32 PM
#10
Race Car
Join Date: Sep 2005
Location: TEXAS
Posts: 4,247
Likes: 0
Received 0 Likes
on
0 Posts
I love it, and will probably work some design cues of the front bumper beams into mine. Strangely though, where I am concentrating a lot of design and build energy, you have none! structural bracing of the shock towers - integrating into the cage.
I'm going to do a combination of the kelly moss cross bracing, and the Boss cars. I'm still working out front bumper
/ radiator - intercooler support design. Not easy. It has to strong and weigh less than 15lbs. - my own rules there.
I'm very happy you shared. Your design solves some issues I have!
But stating once again, Your build is clearly top notch under capable fabricators hands.
Love it.
01-24-2009, 03:53 PM
#11
Pro
Thread Starter
Join Date: Aug 2002
Location: Netherlands
Posts: 589
Likes: 0
Received 0 Likes
on
0 Posts
Yes it would. Not as much from the mistakes, but e.g. if you would do all the changes to the chassis all at once it would save a lot of hours in assembly/disassembly painting etc. Also the countless hours spend in thinking discussing, measuring, fitting would be reduced.
01-24-2009, 04:02 PM
#12
Pro
Thread Starter
Join Date: Aug 2002
Location: Netherlands
Posts: 589
Likes: 0
Received 0 Likes
on
0 Posts
I wanted the cage to be FIA certified, and when I wanted to do this, the rules had just changed: Any adjustment from a standard design needed to be certified with a calculation of the strength. My builder, one of the best in NL, was not able to do this.
I have left the FIA rules a bit, do not drive in competition where this is required anyway. So I am still hoping that I one day can do a new tub, with the improved strut tower bracing.
Send me some pictures of your design!
01-24-2009, 04:57 PM
#14
Rennlist Member
Always impressed with your car Hans and equally, if not more, by your openness to share and in a detailed manner. Very much appreciated. That's good to know about the hood vent working. I am doing the same and we have thought we would need to do some ducting.
I was at a talk about suspension setup recently and the guy suggested that unless strut braces had some triangulation, they were more than likely to act as a nice parallelogram under loading. Have you done any underbody bracing or anything like seam welding the tub? There is a Brey-Krause piece that is meant to help in this dept. What is your opinion of something like this?
http://www.bkauto.com/porsche/r1524.php I'm not sure it would fit with a larger exhaust though.
ps thanks for that info on the Wheel/tyre setup. I managed to do some trial fitting yesterday. One thing, how many heat cycles are you getting out of those Dunlops?
Sorry, back to the fine subject.