
Made my own Brake cooling kit for under 100$
 03-02-2008, 11:12 AM
#1
Instructor
Thread Starter
Join Date: Jul 2006
Location: Fort Worth, TX
Posts: 207
Likes: 0
Received 0 Likes
on
0 Posts
Ok, finished it last night and I'm planning on taking some pic's...but for now here's the description:
1) bought 6' of brake cooling hose and two 3.5" x 6" ducts from pegasus ($84.29 shipped)
http://www.pegasusautoracing.com/adv...ryID=BRAKEDUCT
2) Bought a 45deg 3" aluminum tubing bend ($12 local shop)
3) Four 3" hose clamps and some silicome Caulk ($6)
Ok, so it's just over 100 dollars.
Now, for procedure:
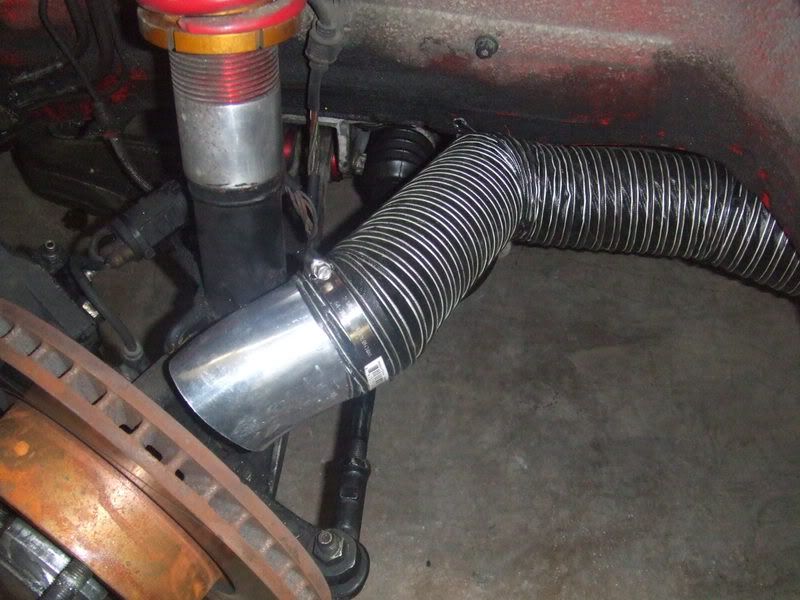
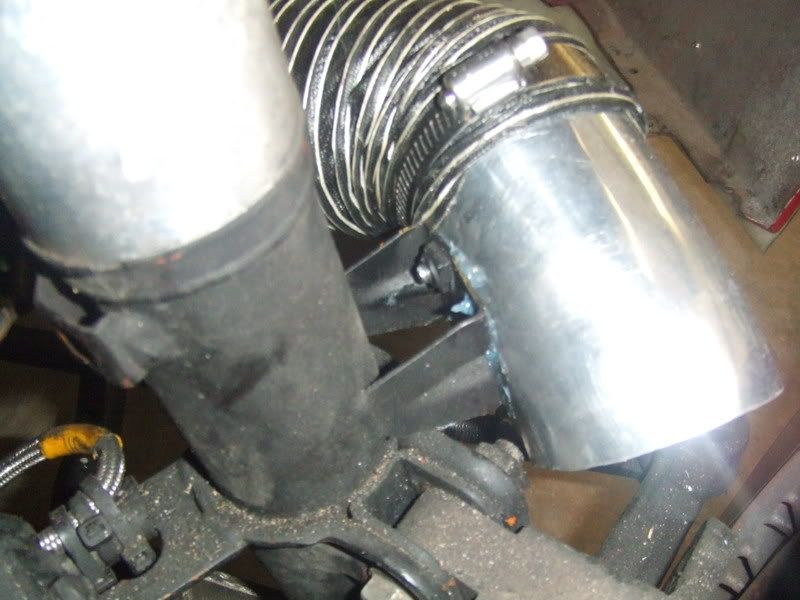
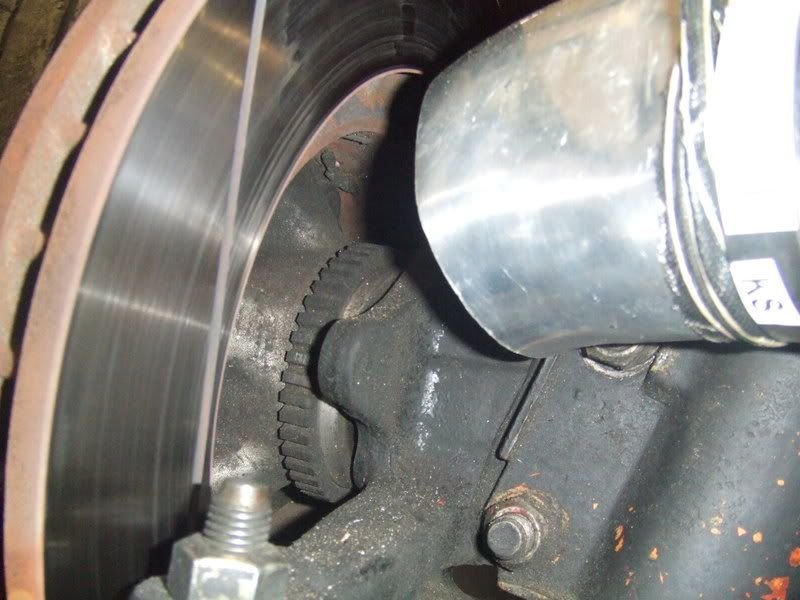
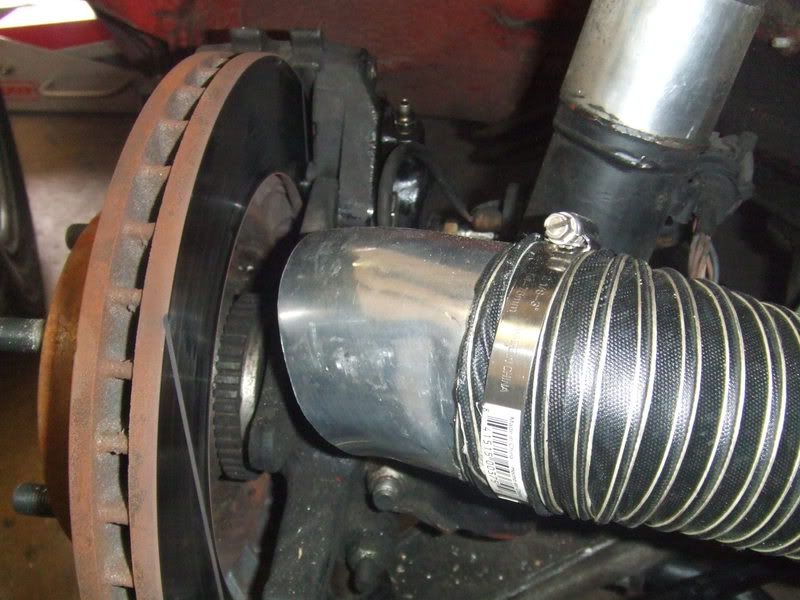
First we'll need to cut that 45deg bend in half with a hack saw...right at the center of the bend, not that it looks like the perfect nozzle.
I mounted it where the stock brake cooling scoop is located so we'll need a flat surface on the side of the nozzle we just made. I simply ball parked the angle of the nozzle so that all the flow is pointing towards the middle of the rotor, withing an inch of the rotor and marked it. I then put it in a vice where I wanted the flat surface and put a quick grip wood working clamp on the end i want to stay round so that when i clamp the middle (my mounting surface) it won't warp the end which will be connected to the hose.
Finally, you cut the end where you plan to connect the hose as close to the mounting point as possible, but leaving enought to hose clamp the hose on. The reason to cut it close it because the hose stretches more the further it is away from the point of rotation. Basically you don't want lost of hose movement when you turn the wheel.
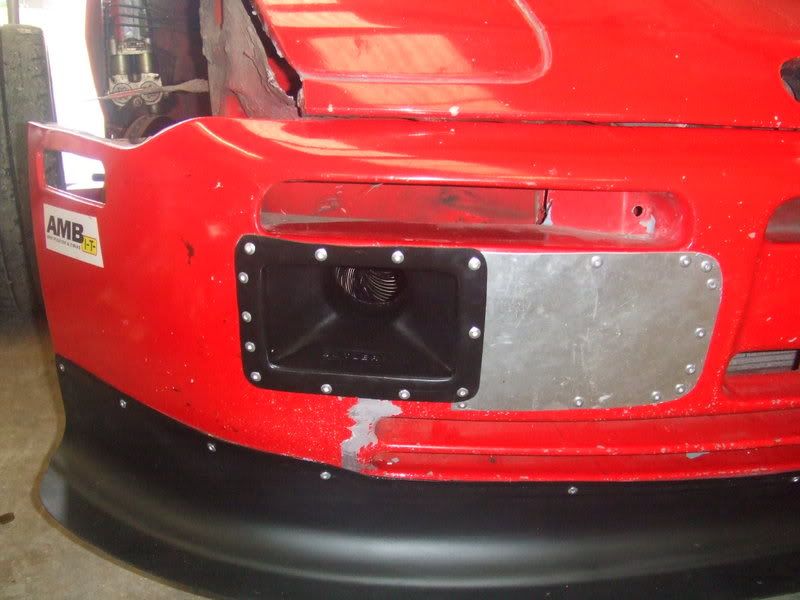
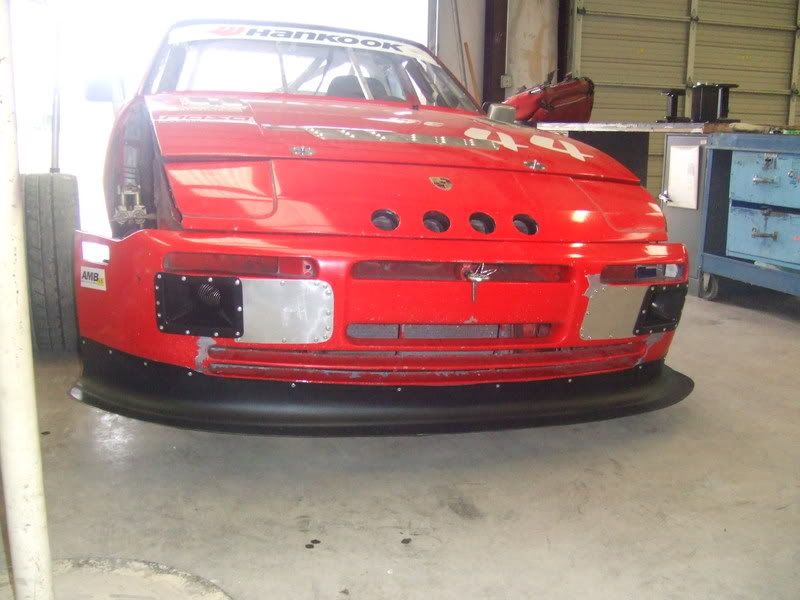
finally I zip tied and speed wired the hose along the inner wall of the fender and even with 275/40/17 tires it has plenty of clearance. Mounting the duct was easy for me because i just put it where the turn signal buckets used to be and filled the rest with aluminum sheet metal and rivets. Finally i attached the hose using a bit of bathroom caulk because the duct plastic was a bit slick. This job was much easier than I thought it would be and it's very very clean looking kit. I'll take pictures and send them out.
1) bought 6' of brake cooling hose and two 3.5" x 6" ducts from pegasus ($84.29 shipped)
http://www.pegasusautoracing.com/adv...ryID=BRAKEDUCT
2) Bought a 45deg 3" aluminum tubing bend ($12 local shop)
3) Four 3" hose clamps and some silicome Caulk ($6)
Ok, so it's just over 100 dollars.
Now, for procedure:
First we'll need to cut that 45deg bend in half with a hack saw...right at the center of the bend, not that it looks like the perfect nozzle.
I mounted it where the stock brake cooling scoop is located so we'll need a flat surface on the side of the nozzle we just made. I simply ball parked the angle of the nozzle so that all the flow is pointing towards the middle of the rotor, withing an inch of the rotor and marked it. I then put it in a vice where I wanted the flat surface and put a quick grip wood working clamp on the end i want to stay round so that when i clamp the middle (my mounting surface) it won't warp the end which will be connected to the hose.
Finally, you cut the end where you plan to connect the hose as close to the mounting point as possible, but leaving enought to hose clamp the hose on. The reason to cut it close it because the hose stretches more the further it is away from the point of rotation. Basically you don't want lost of hose movement when you turn the wheel.
finally I zip tied and speed wired the hose along the inner wall of the fender and even with 275/40/17 tires it has plenty of clearance. Mounting the duct was easy for me because i just put it where the turn signal buckets used to be and filled the rest with aluminum sheet metal and rivets. Finally i attached the hose using a bit of bathroom caulk because the duct plastic was a bit slick. This job was much easier than I thought it would be and it's very very clean looking kit. I'll take pictures and send them out.
 03-02-2008, 09:19 PM
#2
Instructor
Thread Starter
Join Date: Jul 2006
Location: Fort Worth, TX
Posts: 207
Likes: 0
Received 0 Likes
on
0 Posts
Wow...thought I would have stirred up some interest with this one...well here goes the photo's anyways.
http://www.shutterfly.com/view/pictures.jsp
http://www.shutterfly.com/view/pictures.jsp
03-02-2008, 10:14 PM
#6
Pro

Join Date: Sep 2005
Location: Sammamish, WA
Posts: 708
Likes: 0
Received 0 Likes
on
0 Posts
you can either make a photobucket account (very easy) or email them to me and I will ( je_951@hotmail.com )
Trending Topics
03-03-2008, 01:09 AM
#10
Instructor
Thread Starter
Join Date: Jul 2006
Location: Fort Worth, TX
Posts: 207
Likes: 0
Received 0 Likes
on
0 Posts
 03-03-2008, 12:17 PM
#13

Looks good gjoey66. It should make a big difference in keeping your brakes from fading.
To post pics click on the little yellow square icon with the mountain and sun/moon, or go to the top of the page where it says "upload photo". Just follow the prompts.
To post pics click on the little yellow square icon with the mountain and sun/moon, or go to the top of the page where it says "upload photo". Just follow the prompts.
03-03-2008, 02:26 PM
#14
I really like this approach rather than the backing plates. I have an 89 which has the ducts and the big scoop but I think I am going to fab something like this.
Thanks,
IPSC
P.S. Nice slotting and could ya show some pictures of the rest of the car?
Thanks,
IPSC
P.S. Nice slotting and could ya show some pictures of the rest of the car?
03-03-2008, 02:49 PM
#15
Instructor
Thread Starter
Join Date: Jul 2006
Location: Fort Worth, TX
Posts: 207
Likes: 0
Received 0 Likes
on
0 Posts
I'm going to be putting the fenders on this week and then i'm planning a full photo shoot including some centerfold shots.
on another not when i click on the insert image icon i get a "please enter the URL of your image" what do I need to do in order to just drop an image in here?
on another not when i click on the insert image icon i get a "please enter the URL of your image" what do I need to do in order to just drop an image in here?