When you click on links to various merchants on this site and make a purchase, this can result in this site earning a commission. Affiliate programs and affiliations include, but are not limited to, the eBay Partner Network.
Microsquirt ECU for Porsche 944 S2 - Motronic replacement - How To
Here is a Plug and play solution for replacing the Porsche 944 S2 Motronic ECU with Megasquirt (Microsquirt actually) tuned with TunerStudio PC software. Using the Porsche original 944 S2 harness, with a few mods:
Wiring changes that are needed for converting Porsche 944 S2 from stock Motronic with Air Fuel Meter "barn door" to a MAP run modern ECU (Microsquirt from DIY autotune).
This guide keeps the factory harness, only with a few modifications (see attached pics)
Summary highlights:
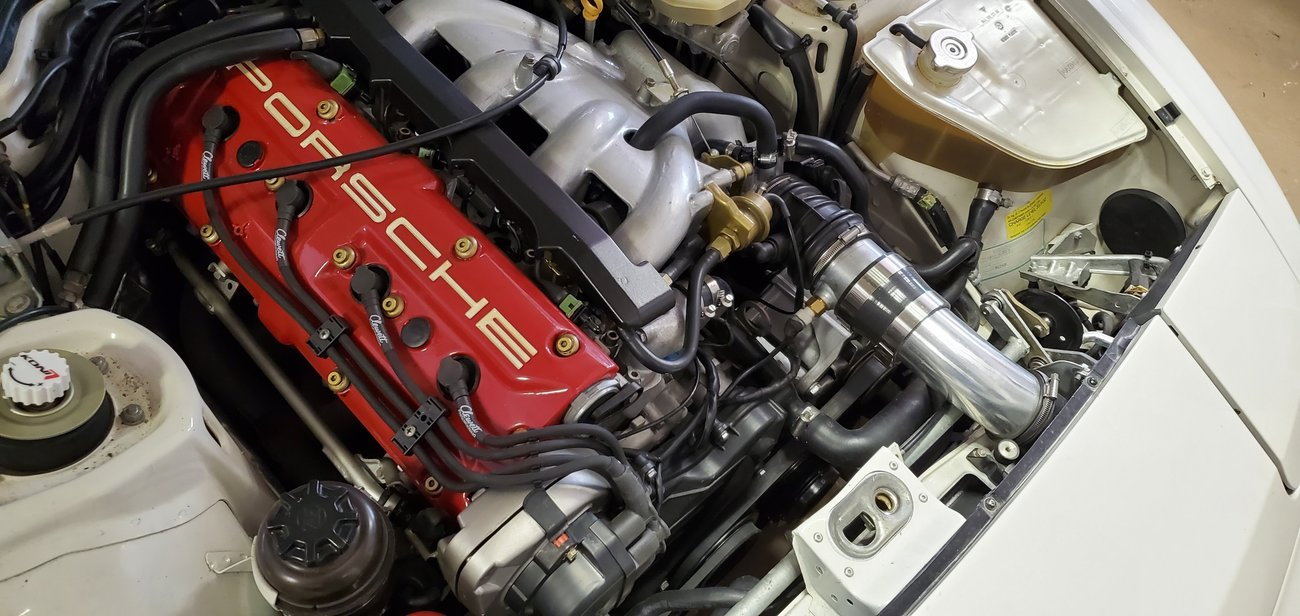
1. Delete AFM, replace with a 3" aluminum intake tube with IAT sensor/bung added to a 3.5" tube (matches throttle body diameter). Motor will now be run by this and a MAP sensor added to the manifold vacuum tube tree.
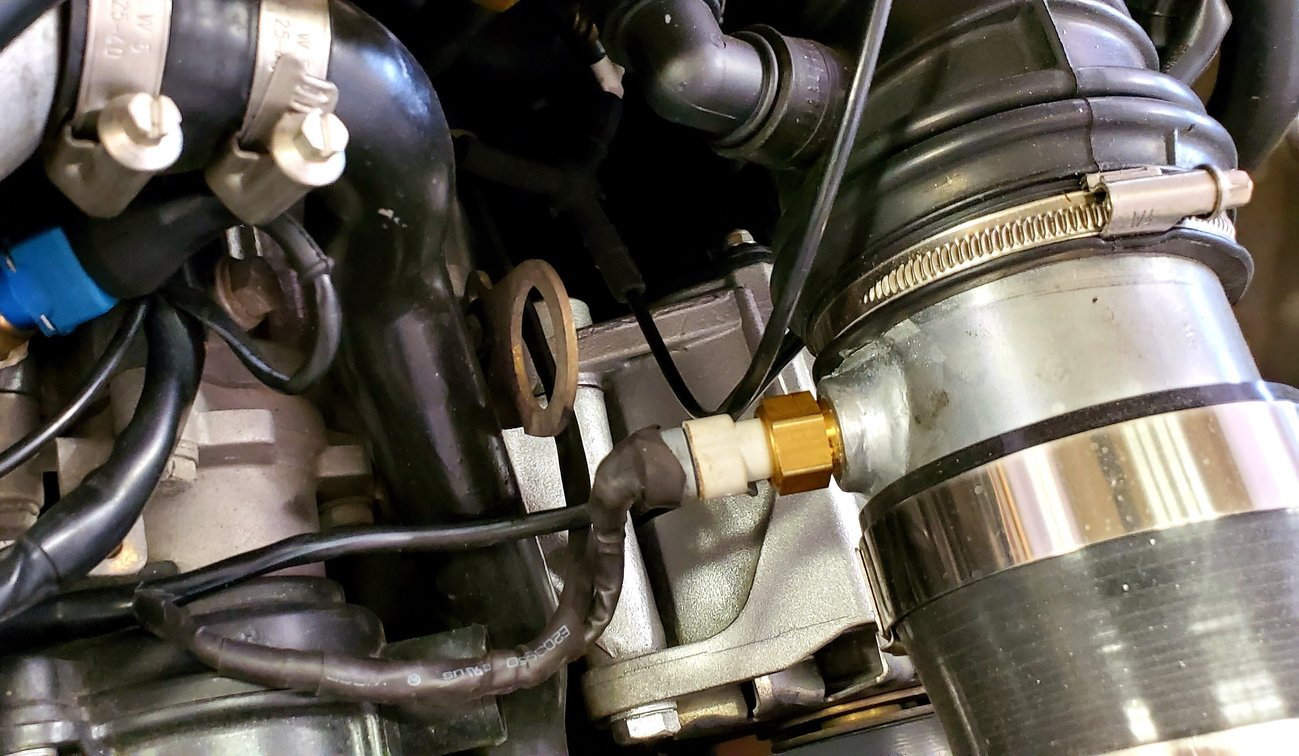
2. Change connector for AFM to now supply IAT and MAP sensors and a new proportional TPS sensor (original 944 S2 is an on/off switch). MAP sensor is plumbed to underside of intake manifold to a central vacuum line.
3. You'll need to add extra wires to the harness to permit the use of sequential injection (one wire per injector instead of original batch fire). You can get extra pins for the Bosch connector to use some of the "blank" unused slots.
While this (sequential inj) isn't absolutely necesssary, I think it makes the idle smoother. I just used the orginal batch wire to pull four wires through the original harness, and connected each wire and a separate ground to new injector plugs (I replaced all the injectors also with 30lb (315cc) new injectors).
4. Repurpose some wires, add some pin connectors to the Bosch 55 pin ECU connector. See the wiring detail in the pics and spread sheet. (Several 10k ohm resistors were added to make input signal values within range for microsquirt to process reliably (no aliasing, etc. - see #6 below)
5. Use Knocksense for processing knock sensor input to the ECU. The Knocksense small unit "listens" to the factory Bosch knock sensor and decides if/when to fire to the ECU to say that a "knock" (detonation) had occurred. (see connections on diagram). Microsquirt responds by retarding timing. You can adjust or turn off this feature.
6. I used the original factory Bosch speed and crank reference sensors. It took a while to get them to reliably "talk" to the new Microsquirt ECU. See wiring adaptations below. Your welcome.
If you are unsure about starting this, find a friend or tuner who understands basic fuel injection tuning. Once you spend some time with it, I think you'll find that it's not that hard and kind of fun to learn something new.
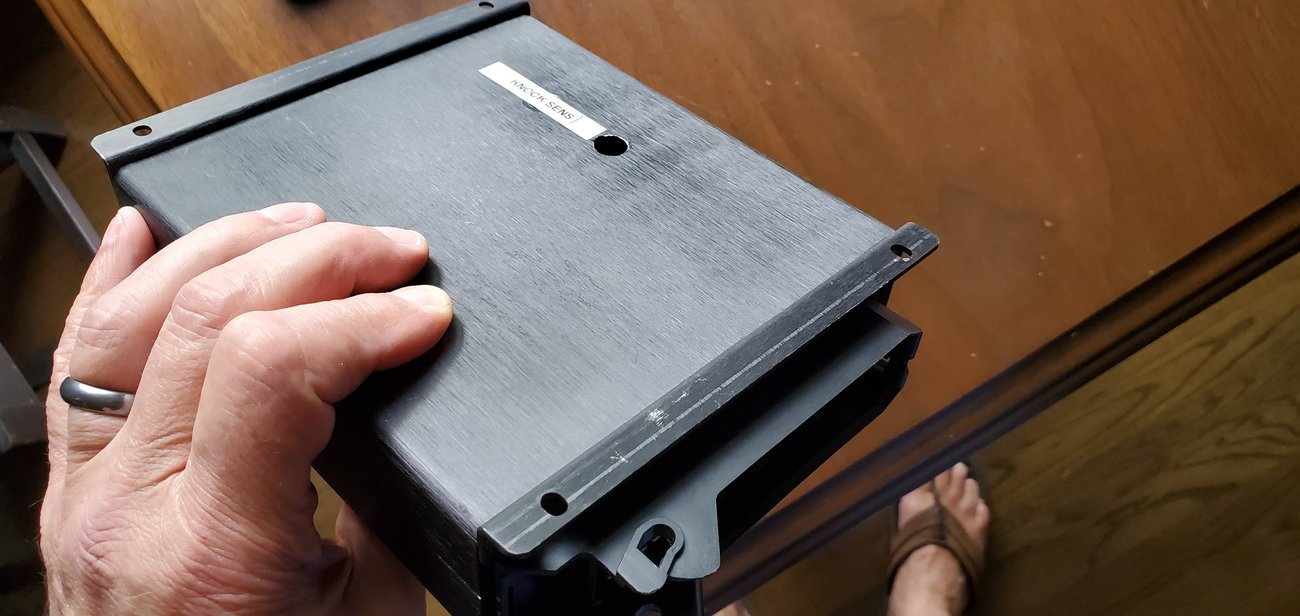
Finding the case and the blank Bosch 55 pin ECU male connector made me decide to do it. It is a "clean" install that looks professional, imo.
This setup is working great for me, with probably an additional 20hp because of the AFM delete, and with a better idle and better cold/warm season adaptation.
Most of this should be self explanatory, if you spend some time with it. I hope you like this and it helps you.
very similar in size to original Motronic case
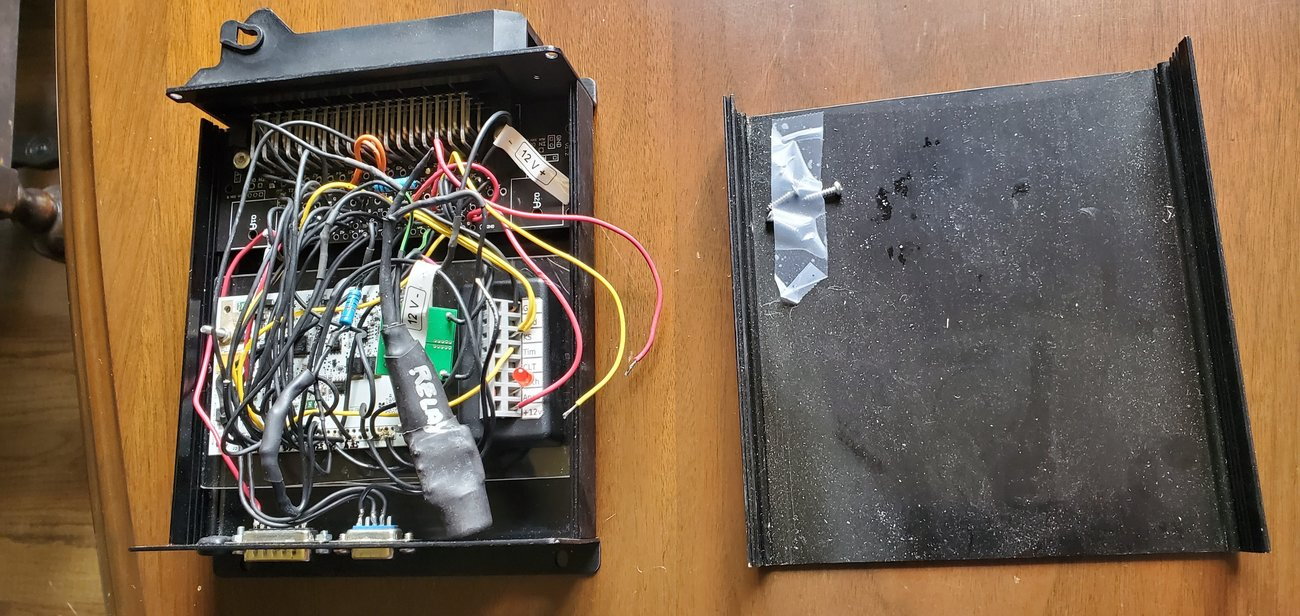
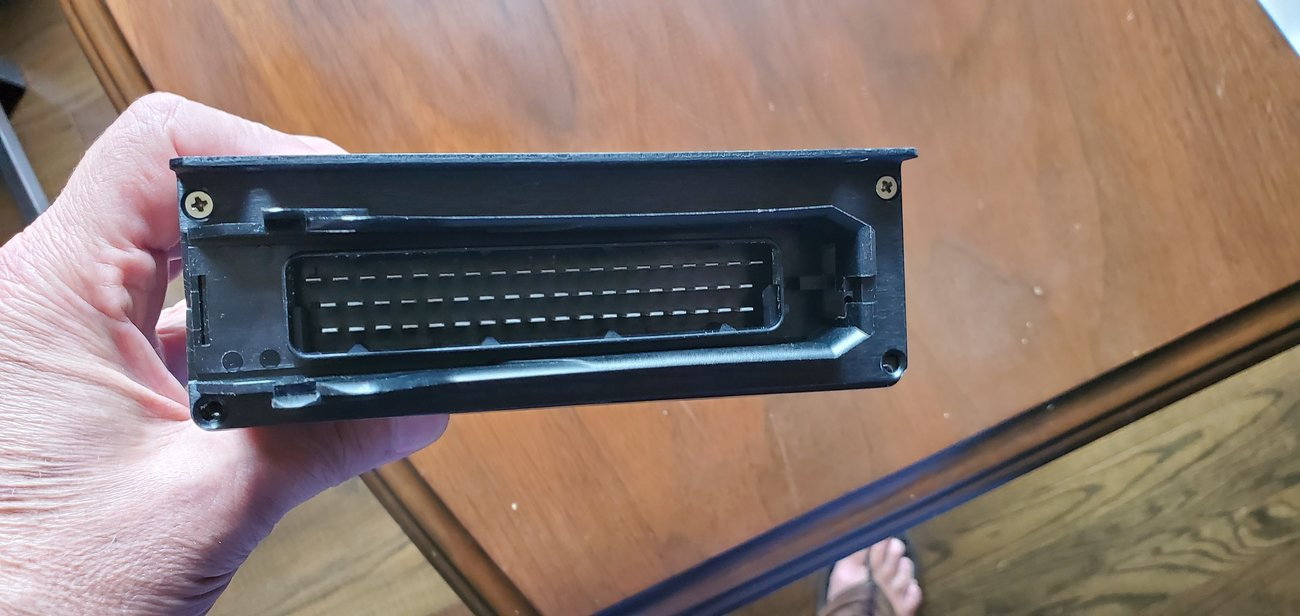
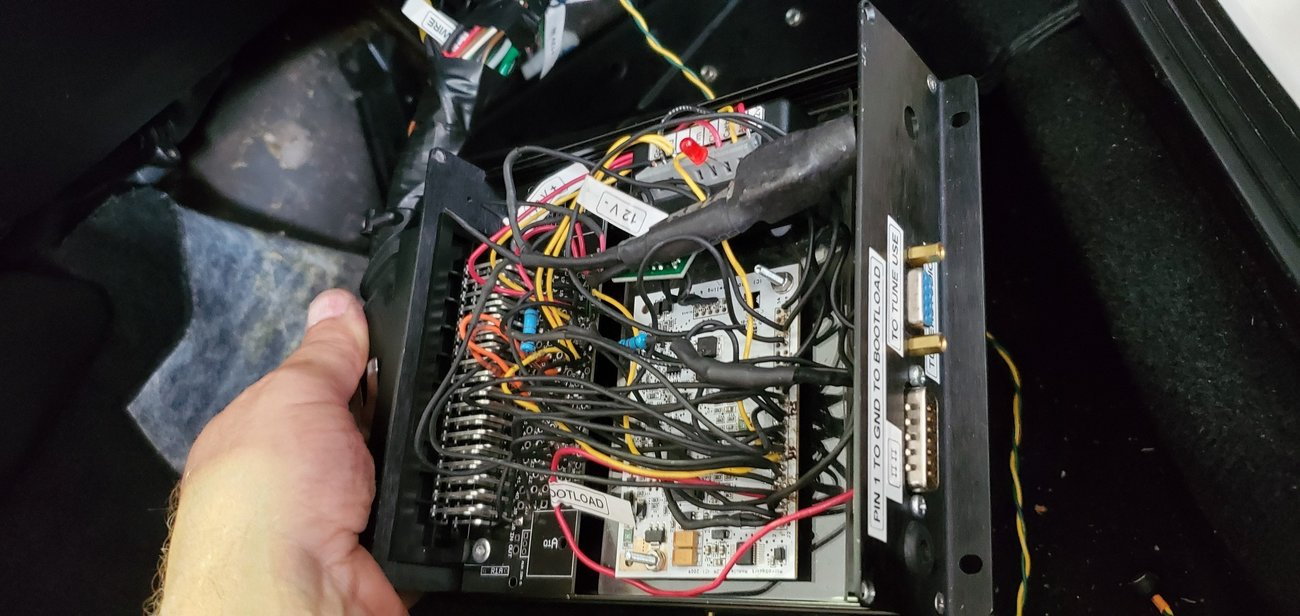
Here's the back of the case, with the connector for serial cable which connects to PC with a usb plug. The larger connector just fills a space opening in the case. I connected the bootloader wire lead to pin 1 on this, for ecu operating system upgrades, though I haven't seen any, and wouldn't mess with this, because it works so well. Use TunerStudio software on a PC laptop to tune. with the cover off. Microsquirt used because it fits in the case. I added the optional card (green behind the relay) to drive four injectors separately, to allow sequential fuel injection, instead of microsquirt's default batch fire. Sequential gives a better idle. You can buy this connector to plug into the factory harness. It fits on the box from DIY Autotune, seller of Megasquirt/microsquirt products pic of jumpers from microsqirt card to the bosch connector. You can see the Knocksense processor on the right with the red led, which processes the signal from the factory bosch knock sensor on the motor, again jumpered to the correcto harness pin. The microrelay is for the cycle to operate the gas tank vent system solenoid, to mimic the original motronic.
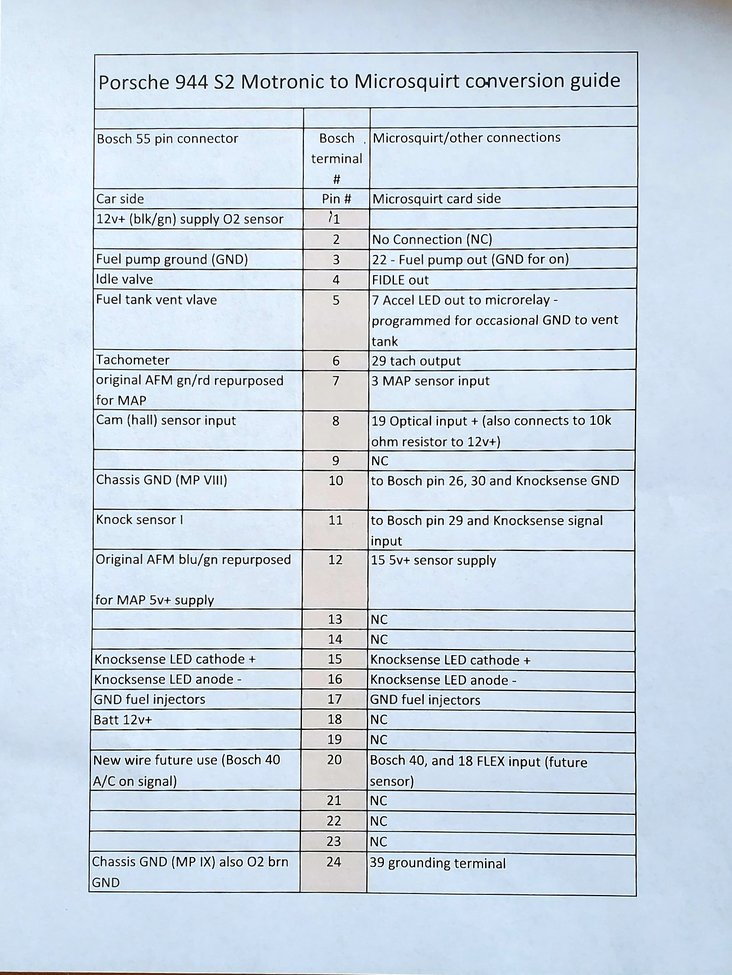
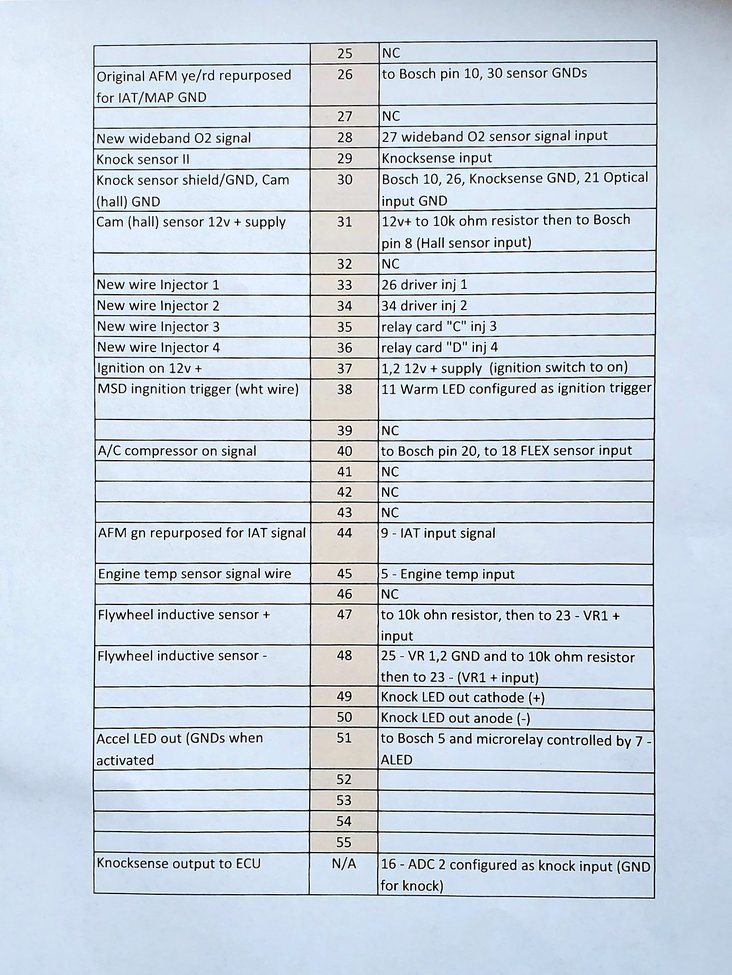
pinout for jumpers from microsquirt to 55pin Bosch connector
pinout for jumpers from microsquirt to Bosch 55 pin connector
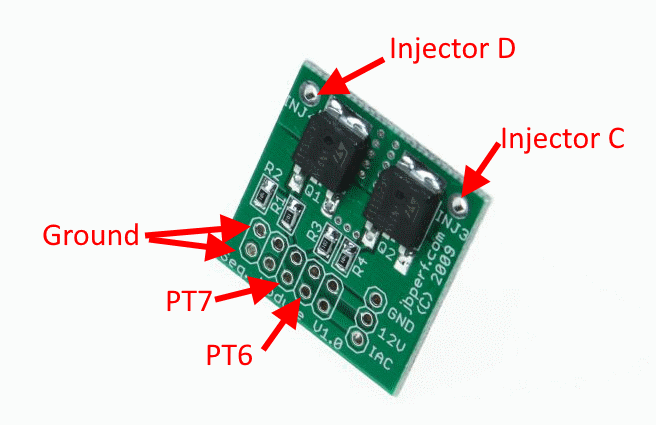
This is the tiny card you add to the Microsquirt board to permit the Microsquirt to drive all four injectors in sequential mode. Red labels are what to connect, then all you do is a TunerStudio "click" to pick "sequential option, which will then automatically use the PT6 and PT7 Microsquirt outputs to drive injectors 3 & 4 in sequential mode. (Alternative to using this is to keep it simple and just use the Microsquirt board's native 2 channels to fire the four injectors 2 at a time, back and forth, bank-to-bank, just like the original Motronic.) I picked the former, and used the original injector wires in the harness to "pull" 4 new wires through the harness to wire new individual injector plug connectors. My harness was in good condition (i.e., not brittle).
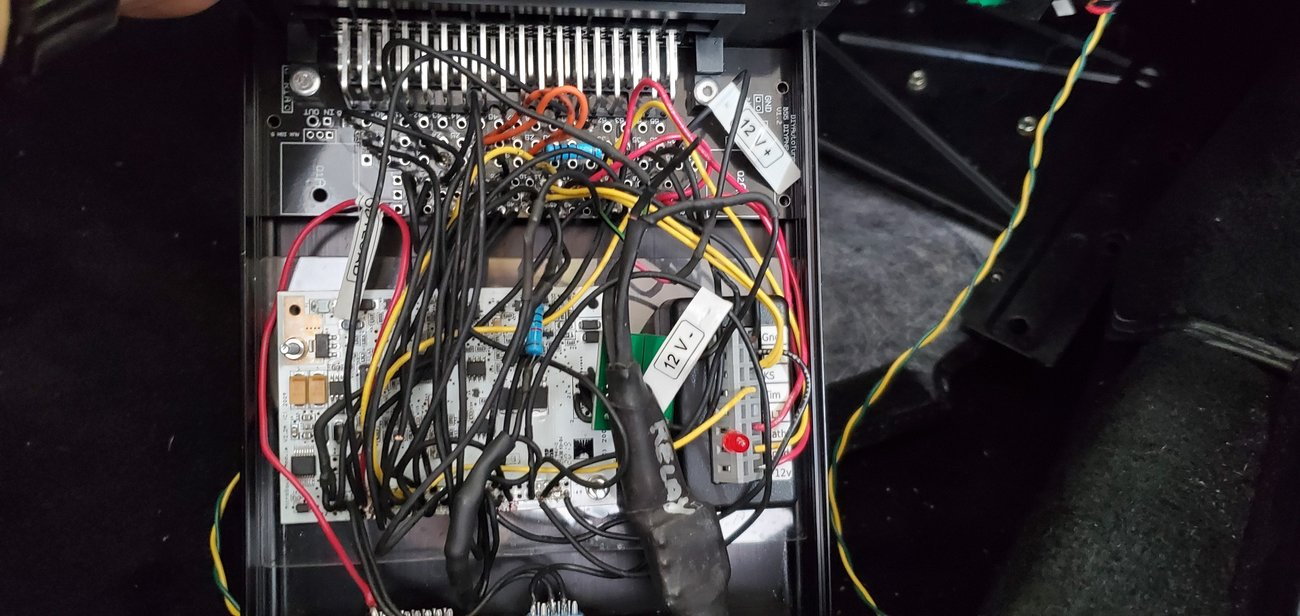
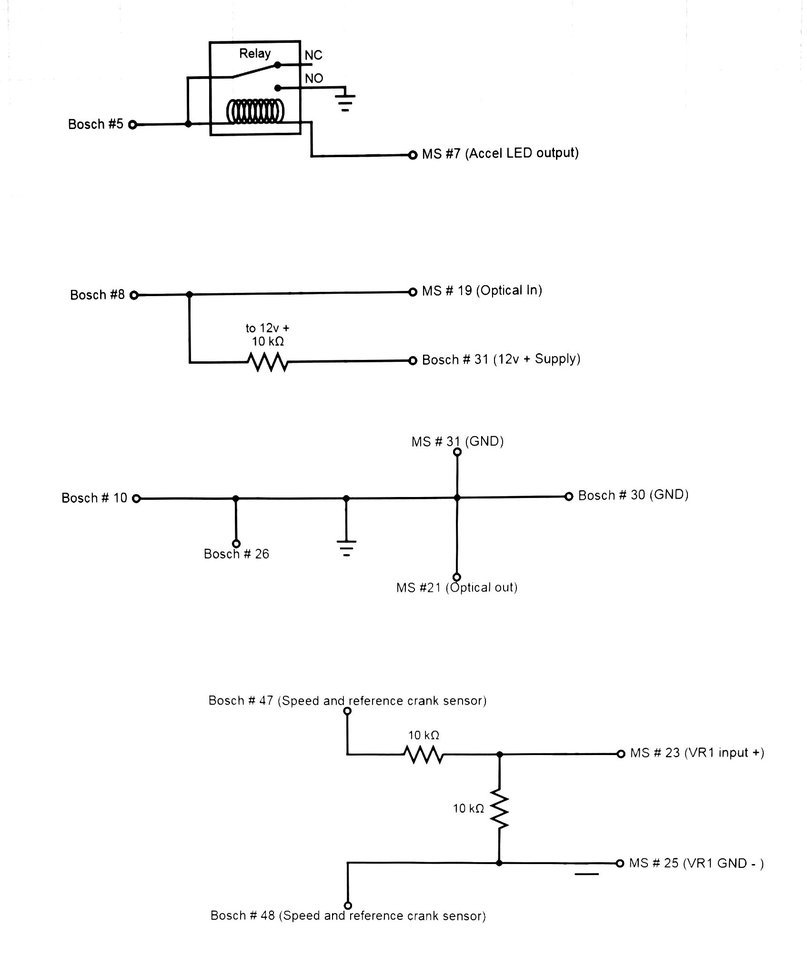
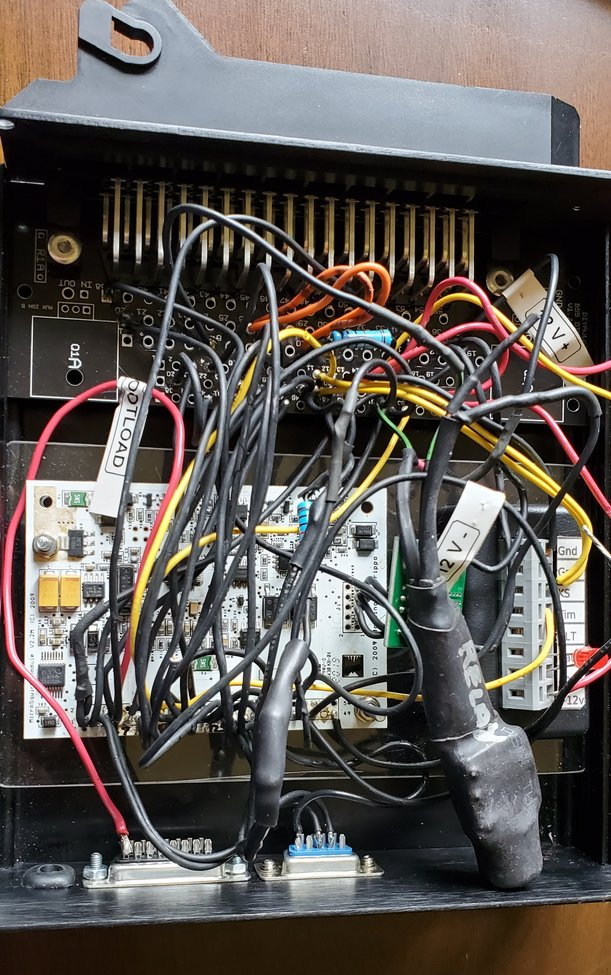
These "special" jumper connections are inside the ECU box. The remaining connections in the box are just point-to-point jumper wires from the Microsquirt board, soldered to the appropriate numbered connections on the 55 pin Bosch male (ECU side) terminal. (See pinout chart attached to this post). I was able to use the OEM porsche speed and reference sensors, with the above resistors to connect to Microsquirt without overvoltage or aliasing. The 10k ohm resistors make the signal within range for the Microsquirt to "read". This took a while to figure out. The microrelay is my solution to open the fuel system/charcoal tank vent solenoid on an occasional basis. I hooked it up to Microsquirt pin 7, to open occasionally during acceleration to suck out tank fumes. You might have a better idea on how to connect this or just leave it open - to atmosphere.
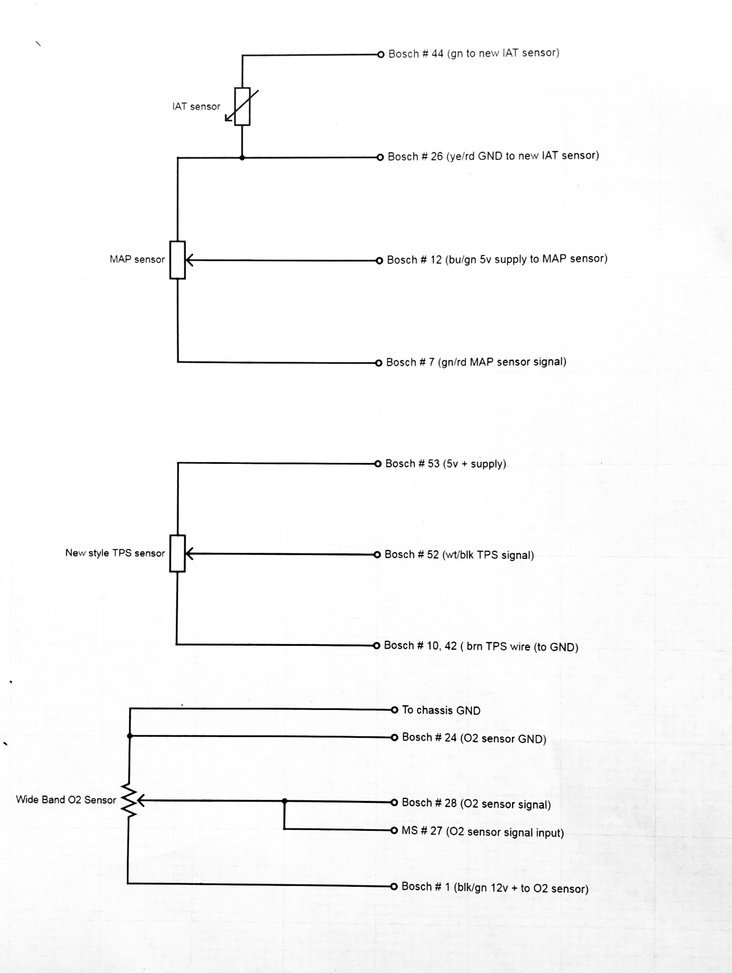
Here are the wiring harness mods and/or added wires to make it all work (these connections are mods to the harness, outside of the ECU).
You will need to add a wideband 02 sensor (it replaces the factory original narrow band dinosaur - same threads). It has it's own small signal processor that you buy with it. The separate signal processor (lambda controller) for the wideband O2 sensor is 12v powered, and processes and feeds the wideband 02 signal to the microsquirt input. I used a compact inline one from Ecotron (for a Bosch LSU4.9 wide band modern sensor). I mounted the small signal processor on the firewall with Zip ties.
You will need to replace the throttle position sensor on the throttle body. You will then adapt the factory harness plugs to the old TPS and old AFM to connect wires with the new MAP sensor, new TPS, and new intake air temperature sensor (IAT).
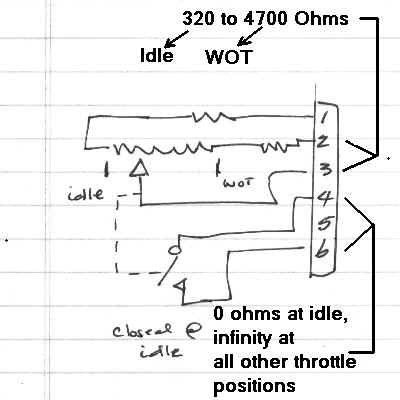
Pinout for the new TPS. You have to replace the original 944 TPS - throttle position sensor (original is an "on-off" switch basically) with a slider type progressive resistance TPS. Its a bosch/Audi standard part. (Bosch P/N: 0280120431 I think) Here are the TPS pinout connections.
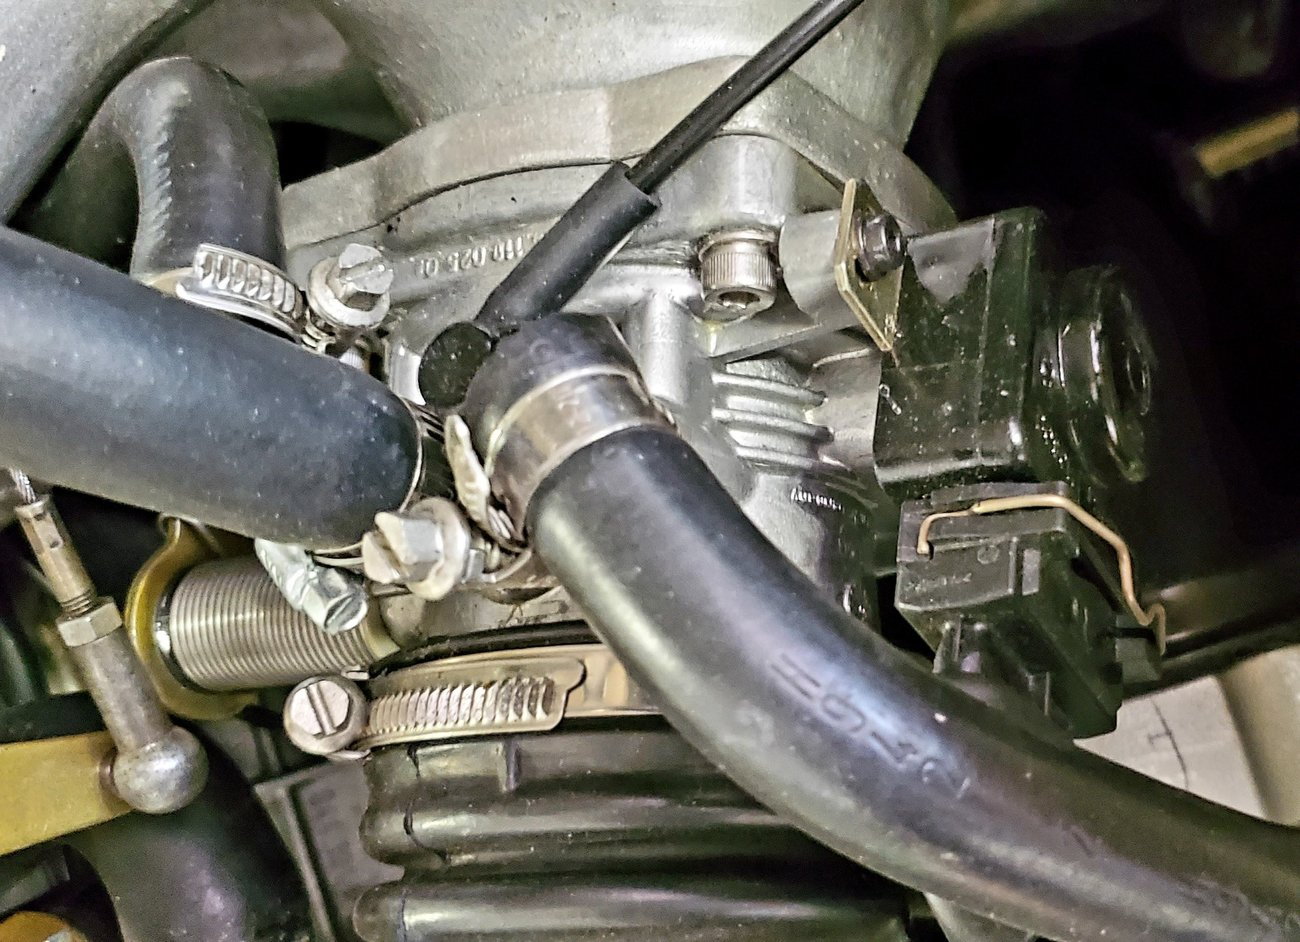
Pic of TPS: Here is the Bosch proportional TPS in place. I think it's part # P/N: 0280120431 Bosch. (The 944 original is basically an on/off switch for idle and WOT).
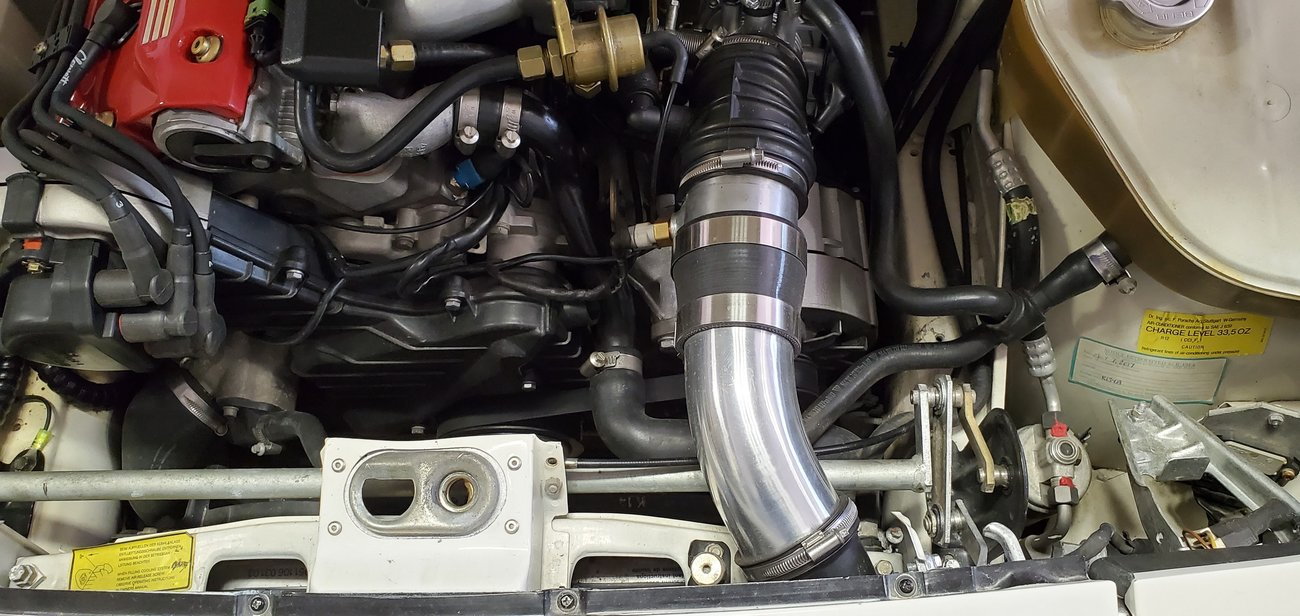
A 3" intake pipe replaces the original restrictive and problematic "barn door" original AFM. Thats a 3.5" to 3" silicone reducer.
Looks cleaner, imo.
more jumper pics
more jumper pics IAT added to the 3.5" pipe with bung.
More jumper pics
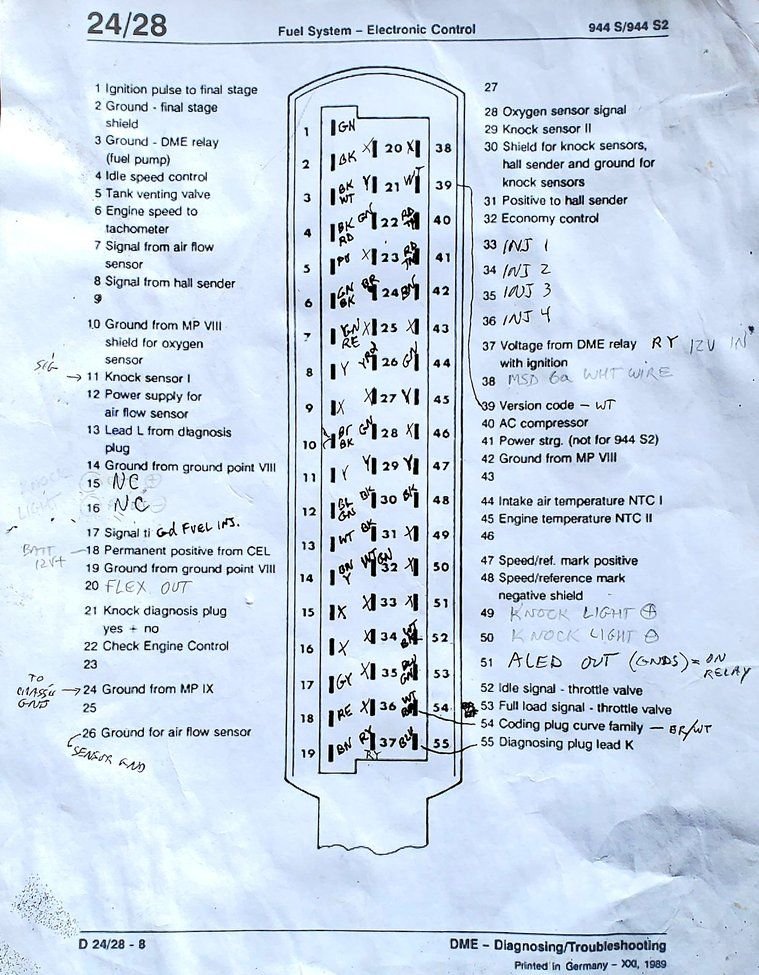
Pinout for the factory harness connector. I hand labeled my added pin connectors. You can find extra pin connectors online.
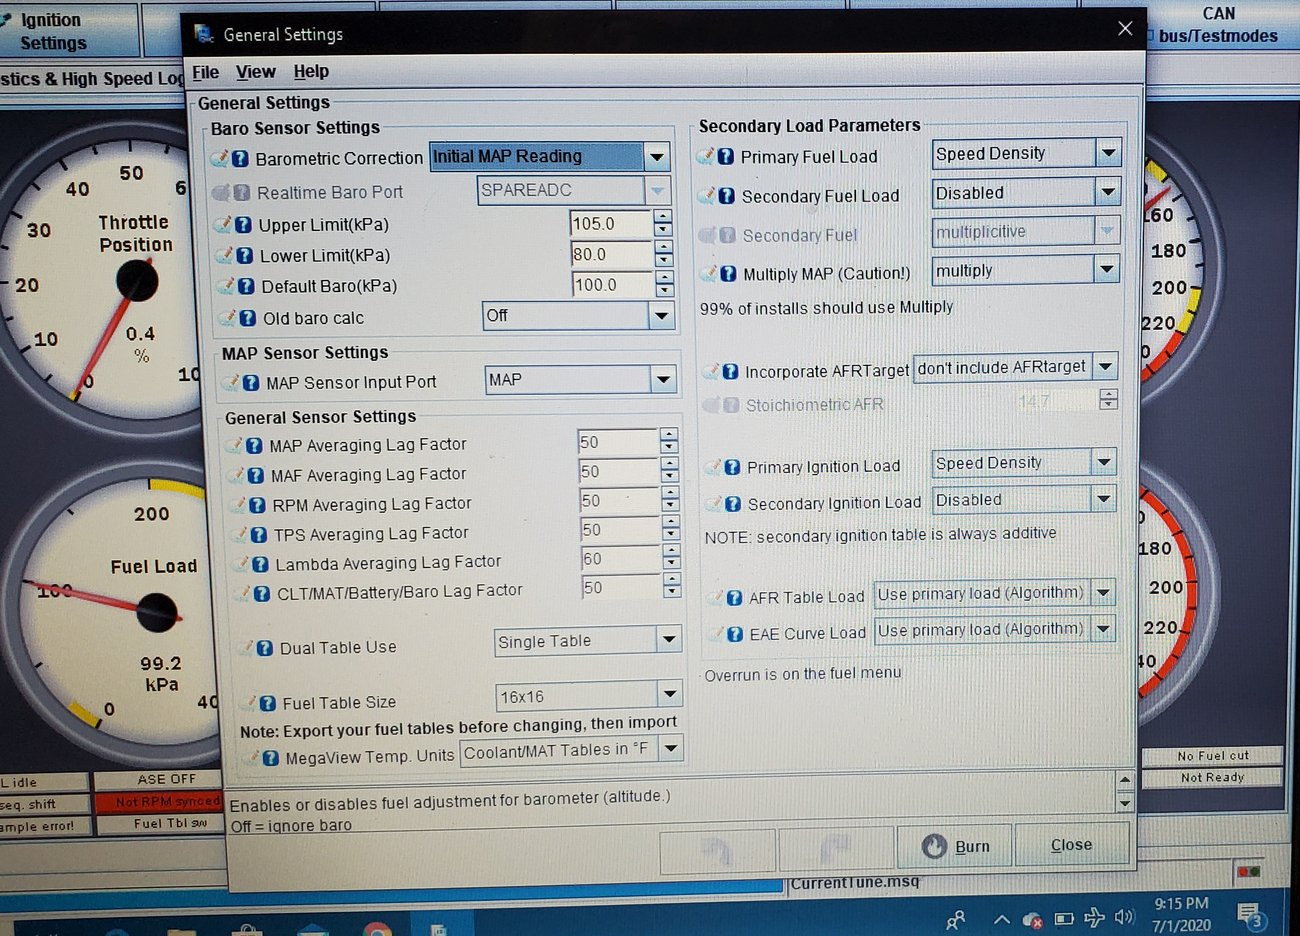
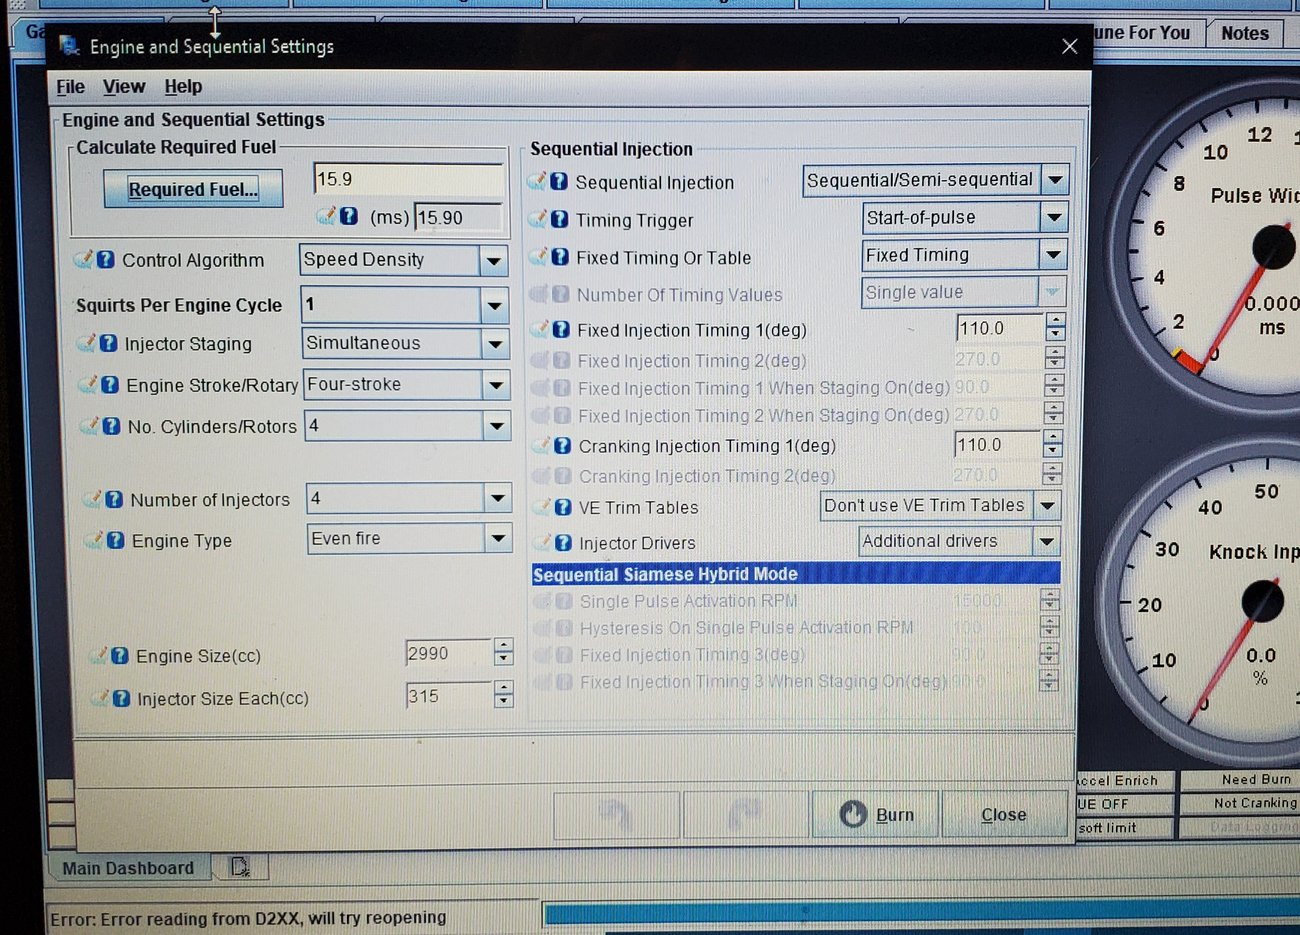
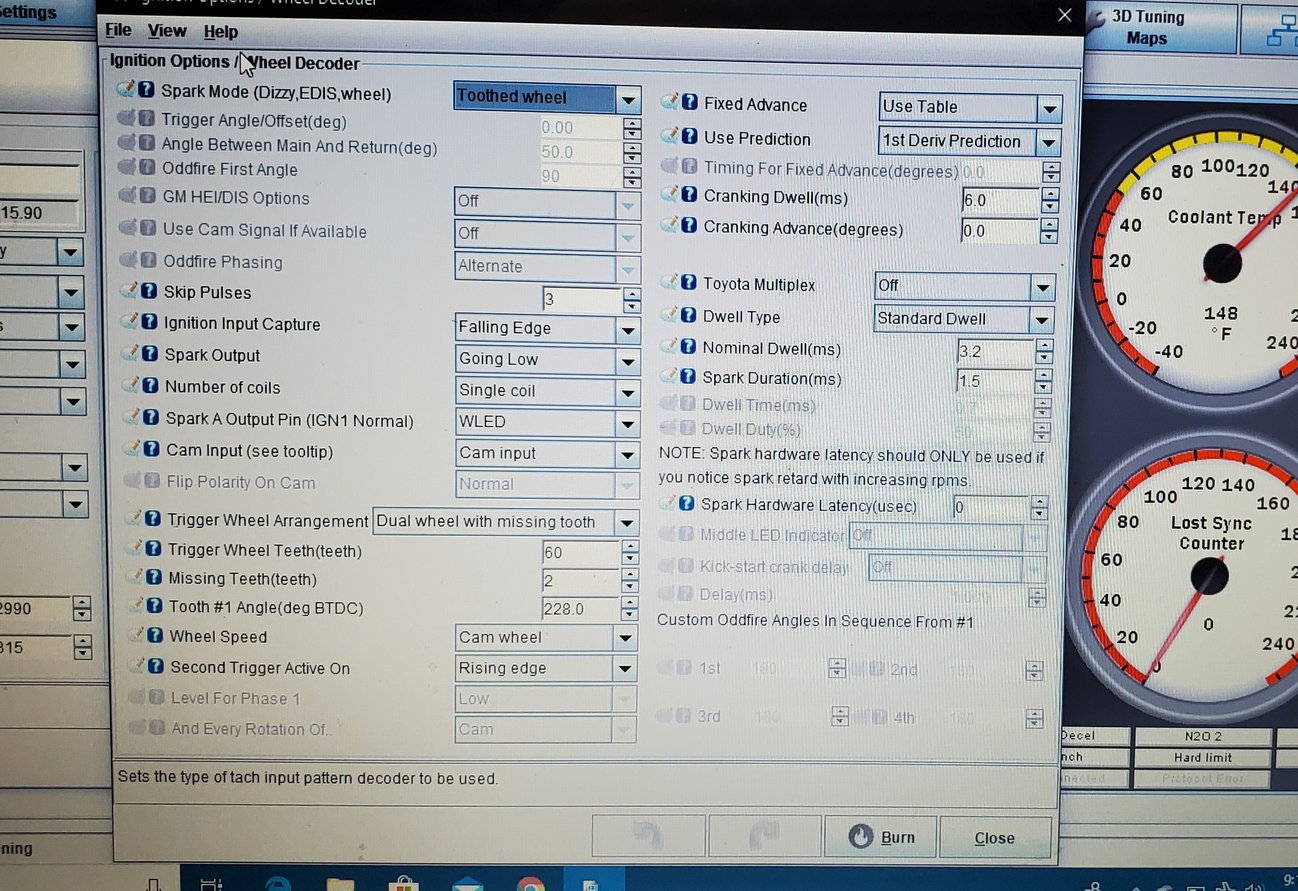
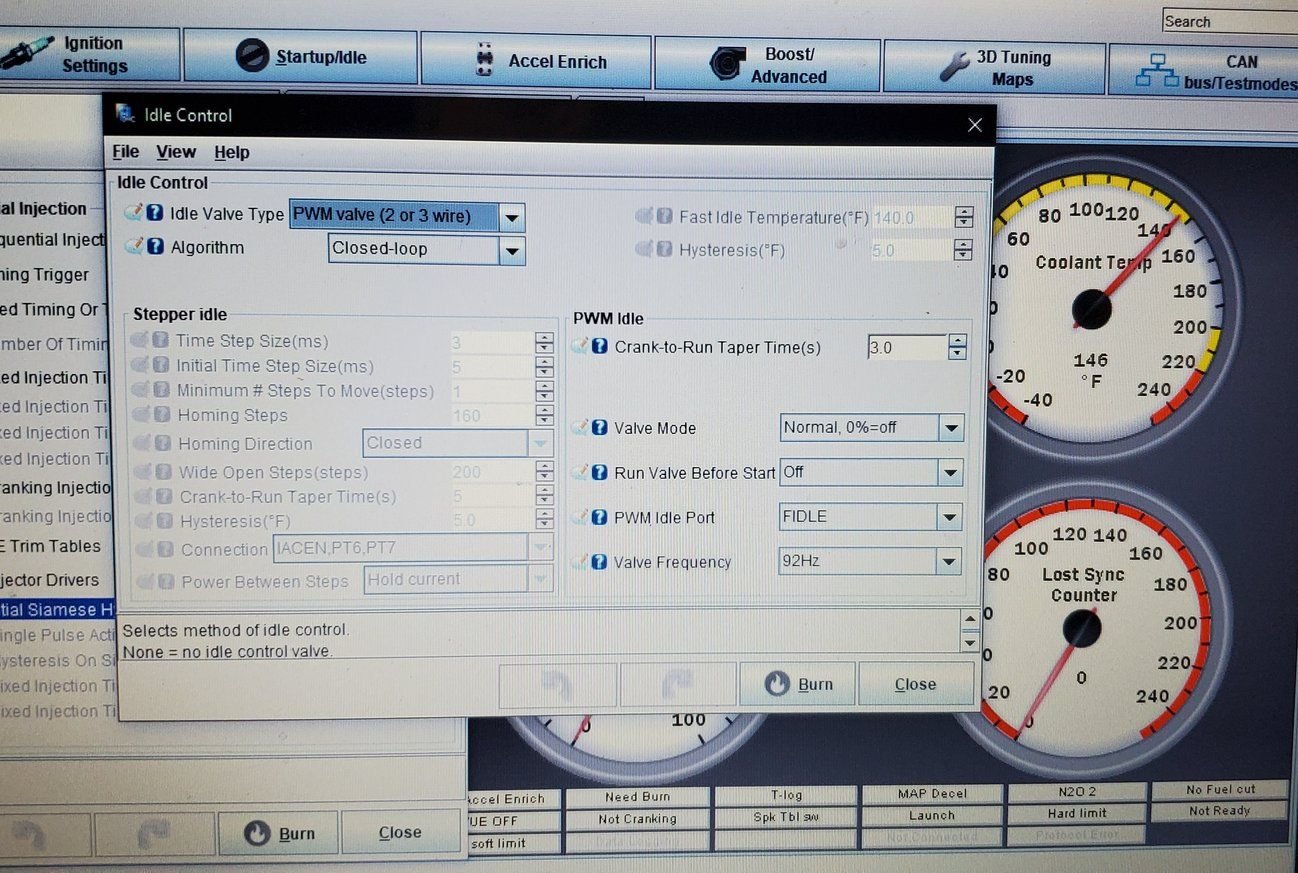
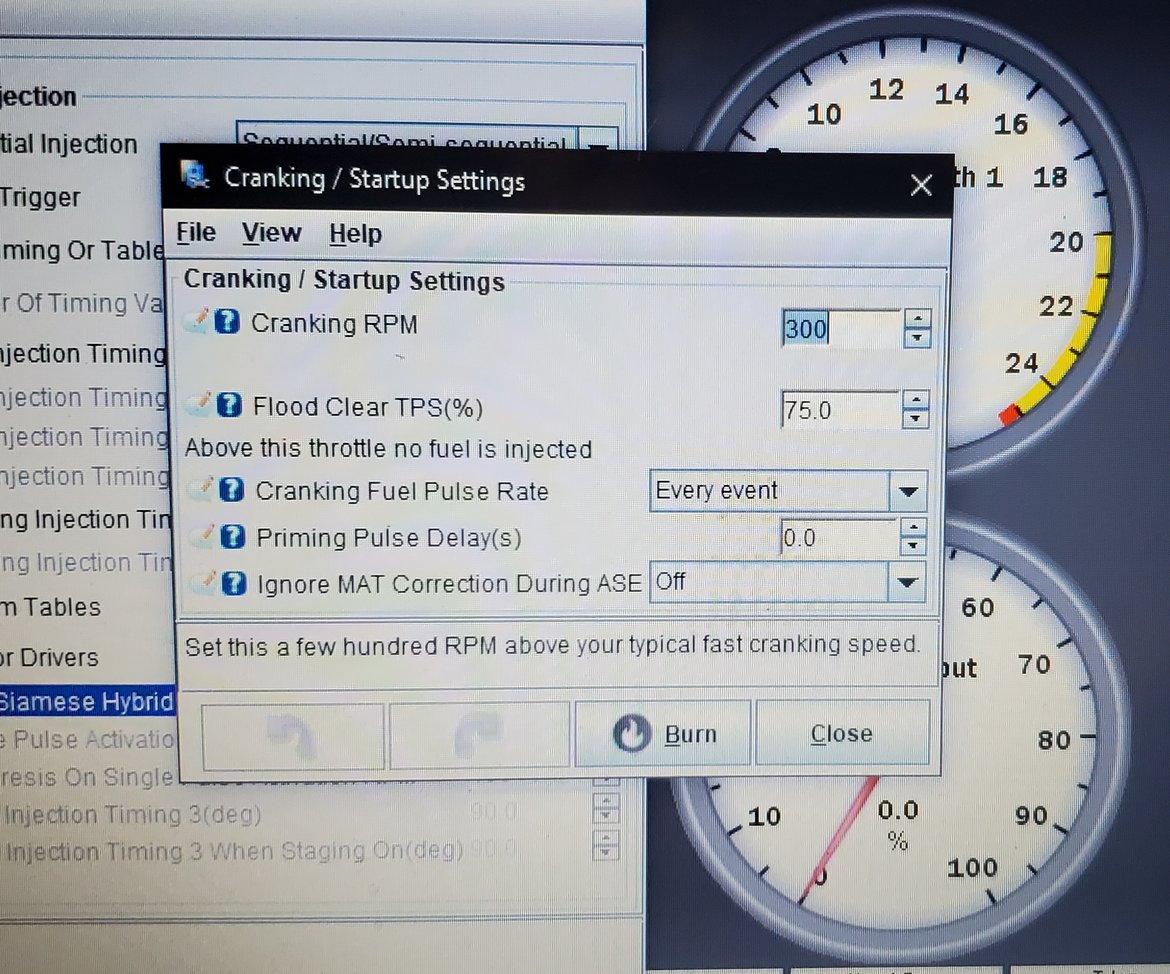
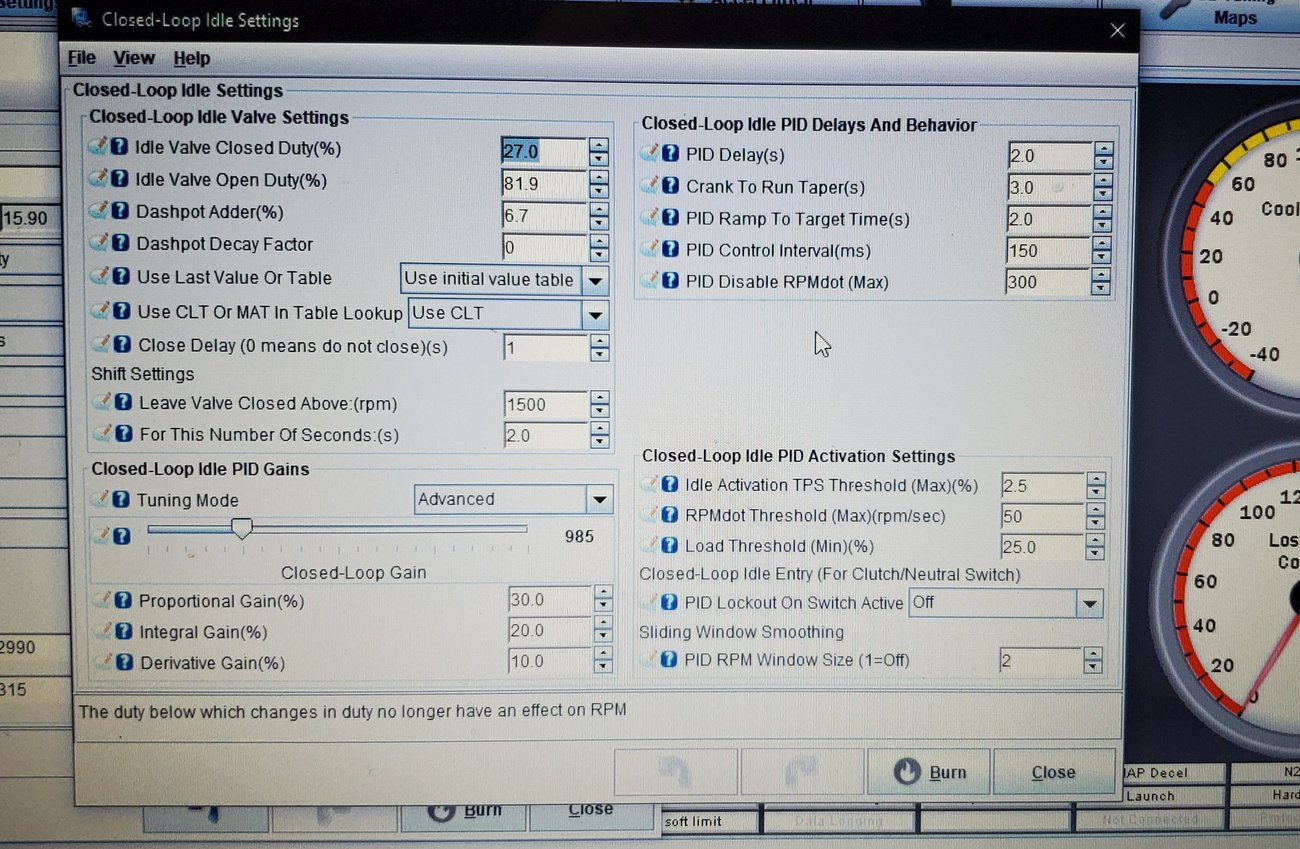
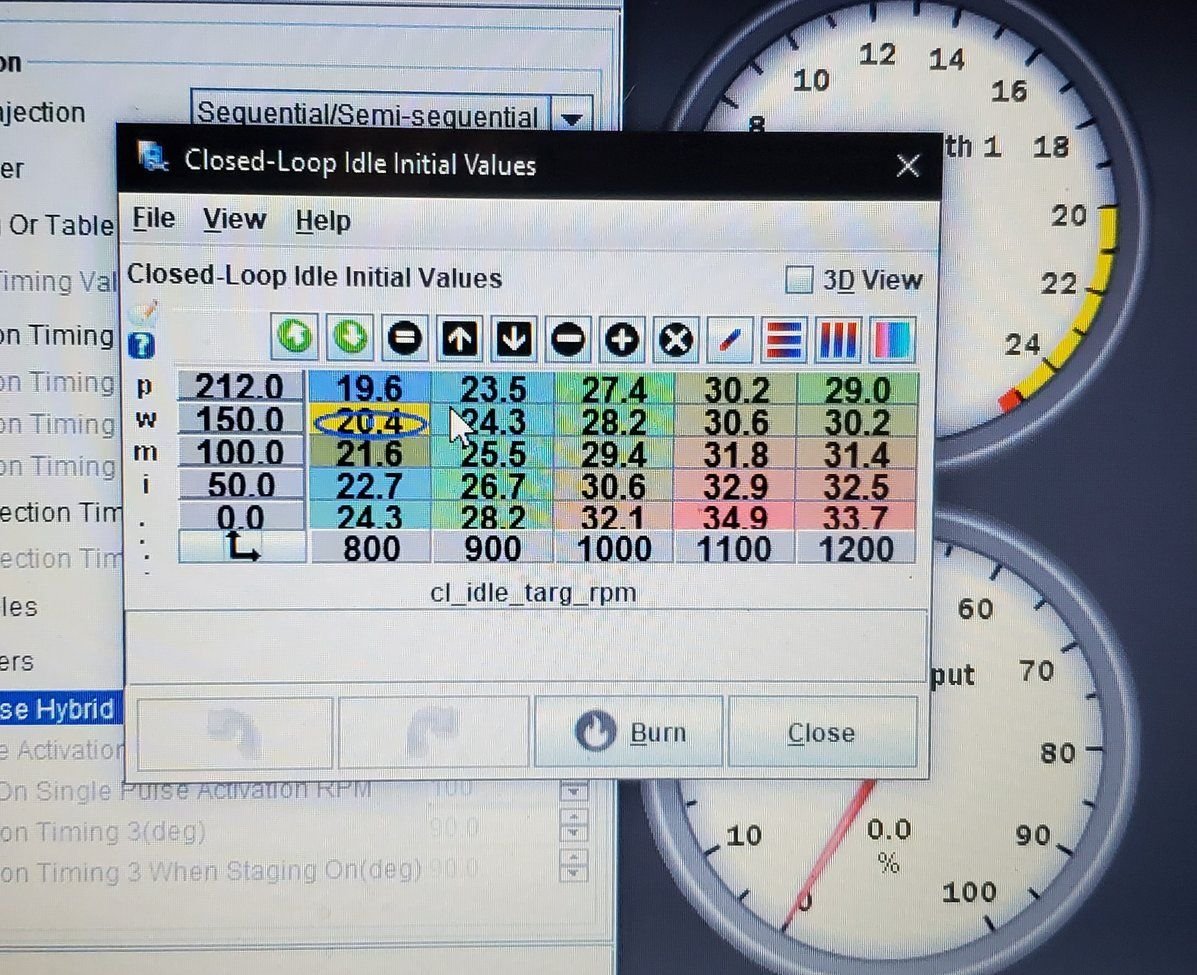
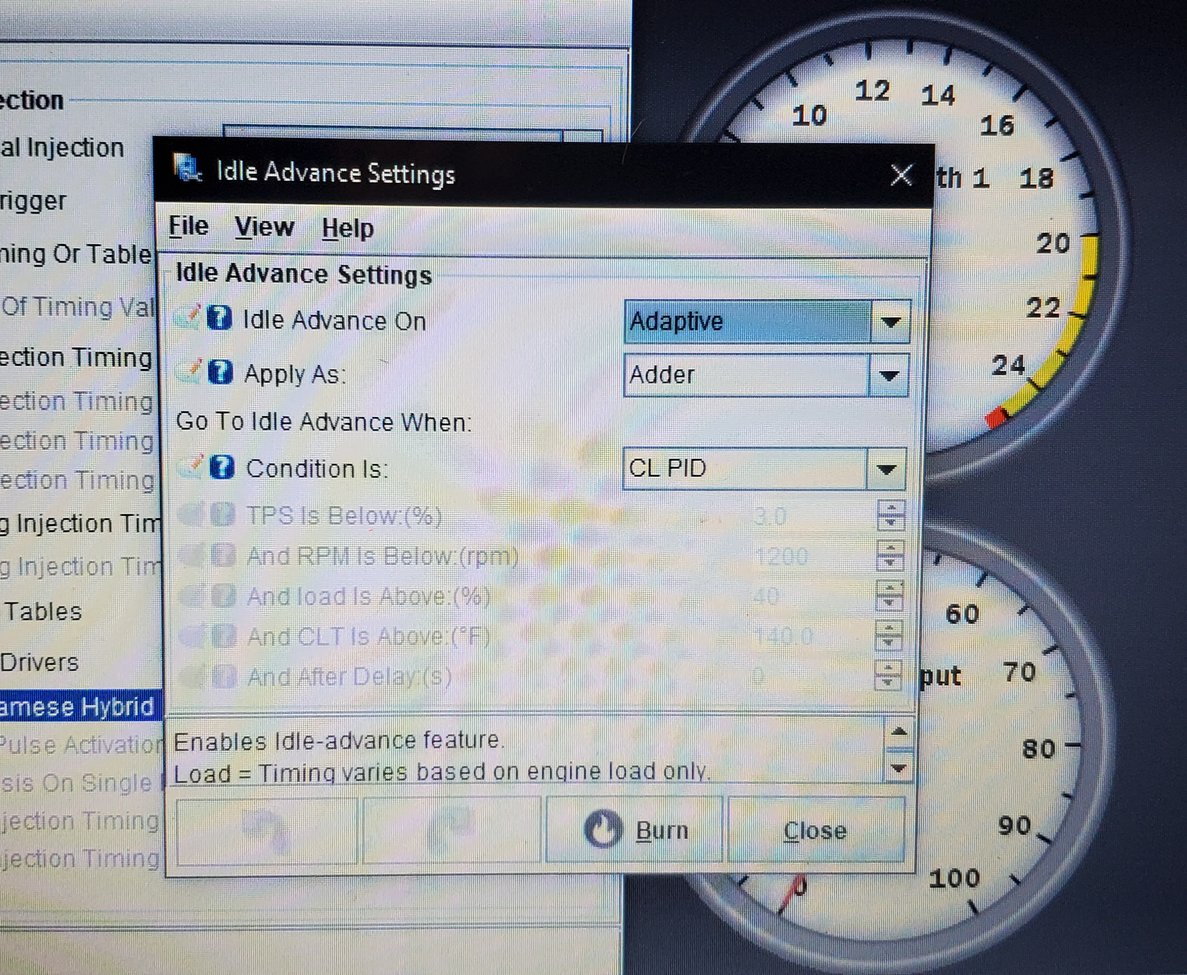
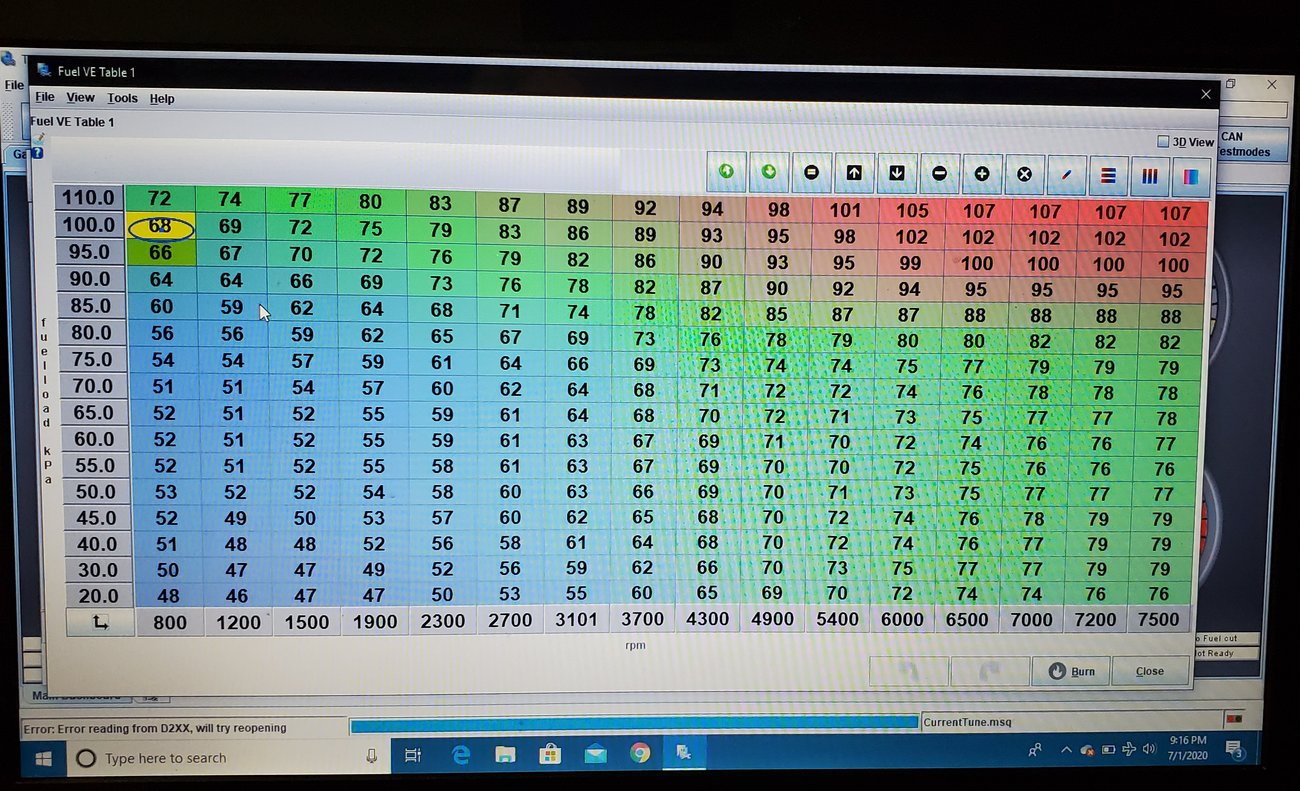
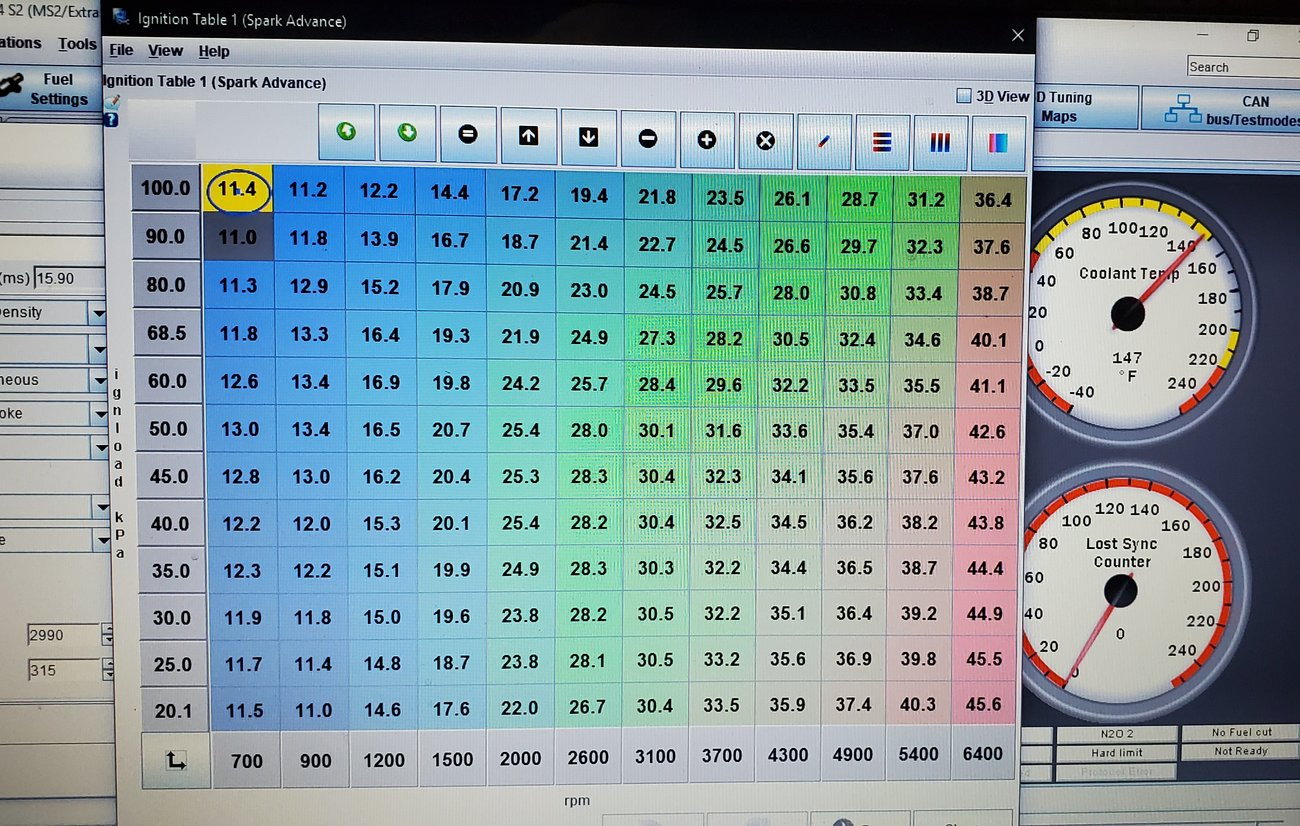
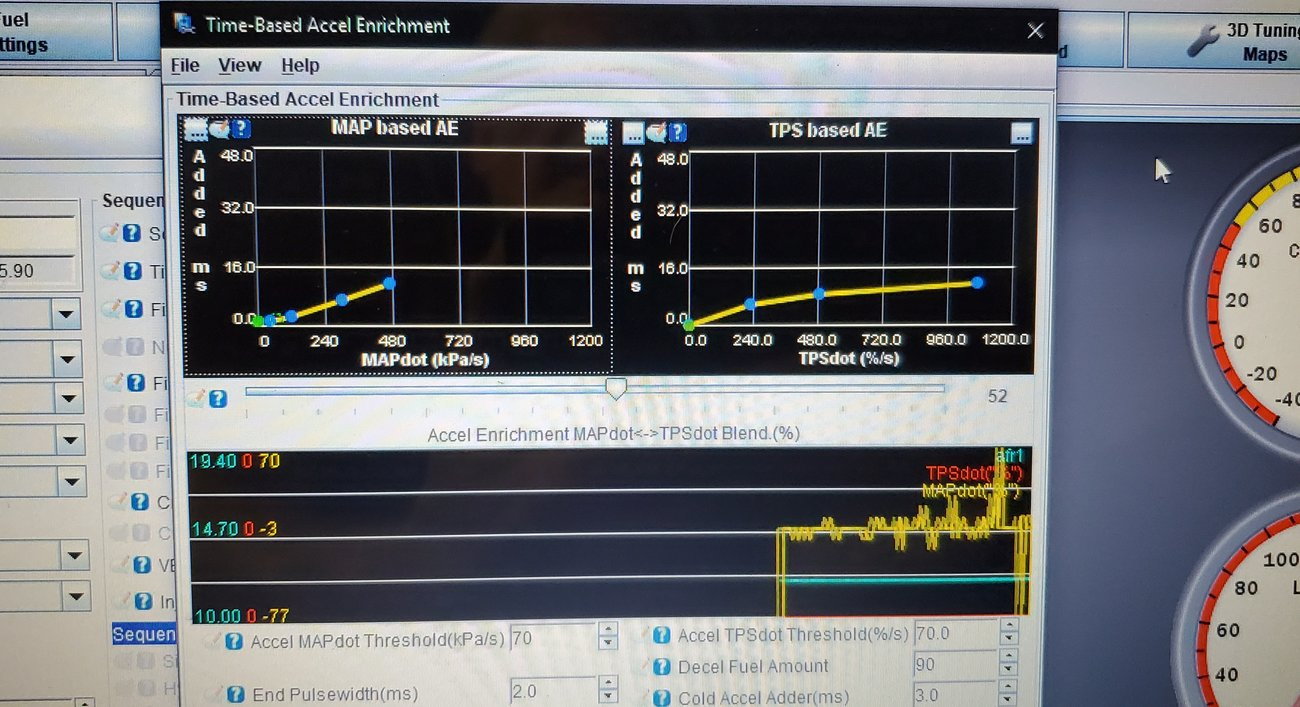
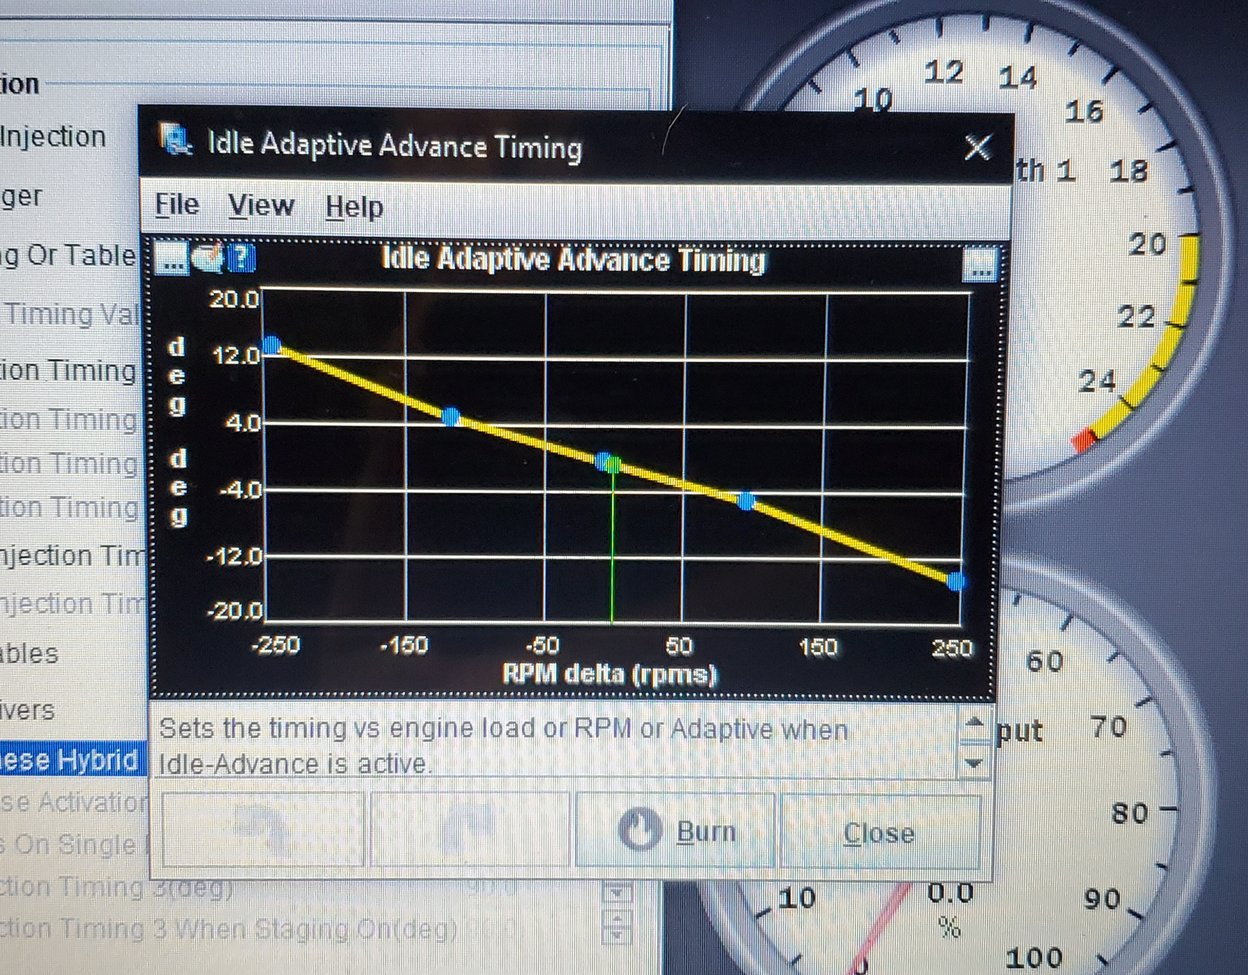
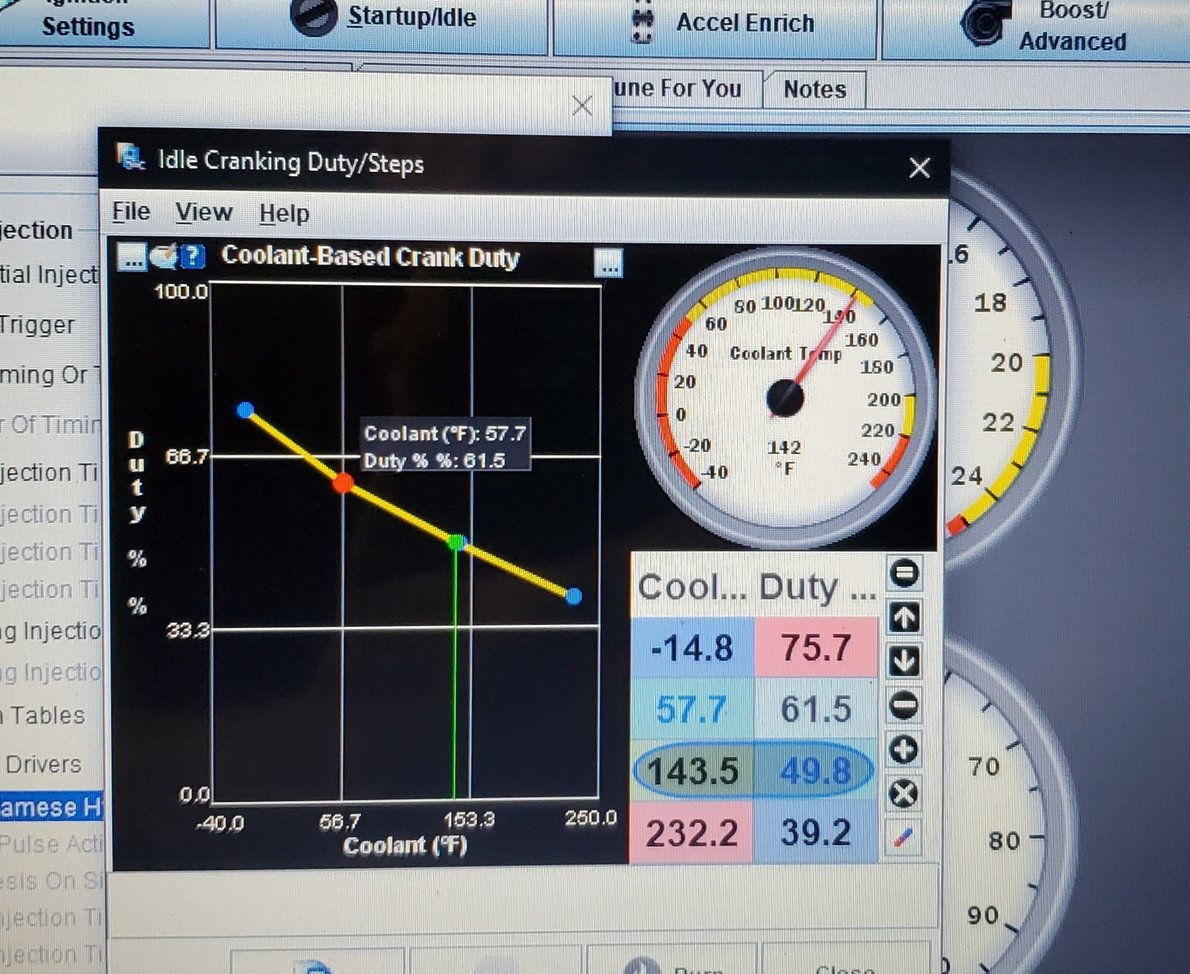
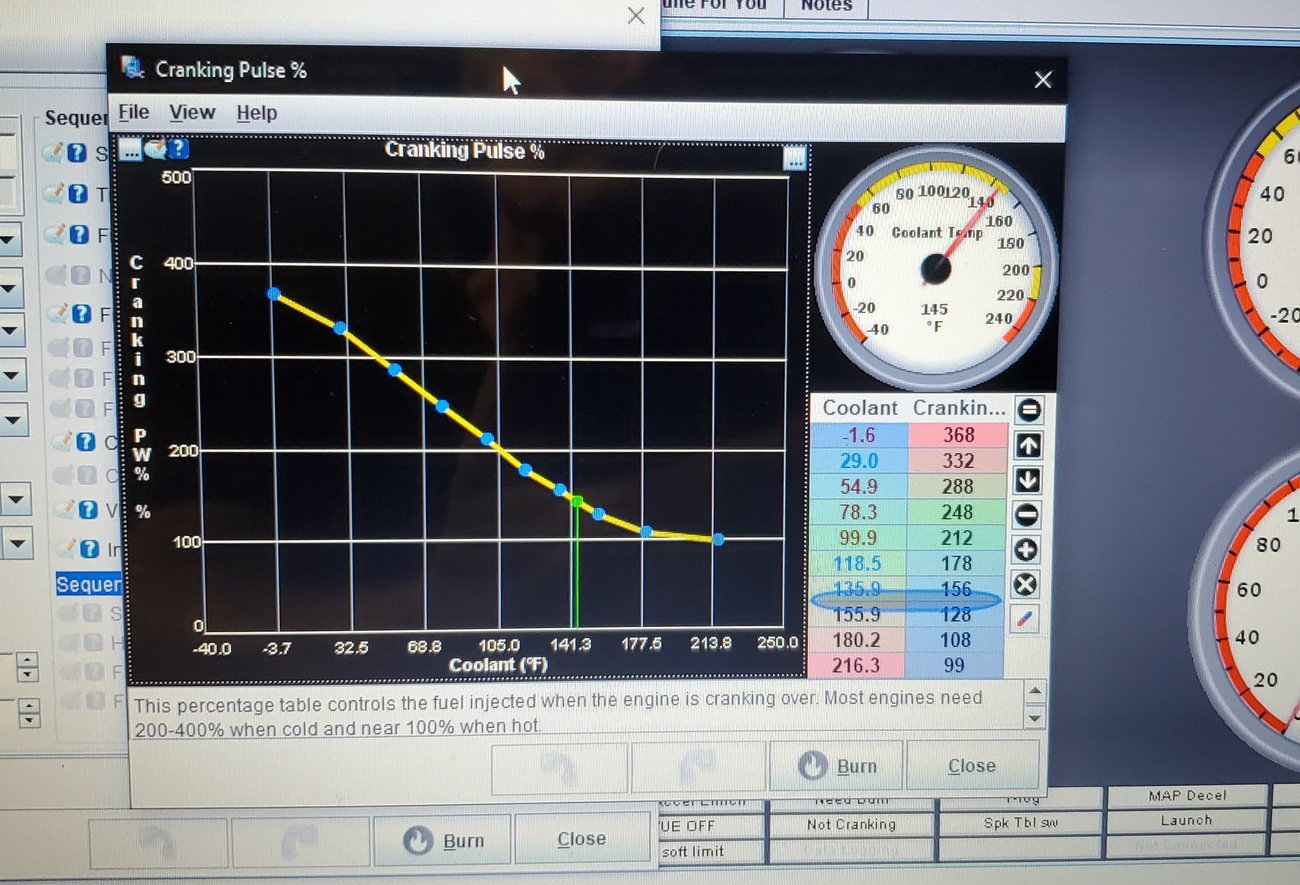
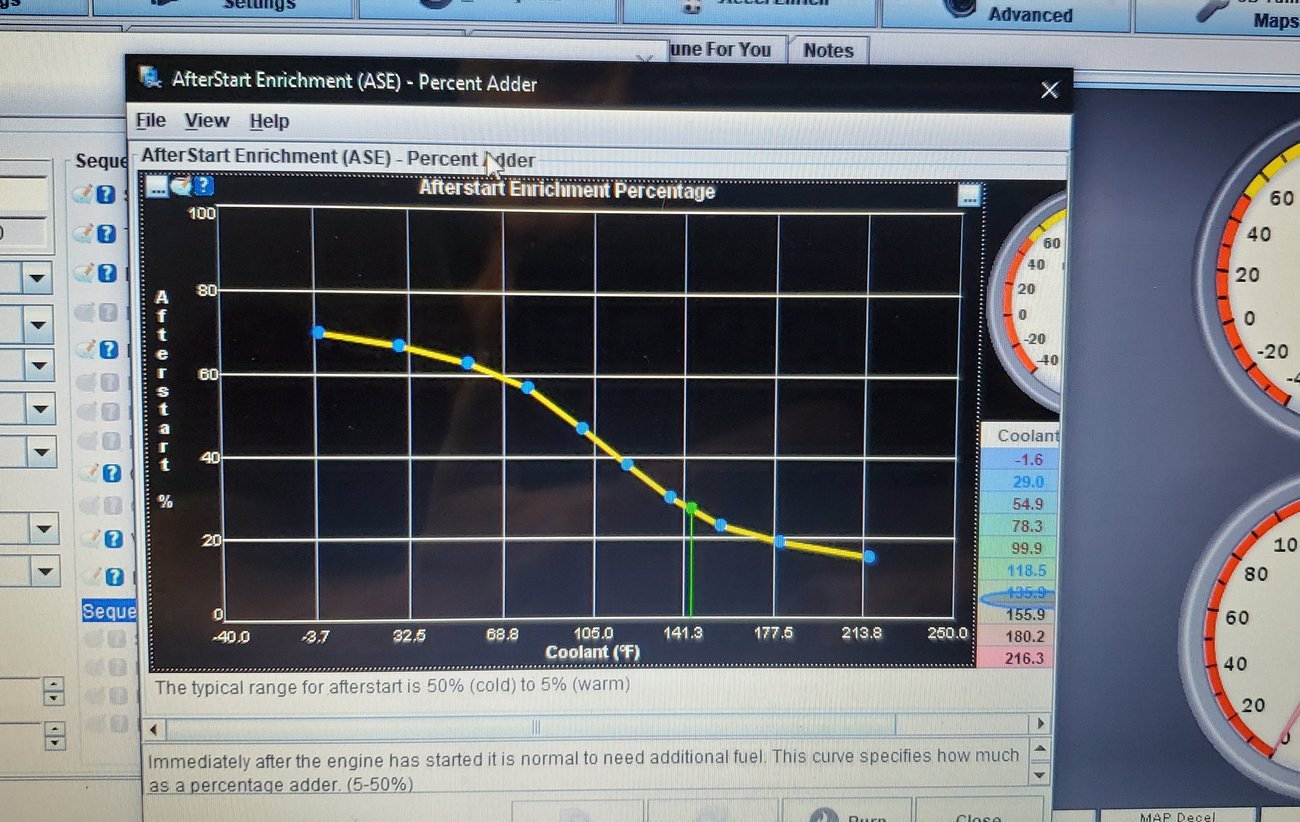
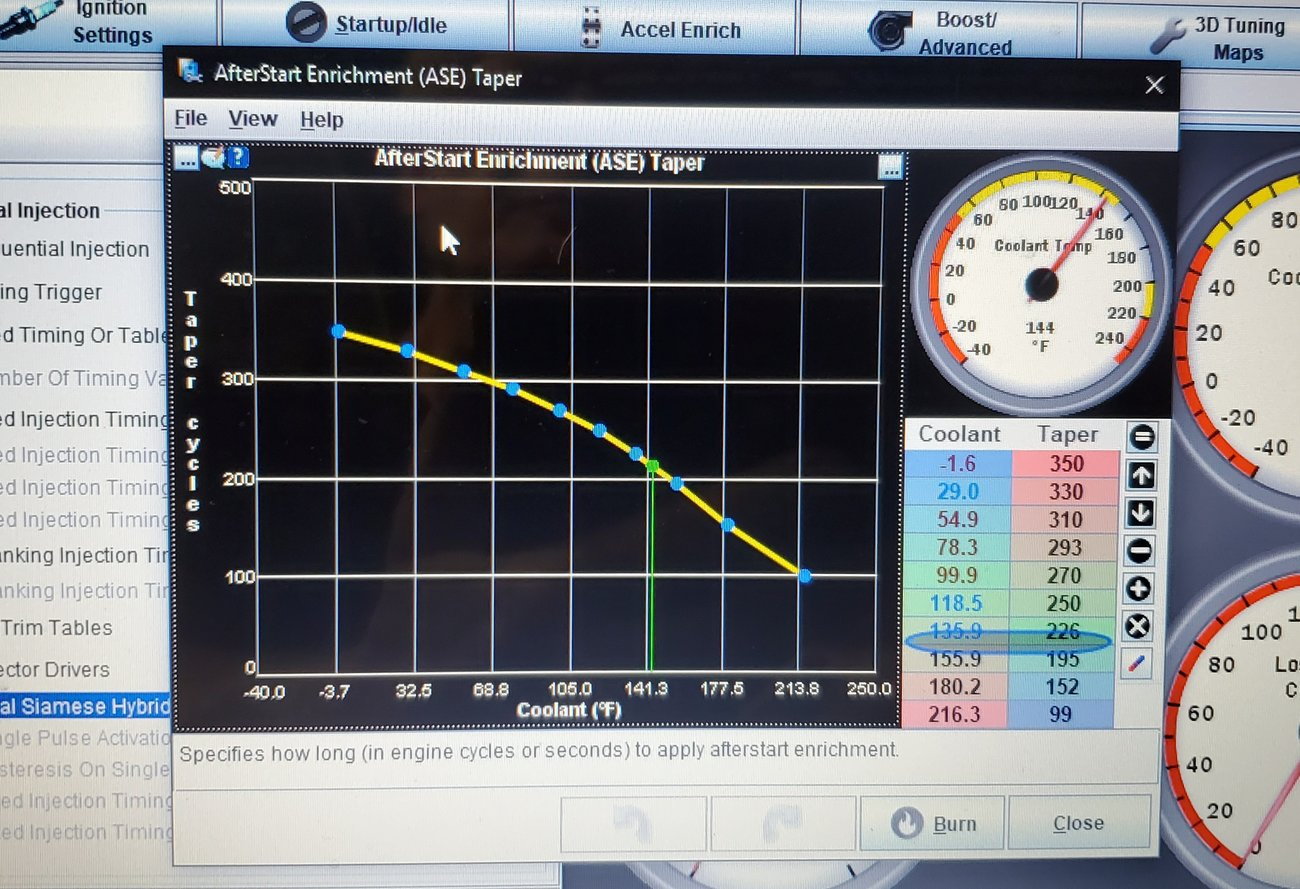
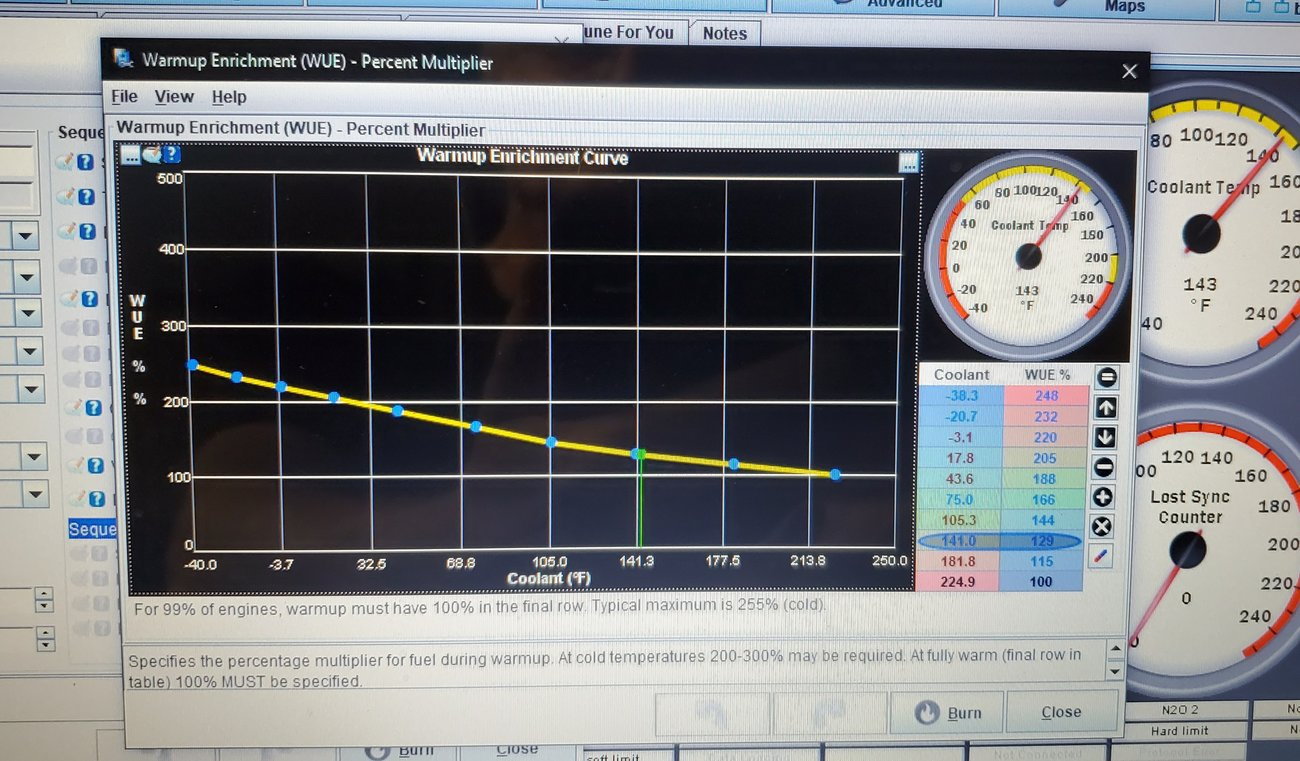
TunerStudio setup screen pics: What follows are the TunerStudio settings and setup that works for my car. Use setting at your own risk Box is checked for sequential. Read and follow TunerStudio instructions and YouTube guides. You may need to adjust this table up or down to have a sustainable startup idle Starter table for fuel. Starter table for timing. Use at your own risk. What follows are some starting points These curves are a starting point, but are working well for me. Nothing but smooth power.
Wow, what a great blast of info here. Thanks for doing this. I'm very interested in utilizing a system like this on an S2 build. It's going to take some days for me to digest a lot of this but the first question that comes to mind is; how is the sequential fuel injection triggered? I see a 110 designation in one of the tables but not sure what that means.
Wow, what a great blast of info here. Thanks for doing this. I'm very interested in utilizing a system like this on an S2 build. It's going to take some days for me to digest a lot of this but the first question that comes to mind is; how is the sequential fuel injection triggered? I see a 110 designation in one of the tables but not sure what that means.
There are a lot of theories about injection timing. I used 110゚ because at 3000 RPM an 8 ms long injection pulse will last about 120゚ of rotation. Starting the injection at 110 after top dead center means the exhaust valve/scavenging is closed/over (better fuel economy) and spray/mist is occurring during high velocity cylinder filling. I used this with a supercharger motor once and it worked great and provided improved fuel economy. It might be better to change to an earlier timing and make it rpm-variable, though. Does anyone have experience with the 944 S2 twin cam?
Well, this is fantastic. I, too, will have to digest what's going on here since I've never done anything like this.
Did you buy the case and plug from DIYAutotune? I love the idea of moving to a MAP sensor and sequential injection.
Finally, do feel like you're missing out on any capability by not using one of the more "advanced" boards that they offer? It really seems like the Microsquirt is all that the S2 needs but, sometimes, you don't know what you don't know.
I had your same concerns about whether the Microsquirt card could handle the job. It performs beautifully. I picked the Microsquirt mainly because it fit in the case. It has all the capability you need. You could make the install even easier by connecting it to the original harness in batch mode (just like the original motronic arrangements/connections) and it will run quite well. (The Microsquirt card comes with 2 native injector outputs - for bank 1 and bank 2.)
Hi dtam,
I have just finished my schematics for using MicroSquirt Assembled unit mated with the existing DME wiring for fuel injection, fuel pump, and spark ignition retaining the distributor. All sensors are connected to the AMP'dMicroSquirt. The race car is an '83 944. Because it has '83 DME, a 36-1 trigger wheel is needed along with hall trigger sensor. The AMP'd ECU provides flexibility on Hall sensor w/o making board wiring changes, just flip a dip stick
What was the MAP, 1 Bar unit?
The goal was to retain the original DME wiring harness if the future, there was a requirement to use it.
Can also be used with a regular NA just get a S2 flywheel n harness. The clutch n pressure plate fit the S2 flywheel
just need to add a +power wire for the injectors powered by the dme relay
Were you able to remove the stock air box and filter on your setup and just take air into the intake straight from the intercooler? In your pic below I just don't see an airbox and, since mine is broken, would love to not replace it. Thanks!
Were you able to remove the stock air box and filter on your setup and just take air into the intake straight from the intercooler? In your pic below I just don't see an airbox and, since mine is broken, would love to not replace it.
Thanks!
This is a NA 944 S2. Thus, the air filter box is under the removable center panel where the intercooler is on a 951.
Thanks for all this info! These may be some dumb questions but both your thread and the website here: https://www.diyautotune.com/product/...sche-944-s-s2/ call this a "plug and play" solution. First, is the product shown on the diyautotune website the same one discussed in this thread? Are the modifications (AFM delete, wiring changes shown by dtam) necessary?
And - forgive me - this is not a Troll - but dtam's mods kind of defeat the purpose of plug and play IMHO??? Or, can the unit shown on the diyautotune website really just be plugged in and the car driven with some basic software tuning/tweaking? I've been considering getting a refurbished ECM unit or outright replacing my S2's ECM for some time now and this product caught my attention.
I believe the product discussed on the diyautotune is different than poster "dtam" Dtam purchased components and installed the components in a box, not plug and play for an S2. DIYAutoTune complete product is plug and play for S2.
Hi dtam,
Thanks for your project writeup from a couple years ago. I used it as a template for a similar setup with a microsquirt on a 3.0L swapped into a 1988 944 coupe. I'm having trouble getting mine running and wonder if you can email your .msq file so I can dig deeper into settings? Asking for help also over at msextra tuning forum Red 944 blues - Megasquirt Support Forum (MSEXTRA)
Regards,
Bill
Hi Bill,
I am running the MSPNP Gen 2 on my S2 from DIY Autotune.
I have a MSQ I can send. I have the base tune from DIY Autotune which does not require a variable TPS or wideband O2 (but highly suggest you get both) - its for getting the car started mainly, the rest such as idle, afr targets, ve table and ignition are "good enough" to run the car, but will need further configuration to get the car to run right. I also have a tune which incorporates a variable TPS and has a more solid VE and ignition table based on my AFR targets table and wideband inputs configured through VE Analyze (autotune). The latter also has TPS based AE and a better configured open loop idle. I have not gotten around to getting closed loop idle setup. Both MSQ's are setup for speed density (MAP + IAT) and not for MAF, so keep that in mind.
Do you already have a wideband and variable TPS? If you do not have the variable TPS I recommend looking into the BMW M20 TPS to M30 TPS conversion/adapter plate, I believe its compatible with our throttle bodies and will allow you to run the variable M30 BMW TPS. Its vastly cheaper than the 944 Turbo variable TPS. A variable TPS will be needed to use TPS based AE (superior to MAP based), launch control, over run fuel cutoff, among many other features.
I would assume the MSQ would be compatible with a non PNP Megasquirt setup, since its the same engine and same inputs. However there are some slight differences between the PNP and the standard Megasquirt. Im not sure if your board jumpers are all configured the same but you can find the documentation for the PNP here: http://www.megasquirtpnp.com/docs/ms...r=13&isModel=2
For instance, you may need to configure the wideband input to a different pin than what is in my MSQ.
Send me a PM with your email address and I can send over.
Regards
Tyler
Last edited by walfreyydo; 06-06-2023 at 11:33 AM.
 08-30-2021, 08:39 PM


 Or, can the unit shown on the diyautotune website really just be plugged in and the car driven with some basic software tuning/tweaking? I've been considering getting a refurbished ECM unit or outright replacing my S2's ECM for some time now and this product caught my attention.