When you click on links to various merchants on this site and make a purchase, this can result in this site earning a commission. Affiliate programs and affiliations include, but are not limited to, the eBay Partner Network.
Hello,
So the other day my clutch started slipping, pretty sure its the original, needed to be replaced anyway. Knowing it is a very long job, I've heard a lot of recommendations for things to do 'while you're in there'. Here is what I am absolutely certain I am doing:
-Clutch kit (duh)
-Pilot bearing
-rear main seal
-clutch fork bearings
-guide tube
What else should I be looking for? To give some context, I picked up this beater from dirt cheap with no service records (timing belt and water pump are next), and lets just leave it at, the previous owners did not give it the attention it deserves. If you're wondering if a part has been replaced, the safe bet for my car is no, and if it has been replaced, it was likely not done very well. After speaking with a friend who's a tech, he recommended a couple things, clutch slave cylinder (master cylinder went out a few months ago) and to look at resurfacing the flywheel. He did add that this isn't always necessary and you can usually get away without it. What's your take? Should the flywheel be resurfaced? What should I look for? I was also thinking of doing trans fluid while I have easy access to it. Please let me know watcha guys think, thanks!
In your clutch kit, do you have a new pressure plate and throwout bearing? If not, I would consider that as well. And a clutch alignment tool to make the job easier if you don't have that as well. I'd add the speed and reference sensors while you're at it. You're going to have to remove them to access the clutch, so might as well install new ones while you're there. Just my $0.02....
Yeah, the clutch kit I'm looking at on fcpeuro has all of that, and good point with the speed and reference sensors, i'll definitley look at those as well, thanks!
In my mind it would depend on which way you are going about it. Are you taking the engine out, or dropping the transmission and pushing the torque tube back? If the former, I would change the gearbox oil (draining it will make it lighter during the R&R phase), replace the CV joints, fuel filter (in the neighborhood), check the torque tube bearings, replace the shifter arm and linkage (it's on top of the transmission and a real pain to do in situ), and (if yours is really worn - it likely is) replace the shift tube that runs from the shifter to the transmission. Oh, and I would replace the transmission mount. There is a lot of stress on that part and the rubber is likely shot, making the whole assembly move around, affecting the handling of the car.
Removal of the engine is the way I would go, but mine is a racecar with most of the extraneous stuff removed under the hood - that would drive me to replace engine mounts, etc...
Lastly, give some thought to cutting the bellhousing so you can leave the reference and speed sensors in place during removal of this item. It will make it easier "for next time" as you can setup the spacing easier for the sensors, then install the bellhousing...
Look into replacing the clutch fork. I didn't; instead, I had the original professionally restored with refinished tips, special superior bronze bearings, and finally, hardened.
Less than 2 years later, it cracked. Why.. I'm not entirely sure at this point. The new one is in and so far, all good. I kept all the other parts the same. OEM Clutch forks are back available and not too expensive relatively (around $350USD)
Some tips from my second-time-around job:
-all my nuts and bolts came off nice and easy this time; I have been using MolySlip Copaslip copper anti-seize on everything and it appears to work. (Buy some small "left-hand" drill bits; you may have to drill out some nuts and bolts esp. exhaust)
-Do NOT buy the FAE reference sensors. Go with the Bosch brand only and buy the ones for BMW that are exactly the same with slightly--not an issue--longer cables. They are almost as cheap
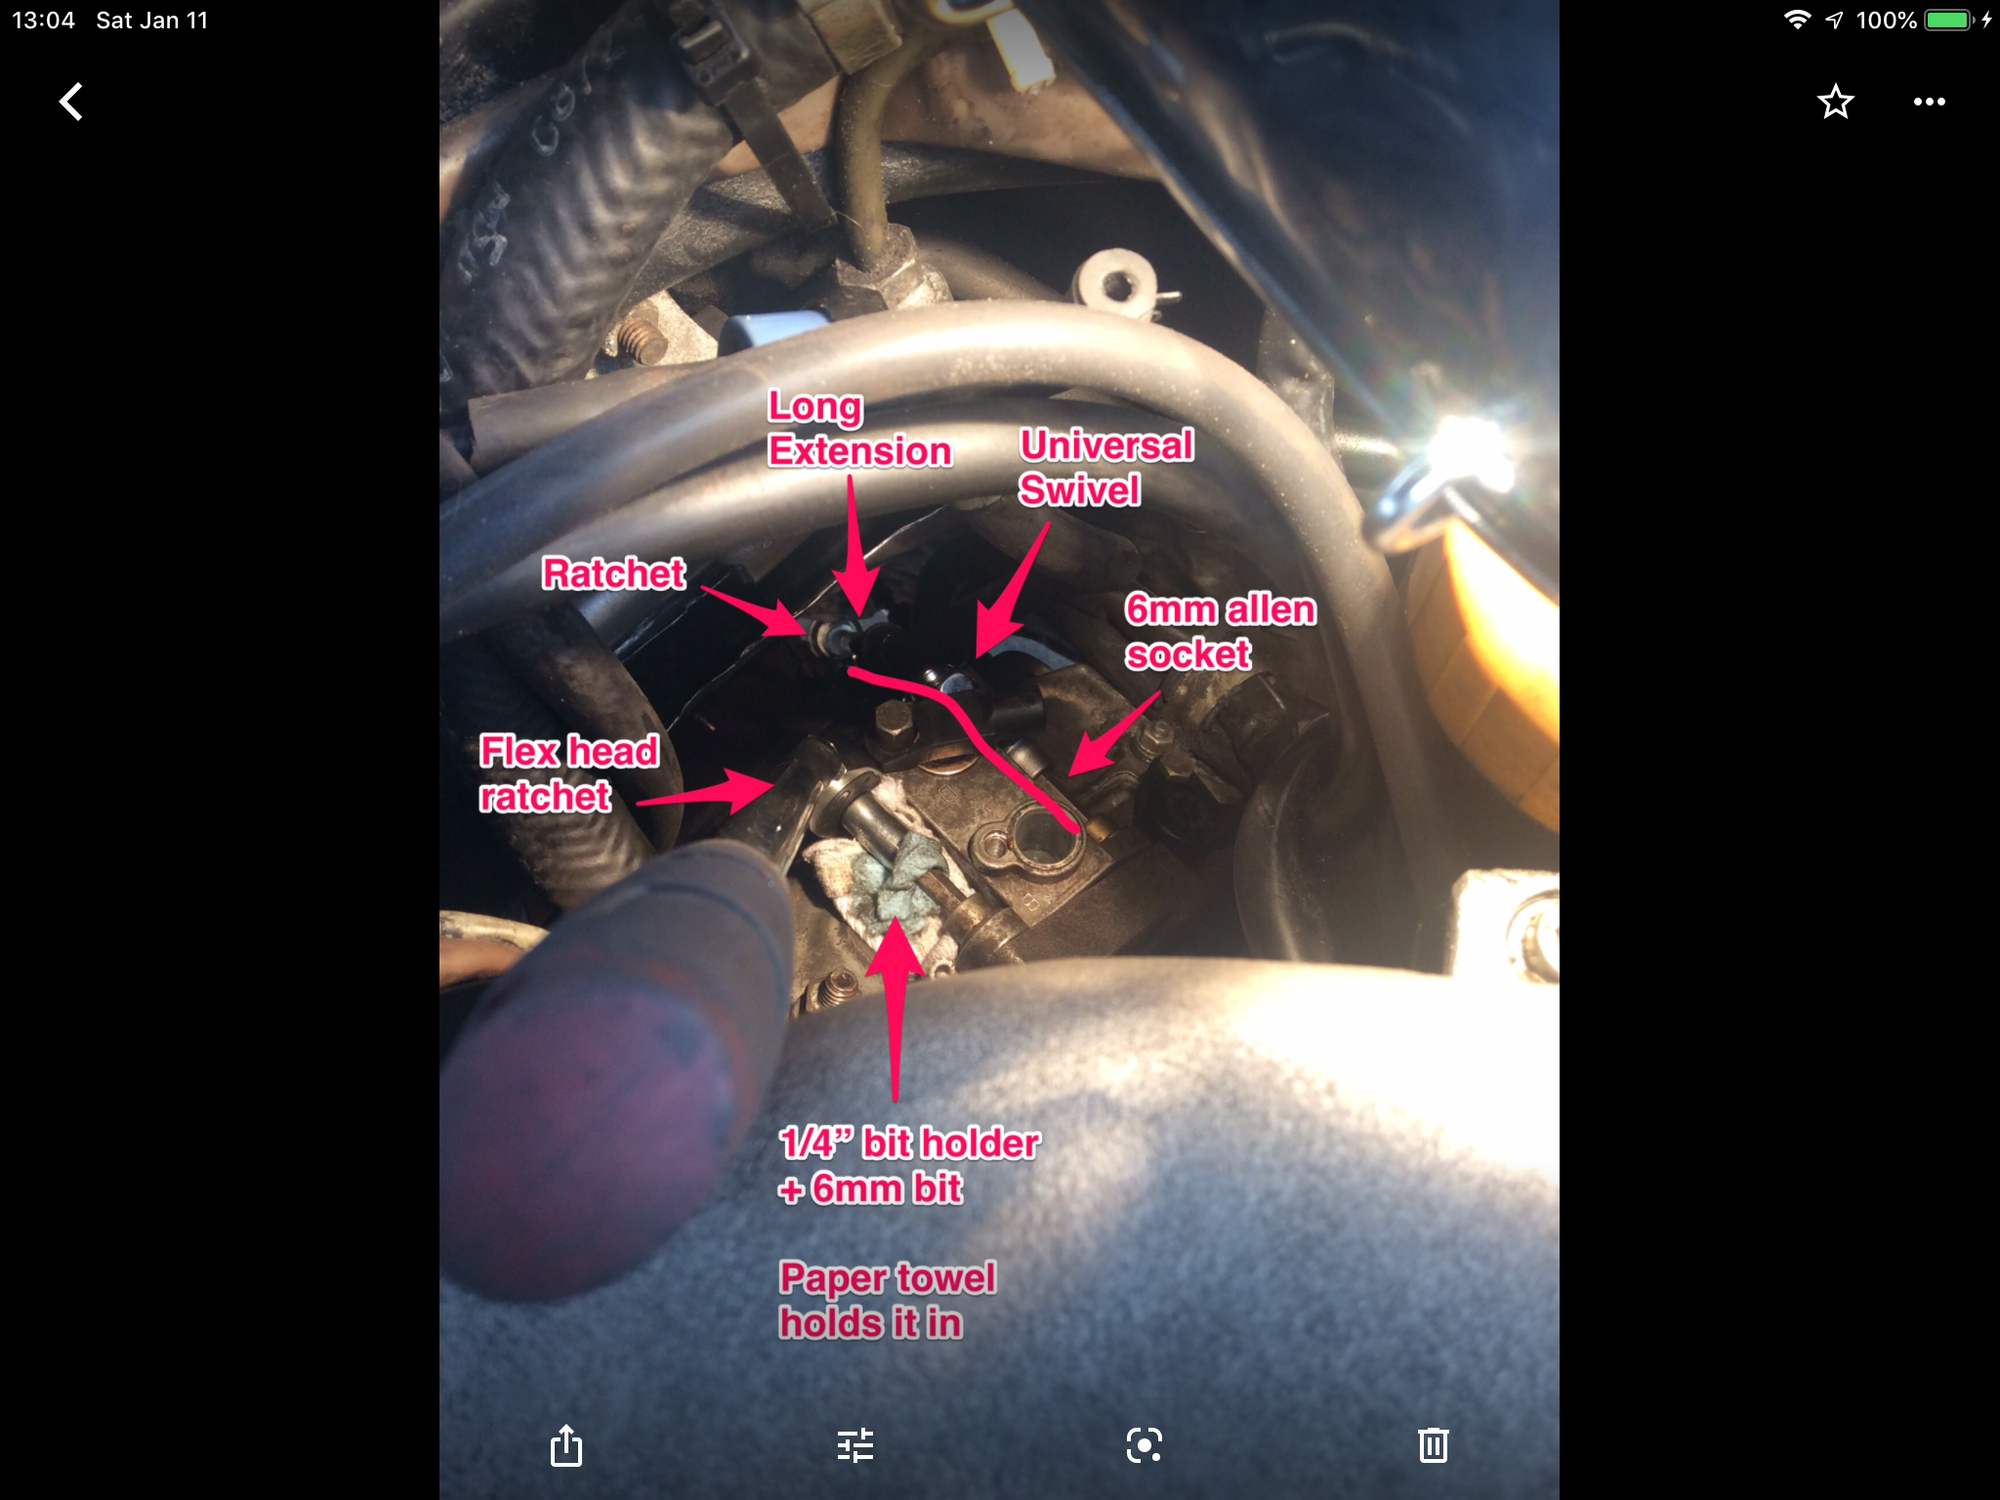
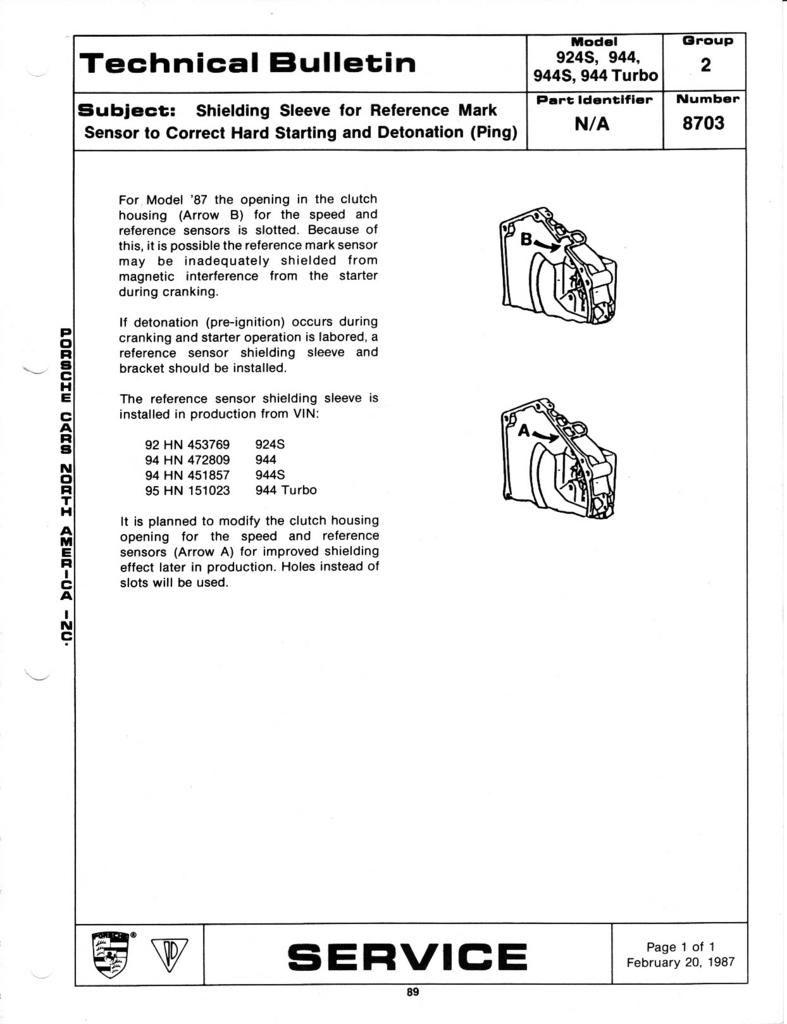
-my understanding is not to cut a slot in the bellhousing as Porsche did this very thing then quickly reverted back to no-slot; it causes an issue with the reference sensors and starter interference. Search for the TSB on this. I have a decent setup for removing the ref sensor bolts:
-definitely rent or borrow a transmission jack
-consider adding an additional pedal stop. This may or may not be the reason for my fork breaking. See the story here -> https://www.lindseyracing.com/LR/Parts/944-CPS.html I'm cheap and I made my own for now from a random bracket I had
-order the mega-expensive exhaust seal rings now so you're not hung up waiting for these stupid things
Post your progress and any hang-ups; there are lots of little things that aren't always written up in the guides... like how the attaching the cat end of the entire assembled exhaust to the downpipe (turbo car) won't line up ever unless you hang the muffler end first
Enjoy!
Last edited by Dan Martinic; 02-07-2020 at 09:07 PM.
Reason: Clarification
Interesting comment on the bellhousing mod. I have it cut in that area and have a 1.5" hole near the bottom to access the set screw in the flywheel that the reference sensor uses to establish crank position. Never had an issue with either sensor's functionality or a starter problem.
People have added most of what I did when I redid my rear main seal, my clutch was actually new(ish) and in good shape. I did my work by removing the trans and shifting the torque tube back. I took a bit of time to clean the trans, as well, as it was filthy.
Things I like, but as some of them were already done and on my car I don't have a reference to what it's like without:
Short shift kit - so long as you have the trans out this is easy to install and set up.
Shift linkage - I second this, from above
Trans mount - I ended up following the procedures for adding polyurethane to the mount to make it a bit more solid and, hopefully, last longer
Needle bearings on the gear shift handle - mine were already done but I could notice a difference once I installed the shift linkage. This is an easy, low cost upgrade
Oil impregnated bronze bearings in the clutch fork - I did this myself since I had everything apart and I could see the needle bearings that were in there but didn't know how old they were, and there looked to be some "marking" on the pin
Fuel filter - I second this, as well. Check the fuel lines while you're in there and make sure everything looks OK
Since you'll have everything in the area apart, new rear brake lines are pretty easy to install; I went with some stainless hoses.
Adjust the parking brake shoes and cable while you have everything off.
I didn't do the full process with the clutch (meaning no install of a new pressure plate and throwout bearing) but it wasn't a terrible job, though I went very slowly. I struggled with small things, like getting the reference sensor out of its bracket, so I made sure to clean things up and replaced nuts and bolts with stainless versions where it was appropriate.
Huh, interesting, I have not previously heard about this clutch fork issue. I think $350 for the fork is a bit outta my budget for the time being, but a DIY pedal stop seems like a pretty good idea, does Lindsey racing have info on how to set it correctly? I've always pushed the clutch to the floor when shifting out of habit even though I know the grab point is higher on these cars.
People have added most of what I did when I redid my rear main seal, my clutch was actually new(ish) and in good shape. I did my work by removing the trans and shifting the torque tube back. I took a bit of time to clean the trans, as well, as it was filthy.
Things I like, but as some of them were already done and on my car I don't have a reference to what it's like without:
Short shift kit - so long as you have the trans out this is easy to install and set up.
Shift linkage - I second this, from above
Trans mount - I ended up following the procedures for adding polyurethane to the mount to make it a bit more solid and, hopefully, last longer
Needle bearings on the gear shift handle - mine were already done but I could notice a difference once I installed the shift linkage. This is an easy, low cost upgrade
Oil impregnated bronze bearings in the clutch fork - I did this myself since I had everything apart and I could see the needle bearings that were in there but didn't know how old they were, and there looked to be some "marking" on the pin
Fuel filter - I second this, as well. Check the fuel lines while you're in there and make sure everything looks OK
Since you'll have everything in the area apart, new rear brake lines are pretty easy to install; I went with some stainless hoses.
Adjust the parking brake shoes and cable while you have everything off.
I didn't do the full process with the clutch (meaning no install of a new pressure plate and throwout bearing) but it wasn't a terrible job, though I went very slowly. I struggled with small things, like getting the reference sensor out of its bracket, so I made sure to clean things up and replaced nuts and bolts with stainless versions where it was appropriate.
Good luck!
Might look at the short shift, or at least replacing those plastic bushings which are probably shot. One of the first things I did to my car was the shift handle linkage replacement thing, got rid of 90% of the slop in the shifting, i'm guessing I can clean up the other 10% from the linkage on the trans. Where do you get those clutch fork bushings? Are they just oilite bushings that are the same dimensions as the needle bearings? That might be worth while. As fr the parking brake, I'm taking care of that along with my rear brakes in the next dew days. Got a lot on my list, but hopefully my car will be a lot better than how I bought it, or at least not worse lol.
While the shift linkage is apart and the trans is on the ground, would be a good time to install the only 944 shift linkage and shifter with the bearings... will feel like a new car...
Huh, interesting, I have not previously heard about this clutch fork issue. I think $350 for the fork is a bit outta my budget for the time being, but a DIY pedal stop seems like a pretty good idea, does Lindsey racing have info on how to set it correctly? I've always pushed the clutch to the floor when shifting out of habit even though I know the grab point is higher on these cars.
New OE clutch fork on the left... on the right, my "refurbished" fork with less than 10K US miles on it and cracked finger. Google "cracked clutch fork porsche 944"--you'll be surprised.
The new one actually looks thinner.. feels lighter.. weaker; but, maybe the material is better? Time will tell. The original is old and perhaps metal fatigue got to it. Or the over-extending pedal thing. Or.....currently a mystery.
FYI those bushings everyone raves about: in filming the broken fork's action, I notice lots of lateral movement with the bronze bushings. See video:
That's the right (unbroken) side. Yes, that one fork is cracked and bent obviously means greater side-to-side movement... but.. I'm curious: would the needle bearings better handle this movement? I don't yet know why the needle bearings "suck"; these are the same type that support the car at the wheels, no?
I was lucky, my car came with an extensive collections of seals and gaskets, so I did the rear main and had new exhaust gaskets.
Someone mentioned a transmission jack - agreed. Or plan ahead to build something that will work. I spent a lot of time building 16"x16" pallets and lifted the car to place 3 pallets under each wheel. It gave me a lot room underneath (I'm a little claustrophobic) and a very stable platform. I should have spend a bit of time building a cradle or something to lower and raise the transmission.
The clutch alignment tool is great - my Sachs clutch came with it from Rock Auto.
I did both plates, pilot bearing, the guide tube (probably not necessary, but for the price I thought I should have it "just-in-case", and since I took it all apart and had a guide tube "just-in-case", I figured I might as well replace it), fork bearings.
There are other things that will probably just end up being necessary, rather than just "while you're in there", like exhaust hangers.
I did not resurface the flywheel, and I'm not sure if it that was a mistake or not. I had some vibration for a while right at top of the pedal travel. After a couple thousand kilometers of driving, it's just noticeable if you put slight pressure on the pedal - not in normal use of the clutch.
I did read somewhere that the slight vibrations would be likely, given that original rubber hub was intended to absorb vibration and a spring-centered plate would not.
It certainly didn't make it any less driveable and it's nearly gone now.
I didn't do hydraulics at the time, but my master cylinder failed 6 months later when it was about 25 degrees below zero (Celsius, but yes, it's cold, -13F). I don't think it would have been any easier to do while the clutch was being done, other than having the car up already.
I didn't do hydraulics at the time ... I don't think it would have been any easier to do while the clutch was being done, other than having the car up already.
If the OP changes the Master, my guess is that hose between Master & Slave might be original and need changing too; if so, fishing around in the area is easier with TT and bellhousing removed, imho.
Mine had that clip for the hose attaching off one of the TT's bolts and boy, is that ever a drag to get back together after! I subbed a longer bolt & two nuts to make a permanent "stud" instead.. much easier to feed just the nut and clip after!
-25 C.. I know it well. If you're in S. Etobicoke, send me a PM and drop by some time
 02-05-2020, 09:43 PM