Steering Shaft Donut Replacement?
 05-23-2017, 10:29 PM
#1
Rennlist Member
Thread Starter
I have searched and found some threads that discuss the replacement of the rubber disc/donut, but none that get in depth.
Are there any specific threads with a walk through of this repair? I'm good with dropping the rack etc, but have never removed the upper U-joint and would like some pointers or tips before I tackle this over the weekend.
Thanks in advance.
Edit:
Is it possible to disconnect the coupler, drop the rack (with the U-joint attached to the rack) replace the donut and bolt it all back up? It sure looks tight in there, looks like a breeze if the engine was out. LOL
Last edited by Adamant1971; 05-23-2017 at 11:06 PM.
 05-24-2017, 01:49 AM
#2
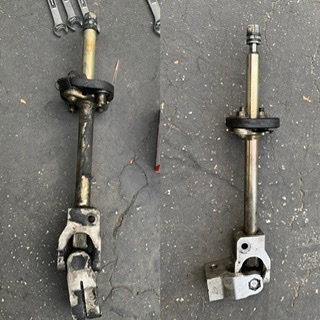
If you are referring to the flex coupler or "rag disk", then I just did this on my '86 while I was messing about with the clutch. It was pretty easy when I had the cats and heat shields off. I did not have to mess with dropping the rack or anything like that. I took the u-joint between the column and the rack off, then had enough room to get a socket and extension up onto the downward facing bolts. Once those are off, the inner portion of the lower steering column slides out with the flex coupler attached (still connected by two bolts). Once it's out, you can get the upper nuts off, take off the old disk, and pop the new one on.
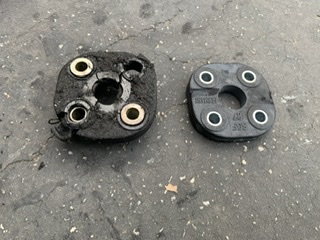
One thing I didn't see mentioned is that the replacement disc I got did not have the same two longer inserts as the original. I found that I could pop out the shorter (flush) inserts from the original worn disk, flip them and use them as stand offs for the new disk. I re-centered my steering wheel and rack using the centering bolt once I was done, and that was it.
Difficulty 3.5/10, only because you have to drop the cats.
The following users liked this post:
coach928 (08-10-2020)
05-24-2017, 10:18 AM
#3
Rennlist Member
Thread Starter
If you are referring to the flex coupler or "rag disk", then I just did this on my '86 while I was messing about with the clutch. It was pretty easy when I had the cats and heat shields off. I did not have to mess with dropping the rack or anything like that. I took the u-joint between the column and the rack off, then had enough room to get a socket and extension up onto the downward facing bolts. Once those are off, the inner portion of the lower steering column slides out with the flex coupler attached (still connected by two bolts). Once it's out, you can get the upper nuts off, take off the old disk, and pop the new one on.
One thing I didn't see mentioned is that the replacement disc I got did not have the same two longer inserts as the original. I found that I could pop out the shorter (flush) inserts from the original worn disk, flip them and use them as stand offs for the new disk. I re-centered my steering wheel and rack using the centering bolt once I was done, and that was it.
Difficulty 3.5/10, only because you have to drop the cats.
Yes the rubber disk on the intermediate shaft.
I will give it a go as you described. If I can leave the rack alone that would be ideal. I have not had a chance to get under the dash, but I assume that the U-joint is disconnected from the inside and the rubber boot that seals the shaft at the firewall is simply removed to gain access to the pinch bolt on the U joint.
05-24-2017, 11:17 AM
#4
I only had to remove the lower u-joint (between rack and shaft) on mine and did it all from underneath the car--I removed the two pinch bolts on the U-joint, then slid the joint up the shaft and wiggled and eventually I worked it off the rack without having to loosen anything on the rack or steering gear itself. Installation was the reverse of... well, you know.
05-24-2017, 12:57 PM
#5
Rennlist Member
Thread Starter
I only had to remove the lower u-joint (between rack and shaft) on mine and did it all from underneath the car--I removed the two pinch bolts on the U-joint, then slid the joint up the shaft and wiggled and eventually I worked it off the rack without having to loosen anything on the rack or steering gear itself. Installation was the reverse of... well, you know.
I will give it a shot with just removing the lower u-joint. I have an H-pipe so hopefully a little more room to get in there.
Thanks
05-24-2017, 01:44 PM
#6
Nordschleife Master
Remove the steering rack, leave the universal on the steering shaft, NOT the rack. Once the shaft is separated from the rack, you can undo the 2 bolts holding it together, the donut will come down with the lower section of shaft. From there the replacement is pretty straight forward.
If you do take off the universal from the lower shaft, make 100% sure that it is installed 180 deg out of sync from the upper universal. If it is not, you may get more binding on the steering shaft....
If you do take off the universal from the lower shaft, make 100% sure that it is installed 180 deg out of sync from the upper universal. If it is not, you may get more binding on the steering shaft....
09-13-2020, 12:10 AM
#7
Rennlist Member
I only had to remove the lower u-joint (between rack and shaft) on mine and did it all from underneath the car--I removed the two pinch bolts on the U-joint, then slid the joint up the shaft and wiggled and eventually I worked it off the rack without having to loosen anything on the rack or steering gear itself. Installation was the reverse of... well, you know.