When you click on links to various merchants on this site and make a purchase, this can result in this site earning a commission. Affiliate programs and affiliations include, but are not limited to, the eBay Partner Network.
+1 on EpoxyCoat. However I'd stay away from white. I initially did my floor in white and let it cure for a week in the dark (windows covered in black plastic) and it still yellowed. EpoxyCoat ultimately stood behind their product and sent me replacement coating, but in gray this time. Just remember if you are going to go with an epoxy floor coating do not seal your slab after it cures. Otherwise you will be left grinding it off so the floor coating will stick. My floor was sealed and removing it was a PITA!
Yup,
I was fortunate to be able to put it on not long after it had cured..
Also, if using non standard colors, they suggest that a double application is needed. I did not read this fine print and made the standard amount work, but it did get thin in a few areas.
The red has held up great and cleans up easily. Almost 3 years now.
After building my garage I was tapped out for funds and could not afford a pro epoxy job, so after doing some research I opted for Rustoleum Rocksolid Epoxy. Cost me 200 bucks and took about 5 hours of prep and cleaning and application for 500 sq ft, with a slab that had a year of use on it. I was skeptical after reading their previous products did not hold up well, but this reformulated stuff is very good. I've dropped heavy stuff on it and spilled pretty much everything on it and it holds up beautifully. Still looks brand new. You have to follow the directions perfectly and it takes two people to apply it since it sets up very fast. Really good product.
My workbay is 22' wide and barely enough to allow cabinets and benches next to the car with lift columns. Outside column width is 11', with 30" deep cabs and benches (vs 24" std kitchen cab depths). My ~11' ceiling is good for SUV on the MaxJax. Full lifts go up another 2'.
The mini-split heat pump HVAC I have is supplemented by a gas-fired ceiling furnace. Include power and thermostat wiring in your plan.
Compressed air and power are all in-wall, with a sub panel dedicated to this end of the house.
Add internet (ethernet) and TV cable to your pull schedule, plus ethernet cables home-runned for smart TV and telephone connections and a wifi access point. If the garage is remote from the house, add intercom and alarm wiring too. The cable itself is cheap (monoprice.com).
I've danced the epoxy floor tango in a real workspace, and opted for porcelain tile with epoxy grout for the current garage and workbays. Much Better, in my opinion.
There's no such thing as too much insulation.
There's no such thing as too much lighting. The workbay has 10 4-tube T8 fixtures for serious work lighting, plus a dozen or so 6" LED cans. Workbenches have double 5050 LED strip lighting underneath the top cabs for task lighting.
Paint the walls a light washable color to reflect the most light you can. Drywall over all the utilities and insulation.
I have a 5hp air compressor for big jobs, and a 2.5 HP Makita slow-speed for the regular stuff. The small one is Much Quieter, and plenty of normal work tasks short of painting or bodywork. Both live in a sound-insulated cabinet under a workbench, with outside ventilation.
Windows are a plus sometimes, but steal wall space if you plan to use upper cabinets for storage. Plan for upper cabinets for storage. Windows are also a security weakness.
+1 on the RockSolid. It is, I think, polyurea and not epoxy. Sold by Rustoleum and available at Home Depot. Very superior, but goes down just like any two-part epoxy. Cures within a day - drive-on in I think 24 hrs or so. Just take the time to do the proper prep work. BTW, Rocksolid is totally immune to hot tire tracking.
Dr Bob, this is an incredible thoughtful planning for a garage! When we move to my wife's hometown of Portland, we may just have to hire you to observe my garage build.
-hoi
Originally Posted by dr bob
My workbay is 22' wide and barely enough to allow cabinets and benches next to the car with lift columns. Outside column width is 11', with 30" deep cabs and benches (vs 24" std kitchen cab depths). My ~11' ceiling is good for SUV on the MaxJax. Full lifts go up another 2'.
The mini-split heat pump HVAC I have is supplemented by a gas-fired ceiling furnace. Include power and thermostat wiring in your plan.
Compressed air and power are all in-wall, with a sub panel dedicated to this end of the house.
Add internet (ethernet) and TV cable to your pull schedule, plus ethernet cables home-runned for smart TV and telephone connections and a wifi access point. If the garage is remote from the house, add intercom and alarm wiring too. The cable itself is cheap (monoprice.com).
I've danced the epoxy floor tango in a real workspace, and opted for porcelain tile with epoxy grout for the current garage and workbays. Much Better, in my opinion.
There's no such thing as too much insulation.
There's no such thing as too much lighting. The workbay has 10 4-tube T8 fixtures for serious work lighting, plus a dozen or so 6" LED cans. Workbenches have double 5050 LED strip lighting underneath the top cabs for task lighting.
Paint the walls a light washable color to reflect the most light you can. Drywall over all the utilities and insulation.
I have a 5hp air compressor for big jobs, and a 2.5 HP Makita slow-speed for the regular stuff. The small one is Much Quieter, and plenty of normal work tasks short of painting or bodywork. Both live in a sound-insulated cabinet under a workbench, with outside ventilation.
Windows are a plus sometimes, but steal wall space if you plan to use upper cabinets for storage. Plan for upper cabinets for storage. Windows are also a security weakness.
Dr Bob, this is an incredible thoughtful planning for a garage! When we move to my wife's hometown of Portland, we may just have to hire you to observe my garage build.
-hoi
Hoi--
I'm a few hours from Portland, on the Dry Desert Side of the mountains. It gets colder and snowier here, trade-off for all the rain you'll enjoy in Portland.
I've been keeping notes and running "wishlist" of learnings good and bad through more than a casual few garage and workbay "projects" over the years. There may be another "project" early next year with a tad more garage/workshop space to play in. There's no such thing as the perfect space if you find yourself doing much actual work on the toys. Each of mine is better than the previous. None are garage-mahals but are quite functional for the level of projects I'm willing to take on myself.
----
Wandering through the workshop this morning on the way to my office (it's a long commute...), I should mention that a twist-lock outlet in the ceiling over each lift column lets me put a coiled pigtail down to the columns with power. Very handy. I use a duplex box with a strain relief for the cord, and a big magnet on the back to stick it to the steel column. Next to that is a short air-hose pigtail, with another short pigtail that can be connected down to an "air station" (valve, filter, regulator, plus a drain) also with a couple big magnets, so limiting the hoses and stuff that otherwise track across the floor during a project. I "harvest" the magnets off the backs of Harbor Freight parts trays, the ones they sell for a few $ or give away sometimes. Besides using the magnets for the dangling lift-column stations, I keep a stack of intact magnetic parts trays handy too, for their intended purpose. There's a couple air hose reels in the ceiling, and a recoiling extension cord with another plastic-outlet-box-and-magnet setup on the end.
The 928 is in its winter-storage spot, so the Honda DD is sitting in the workbay right now. I just wandered around it with the phone pointing up.
First images is a look up at a twist-lock ceiling outlet, with a coily-cord plugged in. The Max-Jax lift columns are put away, so the power box is stuck to the side of the adjacent cabinet in the last image. That last image also includes the collection of handy magnetic parts trays. Those steel cabinets are some I bought at an industrial auction 25+ years ago. Except for the fabulous seasick-green color, they still do their job nicely. Baldhead Cabinets is local, and they graciously offered to powder-paint these to match the new cabinets if I take them apart. That will happen if the new digs come through, as part of the moving process I suspect.
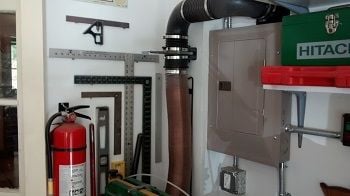
The second image shows a close-up of the power box on the cord reel, with the parts-tray magnet glued to the back (Gorilla Glue). Thse magnets have a rubber cup over them to no scratches when you stick them to something nice. You can also see the air hose reel and the flourescent worklight on a reel, all at the inside end of the workspace. The compressed-air plumbing is all in-wall and in-ceiling, with stub-outs at a few places where air might be handy. That image also picks up a corner of the charcoal-and-silver Baldhead cabinets used through most of the space, and one of the heads for the mini-split heat pump. The other head is on the opposite side of that wall in my office. A few of the LED cans are also visible.
The third image shows a section of the front ceiling that we finished as a partial catherdral. The door tracks follow the slope so the arctic-insulated door isn't in the way of a car on the lift. The flourescent fixtures on the sloped sections are located so they look through the garage door windows when the door is fully open. You can see the condensing gas furnace too, with both the gas and exhaust plumbing. The second twist-lock outlet is just out of the frame there. I leave that outlet empty in winter unless I need it, so the cord doesn't get too baked by the furnace.
It's all handy & convenient stuff that makes the work a lot easier and certainly more fun.
Looking forward to the next space, I'll add a big TV, probably in a swing-up mount at the ceiling when not in use. I'll almost undoubtedly build in the sound system speakers too; I like the Big Sound that real speakers deliver, but they are an eyesore in the giant scheme of things.
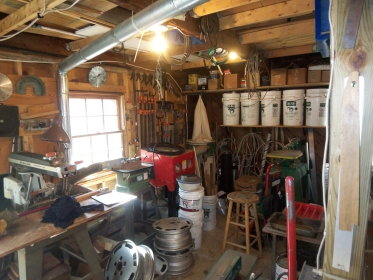
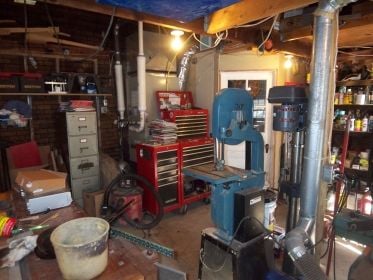
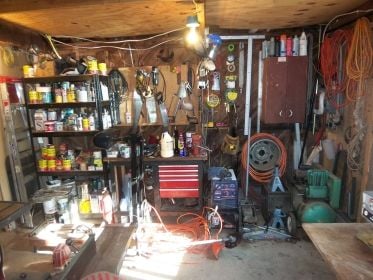
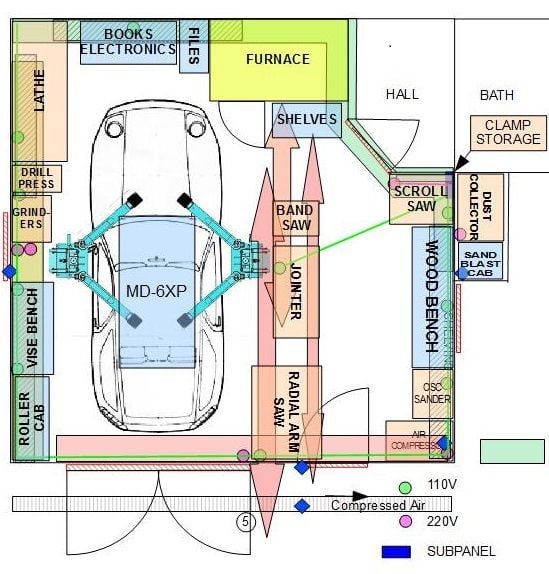
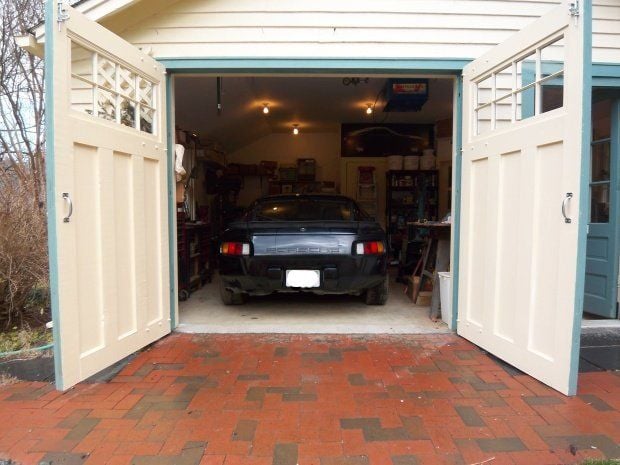
Your thread has a title that very much appeals to me, because for my build planning was absolutely essential as I had only a 19 X 19 sq. ft. space to work with, partly occupied by a furnace and a small vestibule. Here are the "befores":
And used this diagram in planning. This was done in Open Office Draw, which is easy to use, and has a layers feature. This feature allowed for separating services, stationary power tools, indicating work flow where it constrained the position of a power tool, and other nifty things. And it kept me out of trouble. I really wanted a MaxJax, but after creating this layout, it was apparent that it would not functionally fit, but I am totally pleased with the scissors lift I bought. And GarageJournal contributed hugely in the design- deciding on the right size subpanel (100A), installing conduit (great fun using a 1.25" conduit bender, let me say), choosing a heat source (ceiling-mounted electric), air line layout (by the book, 3/4" black iron, proper run - 28 feet - from tank to outlet, drains, etc.) and one of the best tips of all, putting everything possible on casters. This lets me set up the shop to work on the 928, do carpentry, weld, whatever, by moving things around. What a joy!:
Months in the planning and over a year and a half in construction (all of which - including raising the 7' ceiling to 9 1/2', wiring in the subpanel and outlets (yes I have a copy of the NEC on my computer), plumbing the air, etc. even building the carriage doors - I did myself, partly why it took so long) has given me a workplace that is a real pleasure to work in. I wish I had more space, but I'm pretty happy with this, and I am submitting this post just to underline the importance of planning, so I hope it will be useful in encouraging someone who is in the planning stages to do as many iterations as it takes to get it right.
I'll echo the need for planning. We were doing an extensive rehab on an existing house, so worked closely with the architect and designer to get what I wanted. Each time I moved the garage door out to gain the correct space, he extended the inside wall to make a bigger bathroom or closet on the other side. I ultimately shared with him that the garage door needed to be NN feet from the back wall, wherever that ended up. His CAD model included footprints of cars smaller than what we had, plus he scaled them at 7/8 to make the space look larger. I rescaled things to include full-sized SUV's in every slot, with the hatches and doors open, to illustrate why the dims needed to be what they were.
I also did the electrical plans for the whole house, including circuit schedules and detailed switch locations in 3D for the electrician. K said there were too many lights in the kitchen, the architect thought there were too many lights in the garage and workbay. Both wrong... The architect was not at all used to 3D "fly-throughs" on the computer, but it made a lot of details easier to visualize, and made it possible to avoid any serious mid-project changes.
Bottom line is to plan-plan-plan as Martin shares. Don't be afraid to use blue masking tape on the floor of an existing space to lay out where things will fit and what access you'll have. You can do this in your driveway if necessary, with the car [biggest one you'll ever work on] sitting there to walk around. Grid the space with chalk lines if necessary if it helps you see how it will all play together. The more planning you do, the more chance you stand of getting things right the first time. It also gives you a good handle on your budget and schedule, two of the three trifecta items of a successful project.
I haven't read the entire thread, so not sure what has been said about lighting but here's a few comments from my experience with my 28x50 metal building/garage. Consider installing a few industrial metal halide lights instead of many weaker lights. I installed 2 used 350watt halides from eBay ($50 each with bulbs) and they provide enough light for the entire building. The builbs are expensive but they last forever (mine are over 10 years old and I've never had one go out) They can be wired for 110 or 220 and get to full brightness in 1 minute. In about 15 seconds they are bright enough to walk around at night. Also think about lighting when a car is on the lift. I had to add a 3rd halide off to one side on a separate switch to provide good lighting when a car is in the air at night.
On the slab, stronger is always better, but I say don't stress too much about it. I had 4" and it's working fine for a 2 post.