When you click on links to various merchants on this site and make a purchase, this can result in this site earning a commission. Affiliate programs and affiliations include, but are not limited to, the eBay Partner Network.
928 International should still have plenty of used pieces available.
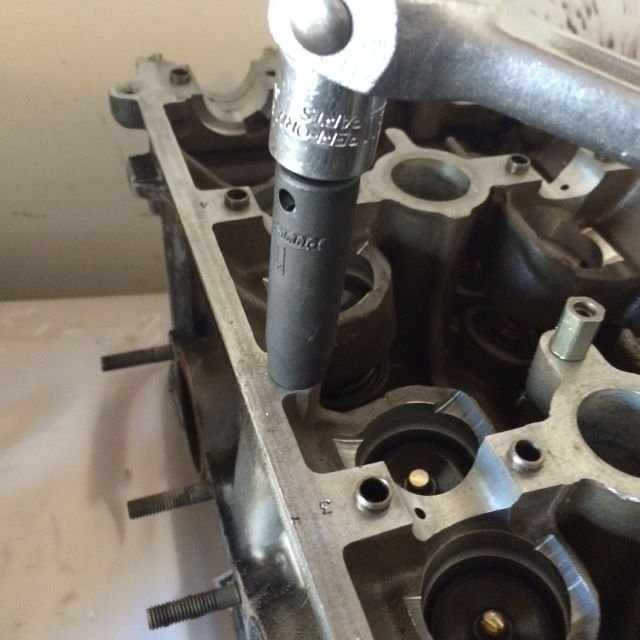
What finally worked consistently for me in addition to the torch was to not turn the socket wrench with steady torque but to kind of pop the socket in very short increments kind of like a super low speed impact driver. Any time I felt like I was meeting resistance I would go in the opposite direction, apply more heat/PB and try again. It might take four or five such cycles but eventually they all gave way after I snapped the first two.
PS - What was the result of your leakdown test?
I'm not willing to keep trying. The engine in this car is good and no pan gasket leaks or anything so I don't want to have to take it out.
The leak down is for the other car. Haven't got around to that yet.
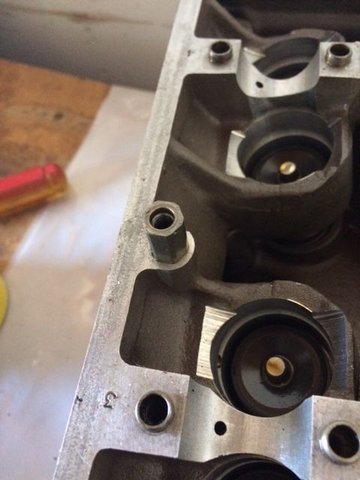
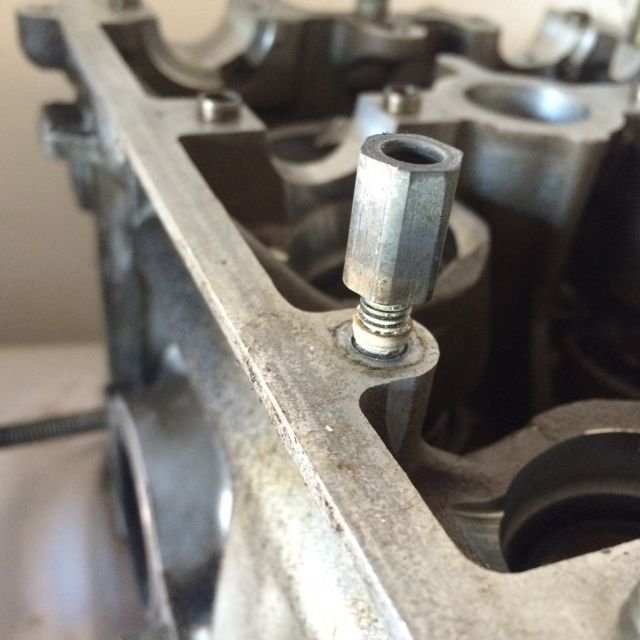
I had one shear off just a few days ago. Now I'm scared to attempt to get the other ones off. I've been fighting a leaking cam cover situation for the last year. I ordered some kroil today and plan on soaking it everyday for a week before attempting to remove. Luckily it's on the top row of 3 so it's accessible. I haven't decided if I'm going to attempt the weld-a-nut approach or not. It might be better to try that instead of drilling first. Thoughts?
Oh shoot, I meant to post these pictures earlier. I broke two bolts until I used this technique with a MAP gas torch, deep socket and breaker bar then got the next 20 out successfully. Key is to heat the base of the bolt and then get it started once you see brown schmutz forming at the base indicating that the threadlocker is releasing. I used a couple of sharp jolts to the end of the breaker bar instead of steady torque to get the bolt started - if it didn't want to move initially then I applied more heat until it did.
For your broken bolt I would try the weld a nut approach first, but you'll still need to get it good and hot to get the threadlocker to release .
Oh shoot, I meant to post these pictures earlier. I broke two bolts until I used this technique with a MAP gas torch, deep socket and breaker bar. Key is to heat the base of the bolt and then get it started once you see brown schmutz forming at the base indicating that the threadlocker is bubbling. I used a couple of sharp jolts to the end of the breaker bar instead of steady torque to get the bolt started - if it didn't want to move initially then I applied more heat until it did.
For your broken bolt I would try the weld a nut approach first, but you'll still need to get it good and hot to get the threadlocker to release .
I used a map gas torch too and a ratchet with the least amount of leverage. I wanted to make sure the heat was doing the work. Once you get them good and heated up they remove rather easily. Below is the technique I used.
I used a map gas torch too and a ratchet with the least amount of leverage. I wanted to make sure the heat was doing the work. Once you get them good and heated up they remove rather easily. Below is the technique I used.
Very nice demo and made a lot of sense.
My 928 engine is almost entirely refreshed, lacking only renewed connecting rod bearings (could've been done when pan gasket was renewed) and a refreshed cam cover gasket seeps.
But this level of upgrade has risks that place it beyond the horizon for me. At 30 years since new and getting comprehensive refreshes, mine is already taking on too much of a garage queen attribute.
But for those willing to take this on, your advise will likely make the difference.
I would only recommend trying to remove the studs with the engine removed. I think it would be too tough with the engine in the car combined with possibly damaging (heat) some other components. I hear you though, we got sick of dealing with the leaks and decided to just pull the engine and do it all. Hopefully it will last another 20-30 years.
I hear you though, we got sick of dealing with the leaks and decided to just pull the engine and do it all. .
Yeah, it is disappointing doing any repeat work (replacing a valve cover gasket *again*), to resolve annoying drips. Thanks again for the detailed video guide.
Yeah, it is disappointing doing any repeat work (replacing a valve cover gasket *again*), to resolve annoying drips. Thanks again for the detailed video guide.
9 Vehicles Porsche Helped Engineer that Aren't Porsches
Slideshow: Long before engineering consulting became trendy, Porsche was quietly helping other automakers build everything from supercars to economy hatchbacks.
9 Features and Characteristics That Only Porsche People Understand
Slideshow: Some brands build cars. Porsche builds traditions, obsessions, and a few habits that stopped making sense decades ago but somehow became part of the charm.
This Builder Is Turning Heads With Its Slantnose 911 Creation
Slideshow: A small Polish tuner has reimagined the Porsche 911 Slantnose for the modern era, blending 1980s nostalgia with widebody tuning culture and serious performance upgrades.
Porsche 911 GT3 Artisan Edition Pays Homage to Japanese Culture
Slideshow: Porsche has created a Japan-only 911 GT3 Artisan Edition that blends track-ready hardware with design cues inspired by traditional Japanese craftsmanship.
Porsche Reveals Coupe Variant of the Electric Cayenne With a Fresh Look
Slideshow: Porsche's latest electric Cayenne Coupe blends dramatic styling with supercar acceleration, turning the brand's midsize SUV into a 1,139-horsepower flagship.