When you click on links to various merchants on this site and make a purchase, this can result in this site earning a commission. Affiliate programs and affiliations include, but are not limited to, the eBay Partner Network.
After consulting my wallet I've decided to stay with the original 85 valve cover bolts however upon closer inspection it turns out that the left side head is missing the standoff shoulder bolt on the lower left hand corner and when I went back and inventoried the bolts I have 10 long and 2 short ones. I assume from the sealant in the cover that one of the PO's was in there and either broke or lost the standoff and replaced it with a long shoulder bolt. I'm quite suprised that it wasn't either leaking from there and/or that I didn't break it upon removal.
So for today's detour I snapped one of the stupid spark plug wire clip screws in a valve cover then proceeded to screw up the extraction a million ways to Sunday when I tried to drill it out and didn't get the pilot hold centered correctly, resulting in an oblong hole when I moved up a drill bit size. Long story short is that I got as much of the bolt out as I could and plan A is that I have now put some Quicksteel in there (good for up to 500f and can be powder coated), and will let it cure for a day and try to drill and tap a new bolt hole. Not sure about Plan B yet but I'll cross that bridge when I come to it. It's the furthest left of the clips on the passenger side, so not really even sure the clip is required there.
I did manage to get new shaft O-Rings into the throttle body -thanks Mike Frye, Scott Yoo and 928Noobie for documenting this so well, I ended up using the 3/8 x 1/2 x 1/16 O rings that 928Noobie did and they fit perfectly, although not without a bunch of head scratching about the small spring which when re-assembled didn't have any tension, I then figured out I had to wind it around once more and all was good.
928sRUS - Karlyn-Sti Beru look alike - $335
928MS - Custom built with Beru ends and copper core wire - $328
928 Specialists - Beru Assemblies including pre installed dividers - $500 (Roger says the Beru units are NLA for 85-86 32V so I need to verify these are still available)
I bought the karlyns and had the extra sleeving installed.
The sleeving is for heat protection, but I though it would provide some additional abrasion protection.
The ends are factory style, and length/fit is good.
Unfortunately, I think I'm seeing some signs of leakage (couple white spots) where the wires rest against metal parts. Followed factory routing- but there are still some points of contact. So, added some spiral split loom at key points to the arsenal.
Puzzling, in that I went to the Karlyns because the Magnecors I had on prior to that were doing the same thing.
Jeannie says that the Beru wires are shipping again and should be available in 6-8 weeks, I'm actually leaning towards Carl's wires at this point.
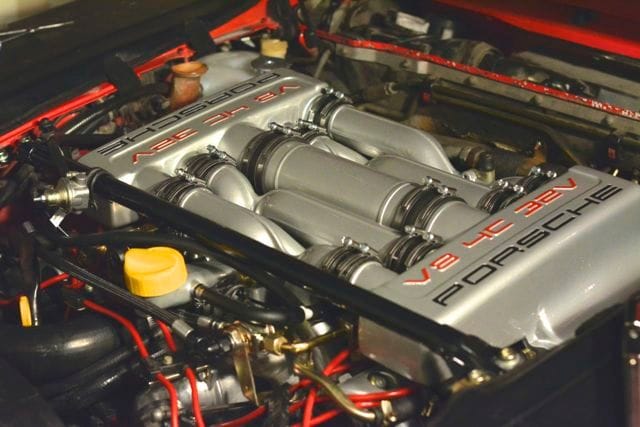
Next up, I found a powder coater who said the right things about prep for the intake based on what Ben has written on the subject, so what color should I go with, stock silver like Scott's or something darker with texture (picture also from Ben.)
Wow very nice. Are your cam covers darker than the intake or is that just lighting? I'm a little worried about the black couplers of the pipe organ with a darker shade but I do really like the satin finishing will see if this is something he can do.
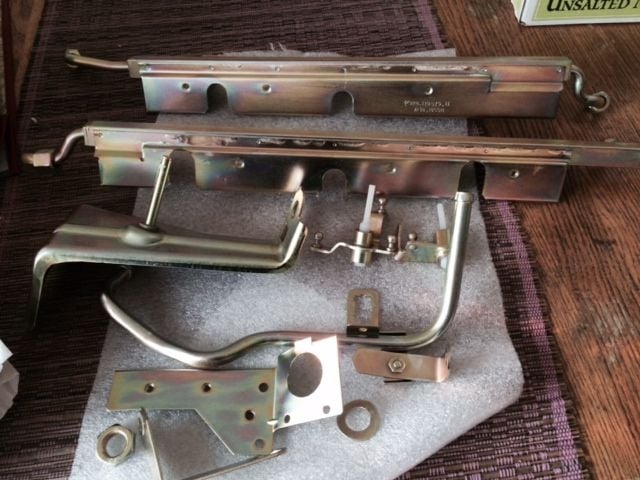
Fuel rails, throttle cable assembly, vacuum pipe and various brackets from the front of the engine freshly back from the platers.. Will be spraying everything with clear coat before reassembly.
I'd be interested in how/where/how much $$$ etc. on plating. It's something I haven't done, and I'd like to sometime.
This batch was $150 for cleaning, stripping and plating in zinc iridite. Done by Valley Plating here in the Bay Area, recommended by Speedtoys. Back in three days, I wish the powder coating would happen on that timeline!
wow that looks great! making me feel bad about my intake refresh... i went with high temp paint. aluminum silver for the tubes and wrinkle black for the connecting tube and chambers on either side. still debating on whether i want to sand the raised letters down to bare metal and clear it. i'll see what it looks like all put together first... injectors come in tomorrow so hopefully ill be starting up tomorrow night!
Post some pics of your paint job, I definitely considered that route and one of the down sides is timing of the job - the powder coating isn't coming back for another week at least so I can only do things like getting the throttle body/air guide/isv put together. This is definitely a WYAIT slippery slope - by the time I'm done I will have replaced the entire fuel and ignition systems including GB's fuel lines and a rebuilt MAF. At some point I resolved not to add up the total damage but Roger thwarted that strategy by combining all of his invoices into one Paypal request which definitely left a mark. Seeing all of the little things that weren't right as I removed them from the car makes me super excited for how it will run when it gets put back together - knowing what I know now its likely I've never driven the car when it was anywhere close to 100% so the anticipation is killing me.

 09-05-2015, 12:34 PM