

New upholstery for 6-way power seat 928S 1984 Pascha
 07-09-2015 | 08:17 AM
#18

Rennlist Member
Joined: Oct 2004
Posts: 2,210
Likes: 6
From: Y-Bridge City, Zanesville, Ohio
07-13-2015 | 07:22 PM
#19

Thread Starter
Rennlist Member
Joined: Jun 2005
Posts: 3,261
Likes: 49
From: Park Ridge, IL (near Chicago)
An update.
I got the kit today. Bob installed the pillows in the seat and back insert areas. In other words he did all the gluing for me. Yesterday I parked my car and pulled the DS seat, and carefully documented everything again. With that fresh in mind, I began to install the upholstery on the PS seat. (I sent the DS inserts off to Bob also). I probably spent 6 hours today but I got the upholstery installed and the seat back in the car. It was too hot for me to take the time to photograph anything. I don't know how Dwayne does it.
I must say that Bob's kit is fantastic. The fit seems pretty much perfect. It is a lot of pulling and stretching, but very doable for DIY.
On the second side I will try and take some pictures of the install.
Take care,
Dave
07-13-2015 | 07:40 PM
#20

Chronic Tool Dropper
Lifetime Rennlist
Member
Lifetime Rennlist
Member
Joined: Oct 2001
Posts: 20,506
Likes: 549
From: Bend, Oregon
Dave, I really look forward to seeing how all this works out. In spite of my fabulous repair efforts, my front seats really do need new leather to be good again. Plan is to get a set of covers, probably from Rob, and do the installation as a winter project. I even looked at an interesting pneumatic hog ring tool, one that the insulators at a recent power plant project were using to build thermal blankets to go around steam valves. Can't decide if a few $hundred is worth the labor and arthritis savings. Interested in a shared asset? Meanwhile, do me and others the favor of setting up a video camera or two, and narrating the steps you take, good or bad, on the way to getting the covers fitted. By all accounts the installation techniques are a lot of the difference between a great job, and one that looks more like grapefruits shoved into a burlap sack.
Thanks for all the help on this tuff!
Thanks for all the help on this tuff!
 07-13-2015 | 08:13 PM
#22
Chronic Tool Dropper
Lifetime Rennlist
Member
Lifetime Rennlist
Member
Joined: Oct 2001
Posts: 20,506
Likes: 549
From: Bend, Oregon
Thanks, Bob.
I will work on that for the next seat. Probably just photos and text.
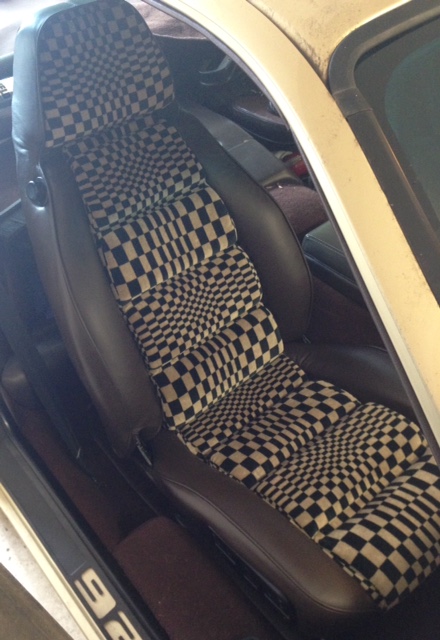
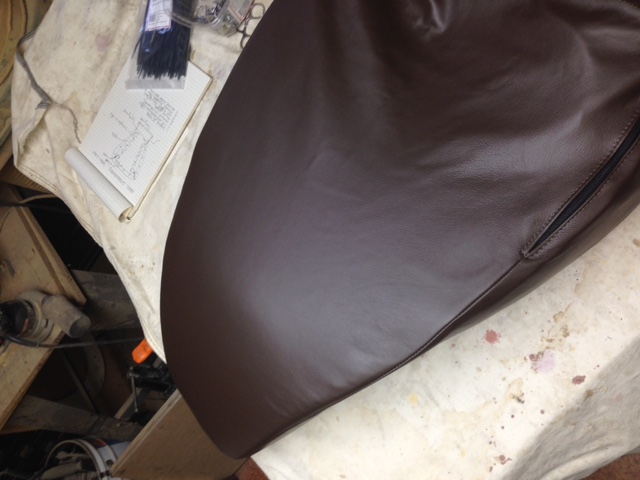
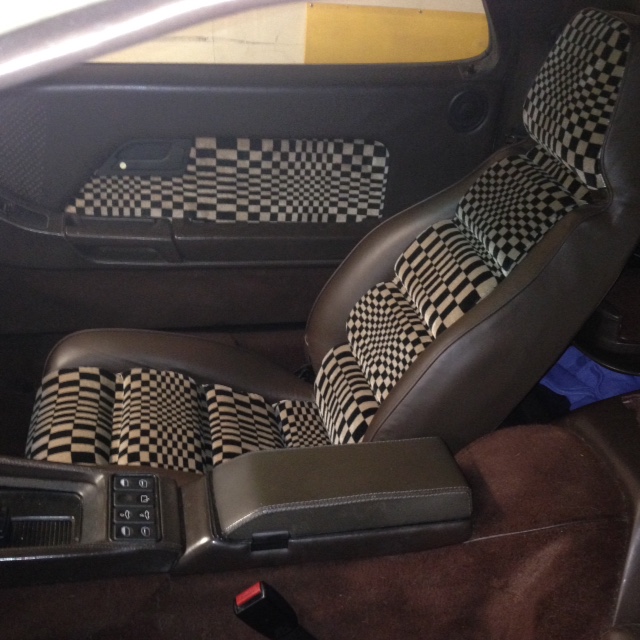
Here's a quick pic of the first side:
Attachment 953870
Dave
I will work on that for the next seat. Probably just photos and text.
Here's a quick pic of the first side:
Attachment 953870
Dave
07-15-2015 | 12:58 PM
#25
Thread Starter
Rennlist Member
Joined: Jun 2005
Posts: 3,261
Likes: 49
From: Park Ridge, IL (near Chicago)
Hi guys,
It's time for an update. I sent my inserts off to Bob Budd for gluing and installing on my foam cores. That leaves me with the seat back perimeter frame and foam and the cover for it. The seats are basically 3 pieces: the seat bottom frame, the seat back frame and foam, and the seat rail frame. The seat back insert is a separate cushion which is attached to the seat back frame. The upholstery kit comes in three pieces for each seat: the seat back perimeter and back, the seat bottom and the seat back insert.
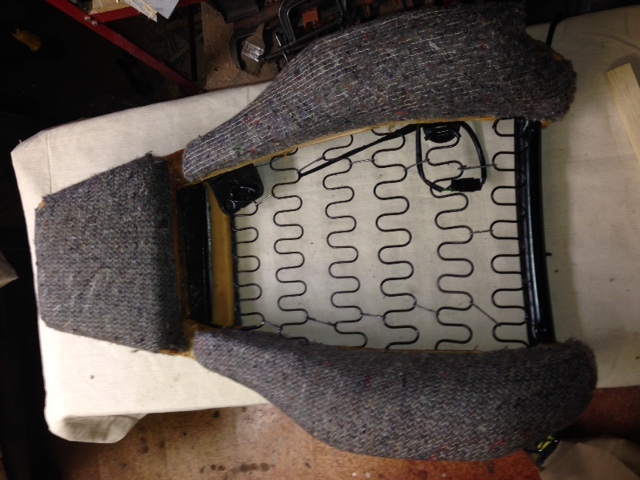
Today I will cover the seat back perimeter frame and foam.
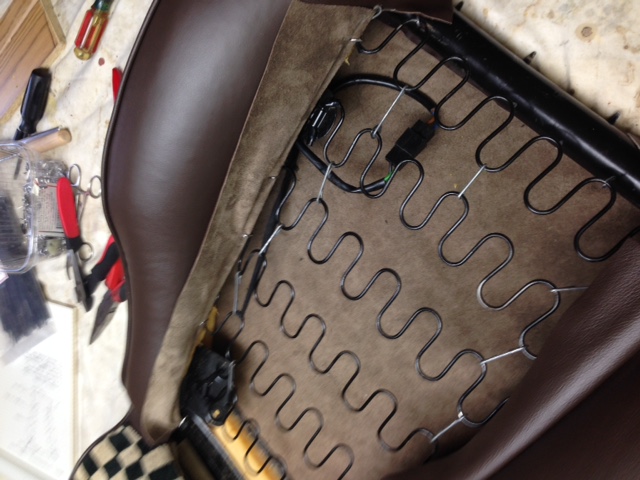
Here's what I start with, after 20 minutes of steaming and smoothing the rag covering:
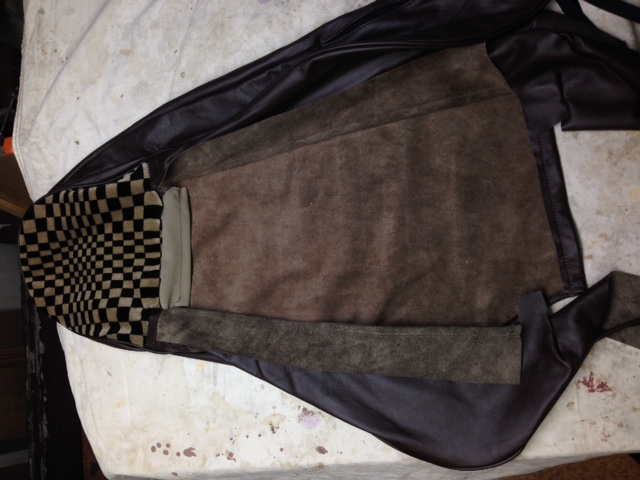
Here is the cover:
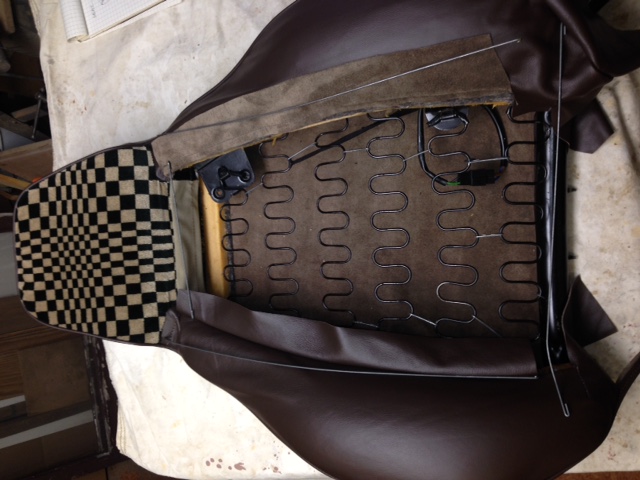
Here I have turned the headrest portion inside out and I'm ready to invert it over the frame and foam. Some people use a plastic bag over the headrest to allow the cover to slide into place more easily. I did not seem to need it. You do have to work it into place from all sides gradually getting it into place. I even turned the seat upside down and pounded in on my table.
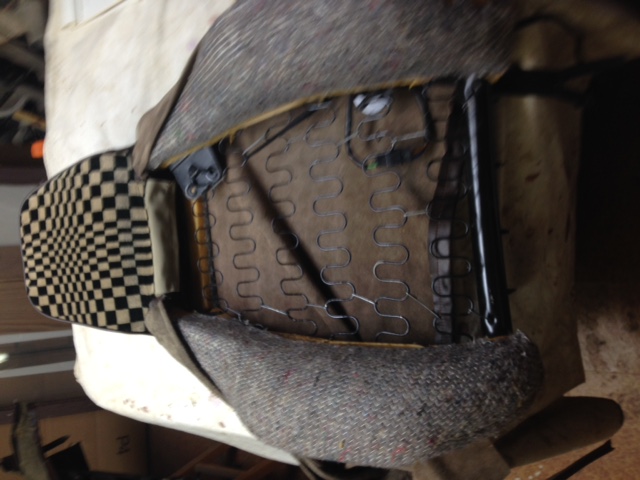
Now I have preliminarily stretched the bolster covers into place and laid four listing wires on the seat which will provide structural attachment for the cover. There is one at the top, which pulls under a bar shared with the insert, one longitudinal wire on the inner side of each bolster, and one at the bottom edge of the back.
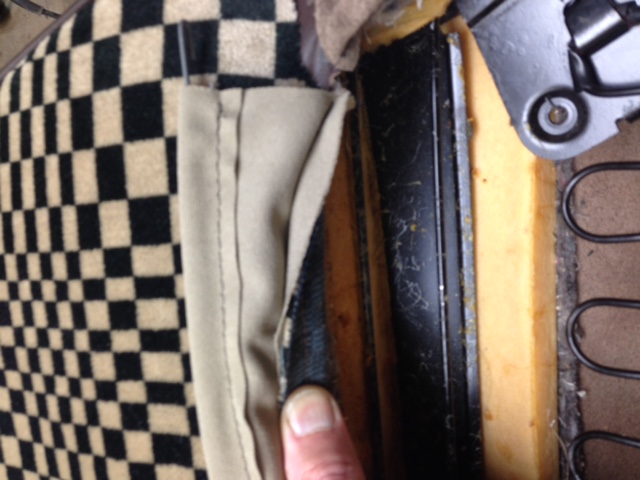
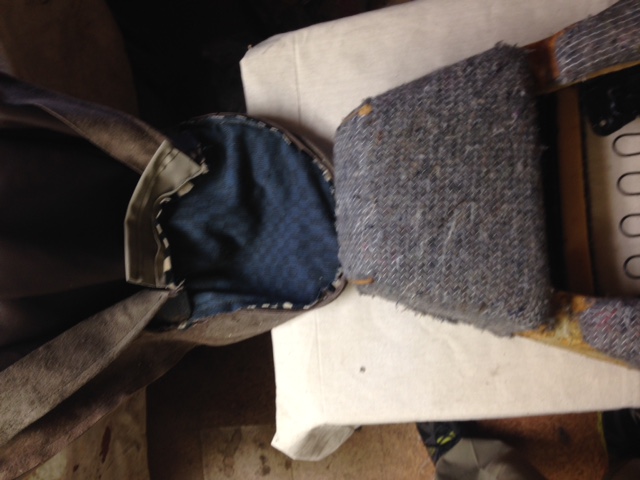
Next I will hog-ring the longitudinal wires to the zig-zag springs of the back. I start at the top and work down.
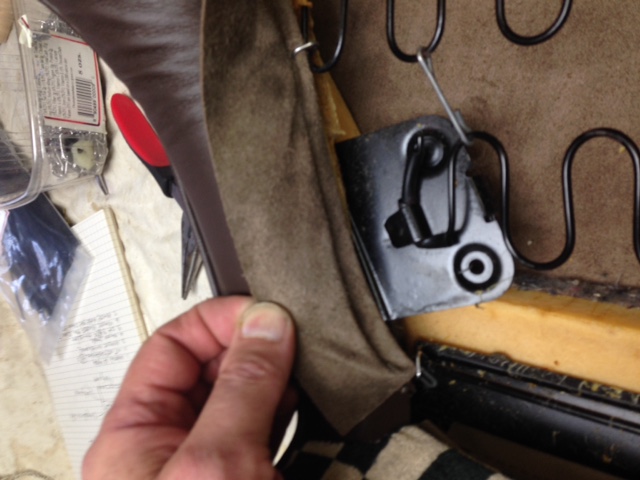
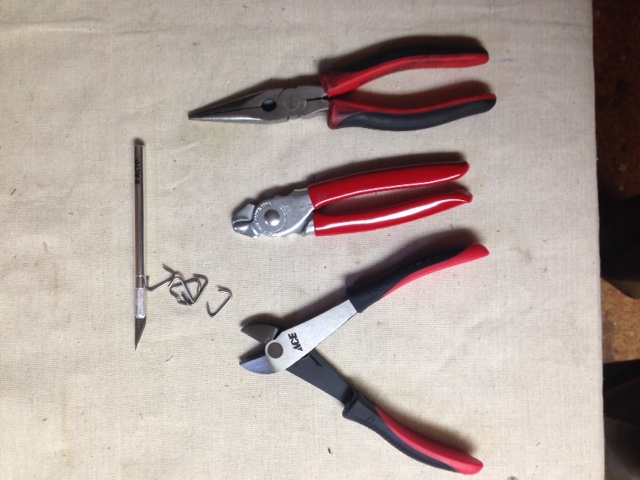
Here's a picture of my main tools. Hog-ring pliers, a strong diagonal cutter to cut the rings, and remove errant rings, needle nose pliers to remove ring and a sharp Exacto knife to cut openings for switches, etc.
Here I have tacked down the flaps over these wires to form a platform to receive the inset. Also a back view to show how the shape is forming.
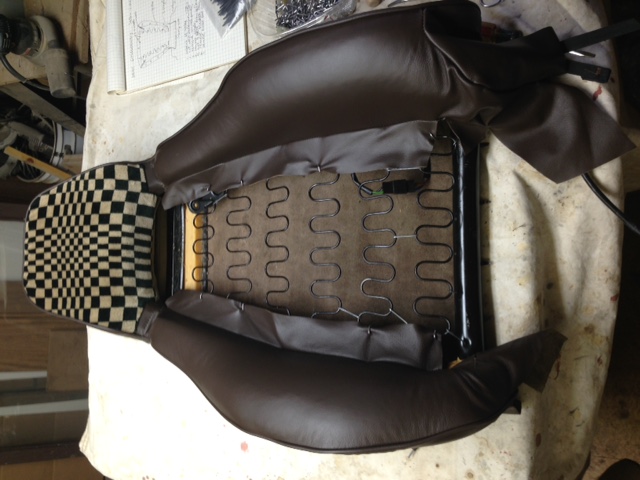
It's looking pretty good, but will get better shape as the bottom edges are pulled and secured. The insert will go in next, when it arrives. The final part is done when the seat is reattached to the hinge of the seat bottom. More to follow.
Thanks for looking,
Dave
It's time for an update. I sent my inserts off to Bob Budd for gluing and installing on my foam cores. That leaves me with the seat back perimeter frame and foam and the cover for it. The seats are basically 3 pieces: the seat bottom frame, the seat back frame and foam, and the seat rail frame. The seat back insert is a separate cushion which is attached to the seat back frame. The upholstery kit comes in three pieces for each seat: the seat back perimeter and back, the seat bottom and the seat back insert.
Today I will cover the seat back perimeter frame and foam.
Here's what I start with, after 20 minutes of steaming and smoothing the rag covering:
Here is the cover:
Here I have turned the headrest portion inside out and I'm ready to invert it over the frame and foam. Some people use a plastic bag over the headrest to allow the cover to slide into place more easily. I did not seem to need it. You do have to work it into place from all sides gradually getting it into place. I even turned the seat upside down and pounded in on my table.
Now I have preliminarily stretched the bolster covers into place and laid four listing wires on the seat which will provide structural attachment for the cover. There is one at the top, which pulls under a bar shared with the insert, one longitudinal wire on the inner side of each bolster, and one at the bottom edge of the back.
Next I will hog-ring the longitudinal wires to the zig-zag springs of the back. I start at the top and work down.
Here's a picture of my main tools. Hog-ring pliers, a strong diagonal cutter to cut the rings, and remove errant rings, needle nose pliers to remove ring and a sharp Exacto knife to cut openings for switches, etc.
Here I have tacked down the flaps over these wires to form a platform to receive the inset. Also a back view to show how the shape is forming.
It's looking pretty good, but will get better shape as the bottom edges are pulled and secured. The insert will go in next, when it arrives. The final part is done when the seat is reattached to the hinge of the seat bottom. More to follow.
Thanks for looking,
Dave
07-15-2015 | 07:33 PM
#26
Chronic Tool Dropper
Lifetime Rennlist
Member
Lifetime Rennlist
Member
Joined: Oct 2001
Posts: 20,506
Likes: 549
From: Bend, Oregon
Thanks for sharing! I've done other seats that seem like took more, um, fiddling to get the covers onjust right. Your pics and description make it look easy. How much time to fit the pieces you show in the pictures? Any tongue-slips?
07-15-2015 | 08:44 PM
#27
Thread Starter
Rennlist Member
Joined: Jun 2005
Posts: 3,261
Likes: 49
From: Park Ridge, IL (near Chicago)
The pictures above represent 1.5 hours. Since it's my second side, I had a pretty good idea of what to do. I will say, that my perfect hog-ring placement percentage is only about 75%. Squeezing the pliers is easy, but often you are stretching, pushing and aligning at just the moment you fire the ring. Sometimes it misses, you cut it out and try again. I'm sure pros almost never miss, but it's not that bad.
Dave
 07-16-2015 | 09:37 AM
#30
Thread Starter
Rennlist Member
Joined: Jun 2005
Posts: 3,261
Likes: 49
From: Park Ridge, IL (near Chicago)
Hi Andy,
It is quite a bit of work, but as a hobby, it's very rewarding. The fact that the outcome is pretty good, is a testimony to the quality of the Classic 9 Leather Shop kit. Imagine going through all the same steps and having a sloppy fit. I am sure one could make adjustments, but with Bob's kit none were needed.
Thanks,
Dave