When you click on links to various merchants on this site and make a purchase, this can result in this site earning a commission. Affiliate programs and affiliations include, but are not limited to, the eBay Partner Network.
I shall be combining the MM job with the oil pan gasket and front shocks. I have not yet absorbed the available information on the best way to do the shocks - it seems the lower arms get loosened anyway, and that is somehow significant.
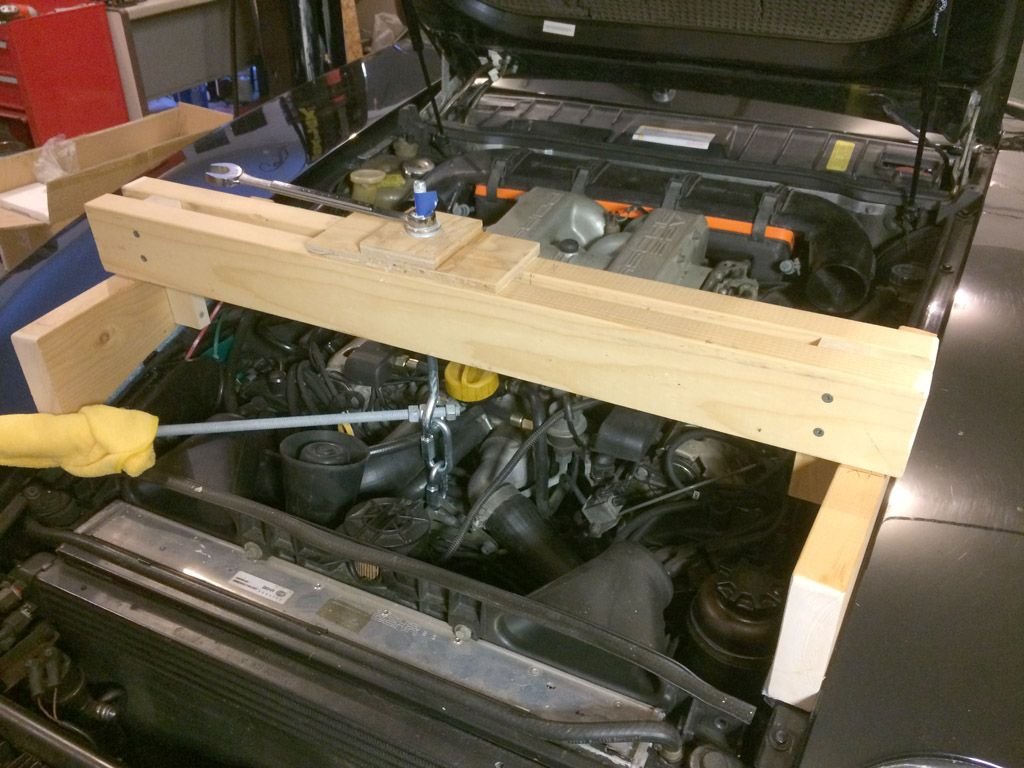
So far, I have installed a MaxJax, purchased Volvo mounts from Roger, done a first pass on the cleaning (less awful than usual, it seems), and made my engine lifting contraption. For that, it was convenient that my new 928 garage is in my old woodworking area. Certainly not otherwise.
Contoured and cushioned support blocks. Eyebolt counter-held by a rod.
Oh, yeah - with a good view of my busted-up chin spoiler, I took it out. The first of many likely extras. The long, cold, dark winter might not last long enough.
I raised the engine a half-inch (easily - I greased the threads), checked the O2 sensor (plenty of room), and started in on dropping the sway bar and loosening the rack plate bolts. I'll study Dwayne's writeup, have second breakfast, play my horn, and try not to worry about the INFAMOUS bolt.
__________________
Does it have the "Do It Yourself" manual transmission, or the superior "Fully Equipped by Porsche" Automatic Transmission? George Layton March 2014
928 Owners are ".....a secret sect of quietly assured Porsche pragmatists who in near anonymity appreciate the prodigious, easy going prowess of the 928."
One thing that doesn't show up in the how-to guides is wedging the gearbox up at the rear crossmember. When you support the engine at the front bracket, it adds a little weight to the trans mounts. More important, any twisting of the engine (rocking side to side) puts a lot of load on the transmi$$ion mounts. A few wood scraps and door-jamb shims (horsefeathers) under the differential will lessen the strain on those rear mounts.
Pull the air cleaner and the lower half of the air cleaner housing, and cover the MAF inlet. The new Volvo mounts will be at least an inch taller than the old Porsche ones collapsed. You'll want the engine up just a bit higher than that so you can maneuver the crossmember around a little on assembly, particularly for the pesky end bracket bolts above the crossmember. Once the crossmember is secured, the engine comes down a bit and the lower nuts on the motor mounts can be tightened from below.
Put a big sheet of sacrificial plastic under the car, and shield the bottom of the lift columns while you do the second and third undercarriage cleanings. And fair warning is given that those handy cheap blue plastic tarps from Harbor Freight are NOT waterproof. They are good at supporting a waterproof plastic layer though, held on with spring clamps from your woodshop or office binder clamps (my preference).
Get or make ~~12"-tall mechanics roller seat for working under the lift if you don't have one of Herman's Deluxe Lazy-Boy Reclining Sleeper Sofa Adjustable-Height Under-Lift Surgeon's Thrones with LED Worklights yet. I have one from Lisle, but like most seats and creepers it has really cheap casters under it. The perfect seat would have bigger PU casters that would roll more easily than those metal angle-wheels, and have room underneath for a slide-out dishpan doubling as a parts & tool tray.
I have sections of indoor-outdoor carpet that go under the work area. Section size is defined by what will fit in the utility washing machine in the garage. So when parts and pieces fall, they are less likely to break, or make a run for that shadowed area over there behind the bloody axes and saws, where they might hide for years...
One thing that doesn't show up in the how-to guides is wedging the gearbox up at the rear crossmember. When you support the engine at the front bracket, it adds a little weight to the trans mounts. More important, any twisting of the engine (rocking side to side) puts a lot of load on the transmi$$ion mounts. A few wood scraps and door-jamb shims (horsefeathers) under the differential will lessen the strain on those rear mounts.
Pull the air cleaner and the lower half of the air cleaner housing, and cover the MAF inlet. The new Volvo mounts will be at least an inch taller than the old Porsche ones collapsed. You'll want the engine up just a bit higher than that so you can maneuver the crossmember around a little on assembly, particularly for the pesky end bracket bolts above the crossmember. Once the crossmember is secured, the engine comes down a bit and the lower nuts on the motor mounts can be tightened from below....
i am just finishing the job.. the shock replacement is ideal at this time as the lower a arms will be off.
i would suggest converting to the stud kit while you are there...
also when disassembling the crossmember, etc, place bolts with the washers on them into a zip lock bag, as they are easy to mix up, and there are different thickness washers for different bolts, and you should not mix them up.
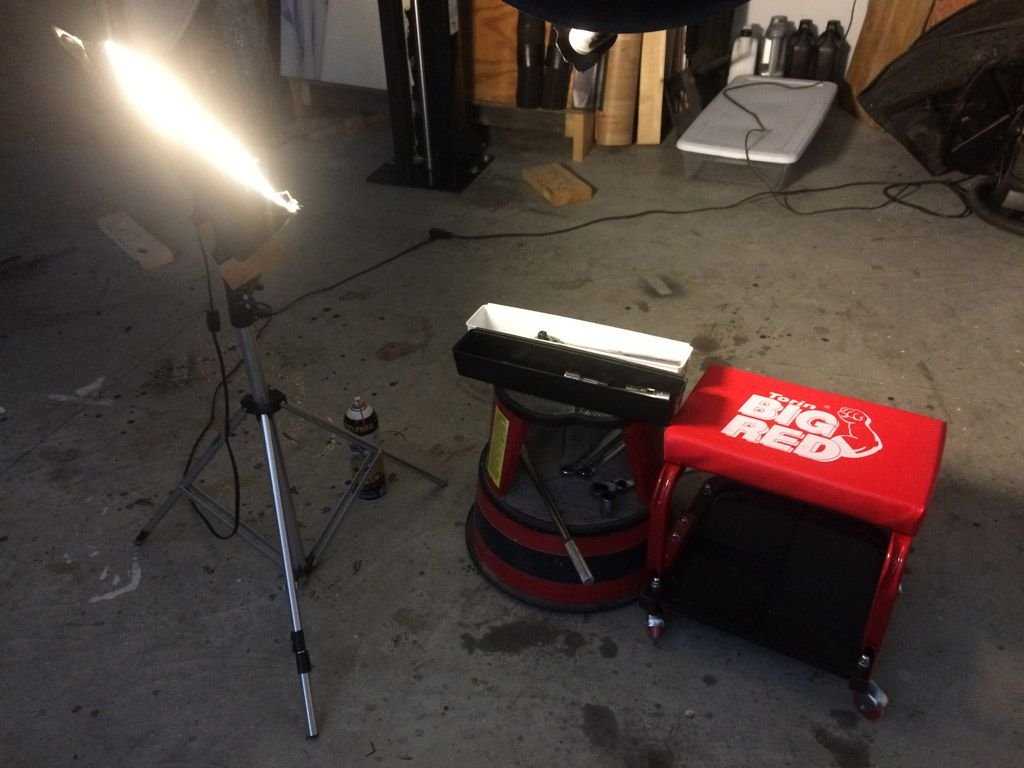
- A cheapo Torin Big Red rolling stool. Requires keeping floor clean due to its lousy wheels.
- Library stool with tools.
- All 13mm items are in white bin; 17mm in black bin; 19mm on bottom. This was a recent epiphany.
- Photographer's light stand, with shop light and crude adapter - I just had to drill a new hole in it to point it upwards. I use light stands for many purposes, sometimes even for photography. Everyone should have a few, along with a 1/4-20 tap.
- In background, a shallow tub for collecting fluids. I supported it on an adjustable-height rolling table for the first pass cleaning - collects all the drips and most of the overspray.
It is important to me to find creative uses for my accumulated junk, since I would otherwise be a simple hoarder.
also when disassembling the crossmember, etc, place bolts with the washers on them into a zip lock bag, as they are easy to mix up, and there are different thickness washers for different bolts, and you should not mix them up.
Different washers - oh my! I'll have my bags and sharpie pen at the ready. Thanks.
I was wandering through Ikea one time, tagalong/cartboy for K's shopping adventure. They had closeout kitchen tool/silverware trays for $0.59 each. I grabbed a handfull. Great for keeping stuff organized on the worktable. Drill a couple tiny holes in each compartment, and they will fit in the dishwasher with the parts safely inside.
Kudos on the light stand. Is that an LED panel on there? I've been brainstorming, trying to come up with an attachment to the lift arm that would let me use cheap spring-arm desktop lamps, with LED flood bulbs in them. No joy even with big magnets, but may come up with something that attaches where the optional MaxJax loop handle would bolt to the arm.
A piece of 3/4" plywood fits up against each column base on the inside, letting you use a 3-ton jackstand under each lift carriage to get lower lift heights safely and easily. For top-of-engine stuff, this brings the car easily to a more comfortable, less back-straining work height.
I have twist-lock receptacles in the ceiling over the lift columns, with some plastic outlet boxes on dangling cords, with magnets glued to the back of the boxes so they stick to the top of the lift column. Keeps cords off the floor. I think Rob has pictures of his similar installation. I thought seriously about adding compressed air plumbing in the same spot in the ceiling above, for an air station on at least one of the columns. Haven't done that yet although it would be pretty easy. I still have to add hinges and soundproofing to the compressor/shop-vac cabinet doors too before any serious projects happen, and I'll work out final air piping then.
I don't have room for a rolling tool cart yet, but will sometime soon.
I finished the MM/OPG job a few weeks ago. Today I finally got the finger pad on the right adjusted properly. Required a long bolt and a big hammer. Worked like a charm. Both sides have exact same clearance. So I guess I "finished" the job today
I did not wedge the trans at the back. I raised the engine very carefully, with no side to side motions and a piece of 2x8 between floor jack and oil pan helping from below while raising the engine with the Harbor Freight engine support bar at the same time.
I didn't remove the airbox. It never made contact with anything, but it was close.
Take a LOT of pictures of how bolts and washers go together before you start taking things apart and putting them in the labeled bags. For example, take pictures of the sway bar links and hardware, paying close attention to how the links are oriented (it matters).
This is a rite of passage. It's also very rewarding.
Well, thank you, Jon. It all began when I went out to the shed to find a 4x4. It was -10F, so when I saw a knot-free length of 2x4, I quickly arrived at a different design, and ran back inside. I was going to paint it, but didn't have the yellow or red paint appropriate for rigging. When I'm done with it, I'll gladly send it to another adventurer.
Jon, when I'm able to visualize the details of your MM adventure, I'll study your thread carefully. Steven, I hope I've got this right - the front engine lift point moved towards the centerline for the S4, so only the one support is necessary (but the transaxle mounts may be at risk).
Those without a lift should consider going without cable and eating Ramen noodles, and save up. I think we should take up a collection and buy a lift for Dwayne.
Here are my fashion accessories - headlamp, single vision eyeglasses (bifocals can break your neck), brown sweatshirt (will look better as a black grease patina develops), and a skullcap to keep my head shiny. It's a more sophisticated look than the guys at the Pottersville Garage, but - snif - they don't work on Porsches.
Classic old garage near me, with huge pile of old catalogs in office - I should contact Guinness book of world records.
. . .snip also when disassembling the crossmember, etc, place bolts with the washers on them into a zip lock bag, as they are easy to mix up, and there are different thickness washers for different bolts, and you should not mix them up.
Someone should make a pictorial view showing what washers go where.
Originally Posted by Captain_Slow
. . .snip For example, take pictures of the sway bar links and hardware, paying close attention to how the links are oriented (it matters).
. ./snip
Yet another good thing to do showing how the sway bar links should look.
I think your lifting point will be fine..
Mine is an s4 but. Had the two lifting points on the opposite sides of the motor... Front passenger rear drivers
LOL..this is going to be an awesome thread...I can feel it
Here are my fashion accessories - headlamp, single vision eyeglasses (bifocals can break your neck), brown sweatshirt (will look better as a black grease patina develops), and a skullcap to keep my head shiny. It's a more sophisticated look than the guys at the Pottersville Garage, but - snif - they don't work on Porsches.
No worries, that old Potter tried and failed to take over George Bailey's Building and Loan, and now you own a 928 and with this forum backing you up -- well, that makes YOU the "richest man in town"


 01-17-2015, 11:36 AM


 George Layton March 2014