

Best fix for loose steering wheel threads?
 11-13-2014 | 01:39 AM
#1
Thread Starter
Pro
Joined: Sep 2014
Posts: 630
Likes: 48
From: Denton, TX
I have loose threads from a couple of the stitches on my leather steering wheel. Oddly on the underside of the top where they don't get touched much.
Should I just use sharp scissors to trim them, get a soldering iron to scorch them, or what? Goal is to prevent any future unraveling.
Brad
Should I just use sharp scissors to trim them, get a soldering iron to scorch them, or what? Goal is to prevent any future unraveling.
Brad
11-13-2014 | 04:18 AM
#2
Rennlist Member
Joined: Aug 2006
Posts: 938
Likes: 35
From: Cromwell, New Zealand
Brad
You could try trimming them to length (or, if possible, tuck them under the seam) and then use some clear nail polish to fix in place and prevent further un-ravelling.
Some of our resident upholsterer's may have other ideas.
Myles
You could try trimming them to length (or, if possible, tuck them under the seam) and then use some clear nail polish to fix in place and prevent further un-ravelling.
Some of our resident upholsterer's may have other ideas.
Myles
11-13-2014 | 08:07 AM
#3
Racer
Joined: Jul 2014
Posts: 258
Likes: 1
From: Dallas, TX
Hey Brad,
Not exactly sure what you're describing, but in similar situations I have turned the steering wheel so that the offending bits are at the bottom (gravitationally speaking) pulled them toward the end (which is to say, tightened the stiches) with needle nose pliers, then dripped super glue into the last stitch hole and tucked in the rest with a tiny screwdriver and dripped super glue over that as well , or snipped off the excess.
Not exactly sure what you're describing, but in similar situations I have turned the steering wheel so that the offending bits are at the bottom (gravitationally speaking) pulled them toward the end (which is to say, tightened the stiches) with needle nose pliers, then dripped super glue into the last stitch hole and tucked in the rest with a tiny screwdriver and dripped super glue over that as well , or snipped off the excess.
11-13-2014 | 10:36 AM
#4
Rennlist Member
Joined: May 2008
Posts: 6,687
Likes: 625
From: 2706 Skyline Drive, Grand Junction CO 81506
Likely any one of the methods you suggest might be successfully used to eliminate the frayed ends of the worn stitches. The best method to prevent further worn stitches is to stop driving the car.
The correct method of dealing with this problem is, however, to remove all of the old stitching and replace it. The first chore in this endeavor will be to find a source for the very heavy thread you ought to be using, and then you will likely end up with about a million year supply all on one $19 spool of it.
Next you need to locate a hooked-end awl of some sort with which to pull all of the original threads out. While you are doing that you need to study the manner in which it, or they, actually, are installed because there are actually two threads involved, or at least, both ends of the same thread. They are both simultaneously cross-laced around the seam. Pull all of it out and clean the leather very well then simply re-lace it. It can probably be done in an evening, and might even be done fairly well in the car. To make the task a little more convenient you can remove the wheel and build yourself a rack of sorts to hang it on in front of you so you don't have to wrestle with it as you work.
Is yours a three- or four-spoke wheel?
What color is the leather. I think I have a spool of very dark blue thread that I bought for this a while back, or it might even be black. If I have the color you need I'll be happy to mail you enough or more than enough to do this job. You will need two pretty large needles also.
11-14-2014 | 11:50 PM
#6

Chronic Tool Dropper
Lifetime Rennlist
Member
Lifetime Rennlist
Member
Joined: Oct 2001
Posts: 20,506
Likes: 549
From: Bend, Oregon
In my limited experience... by the time you are ready to fix the lacing you are ready to replace the lacing. By the time you are ready to replace the lacing you are ready for new leather. The leather was cheap last time I looked. Comes with new lacing. New is easier to replace than old. Old will tear through more easily while lacing. Most folks won't realize how worn the original leather is until they fit new leather.
11-15-2014 | 12:19 AM
#7
Team Owner
Joined: May 2004
Posts: 28,627
Likes: 2,657
From: Philly PA
OldFrat has a very nice early 928 that has just about 12,700 miles on it,
the interior is in otherwise excellent condition,
he infact won the peoples choice and early 928 trophies.
IMHO swapping out the leather on the wheel should not be done as matching it will be tricky, the threads are another story
the interior is in otherwise excellent condition,
he infact won the peoples choice and early 928 trophies.
IMHO swapping out the leather on the wheel should not be done as matching it will be tricky, the threads are another story
Last edited by Mrmerlin; 12-03-2014 at 10:05 PM.
Trending Topics
11-15-2014 | 01:17 PM
#8
Rennlist Member
Joined: May 2008
Posts: 6,687
Likes: 625
From: 2706 Skyline Drive, Grand Junction CO 81506
I found my spool of about 1000 yards of dark blue thread which is shown to be size "207" and I don't know just what that means. I do know that my friend Doug does most of his upholstery sewing with about 92 or 98 thread, so I think this I have is just over twice as heavy. I think it is just about right for hand lacing a steering wheel.
I also re-laced my first S$ steering wheel with some pretty lite venetian blind cord--lite in the sense of venetian blinds, but actually pretty heavy in terms of lacing a steering wheel. It looks pretty good, but it is actually probably too heavy and feels so.
I also found a source of thread on eBay and ordered another spool of black in the 207/210 weight and then also found some a bit heavier in 270/277 weight and ordered that too. These will come in spools of 1000 or 800 yards, so I am going to have plenty to mail to just about anyone who needs enough to do their steering wheel. Any Takers?
12-03-2014 | 08:24 PM
#11
Archive Gatekeeper
Rennlist Member
Rennlist Member
Joined: Sep 2002
Posts: 17,686
Likes: 2,858
From: Irvine, CA
I found my spool of about 1000 yards of dark blue thread which is shown to be size "207" and I don't know just what that means. I think it is just about right for hand lacing a steering wheel.
These will come in spools of 1000 or 800 yards, so I am going to have plenty to mail to just about anyone who needs enough to do their steering wheel. Any Takers?
These will come in spools of 1000 or 800 yards, so I am going to have plenty to mail to just about anyone who needs enough to do their steering wheel. Any Takers?
Any chance I could get some of your dark blue #207 thread? Happy to kick in for cost plus postage. Got some loose threads on this Cobalt wheel...
12-03-2014 | 08:31 PM
#12
Rennlist Member
Joined: May 2008
Posts: 6,687
Likes: 625
From: 2706 Skyline Drive, Grand Junction CO 81506
Sure, Rob. I'll put a few yards in with the console shortly when I send it back. I'll also include a couple of needles that will be helpful for the project.
 12-04-2014 | 09:35 AM
#14
Pro
Joined: Dec 2010
Posts: 700
Likes: 2
From: Palgrave, Ontario, Canada
I have restitched the steering wheel of both my '88 in black and '90 in burgundy. In the case of the latter shown below, I restitched with a burgundy thread (3/4 mm) obtained from the UK on eBay.
The basic stitch is a cross-stitch, which is done with two needles. It was a first for me. This video gives an excellent overview:
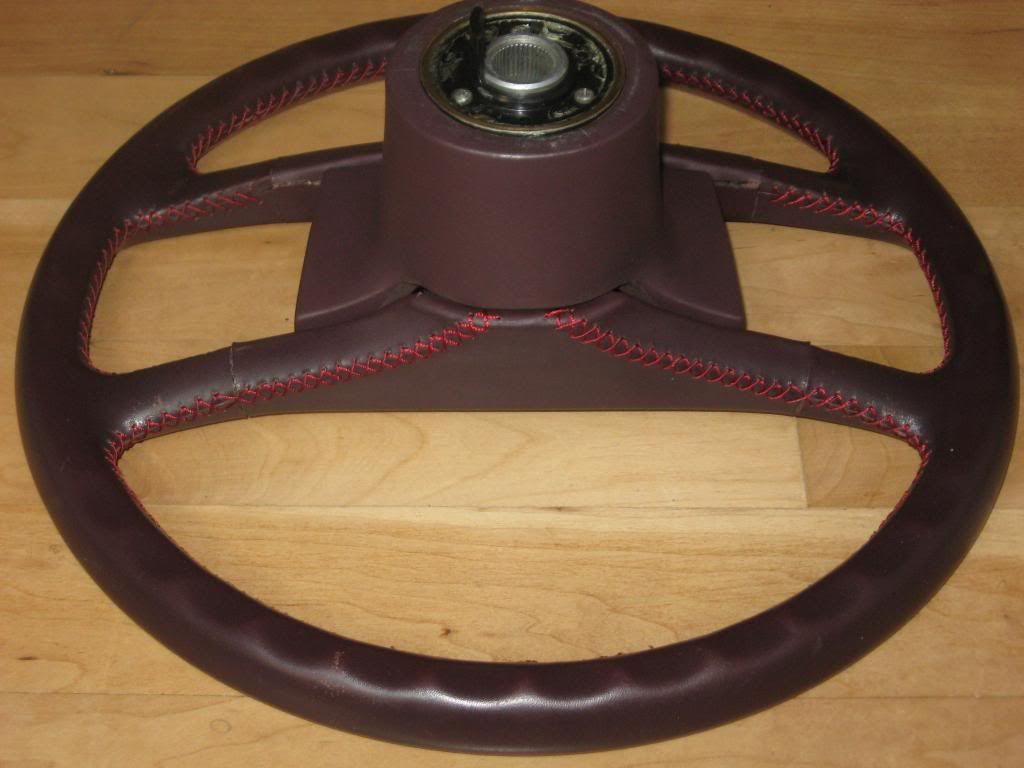
I found it easiest to remove the wheel and hold it between my legs, rotating as I went. There are various ways to do it, but essentially there are at least four separate sections of stitching. The key seemed to be to tension each stitch as you go, then go back every so often to check the tension. It took me about 20 minutes a section, with a break in between as it is hard on finger tips if you are not used to it (I wore mechanics gloves).
12-04-2014 | 10:27 AM
#15
Rennlist Member
Joined: May 2008
Posts: 6,687
Likes: 625
From: 2706 Skyline Drive, Grand Junction CO 81506
Nice post with the video, Martin. A couple of pointers I have is that one doing this project should use blunt needles since pointy ones will tend to pierce the thread when you push the second one through the opposing holes. Since the holes are already there you don't need a pointy needle and blunt ones are available. Also, you need to plan which way you want the stitches to lie--that is left over right or right over left, and then stay with that to the end of that pattern. You might want to switch the pattern over at the top center and bottom center in order to keep the stitching symmetrical.