When you click on links to various merchants on this site and make a purchase, this can result in this site earning a commission. Affiliate programs and affiliations include, but are not limited to, the eBay Partner Network.
A number of manufacturers make the blower unit and some are different and much more expensive.
The best bang for the $ is the unit made by TYC which appears to be a company based in the USA but the parts are probably made in China (Nothing wrong with that).
To fit this unit to the earlier existing LHD blowers takes some minor plastic surgery. Later LHD units (approx. 85 onwards) is very nearly plug and play.
All RHD units that I have seen are similar to the earlier LHD units and will need some minor surgery as per Tazzieman's post #14 above.
I now stock the TYC blower motor/fan assembly for $50.
__________________
Does it have the "Do It Yourself" manual transmission, or the superior "Fully Equipped by Porsche" Automatic Transmission? George Layton March 2014
928 Owners are ".....a secret sect of quietly assured Porsche pragmatists who in near anonymity appreciate the prodigious, easy going prowess of the 928."
I got my Passat blower motor from Roger and here are pics from my install. Sorry that the pictures are clumped at the end of the post. I'll describe what's going on in each.
Obviously, I first got everything apart. The fan came off the shaft with a little pit of back-and-forth and the motor dropped right out after detaching the wires and freeing the one screw.
The new motor has a distinct 'nub' at the top, where the existing motor is flat. I drilled a 1" hole in the top of the housing.
The new motor is a little taller than the old one, so I cleaned up some of the plastic from inside the housing so that the top of the motor would mate up to the top of the depressions in the casing where the retaining screws go in. I also cleared up four raised plastic ribs that helped position the old motor, which was a little thinner than the new one. I also cut away a section of plastic to clear the connector area on the new motor, which protrudes a bit.
Here's the new motor in the housing. You can see the cutout where the electrical connectors are. It's a snug fit!
Here's the top, showing the nub, and with a single retaining screw. The original motor only had one screw. I drilled a second hole, but it was a little off. Rather than pull the motor out again - which is a chore, it's tight! - I put in the one retaining screw and called it a day. It would have probably been fine without a screw at all.
Here's the electrical connections. I just matched the existing connectors to the spades on the new motor and put on some electrical tape. I tucked the wires close to the motor so that they'd clear the fan.
Here's the bottom of the motor with the fan on. The fan was also a snug fit onto the shaft, so I just pressed it into place. I found that if I pushed the fan too far onto the shaft, it scraped against the electrical connectors on the motor (in the fifth picture). When I turned it over, the fan scraped against the lip of the opening in the bottom of the housing. I used my dremel to widen the opening you can see in this pic.
I plugged it in and it works! Nice and smooth and quiet at all speeds, and it throws a lot of air. The last thing I did was spooge some silicon caulk onto the opening where the wiring goes into the housing to keep water out (the rubber grommet was rotten). It goes back in tonight!
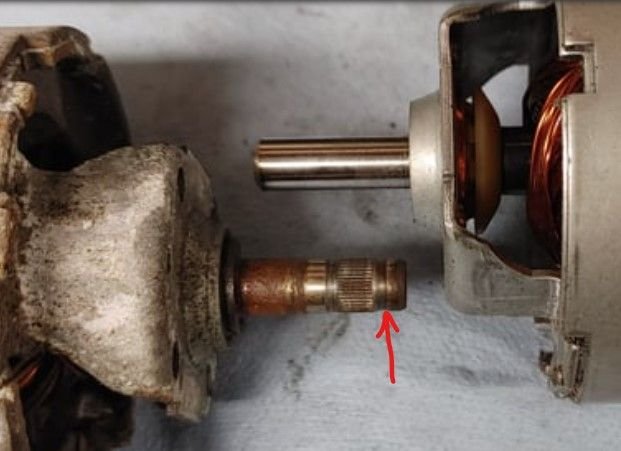
YES, only use the motor itself, pull the VW cage and lose it. I used a small three pronged gear puller to remove the 928 cage, I had to modify the prongs by thinning them to fit between the blades of the 928 fan. I used a small socket to press the 928 cage onto the shaft, uses the same clip, Also the wire plug is different, so that needs to be spliced, and make sure the polarity matches the direction of rotation needed, it is a dc motor, so it is able to spin either direction. I have had a used one from a '91 passat in for over two years now.
It was cheap 'cause I already had the blower from a parts car.
I got my Passat blower motor from Roger and here are pics from my install. Sorry that the pictures are clumped at the end of the post. I'll describe what's going on in each.
Obviously, I first got everything apart. The fan came off the shaft with a little pit of back-and-forth and the motor dropped right out after detaching the wires and freeing the one screw.
The new motor has a distinct 'nub' at the top, where the existing motor is flat. I drilled a 1" hole in the top of the housing.
The new motor is a little taller than the old one, so I cleaned up some of the plastic from inside the housing so that the top of the motor would mate up to the top of the depressions in the casing where the retaining screws go in. I also cleared up four raised plastic ribs that helped position the old motor, which was a little thinner than the new one. I also cut away a section of plastic to clear the connector area on the new motor, which protrudes a bit.
Here's the new motor in the housing. You can see the cutout where the electrical connectors are. It's a snug fit!
Here's the top, showing the nub, and with a single retaining screw. The original motor only had one screw. I drilled a second hole, but it was a little off. Rather than pull the motor out again - which is a chore, it's tight! - I put in the one retaining screw and called it a day. It would have probably been fine without a screw at all.
Here's the electrical connections. I just matched the existing connectors to the spades on the new motor and put on some electrical tape. I tucked the wires close to the motor so that they'd clear the fan.
Here's the bottom of the motor with the fan on. The fan was also a snug fit onto the shaft, so I just pressed it into place. I found that if I pushed the fan too far onto the shaft, it scraped against the electrical connectors on the motor (in the fifth picture). When I turned it over, the fan scraped against the lip of the opening in the bottom of the housing. I used my dremel to widen the opening you can see in this pic.
I plugged it in and it works! Nice and smooth and quiet at all speeds, and it throws a lot of air. The last thing I did was spooge some silicon caulk onto the opening where the wiring goes into the housing to keep water out (the rubber grommet was rotten). It goes back in tonight!

 08-17-2014, 08:50 AM


 George Layton March 2014