

HELP !!! 1985 TB/WP question.
 05-03-2014 | 07:56 PM
#33
Inventor
Rennlist Member
Rennlist Member
Joined: Sep 2002
Posts: 10,175
Likes: 412
They should be installed as per the Black addendum pic, above.
The longer regular bolt goes through the pulley. The flange head goes with the lever.
Both bolts are a little longer than normal so that the shank/body of the bolt goes into the bracket somewhat.
05-03-2014 | 09:34 PM
#37
Thread Starter
Rennlist Member
Joined: Mar 2014
Posts: 914
Likes: 20
From: Gatineau, QC
Hey Ken, is it really important to switch those two bolts ? Would you live with this setup ? I don't want to be lazy, but it's pain in the *** to remove the complete bracket.
Andre
Andre
05-03-2014 | 10:50 PM
#38
Inventor
Rennlist Member
Rennlist Member
Joined: Sep 2002
Posts: 10,175
Likes: 412
IIRC, the smaller 50mm bolt is long enough for the pulley position, but it's not ideal.
Personally, I would switch it. I have become very patient with these types of mistakes, having R&R'ed the timing belt so many times.
Note, always check the distributor bolt holes are roughly centered in the cam gear slots if you are using the notch for alignment.
(They are often at one end or the other because someone strung the belt incorrectly.)
Trivia: those are original late '85 cam gears.
They are rev. 01, but they don't have the smaller holes between the big ones that are on '86-up 01 gears.
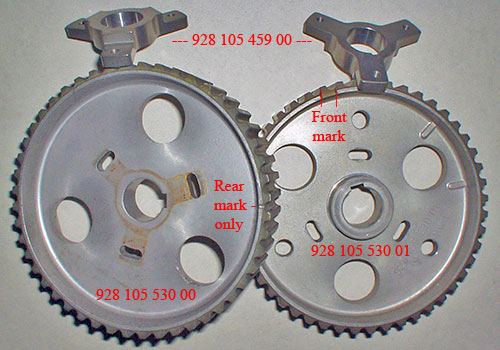
The smaller hole lines up with a drilled boss behind the 5-8 gear at #1 0|T.
Possibly for a assembly line tool to hold the cam while stringing the belt?

Personally, I would switch it. I have become very patient with these types of mistakes, having R&R'ed the timing belt so many times.
Note, always check the distributor bolt holes are roughly centered in the cam gear slots if you are using the notch for alignment.
(They are often at one end or the other because someone strung the belt incorrectly.)
Trivia: those are original late '85 cam gears.
They are rev. 01, but they don't have the smaller holes between the big ones that are on '86-up 01 gears.
The smaller hole lines up with a drilled boss behind the 5-8 gear at #1 0|T.
Possibly for a assembly line tool to hold the cam while stringing the belt?

 05-03-2014 | 11:12 PM
#40
Thread Starter
Rennlist Member
Joined: Mar 2014
Posts: 914
Likes: 20
From: Gatineau, QC
Yes Bertrand I will change it no matter what. If that is the correct way then so be it. And Ken, I was not doubting your expertise, I just wanted to know and understand what the difference was. Thank you again Ken for taking the time to assist me.
05-03-2014 | 11:20 PM
#41
Thread Starter
Rennlist Member
Joined: Mar 2014
Posts: 914
Likes: 20
From: Gatineau, QC
Ken I don't understand why you are showing me pics of the timing gears when we were talking about the porken tensioner. Is it in relation to my pics of the timing gears alignment ? If so are you telling me my gears are not aligned correctly ? Sorry if I sound so stupid but mechanical is not my forte. But I am willing to learn.
05-04-2014 | 12:52 PM
#42
Thread Starter
Rennlist Member
Joined: Mar 2014
Posts: 914
Likes: 20
From: Gatineau, QC
I understand that the brige spacer in the pic below is only for the S4 and up ?
Next thing, since I have an S3 where do I connect the grouding connector shown below ?
Next thing, since I have an S3 where do I connect the grouding connector shown below ?
05-04-2014 | 01:04 PM
#44
Thread Starter
Rennlist Member
Joined: Mar 2014
Posts: 914
Likes: 20
From: Gatineau, QC
Here are the pics of the timing gears at 45 and the black mark aligns with the v notch on the back cover. Belth seems to track correctly, I placed it same location as previous one, which was fine. Also I used a ruler with centimeters since nothing in mm so small, and it looks like the tensioner is at 8 mm (.8cm). I have rotated the engine 5 times in all 10 crank rotations and the belt traction is where it is and the tensioner also. So in my untrained eyes everything looks good. Is it ?
Next step is to reinstall center timing cover with grounded tensioner light, if I can find where to place bracket, on which bolt !
Next step is to reinstall center timing cover with grounded tensioner light, if I can find where to place bracket, on which bolt !
05-04-2014 | 01:30 PM
#45
Inventor
Rennlist Member
Rennlist Member
Joined: Sep 2002
Posts: 10,175
Likes: 412
Looks good!
No worries. Through repetitive head pounding I have found it's much better to take a little more time and do things a few times over, if necessary.
The part about making sure the rotor bolt holes are roughly centered in the cam gear slots was the main information.
The rest was trivia (for you and the folks watching at home).
The 'L' terminal goes on the bolt between the belt, next to the old tensioner pivot boss.
Make sure to plug the hole in the water pump with the 8mm bolt and copper washer.
The 10mm bolt and 'dog bone' are used with a S4 type water pump. You will not use them. Free key chain!
The rest was trivia (for you and the folks watching at home).
Make sure to plug the hole in the water pump with the 8mm bolt and copper washer.
The 10mm bolt and 'dog bone' are used with a S4 type water pump. You will not use them. Free key chain!