
Tow Hook Plug Removal
 01-02-2014, 05:49 PM
#16
Rennlist Member
Hi Martin – You’d be surprised. Even with the factory rubber plug in my GTS, it corroded enough that the tow-eye wouldn’t thread in it. As Rob mentions above, the problem stems from water and crud entering from the rear and because it can't escape through the front, it pools and rusts. My goal was to seal up the rear (and front) so water couldn't enter. So far, so good.
 01-02-2014, 06:42 PM
#17
Rennlist Member

Where is the tow eye tap?
https://rennlist.com/forums/928-foru...ht=tow+eye+tap
Towing eye thread cleaning tap useful ?
https://rennlist.com/forums/928-foru...useful-11.html
01-02-2014, 09:21 PM
#18
Rennlist Member
Rennlist Site Sponsor

Mickey said, "I've considered taking off the front bumper but I only feel comfortable getting under cars on ramps and this car is too low to ride up the ramps I have."
Go to Home Depot or Lowes and buy two 8' 2x8 planks. Either have them cut the boards, or cut them yourself. What you want is to cut 2' off the end of each, with the cut being at 45 degrees to make two 2' ramps and two 6' ramps. Screw the 2' piece on top of the 6' piece, with the square end of the 2' piece hanging over the square end of the 6' piece. Repeat with the other two pieces.
Lay the two ramps that you have made in front of the steel or plastic ramps that you can't get onto, so that you drive onto the 45 degree ends of the 6' pieces, then onto the 45 degree ends of the 2' pieces on top of those, then onto the existing ramps. This should give you enough additional clearance (3") to get on and off your ramps safely. If you need more clearance, get a 12' 2x8 and cut it in half to go under the bottom and give you an additional 1 1/2".
If you want, you can angle the ends of the wooden ramps to match the slope of the existing ramps.
01-02-2014, 09:46 PM
#19
Drifting
Thread Starter
Wally,
However, when you transition onto the steel ramps, they do have a tendency of sliding away. Some kind of wood to hold them in their position helps.
However, when you transition onto the steel ramps, they do have a tendency of sliding away. Some kind of wood to hold them in their position helps.
01-02-2014, 11:08 PM
#21
Rennlist Member
The removal and tapping of the tow eye sounds like a really good reason to have a GTG party. I had to Dremel mine out of the '89 and decided to hell with fooling with the rest of my cars' tow eyes.
I have new meaning in my life again: I'll remove my tow eyes and clean the threads
I have new meaning in my life again: I'll remove my tow eyes and clean the threads
01-03-2014, 12:49 AM
#22
Racer
Join Date: Jan 2003
Location: Clarksville, MD
Posts: 276
Likes: 0
Received 0 Likes
on
0 Posts
Mickey said, "I've considered taking off the front bumper but I only feel comfortable getting under cars on ramps and this car is too low to ride up the ramps I have."
Go to Home Depot or Lowes and buy two 8' 2x8 planks. Either have them cut the boards, or cut them yourself. What you want is to cut 2' off the end of each, with the cut being at 45 degrees to make two 2' ramps and two 6' ramps. Screw the 2' piece on top of the 6' piece, with the square end of the 2' piece hanging over the square end of the 6' piece. Repeat with the other two pieces.
Lay the two ramps that you have made in front of the steel or plastic ramps that you can't get onto, so that you drive onto the 45 degree ends of the 6' pieces, then onto the 45 degree ends of the 2' pieces on top of those, then onto the existing ramps. This should give you enough additional clearance (3") to get on and off your ramps safely. If you need more clearance, get a 12' 2x8 and cut it in half to go under the bottom and give you an additional 1 1/2".
If you want, you can angle the ends of the wooden ramps to match the slope of the existing ramps.
Go to Home Depot or Lowes and buy two 8' 2x8 planks. Either have them cut the boards, or cut them yourself. What you want is to cut 2' off the end of each, with the cut being at 45 degrees to make two 2' ramps and two 6' ramps. Screw the 2' piece on top of the 6' piece, with the square end of the 2' piece hanging over the square end of the 6' piece. Repeat with the other two pieces.
Lay the two ramps that you have made in front of the steel or plastic ramps that you can't get onto, so that you drive onto the 45 degree ends of the 6' pieces, then onto the 45 degree ends of the 2' pieces on top of those, then onto the existing ramps. This should give you enough additional clearance (3") to get on and off your ramps safely. If you need more clearance, get a 12' 2x8 and cut it in half to go under the bottom and give you an additional 1 1/2".
If you want, you can angle the ends of the wooden ramps to match the slope of the existing ramps.
I see that you are from Acworth, GA. I live in MD but traveled to Acworth to by my 928 this past November. I then had an excellent drive back to MD. Ah, the memories.
Thanks
01-03-2014, 02:10 AM
#23
Chronic Tool Dropper
Lifetime Rennlist
Member
Lifetime Rennlist
Member

For the ramps, tie a rope to the ramps, lay the rope so the rear tires roll onto it before the front tire runs up the ramp.
For the broken Allen key in the plug, I used a few 1/8" drill bits in my small air drill, removing aluminum plug around the broken end until the steel bit would come free. Then followed with drilling the plug starting in the center. Progressed to a 9/16" drill bit, just shy of the minor diameter of the threads. Then a file to get the last aluminum out. Craig L loaned me his tap,which then made rather short work of the aluminum remaining in the socket. Patience and a lot of care with the tap made it possible to get all the plug metal out.
I left the front bumper shell in place, but put a few layers of tape on the area around the plug hole to protect from casual tool damage.
My newly-cleaned socket got a thick coating of grease, followed by a plastic plug. The grease should protect the threads from rusting.
01-03-2014, 11:36 AM
#24
Instructor
Join Date: Apr 2013
Location: Austin, TX
Posts: 159
Likes: 0
Received 0 Likes
on
0 Posts
The removal and tapping of the tow eye sounds like a really good reason to have a GTG party. I had to Dremel mine out of the '89 and decided to hell with fooling with the rest of my cars' tow eyes.
I have new meaning in my life again: I'll remove my tow eyes and clean the threads
I have new meaning in my life again: I'll remove my tow eyes and clean the threads
01-03-2014, 11:50 AM
#25
Rennlist Member
Rennlist Site Sponsor
"However, when you transition onto the steel ramps, they do have a tendency of sliding away. Some kind of wood to hold them in their position helps."
That can be a problem, especially on slick concrete. The rope would work - Another possibility is to attach a canvas (or similar) strip to the steel ramps so that the front wheels are on the canvas before they hit the ramps.
I think that I will start applying penetrant to the back of my tow plug so that I can pull it this summer.
01-03-2014, 12:12 PM
#26
Drifting
Thread Starter
I think that I will start applying penetrant to the back of my tow plug so that I can pull it this summer
That has been the original question.
How do you get to the rear of the tow plug opening to apply penetrant?
TIA
01-03-2014, 02:09 PM
#27
Chronic Tool Dropper
Lifetime Rennlist
Member
Lifetime Rennlist
Member
The penetratnt spray can has a plastic nozzle extension. Form that into a U, and put the business end into the socket from the rear. The socket is a piece of steel tubing, open at the rear and welded to the front frame. You can use a small inspection mirror, looking through the grill slats, to see the opening in the back. If the nozzle tube from the can won't get there, a bit of aquarium tubing might help you. One end through the rear of the socket, the other end out forward and up. Fill it with penetrant.
I use the home-brew acetone-and-atf penetrant, in a small pump oiler. 3/16" ID clear vinyl hose from Home Depot slides snugly over the pump oiler I use. A 10" curved-end hemostat is handy for holding the long end of the hose against the opening at the rear of the socket. The other hand pumps the fluid in. ***The acetone will damage paint! Use protection! ***
When I drilled mine out, I didn't know until I was done that the socket was open at the rear. That explained why mine was corroded I guess. So mine came out rather dry. Now that we know that there's rear access for penetrant, others have the opportunity to help their causes.
The Allen key I broke off in there was a Snap-On, but not considered an 'impact driver safe' IMHO even though it was part of the Snap-On impact driver kit. Doing it again, I would spring for a real impact-rated driver to reduce the risk of breaking the tool off in the plug.
Others have experienced the broken-bit thrill. I think Bill Ball reported that he was able to get the broken bit out with a diamond burr on a Dremel. I compared the diameter of the tow eye threads to the diameter of the broken key, and decided that drilling the aluminum around the key with the 1/8" bit would be a lot faster and easier than using the diamond bit in the Dremel to grind the Allen key out.
In hindsight (lots of that for me in this exercise...) I should have run the camera while doing the extraction ad recovery.
01-03-2014, 02:31 PM
#28
Rennlist Member
This thread has given me the "inspiration" I needed to do this. Thank you.
I wasn't as skillful as most here and don't have much left out of the plug.
I started with the allen and it did not work. I used then a bolt extractor (reverse thread) but the aluminum is so soft and it was so stuck that the extractor would remove the material as it bit but not break the plug loose. Finally I used a 9/16" drill (a bit smaller than Dr Bob recommended) and removed the rest of it.
If I were to do it again, I would certainly try to spray from the back, but I could not find a way either. I would not use an extractor because the material is destroyed as it bites.
Now I will need to run the tap. Craig, I will send a PM , if you don't mind, so I will get in line.
Thanks
Last edited by westija; 01-03-2014 at 02:44 PM. Reason: corrected name
01-03-2014, 02:51 PM
#29
Pro
Join Date: Dec 2010
Location: Palgrave, Ontario, Canada
Posts: 700
Likes: 0
Received 2 Likes
on
2 Posts
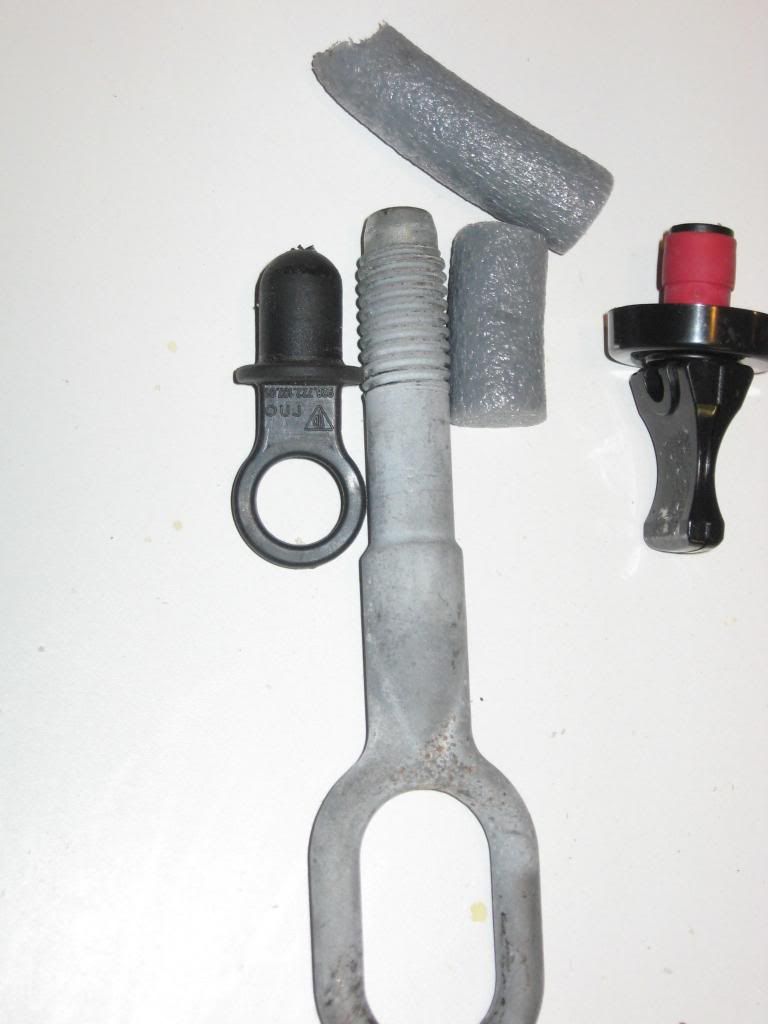
As NoVector noted, the rubber plug is not long enough to fully fill the threaded socket, so he doubled up. Even the original metal one isn't long enough as one can see by the corrosion in the socket in the OP.
I experimented with alternatives using materials on hand. Foam rope works well and can either supplement or fully replace an official plug. The expandable wine bottle cap almost worked. I have 'few' of those...
I experimented with alternatives using materials on hand. Foam rope works well and can either supplement or fully replace an official plug. The expandable wine bottle cap almost worked. I have 'few' of those...
 01-03-2014, 03:02 PM
#30
Race Car
Dan
'91 928GT S/C
 475hp/460lb.ft