

Fender cracks
 09-07-2013, 06:17 PM
#16
Archive Gatekeeper
Rennlist Member
Rennlist Member
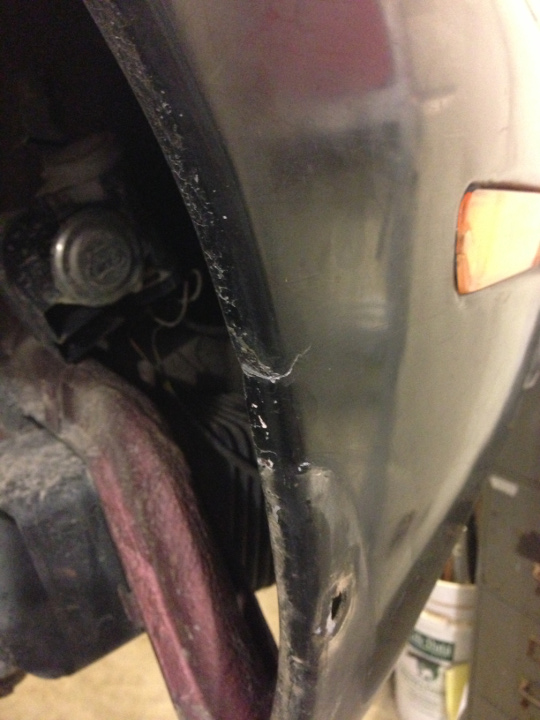
Is it possible that the factory fender rolling starting with the '89 GT is somehow protective against cracking, by doubling over the aluminum sheet?


 09-07-2013, 08:33 PM
#18
Rennlist Member

Martin, I had that same crack on my passenger side fender on my 81, I destroyed the fender in an accident and replaced it. It did have a piece of metal riveted behind the crack that looked like it was put there before the crack originally started. Does anyone else have that extra piece of metal behind their fender?
09-07-2013, 10:17 PM
#20
Drifting
My guess:
Look at the wheel housing pic and how the gussets end at the strut brace mounting locations. Lot of side to side force here.
Cracks happen basically below this area. When cornering your car, there is flex here. All cars with struts flex this way under hard cornering loads.
Torsion bar suspended front end 911s do not obviously, and they don't really need strut braces.
The bottom forward fender attachment point that holds the fender as well as the rear vertical attachment near fire wall do not move as the upper fender does under cornering.
This pushes the forward upper section of fender outward slightly, the rest stays put, causing metal fatigue over time.
If you're not hearing tire rub, what else could it be.
Last edited by The Fixer; 09-08-2013 at 03:23 AM.
09-07-2013, 10:56 PM
#21
Rennlist Member
I think that's probably the right analysis. It's not a problem you might see with steel fenders, but the 928's alloy fender could be more prone to this. Interesting to see all this input- definitely an age thing. I'm getting to know about that. No cracks, please!
09-07-2013, 11:08 PM
#22
Vegas, Baby!
Rennlist Member
Rennlist Member


Thread Starter
Rob, I've worked with sheet metal for over 50 years. any time you fold the leading edge of metal you'll make that edge stiffer, and stronger.
I guess the factory rolled the fender edge for clearance, on the GT only, but rolling the inner edge of the lip in the wheelhouse opening would have doubled the stiffness of the metal, and made it less prone to flexing, causing cracks.
I'm going to lay a thin coat of epoxy behind the crack, to keep from running, after I pinhole the crack. I guess my car isn't the only one that's had this happen.
09-08-2013, 12:08 PM
#24
Drifting
Martin, this is for others, I know you're tuned in.
Be sure to remove all undersealant (i know, obviously) rough up your alum. fender behind crack with 80 grt. and use Laquer to clean (and inch minimum in all directions beyond crack and the flange or lip too).
Then pilfer and aluminum cookie sheet from the Mistress of the house and cut a piece of it to use as a reinforcement backing plate and epoxy it behind the crack. Be sure to de-grease this cooking sheet and rough up as well)
Then return the unused part of sheet to the kitchen with a 2"x 2" hole cut out of it and swear you know nothing about it.
Use Loctite 5 Minute Marine epoxy (good for wet locations).
Be sure to bend the reinforcing backing aluminum to mate perfectly into the lip for best repair.
09-08-2013, 01:29 PM
#26
Rennlist Member
Martin, this is for others, I know you're tuned in.
Be sure to remove all undersealant (i know, obviously) rough up your alum. fender behind crack with 80 grt. and use Laquer to clean (and inch minimum in all directions beyond crack and the flange or lip too).
Then pilfer and aluminum cookie sheet from the Mistress of the house and cut a piece of it to use as a reinforcement backing plate and epoxy it behind the crack. Be sure to de-grease this cooking sheet and rough up as well)
Then return the unused part of sheet to the kitchen with a 2"x 2" hole cut out of it and swear you know nothing about it.
Use Loctite 5 Minute Marine epoxy (good for wet locations).
Be sure to bend the reinforcing backing aluminum to mate perfectly into the lip for best repair.
Be sure to remove all undersealant (i know, obviously) rough up your alum. fender behind crack with 80 grt. and use Laquer to clean (and inch minimum in all directions beyond crack and the flange or lip too).
Then pilfer and aluminum cookie sheet from the Mistress of the house and cut a piece of it to use as a reinforcement backing plate and epoxy it behind the crack. Be sure to de-grease this cooking sheet and rough up as well)
Then return the unused part of sheet to the kitchen with a 2"x 2" hole cut out of it and swear you know nothing about it.
Use Loctite 5 Minute Marine epoxy (good for wet locations).
Be sure to bend the reinforcing backing aluminum to mate perfectly into the lip for best repair.
And your project looks fantastic! I've been watching without making comments lately but that blue is extremely interesting, and obviously hard to photograph - my mind's eye sees it though.
09-08-2013, 04:01 PM
#27
Nordschleife Master
...Then pilfer and aluminum cookie sheet from the Mistress of the house and cut a piece of it to use as a reinforcement backing plate and epoxy it behind the crack. Be sure to de-grease this cooking sheet and rough up as well)
Then return the unused part of sheet to the kitchen with a 2"x 2" hole cut out of it and swear you know nothing about it...