
928 battery terminal
 06-16-2013, 10:48 AM
#1
Rennlist Member
Thread Starter
Hi Gang,
I have a 1982 928.
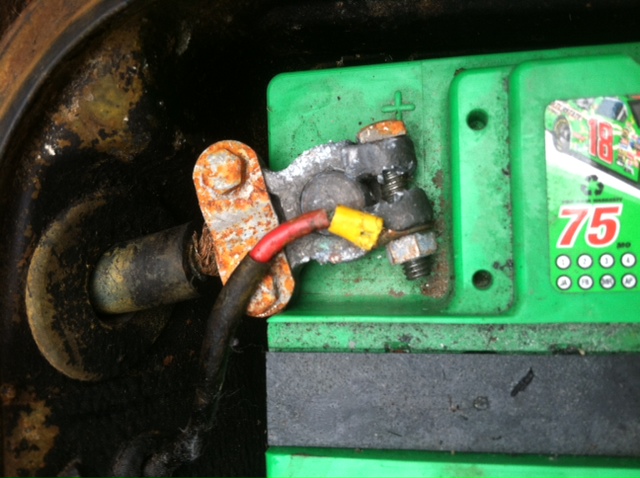
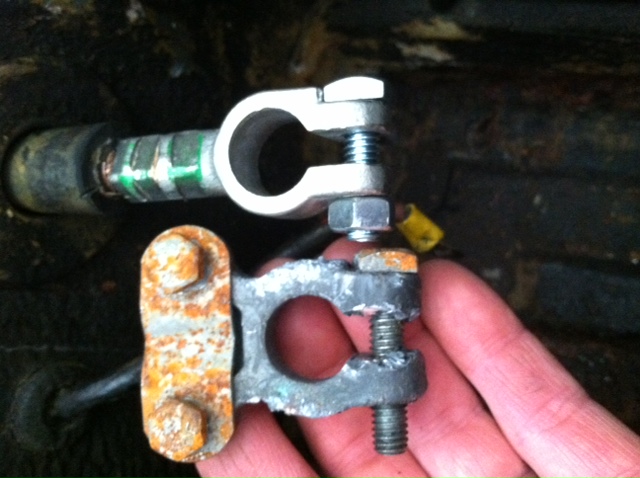
Attached: photo of my Positive battery terminal end. As you can see, it is not pretty. It has conductor strands which have been cut during the stripping of the cable's insulation.
My primary question that I need help with is: What gauge is my positive cable?
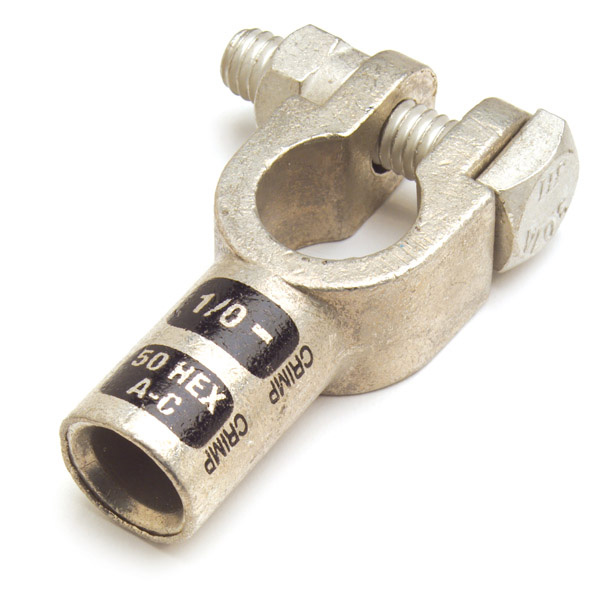
so I can get one of these cool cable ends pictured below.
Yes, this cable end requires the use of a hydraulic crimping tool owned by most electricians.
As there are different cable gauges for different years:
My second question is:
Can you folks help me list the various cable sizes by year so the next thread search has all the info a 928 owner would need?
I have a 1982 928.
Attached: photo of my Positive battery terminal end. As you can see, it is not pretty. It has conductor strands which have been cut during the stripping of the cable's insulation.
My primary question that I need help with is: What gauge is my positive cable?
so I can get one of these cool cable ends pictured below.
Yes, this cable end requires the use of a hydraulic crimping tool owned by most electricians.
As there are different cable gauges for different years:
My second question is:
Can you folks help me list the various cable sizes by year so the next thread search has all the info a 928 owner would need?
 06-16-2013, 12:23 PM
#2
Rennlist Member
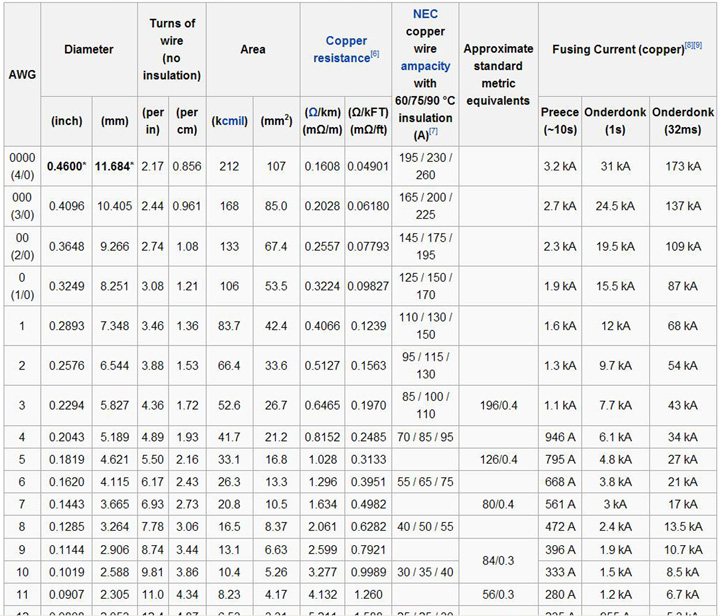
It is 35mm which is between 1 and 2 AWG. 1 = 42.4 and 2 = 33.6 so for all practical purposes you could call it 2 AWG. All years are the same. The cable below is 1 AWG high flex which requires a terminal for 1/0.

Last edited by depami; 06-16-2013 at 03:01 PM.
06-16-2013, 10:09 PM
#4
Rennlist Member
Join Date: May 2011
Location: Edina, MN
Posts: 130
Likes: 0
Received 0 Likes
on
0 Posts
The battery cable in my 82 was totally falling apart at the other (starter) end. It actually came apart on me.
So, I decided to rebuild it completely. I am doing all the wire using SGX insulation which is XLPE (cross-linked polyethylene) and rated for 125 C. I could not find reasonable lengths of 1 AWG with SGX insulation, but I did find a piece of 1/0 gauge SGX on e-bay, 25 feet for $27.
1/0 gauge and 1 gauge are NOT same thing. 1/0 is quite a bit larger. I found, however, that the piece I got fit into the plastic holders for the original cable. It is a bit tight, but it does fit.
I used the fusion solder connectors for the 1/0 cable instead of the crimp versions. Not sure if they are right, but the claim is up to 70% stronger than crimp. And it was easy to put on with a propane torch.
Also used No Ox Id grease for all connections. It is really impressive stuff.
Instead of the rubber pieces on the cable to protect against heat, I used Insultherm which is fiberglass with an acrylic coating rated to 640C.
No affiliation to any mentioned products.
06-17-2013, 10:31 PM
#6
Rennlist Member
Thread Starter
[QUOTE=depami;10542161]It is 35mm which is between 1 and 2 AWG. 1 = 42.4 and 2 = 33.6 so for all practical purposes you could call it 2 AWG. All years are the same. The cable below is 1 AWG high flex which requires a terminal for 1/0.
Denny thanks for the helpful information.
I would like to clarify though:
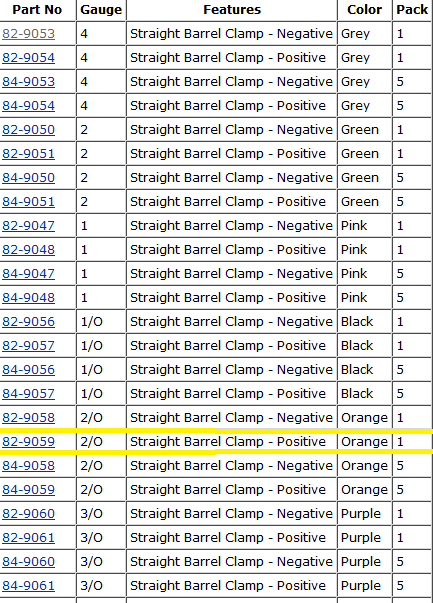
The chart of available crimp type terminal ends are listed by size ex. 2 gauge and 2/0 as if these were different.
Is this because 2 gauge is AWG sizing and 2/0 is AWT sizing ?????
Everyone else Thanks for your input as well.
Dave
Denny thanks for the helpful information.
I would like to clarify though:
The chart of available crimp type terminal ends are listed by size ex. 2 gauge and 2/0 as if these were different.
Is this because 2 gauge is AWG sizing and 2/0 is AWT sizing ?????
Everyone else Thanks for your input as well.
Dave
06-17-2013, 10:54 PM
#7
Rennlist Member
Thread Starter
Denny thanks for the helpful information.
I would like to clarify though:
The chart of available crimp type terminal ends are listed by size ex. 2 gauge and 2/0 as if these were different.
Is this because 2 gauge is AWG sizing and 2/0 is AWT sizing ?????
Here's the mfgr's chart of terminal ends I put a yellow box around the one I think is right.
Trending Topics
06-18-2013, 01:11 AM
#9
Rennlist Member
They are both AWG sizes but 2/0 is much larger than 2 (see chart below).
Amps isn�t what causes solder to melt, heat is. 200 amps on 2/0 won�t generate enough heat to melt solder but 200 amps on a 20 AWG will melt solder and cause the wire to fuse. http://en.wikipedia.org/wiki/American_wire_gauge
Solder is not to be relied upon for mechanical connection. Crimp and solder would be a good electrical connection and deter corrosion but the wire strands may break at the solder under flexing or vibration. The best would be simply a �proper� crimp. A �proper� crimp provides a �gas tight� connection at the contact points which will prevent corrosion to the conducting area. Corrosion will eventually attack the wires to the point of failure but that will likely be years down the road.
 06-18-2013, 01:09 PM
#10
Rennlist Member
Rennlist Site Sponsor

And just for clarity: The wire sizes given in the 928 wiring diagrams are in cross-section area in square mm. Find the wire size on the wiring diagram, and then find the closest number in the column under area (mm2). (No, I'm not going to look up how to do superscripts in this message system!) You can then find the closest AWG (American Wire Gage) size, which is what you will commonly find with USA vendors.
You can also find the Ampacity, which is a very useful number to have.
You can also find the Ampacity, which is a very useful number to have.
06-18-2013, 01:32 PM
#11
Nordschleife Master
Join Date: Dec 2004
Location: Guelph, Ontario, Canada
Posts: 6,164
Likes: 0
Received 5 Likes
on
5 Posts
1/0 gauge and 1 gauge are NOT same thing. 1/0 is quite a bit larger. I found, however, that the piece I got fit into the plastic holders for the original cable. It is a bit tight, but it does fit.
I used the fusion solder connectors for the 1/0 cable instead of the crimp versions. Not sure if they are right, but the claim is up to 70% stronger than crimp. And it was easy to put on with a propane torch.
I used the fusion solder connectors for the 1/0 cable instead of the crimp versions. Not sure if they are right, but the claim is up to 70% stronger than crimp. And it was easy to put on with a propane torch.
I solder all my large connections. Never had a problem. Crimp is just easier (no heat) not better (or worse for that matter).
07-06-2013, 09:06 AM
#12
Rennlist Member
Thread Starter
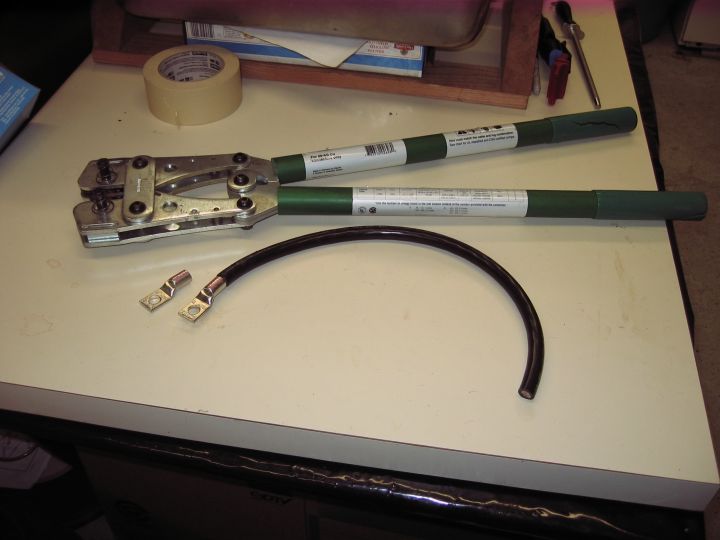
OKaaaaaaay, I finally got the new terminal on.
I would have to say, that it requires 2 people to do, because the cable had little or no slack, and I chose to crimp it in the battery box.
I didn't buy the terminal high lighted on page 7
The 2 guage terminal suggested by forum members was perfect.
Conditions:
When the crimper is opened up to accept the terminal it is too big to fit into the car and battery area.
The terminal fit so tightly onto the stripped copper conductor, that it had to be
done with the crimper out of the way.
I had to remove one of the crimper handles to get it into the battery box, then over the new terminal.
My buddy and I worked together to crimp the terminal on in 3 places, (one time we kind of missed), I think 2 crimps would suffice.
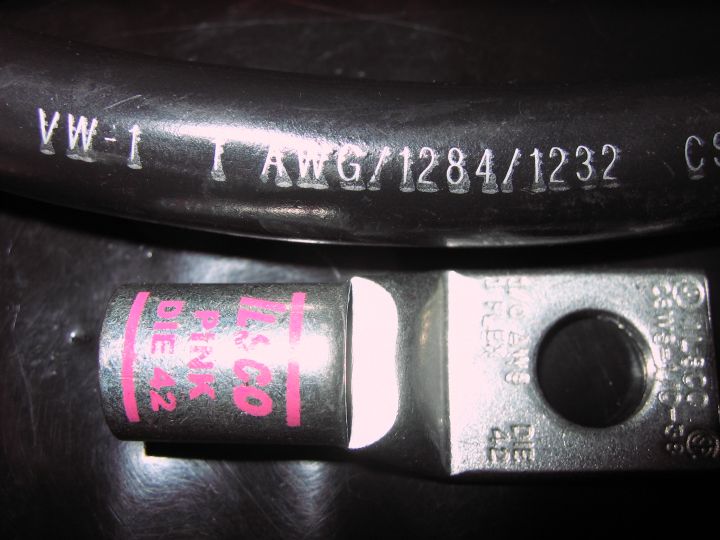
The terminal was coded "green" which matches to the crimper dye for that terminal.
I will have much better voltage without that repair terminal.
Now it's time to clean up the battery box.
Over all this was a success, but: If I had it to do over I would have bought a right angle terminal, so that a socket could get on the battery terminal nut.
If this thread was any help to you, please leave a note.
I would have to say, that it requires 2 people to do, because the cable had little or no slack, and I chose to crimp it in the battery box.
I didn't buy the terminal high lighted on page 7
The 2 guage terminal suggested by forum members was perfect.
Conditions:
When the crimper is opened up to accept the terminal it is too big to fit into the car and battery area.
The terminal fit so tightly onto the stripped copper conductor, that it had to be
done with the crimper out of the way.
I had to remove one of the crimper handles to get it into the battery box, then over the new terminal.
My buddy and I worked together to crimp the terminal on in 3 places, (one time we kind of missed), I think 2 crimps would suffice.
The terminal was coded "green" which matches to the crimper dye for that terminal.
I will have much better voltage without that repair terminal.
Now it's time to clean up the battery box.
Over all this was a success, but: If I had it to do over I would have bought a right angle terminal, so that a socket could get on the battery terminal nut.
If this thread was any help to you, please leave a note.
07-06-2013, 08:36 PM
#14
Chronic Tool Dropper
Lifetime Rennlist
Member
Lifetime Rennlist
Member

I recommend that folks who try this in the future take a moment and a dollar, and invest in a short section of adhedive-lined shrink tubing to seal the area between the end of the insulation and the new terminal. The battery well fills with corrosive vapors when the battery is charging (unless you've gone through the trouble of installng a vent hose from the vapor space in the top of the battery case...), and the fumes will make short work of that exposed copper. The old cable was suffering from this, as indicated by the green corrosion on the repair terminal.
Autoslave, there are silicone fillers and repair tape that will take you part of that way without redoing all your work. At the same time, the Group 48 battery in my car came with a connection point for a vent hose. I used some handy 1/4" OD black plastic drip irrigation tubing to connect to the battery, other end through the positive-cable grommet and down to the bottom of the battery box just aft of the rear of the differential cover. Some earlier cars came with Group 49 batteries I think, and I don't remember if that spec includes a vent connection.
If anyone in the L.A area needs a similar repair, I have a cute little handheld hydraulic cable crimper that does a pretty nice jon on these connectors, without having to wrestle with the long handles on the mechanical crimper.