
DIY Nylon Core Fuel Lines
 11-11-2012, 11:58 AM
#1
Rennlist Member
Thread Starter
Given the amount of controversy over materials for replacement fuel lines, I decided to try to make my own that used nylon inside a rubber hose like the OE hose that I understand to be NLA. I got it to work using a home-made tool and made lines for my 86.5. They have been in the car for a few weeks now and seem to work fine. I think they are pretty bulletproof, but I am not an engineer and the design has not been tested. I am sure others will have their own views.
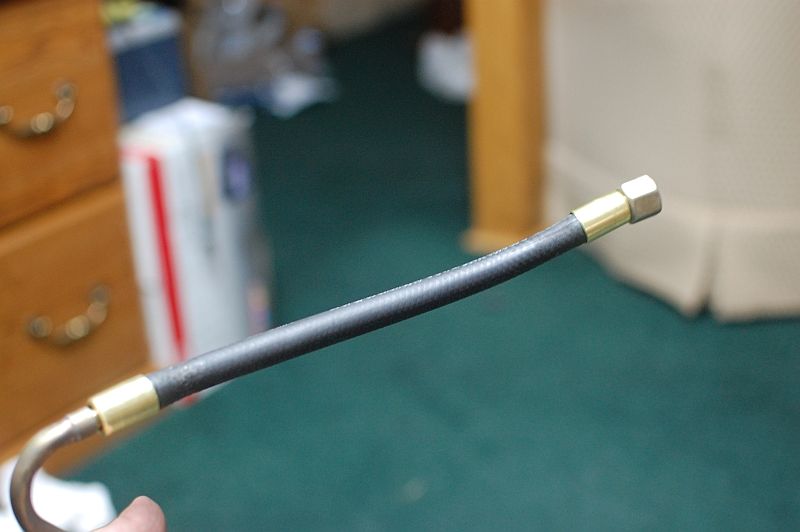
Here is what ended up with:
This leads to the mandatory disclaimer. If you make these lines, you are strictly on your own. Absolutely no representations are made, or can be made, about the integrity of the end product. Cooper-Standard did not make the nylon hose to live inside a rubber hose. Gates did not make the rubber hose to be compatible with the nylon hose I stuffed into it. Compatibility of either with lubricants used in assembly is another unknown. The assembled fuel lines have not been pressure tested, undergone durability testing or otherwise evaluated as replacements or the OE lines. USE AT YOUR OWN RISK.
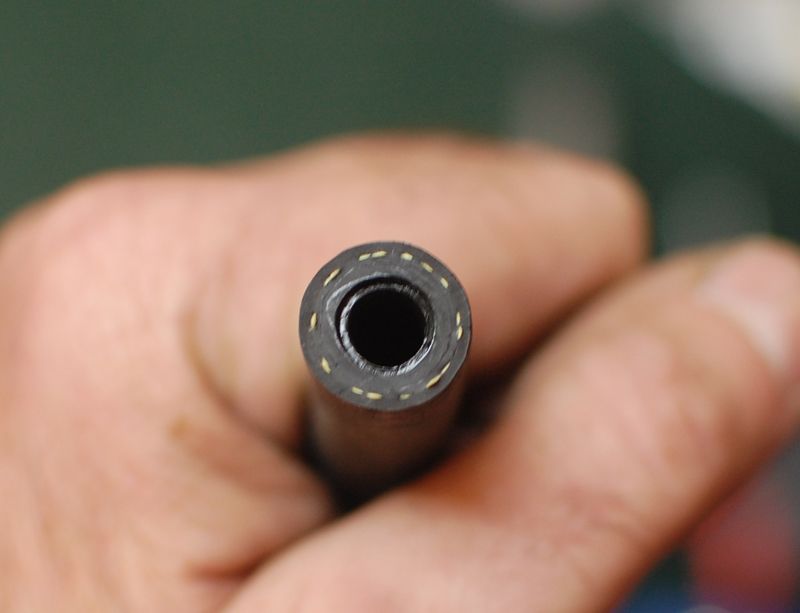
That being said, this is Cooper-Standard nylon fuel injection hose inside Gates Barricade fuel injection hose. Either hose by itself is resistant to contemporary fuels and rated for the pressures in our systems. As is the case with the original hose, the nylon inner protects the Gates outer hose from the sharp edges of the barbs used on the Porsche fittings. Because the I.D. of the nylon hose is smaller than the OE hose, those barbs are in there to stay.
Materials List
Watts 5/16" x 1/4" Brass Barb - Model #: A-201B
3/16 threaded rod or 3/16 copper or brass plated rod � minimum 18� long
5/16 Gates Barricade Fuel Injection Hose (10 Ft. Length is Part #27348)
5/16 Dorman Nylon Fuel Line (10 Ft. Length is Part # 800-074)
(If you can find it � original hose is Cohline Type 3024 Polyamide Hose with rubber jacket [Polyamid-Rohr mit Obergummi] � Cohline Part #3024.0800. A potential source is http://www.newcoproducts.com/.)
If you cut the original �collars� or ferrules off your existing OE lines (which you do not have to do if you have a heat gun) you will need either Welding Hose Ferrule, .625" ID, 1/2" Length (McMaster-Carr Part #79205A668) or Welding Hose Ferrule, .625" ID, 1" Length (McMaster-Carr Part #79205A669). Neither is a match for the original, which is Cohline part #8001.1551 and is 15 mm long. The 1� long brass ferrule from McMaster can be cut down to this length. The originals are zinc chromate plated steel and the McMaster are brass, so you will not get an OE look with the latter unless you get them plated.
Penetrating oil or similar lubricant
Work gloves
Required Tools
Hacksaw or Dremel with cut-off wheel
Vice Grips or bench vice
Tubing Cutter
Needle Nose Pliers
Bar Clamp (one will do but two is better)
Tube Flaring tool(s) and/or scrap hardwood 1 x 3 or 1 x 4
drill bits
Heat Gun (if you wish to re-use the original sleeves)
Propane torch or BFH (Big F-ing Hammer)
A pair of work gloves
Procedure
There are two big tricks to making these lines. The first is getting the nylon FI hose inside the rubber FI hose. The second is getting the barbed fittings pushed all the way into the hose.
The first trick is accomplished by making a tool that allows you to hold the nylon core stationary while pulling the rubber hose over it. The tool is simply a 3/16 inch rod with the cut off end of a brass 5/16 hose barb fixed on the end. Because my GF is fabulous and knows intrinsically valuable scrap when she sees it, I had some copper plated steel rods in my shop. I took a 5/16 brass barb plumbing fitting, dremeled the barb section off and soldered it to the rod. You could achieve the same result by getting a 3/16 threaded rod and beating the hell out of one end with your BFH so the barb section cannot come off the rod.
The tool works like this - the nylon inner is pushed on the barbed end of the rod. A length of the rubber outer hose a little longer than the section you are replacing is threaded over the rod. Fix the non-barbed end of the in a vise or clamp some vice grips on that end perpendicular to the rod. Lube up the outside of the nylon and the inside of the rubber hose, put on your work gloves, put a foot on the vice grips if not using a vice, grab the leading edge of the rubber hose and PULL. The rubber outer then slides over the barbed section and over the nylon line.
The tool:

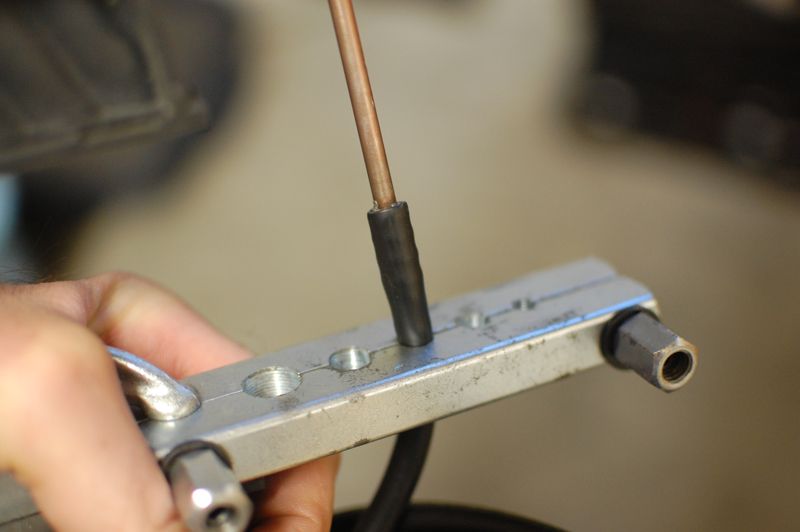
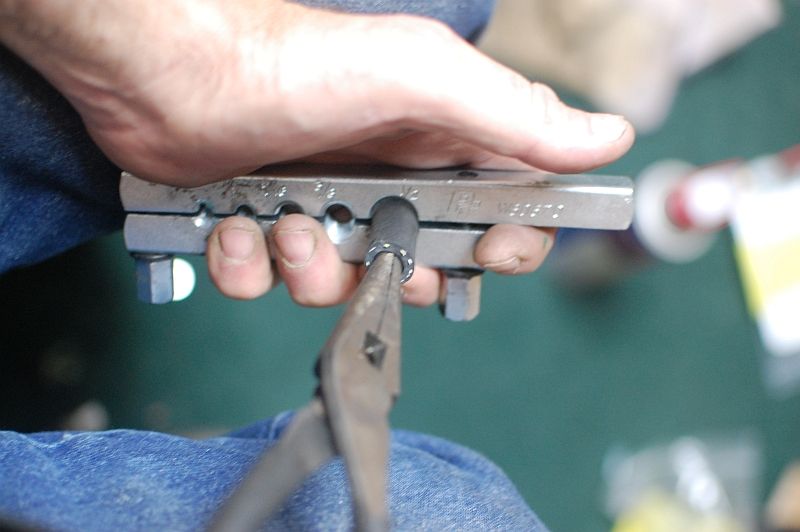
Getting the nylon over the barbed end of the tool and, later, on to your fuel fittings, requires a bar clamp, something to hold the fittings, something to hold the tube, and a few c-clamps. If you clamp your tube/fitting holders to the inner face of the bar clamp and properly align the fitting on one face with the tube end clamped to the other face, you can force the barb all the way into the tube.
These pictures explain it better than I can:

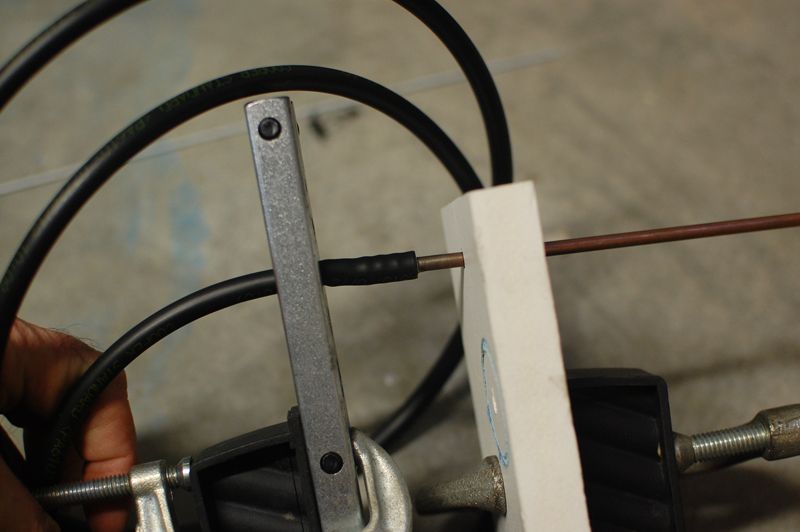
Once the nylon line is on the end of your tool, you pull the appropriate length of rubber hose over the nylon inner hose. Use a lubricant and some work gloves. I found that Gates Hose would make your hands pretty black with one or two pulls. The only tricky part of this process is to be mindful that the rubber outer needs a lot less force to move when the lower end finally snakes over the barbed end of the rod. You will waste nylon hose if you end up pulling the rubber outer too far. However, you DO want to pull past any witness marks left on the nylon hose left by the clamp used in forcing the nylon inner onto the barbed end of the rod.
Here is what a �pull� looks like:
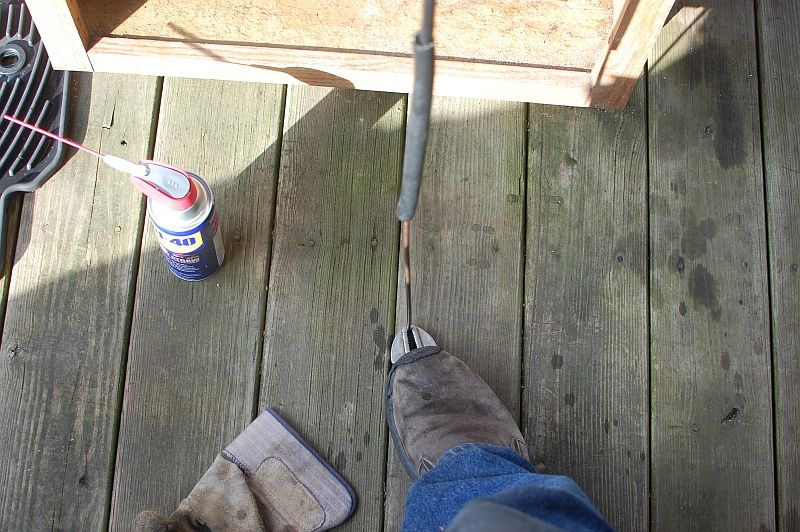
After �pulling� a section, and measuring two or three times, cut your newly assembled composite hose to the proper length. The �tag� end of nylon hose left on the rod end can be cut off with a razor knife in preparation for your next pull.
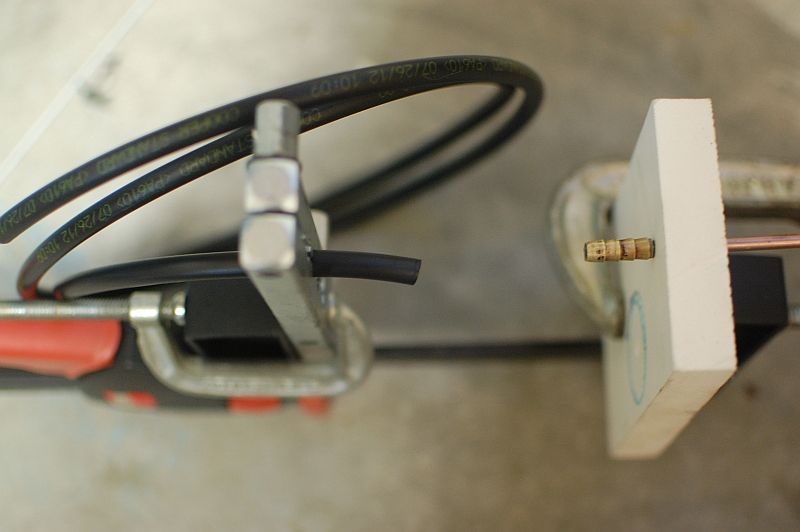
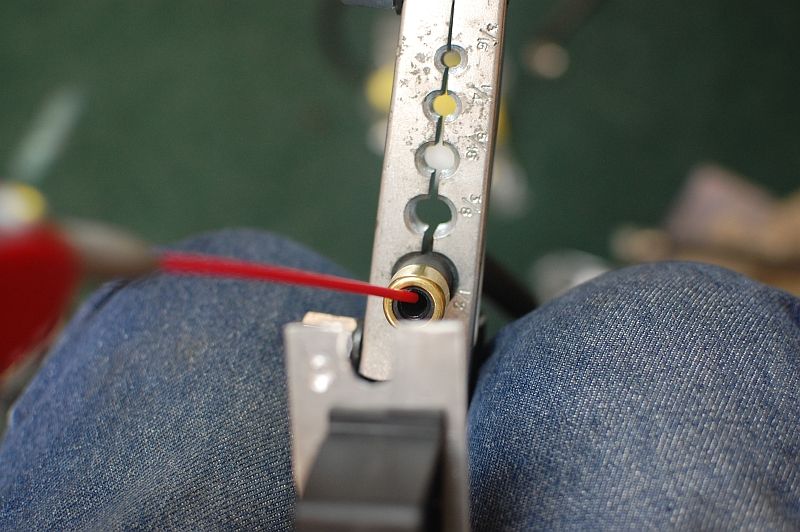
To assemble your hose assembly, clamp the rubber/nylon hose in your holding tool with enough room left on one side to accommodate the full length of the barbed portion of your hardline/fitting. Take a pair of needle nose pliers held shut or a similar cone shaped tool, shove it in your hose end and expand the inside of the hose enough so you can get the barb started INSIDE the nylon tube.
Do a test fit before actual assembly:
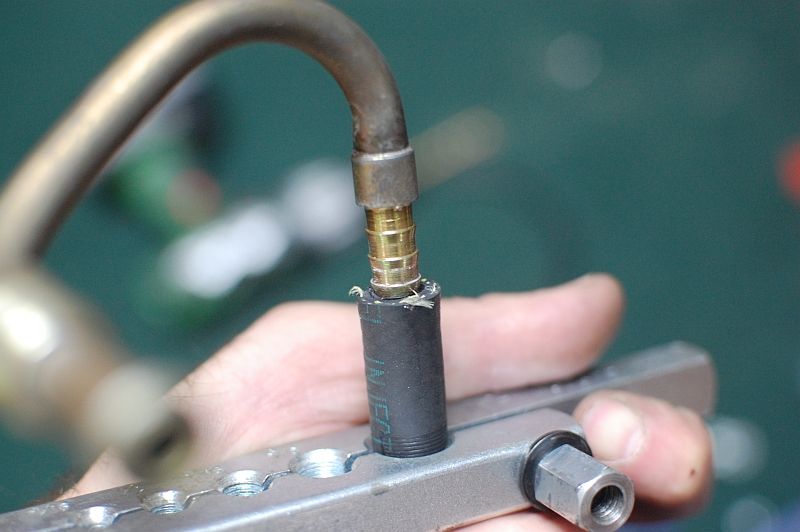
Make sure the nylon inner is visible around the entire circumference of the barb. If not, pressing the barb in will crush and fold the inner nylon liner (ask me how I know). Note that the hardline barbs are a little bigger than the barbs for the other fittings.
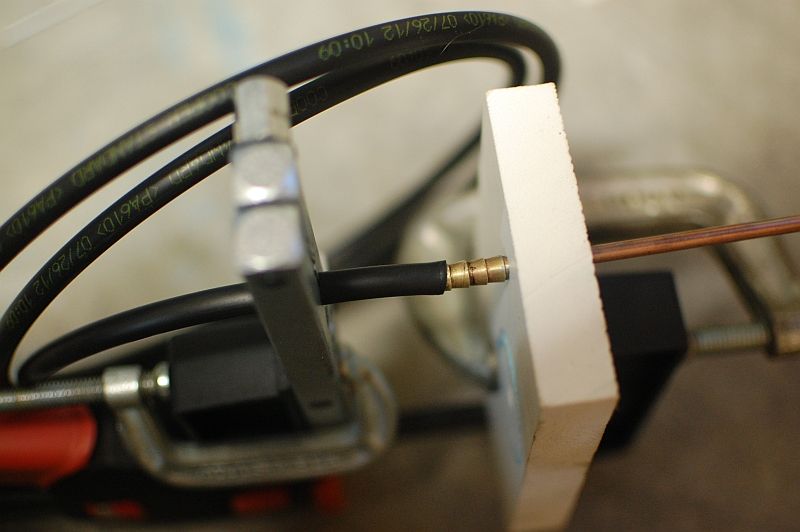
Clamp up your tube holder/fitting holder in your bar clamp, make sure everything is lined up, shoot some lube in the hose end, pop the OE ferrule of McMaster ferrule over the hose end and use the bar clamp to squeeze the barb into the hose. Again, make sure the nylon inner is sliding over the barb end and not being folded or crushed.
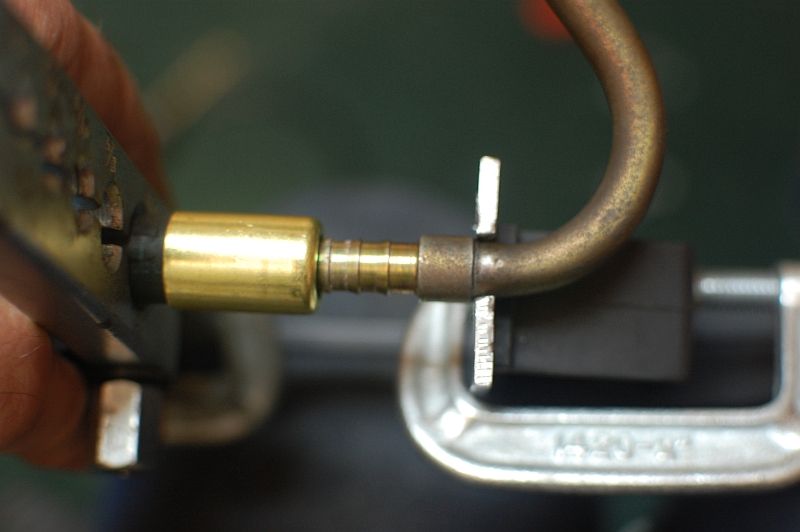
Here is the end result:
Use a bolt as a guide for the dampener/FPR barbs and be sure to add a couple of washers so you are pushing the barb into the tube instead of just forcing the nut against the ferrule.

The right angle fittings for the infamous U-bend hose between the fuel rails were accommodated by drilling a hole into piece of scrap wood and then sawing off enough on one side of the hole to make a �cradle� for pressing against the backside of the fitting and them proceeding as usual. Did not take a picture of that�.
If and when I do this again, I might buy or rent another tube flaring tool so I would have two easy to use holders for tubes/hose. Also, I might also try taping the outside of the hose or otherwise protecting it before clamping it in. The clamp left its mark on the exterior of the hose, so if you care about that, you may want to protect the hose with stiff heat shrink tube etc.
Comments, feedback, suggested edits etc. are welcome.
Here is what ended up with:
This leads to the mandatory disclaimer. If you make these lines, you are strictly on your own. Absolutely no representations are made, or can be made, about the integrity of the end product. Cooper-Standard did not make the nylon hose to live inside a rubber hose. Gates did not make the rubber hose to be compatible with the nylon hose I stuffed into it. Compatibility of either with lubricants used in assembly is another unknown. The assembled fuel lines have not been pressure tested, undergone durability testing or otherwise evaluated as replacements or the OE lines. USE AT YOUR OWN RISK.
That being said, this is Cooper-Standard nylon fuel injection hose inside Gates Barricade fuel injection hose. Either hose by itself is resistant to contemporary fuels and rated for the pressures in our systems. As is the case with the original hose, the nylon inner protects the Gates outer hose from the sharp edges of the barbs used on the Porsche fittings. Because the I.D. of the nylon hose is smaller than the OE hose, those barbs are in there to stay.
Materials List
Watts 5/16" x 1/4" Brass Barb - Model #: A-201B
3/16 threaded rod or 3/16 copper or brass plated rod � minimum 18� long
5/16 Gates Barricade Fuel Injection Hose (10 Ft. Length is Part #27348)
5/16 Dorman Nylon Fuel Line (10 Ft. Length is Part # 800-074)
(If you can find it � original hose is Cohline Type 3024 Polyamide Hose with rubber jacket [Polyamid-Rohr mit Obergummi] � Cohline Part #3024.0800. A potential source is http://www.newcoproducts.com/.)
If you cut the original �collars� or ferrules off your existing OE lines (which you do not have to do if you have a heat gun) you will need either Welding Hose Ferrule, .625" ID, 1/2" Length (McMaster-Carr Part #79205A668) or Welding Hose Ferrule, .625" ID, 1" Length (McMaster-Carr Part #79205A669). Neither is a match for the original, which is Cohline part #8001.1551 and is 15 mm long. The 1� long brass ferrule from McMaster can be cut down to this length. The originals are zinc chromate plated steel and the McMaster are brass, so you will not get an OE look with the latter unless you get them plated.
Penetrating oil or similar lubricant
Work gloves
Required Tools
Hacksaw or Dremel with cut-off wheel
Vice Grips or bench vice
Tubing Cutter
Needle Nose Pliers
Bar Clamp (one will do but two is better)
Tube Flaring tool(s) and/or scrap hardwood 1 x 3 or 1 x 4
drill bits
Heat Gun (if you wish to re-use the original sleeves)
Propane torch or BFH (Big F-ing Hammer)
A pair of work gloves
Procedure
There are two big tricks to making these lines. The first is getting the nylon FI hose inside the rubber FI hose. The second is getting the barbed fittings pushed all the way into the hose.
The first trick is accomplished by making a tool that allows you to hold the nylon core stationary while pulling the rubber hose over it. The tool is simply a 3/16 inch rod with the cut off end of a brass 5/16 hose barb fixed on the end. Because my GF is fabulous and knows intrinsically valuable scrap when she sees it, I had some copper plated steel rods in my shop. I took a 5/16 brass barb plumbing fitting, dremeled the barb section off and soldered it to the rod. You could achieve the same result by getting a 3/16 threaded rod and beating the hell out of one end with your BFH so the barb section cannot come off the rod.
The tool works like this - the nylon inner is pushed on the barbed end of the rod. A length of the rubber outer hose a little longer than the section you are replacing is threaded over the rod. Fix the non-barbed end of the in a vise or clamp some vice grips on that end perpendicular to the rod. Lube up the outside of the nylon and the inside of the rubber hose, put on your work gloves, put a foot on the vice grips if not using a vice, grab the leading edge of the rubber hose and PULL. The rubber outer then slides over the barbed section and over the nylon line.
The tool:
Getting the nylon over the barbed end of the tool and, later, on to your fuel fittings, requires a bar clamp, something to hold the fittings, something to hold the tube, and a few c-clamps. If you clamp your tube/fitting holders to the inner face of the bar clamp and properly align the fitting on one face with the tube end clamped to the other face, you can force the barb all the way into the tube.
These pictures explain it better than I can:
Once the nylon line is on the end of your tool, you pull the appropriate length of rubber hose over the nylon inner hose. Use a lubricant and some work gloves. I found that Gates Hose would make your hands pretty black with one or two pulls. The only tricky part of this process is to be mindful that the rubber outer needs a lot less force to move when the lower end finally snakes over the barbed end of the rod. You will waste nylon hose if you end up pulling the rubber outer too far. However, you DO want to pull past any witness marks left on the nylon hose left by the clamp used in forcing the nylon inner onto the barbed end of the rod.
Here is what a �pull� looks like:
After �pulling� a section, and measuring two or three times, cut your newly assembled composite hose to the proper length. The �tag� end of nylon hose left on the rod end can be cut off with a razor knife in preparation for your next pull.
To assemble your hose assembly, clamp the rubber/nylon hose in your holding tool with enough room left on one side to accommodate the full length of the barbed portion of your hardline/fitting. Take a pair of needle nose pliers held shut or a similar cone shaped tool, shove it in your hose end and expand the inside of the hose enough so you can get the barb started INSIDE the nylon tube.
Do a test fit before actual assembly:
Make sure the nylon inner is visible around the entire circumference of the barb. If not, pressing the barb in will crush and fold the inner nylon liner (ask me how I know). Note that the hardline barbs are a little bigger than the barbs for the other fittings.
Clamp up your tube holder/fitting holder in your bar clamp, make sure everything is lined up, shoot some lube in the hose end, pop the OE ferrule of McMaster ferrule over the hose end and use the bar clamp to squeeze the barb into the hose. Again, make sure the nylon inner is sliding over the barb end and not being folded or crushed.
Here is the end result:
Use a bolt as a guide for the dampener/FPR barbs and be sure to add a couple of washers so you are pushing the barb into the tube instead of just forcing the nut against the ferrule.
The right angle fittings for the infamous U-bend hose between the fuel rails were accommodated by drilling a hole into piece of scrap wood and then sawing off enough on one side of the hole to make a �cradle� for pressing against the backside of the fitting and them proceeding as usual. Did not take a picture of that�.
If and when I do this again, I might buy or rent another tube flaring tool so I would have two easy to use holders for tubes/hose. Also, I might also try taping the outside of the hose or otherwise protecting it before clamping it in. The clamp left its mark on the exterior of the hose, so if you care about that, you may want to protect the hose with stiff heat shrink tube etc.
Comments, feedback, suggested edits etc. are welcome.
Last edited by Eplebnista; 05-05-2013 at 12:39 PM.


 11-11-2012, 12:22 PM
#3
Rennlist Member
Nicely done.
Would be interesting to perform a pressure test and verify no leaks. Maybe 2 or 3 x working PSI?
Also, maybe park outside and make sure you have good replacement value insurance that covers fire.
Would be interesting to perform a pressure test and verify no leaks. Maybe 2 or 3 x working PSI?
Also, maybe park outside and make sure you have good replacement value insurance that covers fire.
 11-11-2012, 07:00 PM
#5
Rennlist Member
Thread Starter
Would be interesting to perform a pressure test and verify no leaks. Maybe 2 or 3 x working PSI?
11-12-2012, 10:18 AM
#7
Trending Topics
11-12-2012, 11:31 AM
#8
Three Wheelin'
Nice write up. If possible, you might want to try this
or something like it for asssembly. Lucas uses aprox 50 psi +- pressure, so this is well proven.
http://www.kinsler.com/handbook209.html
or something like it for asssembly. Lucas uses aprox 50 psi +- pressure, so this is well proven.
http://www.kinsler.com/handbook209.html
11-12-2012, 12:06 PM
#9
Rennlist Member
Thread Starter
Thanks. I thought briefly of making line holding fixtures by cutting up a nylon cutting board.
The Kinsler manual suggests forcing the barbs in by hand. I know I couldn't do it with the tubes I made and I don't think many people could. The arms of my bar clamp were bowing out when bushing the slightly larger hardline barbs in the tubes.
Love the Kinsler catalog. Fabulous car ****....
The Kinsler manual suggests forcing the barbs in by hand. I know I couldn't do it with the tubes I made and I don't think many people could. The arms of my bar clamp were bowing out when bushing the slightly larger hardline barbs in the tubes.
Love the Kinsler catalog. Fabulous car ****....
11-12-2012, 12:19 PM
#10
Three Wheelin'
Thanks. I thought briefly of making line holding fixtures by cutting up a nylon cutting board.
The Kinsler manual suggests forcing the barbs in by hand. I know I couldn't do it with the tubes I made and I don't think many people could. The arms of my bar clamp were bowing out when bushing the slightly larger hardline barbs in the tubes.
Love the Kinsler catalog. Fabulous car ****....
The Kinsler manual suggests forcing the barbs in by hand. I know I couldn't do it with the tubes I made and I don't think many people could. The arms of my bar clamp were bowing out when bushing the slightly larger hardline barbs in the tubes.
Love the Kinsler catalog. Fabulous car ****....
If you get a chance, click on Kinsler's bio- interesting read
I would completely trust anything with his brand on it. They also do injector matching when it's time for a top end refresh.
With a long roll of nylon tubing, you can practice
different ways of assembly until you find an easy way.
Last edited by Jim Devine; 11-12-2012 at 11:37 PM.
05-05-2013, 12:36 PM
#11
Rennlist Member
Thread Starter
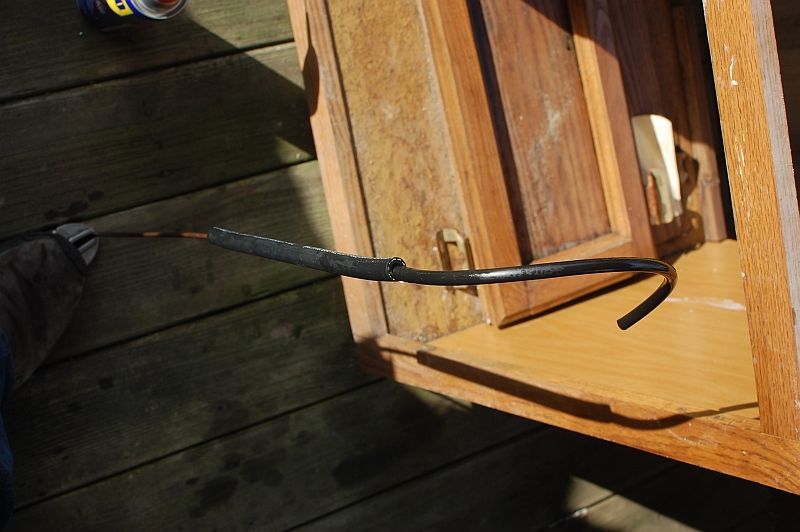
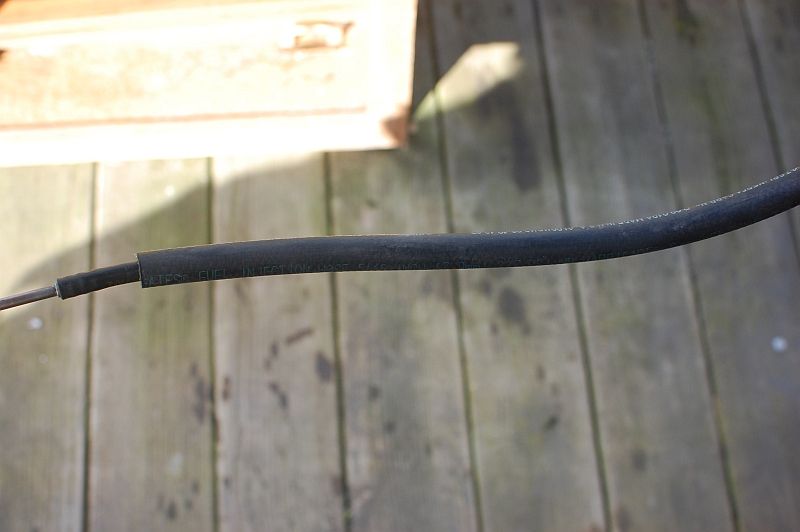
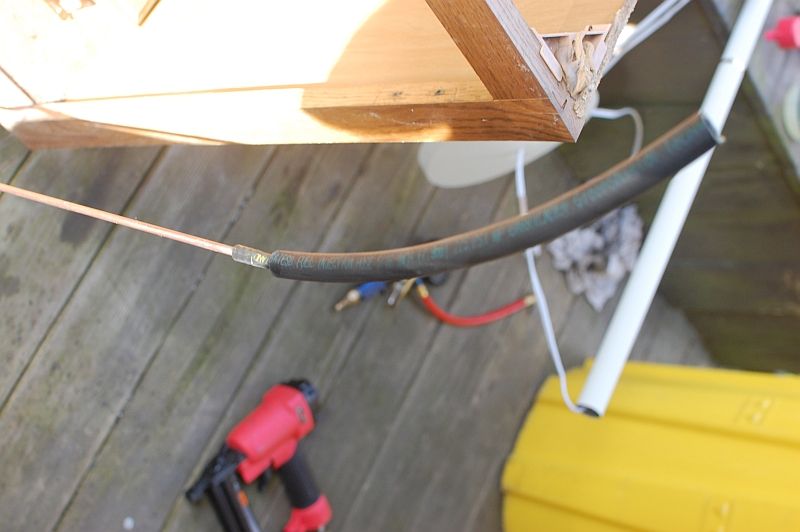
UPDATE: A few months of use have revealed a cosmetic issue - not a safety issue. It takes a good pull to get that nylon hose through the Gates hose. It turns out that the Gates hose stretches a fair amount when you do this. The result is that after some hot/cold cycles under the hood, the Gates hose returns to its original length. This the result:
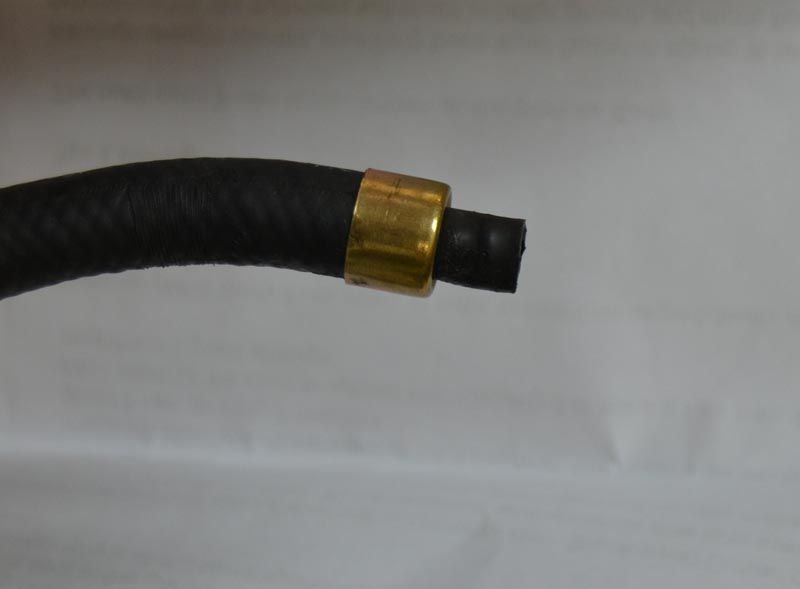
This is cosmetic, because the nylon inner hose carries the fuel and it is not coming off the barbs. I had to use a heat gun on the highest setting to pull the barb out of the nylon hose in the picture above.
I still think the idea is sound, but the next hose I build up like this will be given time and/or some hot/cold cycles so the outer rubber section has a chance to contract before I push the barbs in and complete the assembly.
If clamps are used, the contraction of the outer hose would probably not be a problem and the nylon inner will protect the outer rubber section from the dreaded barb....
05-26-2013, 10:39 PM
#12
Racer
Join Date: Apr 2013
Location: plainfield, nj
Posts: 271
Likes: 0
Received 0 Likes
on
0 Posts
Eplebnista, this concept is genius. By having the nylon inner wrapped inside the Gates hose rated at 225 psi it seems that, theoretically of course, you have the manufacturer's intended design purpose. The stretching issue seems logical but it makes me wonder how the original factory line was constructed to address heating/cooling cycles over time. I'm wondering, in a cottage sort of mentality, if one could run a series of tests that would involve leaving it in the freezer overnight, then place it in the engine compartment during a drive (unconnected) where it will be exposed to engine generated heat/fumes and repeating the process a few times to see how the three components (rubber, nylon, metal) react with each other. How bad can it be long term if there is little change during this period?
I'd like to replicate your idea for my own use...I think it has a lot of merit and, short of having a custom AN line made, addresses all of my concerns I've had with most of the attempts made to replicate the manufacturer's original design. Well done!
I'd like to replicate your idea for my own use...I think it has a lot of merit and, short of having a custom AN line made, addresses all of my concerns I've had with most of the attempts made to replicate the manufacturer's original design. Well done!
05-27-2013, 10:21 AM
#13
Rennlist Member
Join Date: Jan 2012
Location: Oklahoma City, Oklahoma
Posts: 1,158
Likes: 0
Received 0 Likes
on
0 Posts
Could you not achieve the same thing by baking it in the oven at engine bay temps?
Eplebnista, this concept is genius. By having the nylon inner wrapped inside the Gates hose rated at 225 psi it seems that, theoretically of course, you have the manufacturer's intended design purpose. The stretching issue seems logical but it makes me wonder how the original factory line was constructed to address heating/cooling cycles over time. I'm wondering, in a cottage sort of mentality, if one could run a series of tests that would involve leaving it in the freezer overnight, then place it in the engine compartment during a drive (unconnected) where it will be exposed to engine generated heat/fumes and repeating the process a few times to see how the three components (rubber, nylon, metal) react with each other. How bad can it be long term if there is little change during this period?
I'd like to replicate your idea for my own use...I think it has a lot of merit and, short of having a custom AN line made, addresses all of my concerns I've had with most of the attempts made to replicate the manufacturer's original design. Well done!
I'd like to replicate your idea for my own use...I think it has a lot of merit and, short of having a custom AN line made, addresses all of my concerns I've had with most of the attempts made to replicate the manufacturer's original design. Well done!
05-28-2013, 08:56 PM
#14

Eplebnista, seems like a dumb question but why not go with the original Cohline hose and ferrules if they are available from Newcoproducts? I like the idea of replacing the OE hoses with the original stuff.
05-29-2013, 12:03 AM
#15
Rennlist Member
Thread Starter
I had all the supplies to make my own hoses by the time I found the Newcoproducts site. I don't know if Newco actually stocks the hose. They are a distributor for Cohline, but that is all I know.