
Power window moldings
 06-20-2012, 03:42 PM
#16
Rennlist Member
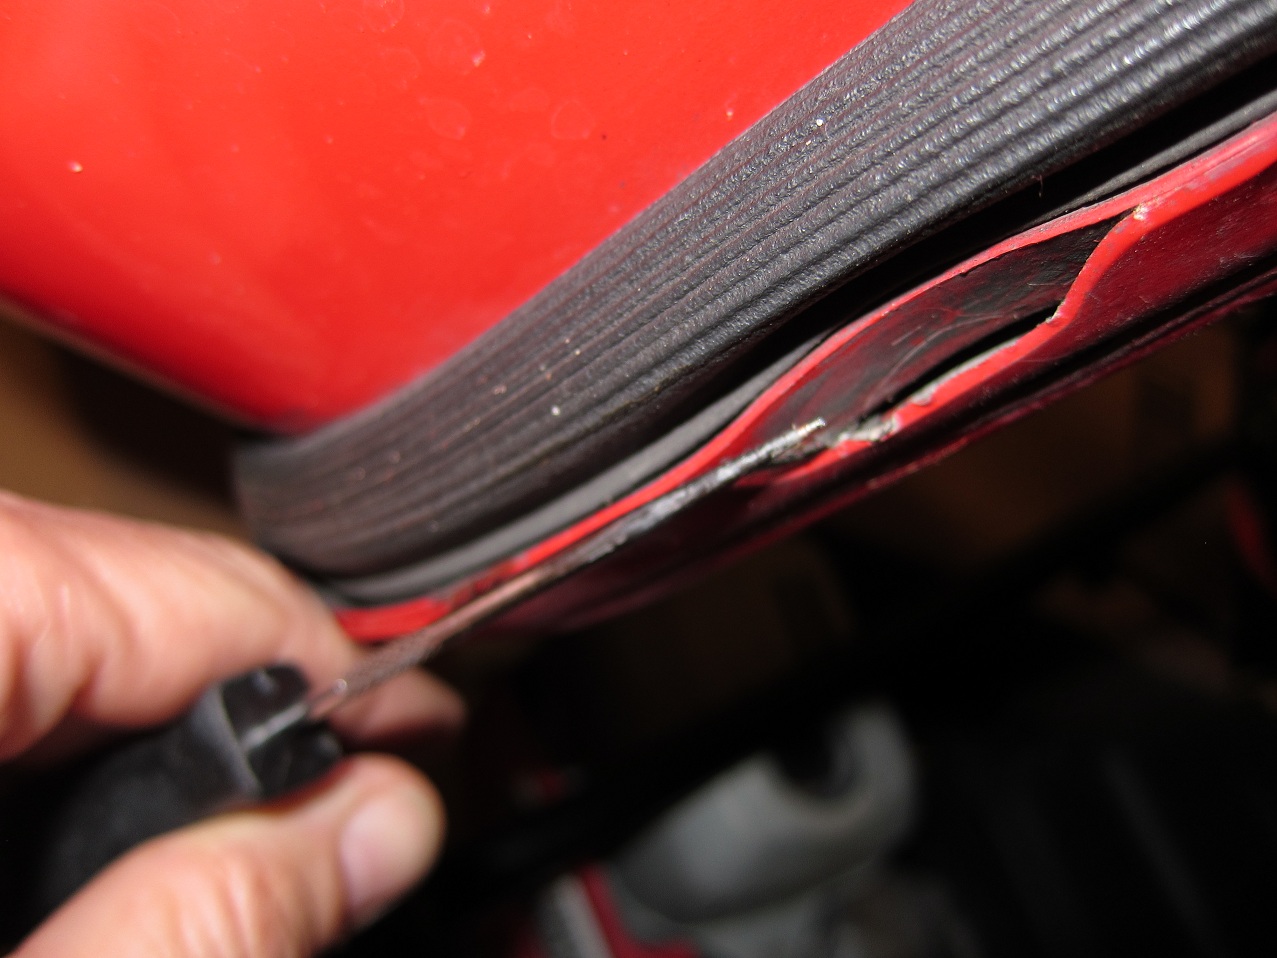
When I made the video of installing the seals, I didn't record the cutting of the curved part, because I had not even figured that part out myself at that point. I just layed out the old seal, and lined up the new seal, and tried to cut the shape as close to the original as I could. To me, this is the most difficult part of the job. I used a combination of sewing scissors, and a sharp exacto type razor blade.
I just didn't have a difficult time at all installing these seals. As long as you used a soapy/water solution, they really went on pretty easy. Not the easiest 928 job in the world, but not really what I consider bad. And I was dreading it after reading up on past threads on the subject.
One thing I recommend is on the bottom part of the seal, is to cut two or three 'A' shaped cuts into the last 1.5 inches or so of seal. This will allow it to bend up as it presses on the curved part of the channel inside the door.
And, I cut the single long piece in half, and then trimmed the non curved end by the mirror to fit once complete. You should have an inch or so extra to play with. This insures that you have some to work with if you screw up on the curved end the first time around and do not like the fit.
Also, when using the "sliding" technique with the factory seals, I would start at the back of the door farthest away from the mirror, and slide it on towards the front of the car (if you don't want to remove the window glass). This way, the curved part does not get in your way and goes on last.
 06-20-2012, 03:52 PM
#17
Rennlist Member
Thread Starter
Join Date: Sep 2010
Location: Fresno, CA (summer in Calgary)
Posts: 1,376
Likes: 0
Received 2 Likes
on
2 Posts
I think I made the mistake of assuming the shop knew what they were doing. I've known them a long time and they are a very professional operation recommended by several insurance companies. They refinished my rear bumper last spring following a "love tap" I received in a parking lot, and did fine with that. Is the procedure for these moldings quite unusual, compared to other cars? If so then that would explain a lot.
07-04-2012, 06:57 PM
#18
Rennlist Member
Thread Starter
Join Date: Sep 2010
Location: Fresno, CA (summer in Calgary)
Posts: 1,376
Likes: 0
Received 2 Likes
on
2 Posts
Still not perfect in these moldings,
I am seeing water getting under the drivers' side molding along its entire length, after washing car. The molding is firmly pressed against the window (or the other way around) all the way along, so I'm at a loss to figure this out. Still getting a trickle of water into the driver's door that way. How hard does the window have to push up against the molding to get it to seal?
-Sean
07-04-2012, 07:11 PM
#19
Addict
Lifetime Rennlist
Member
Lifetime Rennlist
Member
Yeah, I took a look over my bill from this job; I was charged 7 hours of labor for the moldings. 1 hour for molding, 1 hour for window alignment, and 1.5 hours for interior trim panel R&I, each side. And the owner still chewed me out for making him "lose his shorts" on this job, as he put it, because he could not justify charging even more time. Oh, 928s cause trouble don't they?
-Sean
-Sean
07-04-2012, 07:53 PM
#20
Rennlist Member
Thread Starter
Join Date: Sep 2010
Location: Fresno, CA (summer in Calgary)
Posts: 1,376
Likes: 0
Received 2 Likes
on
2 Posts
Basically, I have neither the time nor the tools and expertise to start taking apart my car to that extent. I would be too scared that I would just screw it up and end up at the body shop with a half-done messed up car, which would be even worse than not having started the job myself. I trust experts to have skills with taking apart cars, which is more than I've done. I may be misplaced in this trust, however. . .
07-05-2012, 05:17 PM
#21
Addict
Lifetime Rennlist
Member
Lifetime Rennlist
Member
If you want it done right, do it yourself.

There is a lot of satisfaction in doing it yourself, not to mention the money you save.
There is a lot of satisfaction in doing it yourself, not to mention the money you save.
07-05-2012, 05:56 PM
#22
Basic Sponsor
Rennlist
Site Sponsor
Rennlist
Site Sponsor
Sean,
I can only guess that somehow they installed then incorrectly as on my car they fit perfectly and certainly do not let water in. If you find something wrong with the seals I will gladly replace them or refund your money.
Roger
I can only guess that somehow they installed then incorrectly as on my car they fit perfectly and certainly do not let water in. If you find something wrong with the seals I will gladly replace them or refund your money.
Roger
__________________

Does it have the "Do It Yourself" manual transmission, or the superior "Fully Equipped by Porsche" Automatic Transmission? George Layton March 2014
928 Owners are ".....a secret sect of quietly assured Porsche pragmatists who in near anonymity appreciate the prodigious, easy going prowess of the 928."
Does it have the "Do It Yourself" manual transmission, or the superior "Fully Equipped by Porsche" Automatic Transmission?
George Layton March 2014928 Owners are ".....a secret sect of quietly assured Porsche pragmatists who in near anonymity appreciate the prodigious, easy going prowess of the 928."
07-06-2012, 02:45 AM
#24
Rennlist Member
Thread Starter
Join Date: Sep 2010
Location: Fresno, CA (summer in Calgary)
Posts: 1,376
Likes: 0
Received 2 Likes
on
2 Posts
Well that's the funny part, they *appear* to fit exactly as intended. They are tight up against the windows and look installed properly. There are no visible gaps except for the back part where there is no curved bit, there might be a tiny gap in there and I have been playing with sealant to try to block it up where the lower molding meets the upper. There seems to be just a trickle of water getting in to one door at this point, it may be just a result of pushing on the seal too much while washing the window. The new seals are very soft and flex easily when pushed on, which can open the top of the seal to allow water down inside. I'm just going to go with it for now, try to seal up the remaining little gap where the two moldings meet and not worry too much about it. There is a drain in the bottom of the door for a reason, and there is not the flood of water getting in that was happening before, so at least we are improving!
-Sean
-Sean
07-09-2012, 03:36 AM
#25
Rennlist Member
Thread Starter
Join Date: Sep 2010
Location: Fresno, CA (summer in Calgary)
Posts: 1,376
Likes: 0
Received 2 Likes
on
2 Posts
I am so confused about this stuff now. I saw two nice 928s today and they both had factory window moldings. The lower molding, which is causing me so much fuss and bother, was installed with this big gap (at least 1/2") from the curved-up bit at the rear to the upper belt molding. I verified this for all four moldings on the two cars. How could this possibly keep water out of the door? The owner of the cars has assumed that it is normal for them to be positioned like that, but my previous factory moldings were not really like this.
I am paying way too much attention to this issue, I realize.
-Sean
I am paying way too much attention to this issue, I realize.
-Sean
07-09-2012, 09:46 AM
#26
Rennlist Member
My stock moldings were like that too, big gap at the ends. Roger's car was even worse. Maybe they shrink over time?
I have never considered the outer door seal (factory or aftermarket) waterproof, just water resistant so that the inside of the door doesn't flood, and can let what little water does get in through the edges, get out through the bottom "vents/drains".
I have never considered the outer door seal (factory or aftermarket) waterproof, just water resistant so that the inside of the door doesn't flood, and can let what little water does get in through the edges, get out through the bottom "vents/drains".
07-09-2012, 12:18 PM
#28
Three Wheelin'
Join Date: Feb 2009
Location: Washington "Dc"
Posts: 1,810
Likes: 0
Received 0 Likes
on
0 Posts
Are the seals engaging the groove in the door? From what I've seen the door has a channel that engages the seal to hold it against the door. I think its possible the installer did not fully engage the molded channel in the door-seal with the door. I could see how this could cause the seal to leak or roll if you raise and lower the window.
07-10-2012, 04:30 AM
#29
Rennlist Member
Thread Starter
Join Date: Sep 2010
Location: Fresno, CA (summer in Calgary)
Posts: 1,376
Likes: 0
Received 2 Likes
on
2 Posts
My stock moldings were like that too, big gap at the ends. Roger's car was even worse. Maybe they shrink over time?
I have never considered the outer door seal (factory or aftermarket) waterproof, just water resistant so that the inside of the door doesn't flood, and can let what little water does get in through the edges, get out through the bottom "vents/drains".
I have never considered the outer door seal (factory or aftermarket) waterproof, just water resistant so that the inside of the door doesn't flood, and can let what little water does get in through the edges, get out through the bottom "vents/drains".
-Sean
07-10-2012, 10:40 AM
#30
Drifting
I'm pretty sure the window seals are not the source of water on the footplate because the weep hole for the door cavity drains external to the weather seal:
A small amount of water getting in the door is almost expected, that's why they drains are included in the design.
The water source must be somewhere else external... possibly the weatherstrip seal around the perimeter of the door or maybe the door striker isn't adjusted properly to hold the door seal snug.
Are you using a high pressure washer?
Last edited by auzivision; 07-10-2012 at 11:01 AM.