

78 Euro #579 OB Blog
 06-18-2012 | 01:50 PM
#91
Pro
Joined: Mar 2012
Posts: 712
Likes: 38
From: Upstate NY
looks awesome Jim. I wondered- what did you use to get the outer trim ring around the stereo/shifter to stay down? mine is curling up at the bottom right near the shifter, and i'f like to stick it down, just can't think of a good thing to use that'll allow me to remove it in the future if needed. i was thinking silicone adhes, but not sure if it'll be strong enough. i see you had it clamped, i assume after applying some kind of adhesive..
06-18-2012 | 05:28 PM
#92
Thread Starter
Rennlist Member
Joined: May 2003
Posts: 8,693
Likes: 137
From: Frankenmuth, Michigan
looks awesome Jim. I wondered- what did you use to get the outer trim ring around the stereo/shifter to stay down? mine is curling up at the bottom right near the shifter, and i'f like to stick it down, just can't think of a good thing to use that'll allow me to remove it in the future if needed. i was thinking silicone adhes, but not sure if it'll be strong enough. i see you had it clamped, i assume after applying some kind of adhesive..
06-19-2012 | 09:33 AM
#94
Thread Starter
Rennlist Member
Joined: May 2003
Posts: 8,693
Likes: 137
From: Frankenmuth, Michigan
For this application, I chose silicone adhesive because I need the bezel to be removable, if required.
06-19-2012 | 05:39 PM
#95

Instructor
Joined: Jun 2010
Posts: 143
Likes: 2
Yes, 5200 is quite permanent. I was thinking the bits you'd glued were as well.
Looks absolutely fantastic. Wish I could find another set of early dash/door louvers like that for my early OB.
Why'd you go "radio delete"? Or is the answer back in the thread somewhere I missed?
Looks absolutely fantastic. Wish I could find another set of early dash/door louvers like that for my early OB.
Why'd you go "radio delete"? Or is the answer back in the thread somewhere I missed?
06-19-2012 | 08:11 PM
#96
Thread Starter
Rennlist Member
Joined: May 2003
Posts: 8,693
Likes: 137
From: Frankenmuth, Michigan
Yes, 5200 is quite permanent. I was thinking the bits you'd glued were as well.
Looks absolutely fantastic. Wish I could find another set of early dash/door louvers like that for my early OB.
Why'd you go "radio delete"? Or is the answer back in the thread somewhere I missed?
Looks absolutely fantastic. Wish I could find another set of early dash/door louvers like that for my early OB.
Why'd you go "radio delete"? Or is the answer back in the thread somewhere I missed?
The radio delete choice was a matter of two things. I can't find an original radio and don't want to put in an aftermarket DIN style (requires cutting up the console.
Also, I like it. Seems inkeeping with the simple purity of the early cars.
Some day, I'd like to develop a back-mounted power supply with a hidden Ipod plug
06-19-2012 | 10:13 PM
#97
Instructor
Joined: Jun 2010
Posts: 143
Likes: 2
Ah, that explains why my bezel is so buggered (also early car, vin -441).
I agree your delete plate looks nice, and it's possible to put together an iPod driven sound system these days without a head unit per se, so... nicely done.
I'm hoping my early pioneer unit keeps chugging along until I can figure out what to do, as I also refuse to cut the early bezel to fit a standard DIN anything.
I've got a similar vintage BMW, with a factory head unit that Becker rebuilt with a hardwired ipod input. It runs into a line-level processor so I can get a pre-amp signal to the run some old A/D/S amps/speakers.
Guess I'll try do something similar eventually with the 928 using a factory head unit, but right now it's hard to imagine me ever getting it looking as nice as yours is.
06-19-2012 | 10:57 PM
#98
Drifting
Joined: Feb 2008
Posts: 3,029
Likes: 6
From: Columbus, Mississippi
Jim...is that a factory radio delete panel? Man that looks clean. I made one for Garrett's car but its a hack job compared to yours. I may try again as yours just looks so good! I for one LOVE the delete. It would ruin a real restore as your doing with a modern radio. A well hidden IPOD attachment could be hidden easily.
06-20-2012 | 08:07 AM
#99
Instructor
Joined: Jun 2010
Posts: 143
Likes: 2
That's funny, Dean, I had just looked at your latest pics and noticed you also doing a radio delete plate and had also thought that...well....Jim did an incredible job on his!
Would also like to know his materials/methods there, assuming he made it himself.
Would also like to know his materials/methods there, assuming he made it himself.
06-20-2012 | 12:47 PM
#100
Rennlist Member
Joined: Jun 2010
Posts: 5,275
Likes: 874
From: The Poconos
You could always get a marine unit; they have smallish wired-remotes with displays. The head unit could mount in the glove box and the remote could be routed somewhere convenient/attractive, along with an aux cable or USB for the iPod. Like this:
This universal with Bluetooth looks even better: http://www.parrot.com/usa/products/b...parrot-mki9100. It's nice and small; looks like it will mount into/onto your delete plate...
This universal with Bluetooth looks even better: http://www.parrot.com/usa/products/b...parrot-mki9100. It's nice and small; looks like it will mount into/onto your delete plate...
Last edited by Shawn Stanford; 06-20-2012 at 01:06 PM.
 06-23-2012 | 03:01 PM
#103
Thread Starter
Rennlist Member
Joined: May 2003
Posts: 8,693
Likes: 137
From: Frankenmuth, Michigan
Re: delete plate and discreet power supply, I'll get back to you guys once I have it sorted out a little more.
Update:
Got most of the primary electrics sorted out and working. Still need to troubleshoot both window switches.
Note: Fuse #2 (16A) is for the aux lamps (highbeam only) and #34 (8A) is for rear foglamp.
This is for Euro/RoW only, and is shown as "open" in the US owners manual.
Funny thing is I couldn't find these circuits in any wiring diagram publication I have.
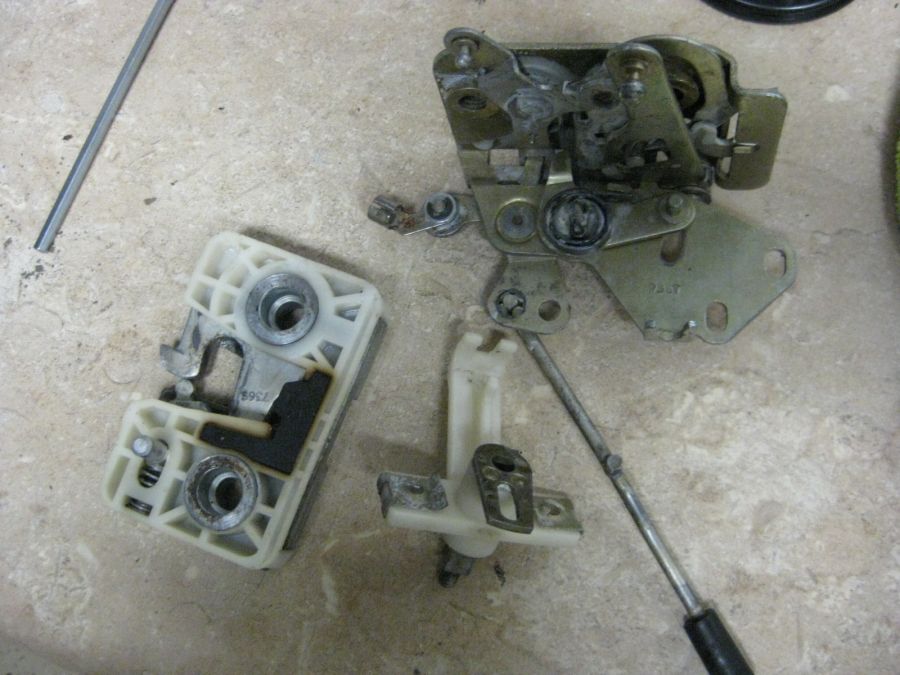
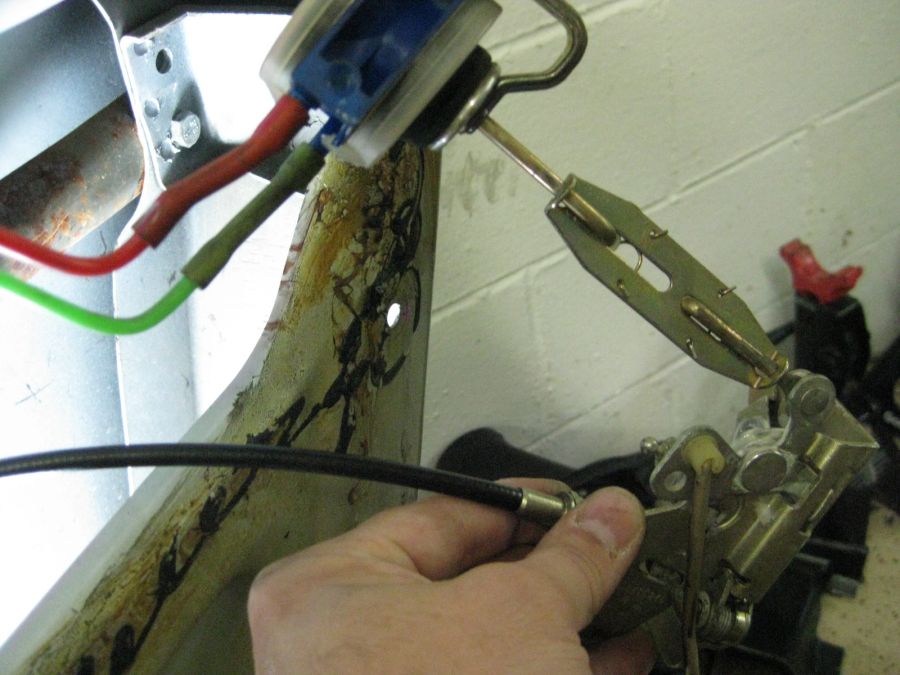
Finished up the vacuum central locking, and appears to be working nicely and holding air.
A few observations: Appears to only work with the doors closed. Appears to only be actuated from the driver's door. So it's only function is to unlock the pax door from the driver door.
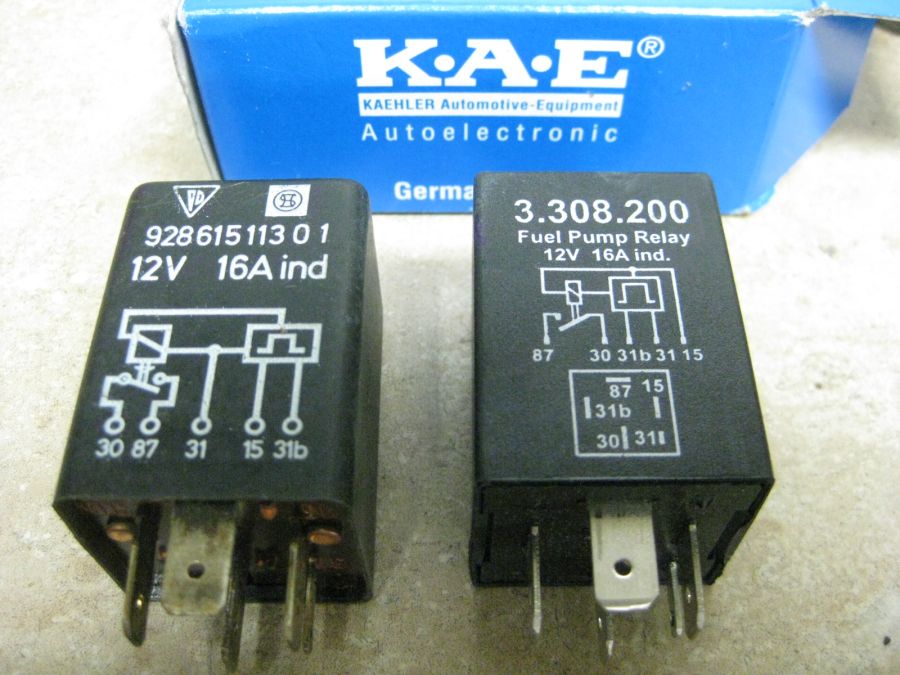
Quick question on the early fump pump relay. I have side-by-side a new OE relay (right) and an old Porsche relay (left). They look very similar, but the schematics are slightly different.
This could just be my electrical ineptitude, but could someone shed some light here? My guess is they both perform the same function, just curious.
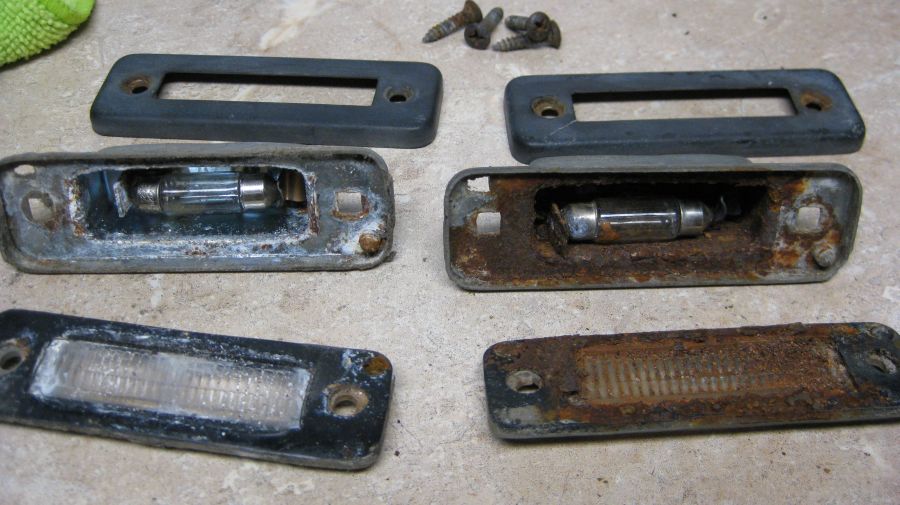
Looks like I need a new license plate light...
Next up:
Finish the coolant bridge and oil filler, and start 'er up again. I'm jonesing to drive this thing again!
Hopefully will happen this weekend...
Thanks for reading!
Update:
Got most of the primary electrics sorted out and working. Still need to troubleshoot both window switches.
Note: Fuse #2 (16A) is for the aux lamps (highbeam only) and #34 (8A) is for rear foglamp.
This is for Euro/RoW only, and is shown as "open" in the US owners manual.
Funny thing is I couldn't find these circuits in any wiring diagram publication I have.
Finished up the vacuum central locking, and appears to be working nicely and holding air.
A few observations: Appears to only work with the doors closed. Appears to only be actuated from the driver's door. So it's only function is to unlock the pax door from the driver door.
Quick question on the early fump pump relay. I have side-by-side a new OE relay (right) and an old Porsche relay (left). They look very similar, but the schematics are slightly different.
This could just be my electrical ineptitude, but could someone shed some light here? My guess is they both perform the same function, just curious.
Looks like I need a new license plate light...
Next up:
Finish the coolant bridge and oil filler, and start 'er up again. I'm jonesing to drive this thing again!
Hopefully will happen this weekend...
Thanks for reading!
 06-23-2012 | 08:29 PM
#105
Nordschleife Master
Joined: Jun 2006
Posts: 6,285
Likes: 56
From: ɹəpun uʍop 'ʎəupʎs
Those will clean up pretty well with some encouragement from a bead blast cabinet, and some zinc plating
Here's some very rusty exhaust hangers..
1 - before
2 - bead blasted
3 - zinc plated then passivated with chromate dip (in my garage) (edit: the camera flash makes them look shinier than they are)