
Help about 89 S4 instrument fuel gauge problem
 06-03-2011, 07:27 AM
#1
Instructor
Thread Starter

I just finished auto convert to 5 speed. My tech man install the center instrument, but some thing happen, the fuel gauge did not go right. Sorry about my poor english, here is the picture.
Any one can help me?

(no power)

(power on)
Any one can help me?
(no power)
(power on)
 06-03-2011, 09:30 AM
#2
Rennlist Member
Rennlist Site Sponsor

The only thing that I can suggest is to remove the instrument cluster, disassemble, remove and replace the needle on the fuel gauge, and replace the cluster. You might want to fill the fuel tank so you know where to put the needle, which would have to be done with the cluster harnesses connected and ignition on.
06-03-2011, 01:13 PM
#3
Addict
Rennlist Member
Rennlist Member
Are you planning on trying to fix this yourself?
If so, I'll assume you haven't removed the instrument cluster before. So... read the first post in the thread "15 minute instrument pod removal update and instrument light bulbs for an OK price"; that will show you how to get the instrument cluster out. Once you get good at it, it really does take less than 15 minutes.
The only thing I'll add to Schocki's good instructions on instrument cluster removal is to be very careful when unlocking the four connectors to the cluster. The little levers are fairly strong, but you can break them if you don't understand how they work. Here are a couple of photos; if you study them, you'll probably notice some details that will make it easier to operate them correctly. Some notable things with these connectors:
(Note: you can get substantially bigger versions of each of these photos by just clicking on them)


I improved the labeling on mine, too, just to make absolutely sure I didn't accidentally swap #1 and #2 or #3 and #4.


Now... when you get the instrument cluster out, you can disassemble it. I've had mine disassembled more than you probably need to disassemble yours; I don't think yours will require as much disassembly.
First, if you want to get to the backlighting and instrumentation bulbs (not what you're dealing with now... but just so you know), you rotate each of the four black ***** on the back of the cluster 180� counter-(anti-) clockwise (you can see the "180�" label near each one of those ***** in the photo above that shows the back of the cluster). This unlocks the black rear part; you can then open it up like a book:

There's all sorts of further disassembly you can do at this point, but I don't think you need to do any of that (or even open it up this way). I think what you'll need to do is just separate the front-most pieces: separating the gauge assembly (black plastic piece on the front) from the white separator piece behind it. To do this, release (by pressing in with a flat-blade screwdriver or equivalent) the five black locking tabs that hold the two above-mentioned pieces together and push the tab enough to start separating the pieces (just a little; you won't be able to get much separation until you get most of the tabs unlocked anyway). There are three such tabs on the top:

... and two on the bottom:

Then before attempting full separation, place the cluster face down on a table/bench on a soft rag or towel (don't want to scratch the clear face). Then use a flat blade screwdriver and at each end of the cluster, insert into the rectangular slot and you can pry the two pieces apart. (Yeah, I didn't use a soft towel in this photo, but I was careful and just left it this way long enough for the photo.)

Once the pieces are separated, use extreme caution with the part containing the gauges and the clear lens assembly; they are not fastened to each other in any way. If you're not careful and pick it up by the edges and do not keep it face down, you run the risk of dumping the gauges on the floor or letting them slide sideways and damaging the gauge needles.


So... that gets you to the back of the gauges. The back of the fuel gauge is the one in the lower right hand corner of the above photo. Unfortunately, it looks like it might be the only one of the four small gauges that doesn't have an adjustment tab (or maybe it's just not visible in the above photo).
To get to the front of the gauges (remember, the clear front piece and analog gauges are still safely face down on a soft towel, right?) lift the part containing the gauges by any of the ivory-colored plastic pieces (the end pieces make nice handles) straight up until it is well clear of the clear plastic. Then flip it over and set it down on your workbench/table. Be careful! Those gauges and needles are fragile!

If you do need to mess with the needle, I'm hoping that someone else can offer advice on that; I have never done it.
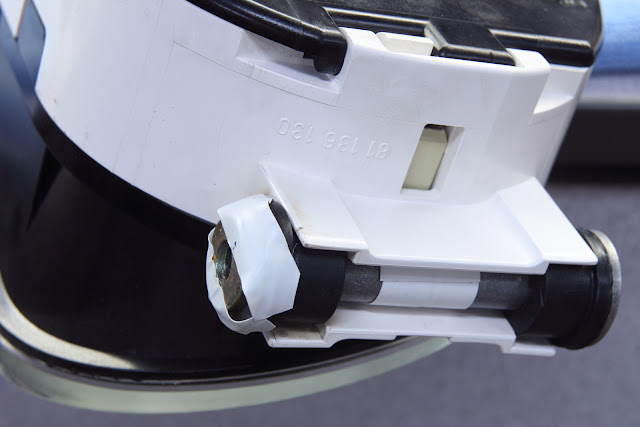
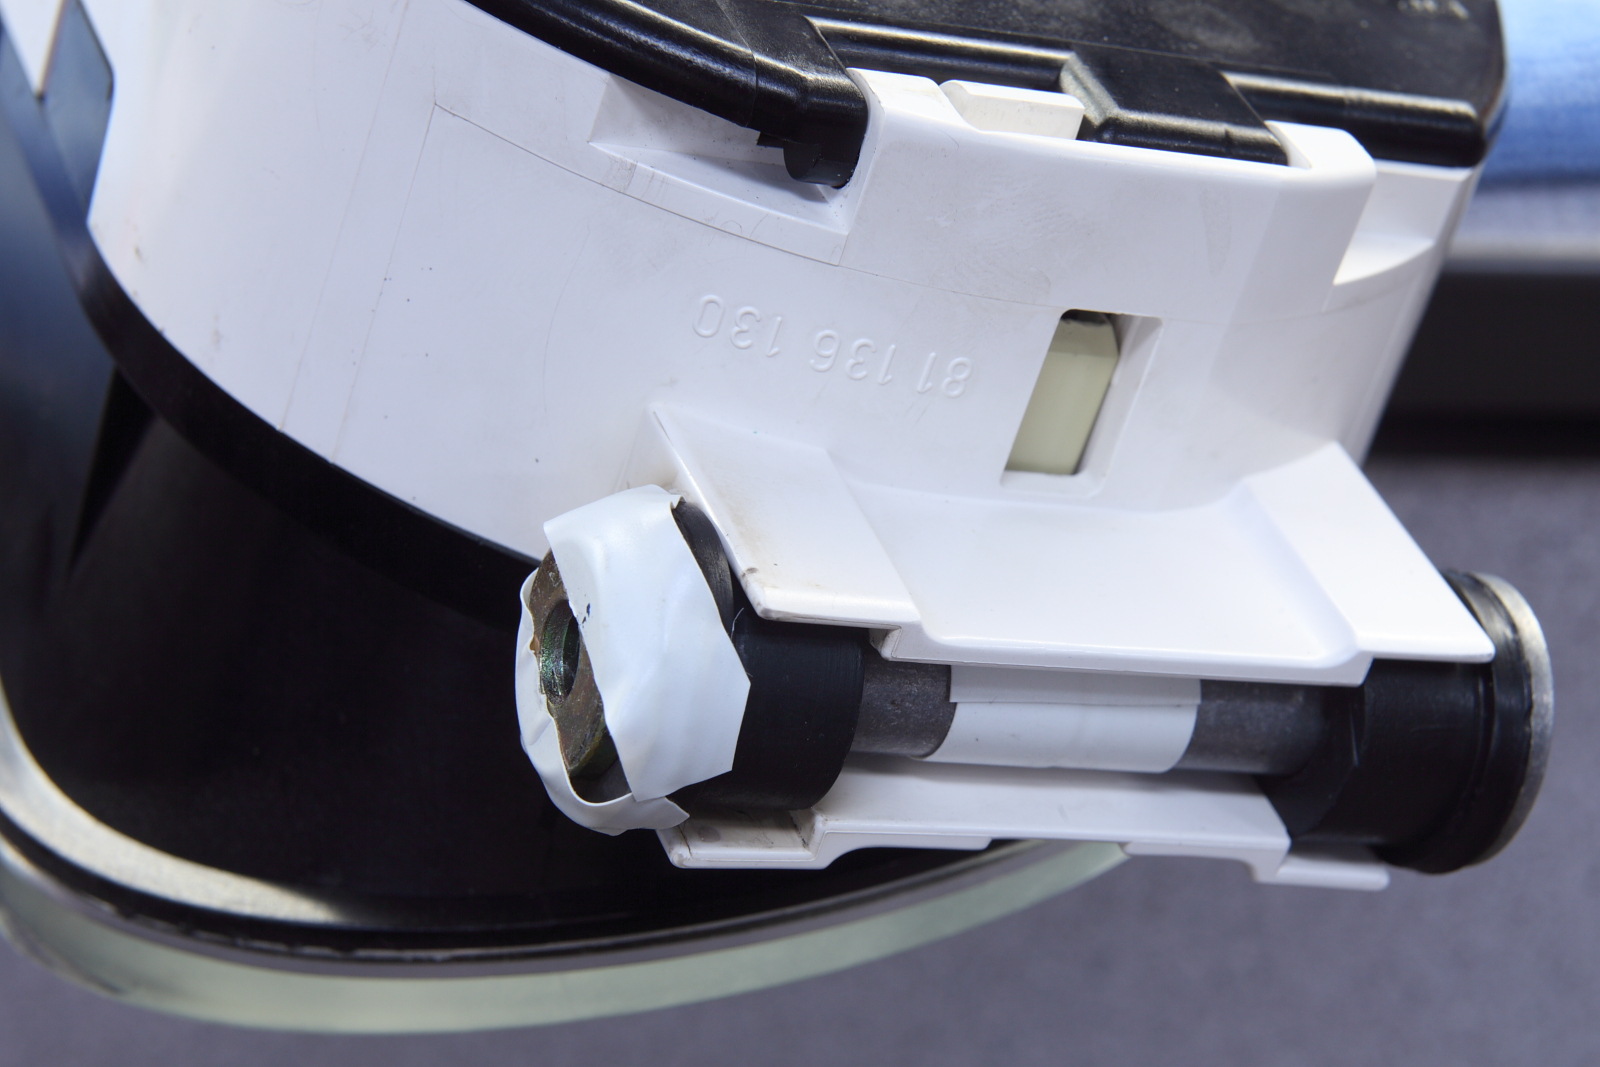
One final tip: prior to attempting to put the cluster back in the car, attach the spacers and lower washer to the left end of the cluster like this; it'll make it much easier to keep the parts together as you put all the fasteners back:
If so, I'll assume you haven't removed the instrument cluster before. So... read the first post in the thread "15 minute instrument pod removal update and instrument light bulbs for an OK price"; that will show you how to get the instrument cluster out. Once you get good at it, it really does take less than 15 minutes.
The only thing I'll add to Schocki's good instructions on instrument cluster removal is to be very careful when unlocking the four connectors to the cluster. The little levers are fairly strong, but you can break them if you don't understand how they work. Here are a couple of photos; if you study them, you'll probably notice some details that will make it easier to operate them correctly. Some notable things with these connectors:
- Move the locking levers slightly away (perpendicular from what appears to be their main direction of travel) from the connector (bend them a little) to allow them to move. This is necessary because the there are little slots on the connector and little "pins" on the locking levers that lock them into position either fully closed or fully open.
- Operate both of the levers at the same time if you can; you probably cannot fully unlock one lever while the other one is still locked (this is because as you move the levers to unlock, it also pushes the connector away from the PC board, but it can't do this if the other lever is still locked and if you're not careful and try to force it, you'll likely break the locking lever).
(Note: you can get substantially bigger versions of each of these photos by just clicking on them)


I improved the labeling on mine, too, just to make absolutely sure I didn't accidentally swap #1 and #2 or #3 and #4.


Now... when you get the instrument cluster out, you can disassemble it. I've had mine disassembled more than you probably need to disassemble yours; I don't think yours will require as much disassembly.
First, if you want to get to the backlighting and instrumentation bulbs (not what you're dealing with now... but just so you know), you rotate each of the four black ***** on the back of the cluster 180� counter-(anti-) clockwise (you can see the "180�" label near each one of those ***** in the photo above that shows the back of the cluster). This unlocks the black rear part; you can then open it up like a book:

There's all sorts of further disassembly you can do at this point, but I don't think you need to do any of that (or even open it up this way). I think what you'll need to do is just separate the front-most pieces: separating the gauge assembly (black plastic piece on the front) from the white separator piece behind it. To do this, release (by pressing in with a flat-blade screwdriver or equivalent) the five black locking tabs that hold the two above-mentioned pieces together and push the tab enough to start separating the pieces (just a little; you won't be able to get much separation until you get most of the tabs unlocked anyway). There are three such tabs on the top:

... and two on the bottom:

Then before attempting full separation, place the cluster face down on a table/bench on a soft rag or towel (don't want to scratch the clear face). Then use a flat blade screwdriver and at each end of the cluster, insert into the rectangular slot and you can pry the two pieces apart. (Yeah, I didn't use a soft towel in this photo, but I was careful and just left it this way long enough for the photo.
)
Once the pieces are separated, use extreme caution with the part containing the gauges and the clear lens assembly; they are not fastened to each other in any way. If you're not careful and pick it up by the edges and do not keep it face down, you run the risk of dumping the gauges on the floor or letting them slide sideways and damaging the gauge needles.


So... that gets you to the back of the gauges. The back of the fuel gauge is the one in the lower right hand corner of the above photo. Unfortunately, it looks like it might be the only one of the four small gauges that doesn't have an adjustment tab (or maybe it's just not visible in the above photo).
To get to the front of the gauges (remember, the clear front piece and analog gauges are still safely face down on a soft towel, right?
) lift the part containing the gauges by any of the ivory-colored plastic pieces (the end pieces make nice handles) straight up until it is well clear of the clear plastic. Then flip it over and set it down on your workbench/table. Be careful! Those gauges and needles are fragile!
If you do need to mess with the needle, I'm hoping that someone else can offer advice on that; I have never done it.
One final tip: prior to attempting to put the cluster back in the car, attach the spacers and lower washer to the left end of the cluster like this; it'll make it much easier to keep the parts together as you put all the fasteners back:
 06-03-2011, 01:28 PM
#4
Addict
Rennlist Member
Rennlist Member
I wonder how vinyl_tien's gauge got this way in the first place? Seems mighty strange.
vinyl_tien, do you know how this happened?
06-03-2011, 02:04 PM
#5
Chronic Tool Dropper
Lifetime Rennlist
Member
Lifetime Rennlist
Member

My 1989 gauge does NOT park at 0 with power off.
06-03-2011, 02:18 PM
#6
Addict
Rennlist Member
Rennlist Member
That's good to know.
In the photo I showed, it's probably kind of hard to tell whether or not it's parked at zero due to the strange camera angle; after reviewing more photos, I don't think it is.
Here's a mostly (slightly higher than) straight-on shot, which shows that it actually parks to the left of zero.

Does yours park there, too?
(BTW, in both of the photos I've posted so far featuring the front of the fuel gauge, the cluster has been flat on its back, so that might have a slight effect, too.)
Last edited by Ed Scherer; 06-03-2011 at 03:08 PM.
06-03-2011, 06:44 PM
#7
Chronic Tool Dropper
Lifetime Rennlist
Member
Lifetime Rennlist
Member
^^^ Mine parks exactly as this one does. Two needle-widths below the zero line on the gaige.
Trending Topics
06-03-2011, 10:47 PM
#8
Instructor
Thread Starter
So glade you guys help.. 
I am doing my 89 S4 auto convert to 5 speed. I ask my tech man to black sticker on auto gear position sign, He might be touch the fuel gauge, that is the best I can gauss!!
I am doing my 89 S4 auto convert to 5 speed. I ask my tech man to black sticker on auto gear position sign, He might be touch the fuel gauge, that is the best I can gauss!!