Rear Hatch-has me beat!
#16
There has been numerous post made on the hatch release mechanism over the years as well as to refit and align the mechanism so that you do not crack the thin side sections of the upper male mechanism.
The "Search" function on this forum is your best friend.
Bill Ball has written numerous posts, Alan Moore and I as well as others on how to repair and align this mechanism.
Now that you have it unlocked, remove the top and bottom mechanism and study how it actually works, by the electrical release mechanism and the key release mechanism. I fabricated my insert around 8 or 9 year ago before Roger and Nicole had inserts made and I also repaired the top male tongue that was cracked (people said it could not be repaired) and it is still working with no problems, no rattles and in excellent alignment. When you reinstall the mechanism the top section need to be correctly aligned and fitted so that there is no aft stress place on the side section of the tongue and this is done by ensuring that the side section are kept in "compressive stress" by the back of the tongue being pushed slightly forward by the back section of the plastic insert (this is why it is a tapered section). The back section of the insert has vertical ridges formed into it to reduce friction and push the top tongue forward toward the electrical operated release cam.
Tails 1990 928S4 Auto
#17
Finally got it thanks to all. I've posted couple of pics on how and where. Harbor Freight had a set of auto panel tools, only 6.99 that I had purchased a while back.
Used these instead of small metal wonder bar that I had, so I wouldn't break/scratch anything. Popped open easily, now to figure what the *%(% is wrong with the darn thing.
Used these instead of small metal wonder bar that I had, so I wouldn't break/scratch anything. Popped open easily, now to figure what the *%(% is wrong with the darn thing.

#18
Rennlist Member
One of the things you need which no one has pointed out is a new Hatch Latch Receiver Liner. Yours is missing. You can buy one from one of the other sponsors on this list, but since mine has been essentily under priced, I will give you one of them, if you are interested. Let me know. You will need to put one in before you make any of the fitting and adjustments that others are recommending for you, all of which is valid and important.
Jerry Feather
Jerry Feather
#19
Cottage Industry Sponsor
Lifetime Rennlist
Member
Lifetime Rennlist
Member
But there really isn't much in terms of instructions...
First, you or a helper push down the white plastic piston and pry out the old piece.
Then - again holding down the white plastic piston - you push-in the new insert. It helps to squeeze it initially. The trick is to make sure that it snaps in in the back, and the pins and holes connect on the opposite end.
There is no magic that I know of - other than pushing down the plastic piston. Optionally, you could remove the lower lock piece for the installation, but then you'd have to worry about realigning everything carefully during re-installation.
My issue is that my hatch does not close tightly and the remote release doesn't...release. It used to after I added the standard shim under the top hatch lock piece but it has stopped releasing again.
When I close the hatch to the closed and locked position, I can push down on the hatch with my hand and it depresses further.
As it sits now the hatch does not sit flush with the body - it is higher by about 1/8 inch. When I press down on it it does line up flush so I think it is not the rubber alignment wedges causing the problem.
I'm not sure what those shims would do, but depending on how they reposition the lock piece, they could have accelerated the cracking, or caused the higher position of the hatch.
I had a similar problem. First I replaced the upper hatch plastic piece, which helped. The new hatch receiver insert put it back to its normal position - I had to screw the rubber bumpers further in to make the hatch close easily.
#20
Addict
Rennlist Member
Rennlist Member
This is very common - as the old assembly wears/disintegrates POs tend to have screwed the rubber bumpers further out to stop the hatch rattling. When you renew the worn parts the hatch won't latch shut because the rubber bumpers won't let it go "closed" enough.
#21
Racer
Thread Starter
Join Date: May 2011
Location: West Chester Ohio
Posts: 262
Likes: 0
Received 0 Likes
on
0 Posts
Jerry, can't tell if you were talking to me but I'll take it! Let me know what you need to get it to me.
jc
Until then I might just drill a 1/4" hole about 1/2" below the receiver so I can still a rod in there to open it quicker. I want to put my golf clubs in there and show it off a little later today.
Also have my rear discs and pads, and ball joint repair kit for the upper front. Done this job on my 944 and it went pretty quick, so I'll be doing that on Sunday. Also back to work cleaning ground points and cleaning the fuse panel contacts.
#22
Rennlist Member
Where did you source the repair kit?
My kit, from 928 motorsports a few years ago, had wrong boots.
Many others reported similar situations.
There is an Audi boot that will fit.
Just be aware / check status before starting that job.
My kit, from 928 motorsports a few years ago, had wrong boots.
Many others reported similar situations.
There is an Audi boot that will fit.
Just be aware / check status before starting that job.
#23
Rennlist Member
#24
Addict
Lifetime Rennlist
Member
Lifetime Rennlist
Member
#25
Addict
Lifetime Rennlist
Member
Lifetime Rennlist
Member
#26
Intermediate
Join Date: Aug 2015
Location: Cambridge, MA
Posts: 46
Likes: 0
Received 0 Likes
on
0 Posts
No problemo, old pal - that's what friends are for! Yeah, those white widows can be scary. 
As it sits now the hatch does not sit flush with the body - it is higher by about 1/8 inch. When I press down on it it does line up flush so I think it is not the rubber alignment wedges causing the problem.

As it sits now the hatch does not sit flush with the body - it is higher by about 1/8 inch. When I press down on it it does line up flush so I think it is not the rubber alignment wedges causing the problem.
I can't get my rear hatch to stay shut. It will close, and if I press down, it will "lock", I will hear a click, and I have to give it a good pull to open it medium amount of force (or go over a large bump on the road) to have the lock disengage. Note that it can disengage, even without the key. I've determined that I need a new liner, which I will promptly order from Roger, but I have another question as well about alignment...
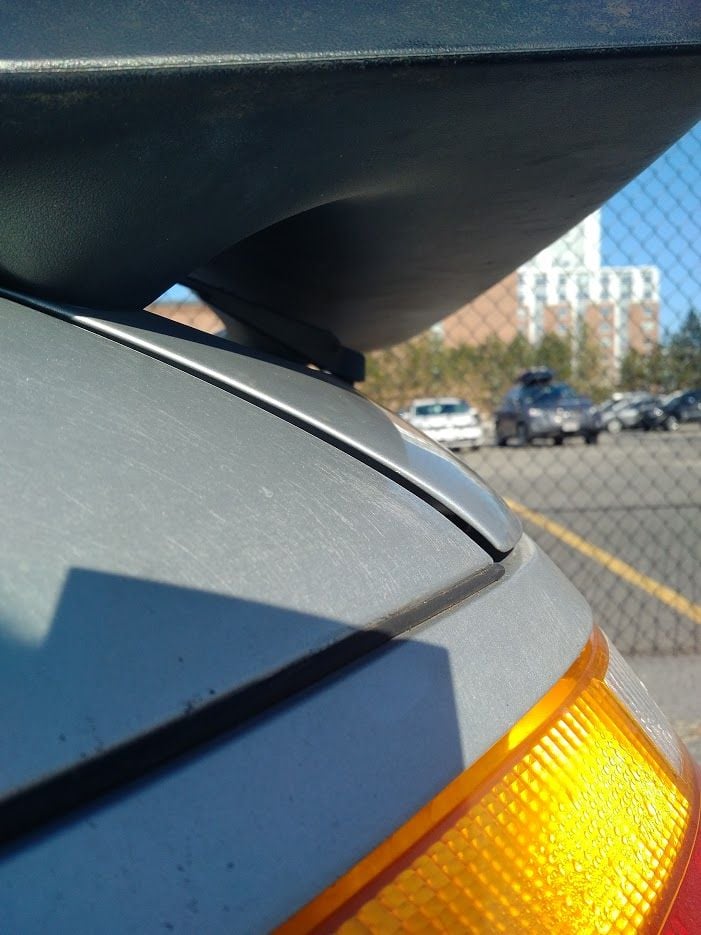
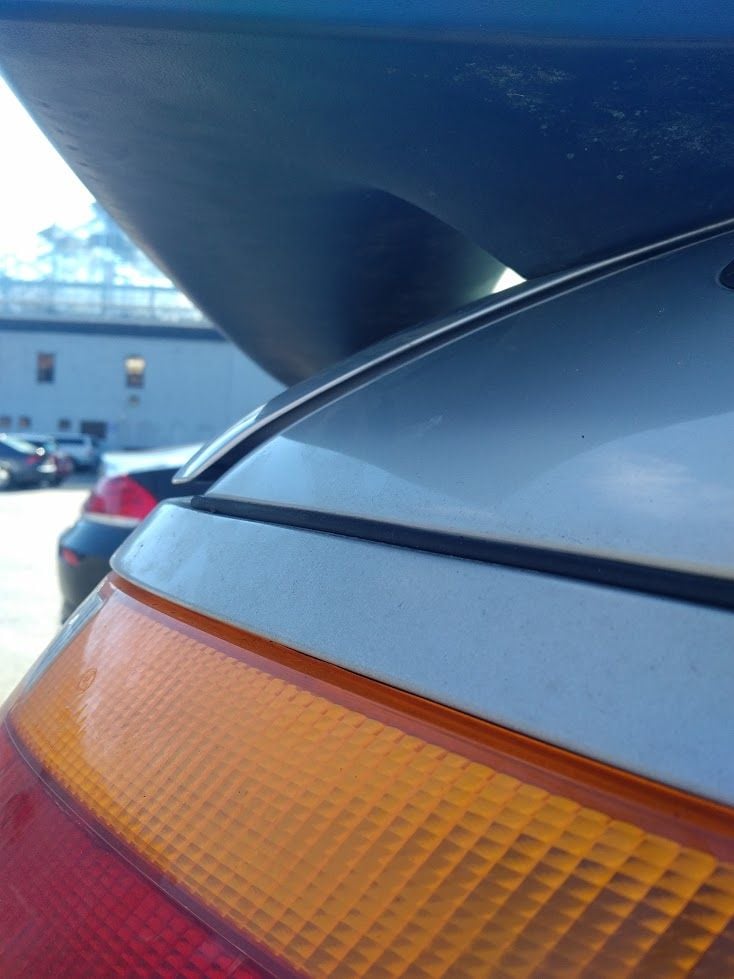
When the hatch sits closed, it should be flush on both sides with the rear panels. When I close my hatch so that it is "locked", it sits flush with the driver side, but not the passenger side. If I remove both hatch pistons, and both the hatch adjustable rubber tabs, it still doesn't sit flush. See the photos below (I know they're not the perfect angle for comparison, but the passenger side doesn't sit flush, and is off by about 1/8" to 3/16").
Am I gasping at straws, and the liner insert will fix my problems. Or, is there some misalignment (or obstruction I haven't found), which is going to prevent optimal closing and in the long-run, added stress on the new liner?
Thanks for any suggestions on how to tweak!

Driver's Side Rear Hatch (flush).<br/><br/>Shocks and rubber inserts have been removed, and hatch has been pushed down into the lock (click is heard when locking it, and takes medium force to unlatch hatch)

Passenger's Side Rear Hatch (not flush).<br/><br/>Shocks and rubber inserts have been removed, and hatch has been pushed down into the lock (click is heard when locking it, and takes medium force to unlatch hatch)
#28
Intermediate
Join Date: Aug 2015
Location: Cambridge, MA
Posts: 46
Likes: 0
Received 0 Likes
on
0 Posts
#29
Addict
Lifetime Rennlist
Member
Lifetime Rennlist
Member
where the hinges bolt to the roof is slotted and adjustable under two small plastic covers in the headliner. Also the receiver for the latch on the body of the car can be raised and lowered with shims if needed.


