


HVAC Fibre Optic Filament
Addict
Rennlist Member
Rennlist Member

Joined: Aug 2002
Posts: 3,488
Likes: 163
From: Plano, Tx.
Finally,
Would like to see the way to illuminate the fan. (Especially if it's easy!! )
)
Hope to see you at Cars/Coffee next Saturday for our get together.
I did the LED upgrade on the 79 and then did the upgrade last year on the GTS.
As Finally said, one of the problems is, the LEDs do NOT shine on the Fiber Optic pickups for the sliders. John Curry turned me on to multi head LEDs.
That's what did the trick. The sliders and the face of the unit illuminate really well and all I had to do is replace one bulb.
I've always gotten all my LEDs from these guys over the years w good results.
http://autolumination.com/74.htm
You can get 1 head, 3 head, or even up to 5 head LEDs for different applications. I installed the 3 head for the HVAC Head Unit.
From the website above:
"Matrix 3 led x brighter than than conventional single #74 leds
3x leds emit light in all directions"
Would like to see the way to illuminate the fan. (Especially if it's easy!!
)Hope to see you at Cars/Coffee next Saturday for our get together.
I did the LED upgrade on the 79 and then did the upgrade last year on the GTS.
As Finally said, one of the problems is, the LEDs do NOT shine on the Fiber Optic pickups for the sliders. John Curry turned me on to multi head LEDs.
That's what did the trick. The sliders and the face of the unit illuminate really well and all I had to do is replace one bulb.
I've always gotten all my LEDs from these guys over the years w good results.
http://autolumination.com/74.htm
You can get 1 head, 3 head, or even up to 5 head LEDs for different applications. I installed the 3 head for the HVAC Head Unit.
From the website above:
"Matrix 3 led x brighter than than conventional single #74 leds
3x leds emit light in all directions"
Three Wheelin'

Joined: Sep 2010
Posts: 1,452
Likes: 43
From: Dallas/Ft. Worth
OK, got it all done but need to check out another idea before I post the DIY, etc.
got some great news, Wojtek is sending me some of the extra HVAC overlays so I can complete my LED project... He is also sending the TIFF files so I can get others made as well!
Below is what he is sending me, great guy!

So any of you with faded, cracking, etc. of the above might have a solution very soon!
got some great news, Wojtek is sending me some of the extra HVAC overlays so I can complete my LED project... He is also sending the TIFF files so I can get others made as well!
Below is what he is sending me, great guy!
So any of you with faded, cracking, etc. of the above might have a solution very soon!
Rennlist Member
Joined: Jul 2009
Posts: 1,923
Likes: 13
From: Austin, Texas
I am interested in this solution. I took my controller apart and I am missing one fiber optic cable for the lower slider. There is a 3 cable wire set that junctions into a single socket.
Three Wheelin'
Joined: Sep 2010
Posts: 1,452
Likes: 43
From: Dallas/Ft. Worth
OK... finished up tonight the HVAC LED upgrade including the fan **** illumination.
The items which I wanted to address were:
llumincation of the
1 fan control **** which is not lit from the factory
2 brighten the lighting of the temp/selection area above and below the sliders
3 brighten the white ends on the sliders
First...
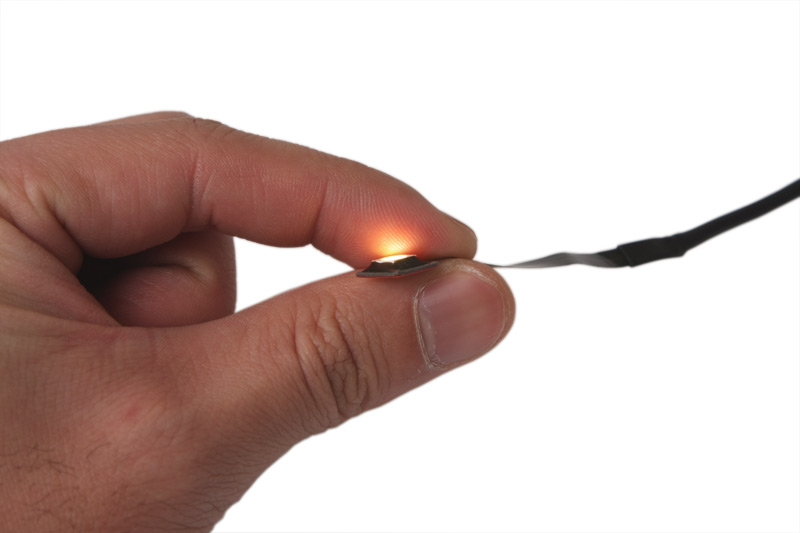
In order, the fan control **** took the most work though frankly now that I figured out what I think is the best solution it would be a piece of cake. I tried running fiber optic to it but it did not provide the even lighting I wanted and the fiber optic cable caused binding when the **** was turned. Instead I found some surface mount LED's at autozone, they come 12 or so on a board. I simply desoldered one of them. Then to put it in the **** drilled out a spot after removing the **** (it simply pries off) and the portion with the fan silkscreen which is easily removed with a small screwdriver. In other words, remove ****, remove silkscreened fan center portion, drill with a large bit enough to make a cavity for the surface mount led. Then take a small drill bit and drill two holes, one at 9 and one at 3 for the wires from the LED to feed through. Then in the arean behind the ****, on the HVAC unite itself, drill a 1/4 circle from approx 5 o'clock to around 8 0'clock to feed the power wire for the LED through.
I found the LED too bright so after much searching and trial and error cut off the cap from a tube of Chapstick and placed it over the LED. It diffused the LED just enough and toned it down as well. I also used a nail file to file down the top of the LED a bit for this reason as well. Once I was happy with the LED placement in the **** I secured it with a few shots of hot glue.
SECOND
I tried the LED kit from Jager and frankly was underwhelmed. While it did brighten the area where temp is chosen it was not by much. After taking the HVAC unit apart I found this to be the design from the factory. The cavity behind the display is black in the interior so no reflective properties at all! TO improve this I bought some chrome tape at Auto Zone and cut it to size and put on the sides, top and bottom insde. THe next step was illumination. While at Auto ZOne I found some LED strips which were made so they could be cut, figured what the heck, only $8.00. Worked EXCELLENT! I cut each on the lines they provide and they fit perfect and the illumination is excellent.
LASTLY...
OF course this left the slider ***** and since I had done away with the OEM tiny *** bulb which lit them via fiber optics this was the last step (and also the area by the fan **** (HI FAN LO text area). I sourced some super bright LED's from and fiber optice cable of various sizes. Find out the 16 strand provided the best light as well as flexibility. I tried running multiple runs of the fiber optice to a single led but could not get them to stay aligned well enough for even short term. Due to this the simple solution was to have an individual LED for each of the slider ***** as well as the top and bottom OEM areas of the HI FAN LO circling the fan ****.
So, in all ran 4 individual LED's with fiber optic cable (the OEM cable is crap IMHO) to the sliders and area surrounding the fan control ****
strips of LED's (see pic below from Auto Zone) for the area behind the temp/selection
and another surface mount LED for the fan control **** itself.
Below are some pics... Forgive the poor photos, all I have is my iPhone.. "P
The place I bought the LED's and fiber optic from will be sending me a "kit" price later this week for anyone who might be interested. I also have an extra fan control **** which I bought as an extra in case this went south... Be glad to convert for someone if you want for a low fee, say $25. Not wanting to do this as a business though!
I could not get a pic of final product lit to come out as it really is. In the pic below it looks WAAAAAAAAAAAAAAAAY bright which it is not.
The items which I wanted to address were:
llumincation of the
1 fan control **** which is not lit from the factory
2 brighten the lighting of the temp/selection area above and below the sliders
3 brighten the white ends on the sliders
First...
In order, the fan control **** took the most work though frankly now that I figured out what I think is the best solution it would be a piece of cake. I tried running fiber optic to it but it did not provide the even lighting I wanted and the fiber optic cable caused binding when the **** was turned. Instead I found some surface mount LED's at autozone, they come 12 or so on a board. I simply desoldered one of them. Then to put it in the **** drilled out a spot after removing the **** (it simply pries off) and the portion with the fan silkscreen which is easily removed with a small screwdriver. In other words, remove ****, remove silkscreened fan center portion, drill with a large bit enough to make a cavity for the surface mount led. Then take a small drill bit and drill two holes, one at 9 and one at 3 for the wires from the LED to feed through. Then in the arean behind the ****, on the HVAC unite itself, drill a 1/4 circle from approx 5 o'clock to around 8 0'clock to feed the power wire for the LED through.
I found the LED too bright so after much searching and trial and error cut off the cap from a tube of Chapstick and placed it over the LED. It diffused the LED just enough and toned it down as well. I also used a nail file to file down the top of the LED a bit for this reason as well. Once I was happy with the LED placement in the **** I secured it with a few shots of hot glue.
SECOND
I tried the LED kit from Jager and frankly was underwhelmed. While it did brighten the area where temp is chosen it was not by much. After taking the HVAC unit apart I found this to be the design from the factory. The cavity behind the display is black in the interior so no reflective properties at all! TO improve this I bought some chrome tape at Auto Zone and cut it to size and put on the sides, top and bottom insde. THe next step was illumination. While at Auto ZOne I found some LED strips which were made so they could be cut, figured what the heck, only $8.00. Worked EXCELLENT! I cut each on the lines they provide and they fit perfect and the illumination is excellent.
LASTLY...
OF course this left the slider ***** and since I had done away with the OEM tiny *** bulb which lit them via fiber optics this was the last step (and also the area by the fan **** (HI FAN LO text area). I sourced some super bright LED's from and fiber optice cable of various sizes. Find out the 16 strand provided the best light as well as flexibility. I tried running multiple runs of the fiber optice to a single led but could not get them to stay aligned well enough for even short term. Due to this the simple solution was to have an individual LED for each of the slider ***** as well as the top and bottom OEM areas of the HI FAN LO circling the fan ****.
So, in all ran 4 individual LED's with fiber optic cable (the OEM cable is crap IMHO) to the sliders and area surrounding the fan control ****
strips of LED's (see pic below from Auto Zone) for the area behind the temp/selection
and another surface mount LED for the fan control **** itself.
Below are some pics... Forgive the poor photos, all I have is my iPhone.. "P
The place I bought the LED's and fiber optic from will be sending me a "kit" price later this week for anyone who might be interested. I also have an extra fan control **** which I bought as an extra in case this went south... Be glad to convert for someone if you want for a low fee, say $25. Not wanting to do this as a business though!
I could not get a pic of final product lit to come out as it really is. In the pic below it looks WAAAAAAAAAAAAAAAAY bright which it is not.
Rennlist Member
Joined: Feb 2002
Posts: 1,240
Likes: 38
From: Allentown, PA
Nice work, I need to do this too, sliders are too dim. My HVAC head unit doesn't have the fan speed numbers, I guess PO had the unit apart and left out the numbers, so I get a big bright light out of the clear window. Anyone have a spare bad HAVC unit that I can strip out the fan speed number from? Please post the "kit" information when you get it. I would also like to get the new overlays.
Three Wheelin'
Joined: Sep 2010
Posts: 1,452
Likes: 43
From: Dallas/Ft. Worth
Nice work, I need to do this too, sliders are too dim. My HVAC head unit doesn't have the fan speed numbers, I guess PO had the unit apart and left out the numbers, so I get a big bright light out of the clear window. Anyone have a spare bad HAVC unit that I can strip out the fan speed number from? Please post the "kit" information when you get it. I would also like to get the new overlays.
Rennlist Stories
The Best Porsche Posts for Porsche Enthusiasts

Genius Porsche-Themed Gifts That'll Make Any Dad or Grad Smile
Joe Kucinski
10 Used Porsches Are Selling for Way Too Cheap
Joe Kucinski
Tuner Is Converting Porsche 911s Into Shooting Brakes
Verdad Gallardo
This Coachbuilt Creation Is A Modern Take on the Legendary Porsche 917
Verdad Gallardo
Is This Convertible Cayenne A Steal, Or A Returnless Investment?
Verdad Gallardo
10 Best Non-Flat Six Porsches You Can Buy For Under $100K
Joe Kucinski
Porsche's Top 5 Most Questionable Naming Decisions
Verdad Gallardo
Pogea Racing's 964 Porsche 911 Reimagination Stands Out in a Crowded Field
Verdad Gallardo
6 Convertible Top MYTHS Most People Don't Understand!
Michael S. PalmerRennlist Member
Joined: Jul 2009
Posts: 1,923
Likes: 13
From: Austin, Texas
As I mentioned earlier I am interested as my HVAC control unit is missing the single fiber optic for the lower slider. How did you deal with the fitting of the fiber optics into the openings into the bulb housing?
Where did you attache the LED strips for repacing the single bulb. Do they also supply the light to the fiber optics?
Where did you source the fiber optics?
Where did you attache the LED strips for repacing the single bulb. Do they also supply the light to the fiber optics?
Where did you source the fiber optics?
Three Wheelin'
Joined: Sep 2010
Posts: 1,452
Likes: 43
From: Dallas/Ft. Worth
As I mentioned earlier I am interested as my HVAC control unit is missing the single fiber optic for the lower slider. How did you deal with the fitting of the fiber optics into the openings into the bulb housing?
Where did you attache the LED strips for repacing the single bulb. Do they also supply the light to the fiber optics?
Where did you source the fiber optics?
Where did you attache the LED strips for repacing the single bulb. Do they also supply the light to the fiber optics?
Where did you source the fiber optics?
Not clear what you are asking: "How did you deal with the fitting of the fiber optics into the openings into the bulb housing?" Please clarify
Next..
"Where did you attache the LED strips for repacing the single bulb. Do they also supply the light to the fiber optics?"
Inside the HVAC unit, i.e. the cavity behind the area where the sliders slide. Will post a pic later. No, they do not supply light for the fiber optics, I ran separate LED's for each fiber optic line.
"Where did you source the fiber optics?"
Got here: www.TheFiberOpticStore.com
Ask for Paul, he is putting together the kits, once I have the info from him I will post here.
Overall the mods are pretty simple. Was hard the first time but mostly that was due to the trial and error nature of it.
Rennlist Member
Joined: Jul 2009
Posts: 1,923
Likes: 13
From: Austin, Texas
Not clear what you are asking: "How did you deal with the fitting of the fiber optics into the openings into the bulb housing?" Please clarify
Next..
"Where did you attache the LED strips for repacing the single bulb. Do they also supply the light to the fiber optics?"
Inside the HVAC unit, i.e. the cavity behind the area where the sliders slide. Will post a pic later. No, they do not supply light for the fiber optics, I ran separate LED's for each fiber optic line.
"Where did you source the fiber optics?"
Got here: www.TheFiberOpticStore.com
Ask for Paul, he is putting together the kits, once I have the info from him I will post here.
Overall the mods are pretty simple. Was hard the first time but mostly that was due to the trial and error nature of it.[/QUOTE]
The three wire fiber optic has a metal sl;eeve the slides snuggly into the back of the hvac housing next to the bulb. A like single fiber optic cable would flop around in the other smaller opening in the HVAC housing. How do you keep the fiber optic wire in the housing without an OEM sleeve?
Three Wheelin'
Joined: Sep 2010
Posts: 1,452
Likes: 43
From: Dallas/Ft. Worth
JIm, I did not use in my mods the three FOF or the OEM bulb at all... The LED's I got from www.thefiberopticstore.com were mated to the FOF using heat shrink. and just to make sure they did not wiggle around I cut some ball point pen barrels and slid those over the heat shrinked area as well as an add'l precaution to keep from moving. the LED's I got from Auto Zone, see the Flex LED in post above, went inside the cavity, see below, after I put some chrome tape in there to increase reflectivity.
Below is PRIOR to putting the Flex LED or the chrome tape in..
Hope this helps!
Below is PRIOR to putting the Flex LED or the chrome tape in..
Hope this helps!
Three Wheelin'
Joined: Sep 2010
Posts: 1,452
Likes: 43
From: Dallas/Ft. Worth
Easy way to light up the Fan control ****...
Get one of these surface mount LED's:
http://cgi.ebay.com/ebaymotors/1-TIN...item1e63b2a062
After you remove the HVAC control unit:
1. pull the fan control **** off with a small screwdriver
2. Remove the center part of the ****, the part with the fan silkscreened, use a small screwdriver
3. Drill a hole large enough for the LED wire to feed through around the 5 o'clock position
4. Where the fan **** slides on dril a hole for the wire at the 5 o'clock position, i.e. the LED wil be placed in the ****, wire fed through the hole and then when you put the **** back on fed through this hole
5. splice into same power as other lights for HVAC unite are on
Done!