
Rear speaker installation.
 11-21-2010, 06:44 PM
#1
Track Day
Thread Starter
Hi all,
If anyone's contemplating replacing the rear (bass) speakers in their 928 you'll probably have quickly realized that it's not easy to make replacements fit properly due to the curved nature of the mounting surface and the fact that the original speaker units and the curved mounting/backing plate are molded as one unit
The rear speakers on my '89, with the 10 speaker system, were buzzing annoyingly. On removing the covers, (tough in itself!) I found that the outer foam/rubber ring, between the cone and the speaker frame had perished and in fact, had completely disintegrated.
My car has an after market head unit fitted and I guessed it would be OK just to use a more common, 4 ohm replacement speaker unit instead of the 2 ohm originals.
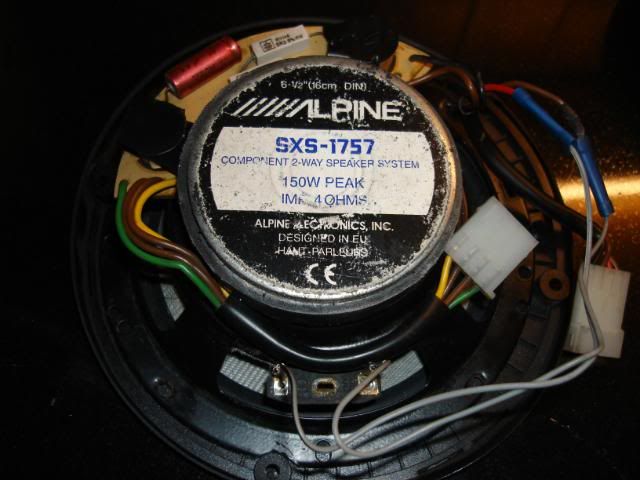
From reading the forum here, I realized I needed a 6.5 inch (16cm) speaker so I used a set of appropriately sized 150 watt Alpines which matched the existing head unit.
I can make no claims about fully understanding the whole 2 ohm/4 ohm, crossover wiring thing,
I did however, have a good go at installing the the new speakers in the old mountings and I thought I'd share the process here.
Excuse me If this has already been posted before, but I while I found several references to cutting the old speakers out of their mountings, I couldn't find a guide with photos.
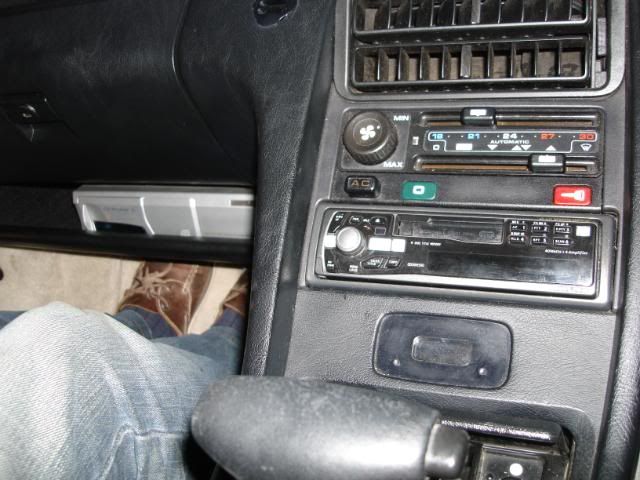
My system.
Alpine radio cassette and 6 CD changer. Old but still good.
---------------------------------------------------------------------
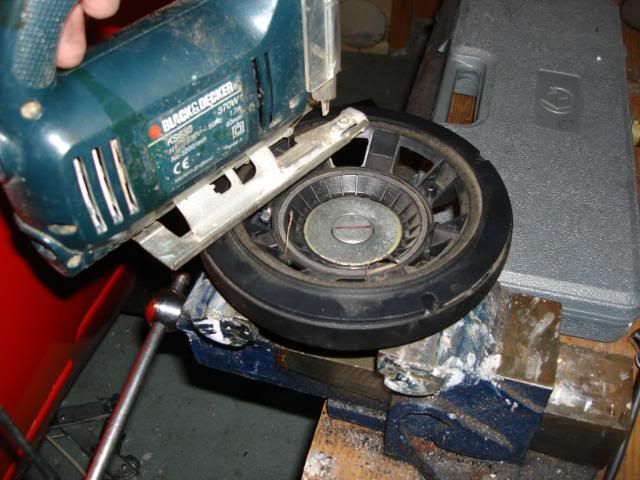
To mount the new speakers, you want to separate the old speaker core from the outer curved plastic piece. I threw caution to the wind, mounted the speakers in the bench vise and used the trusty ol' black & decker jig saw. A bit agricultural, but it did the trick.
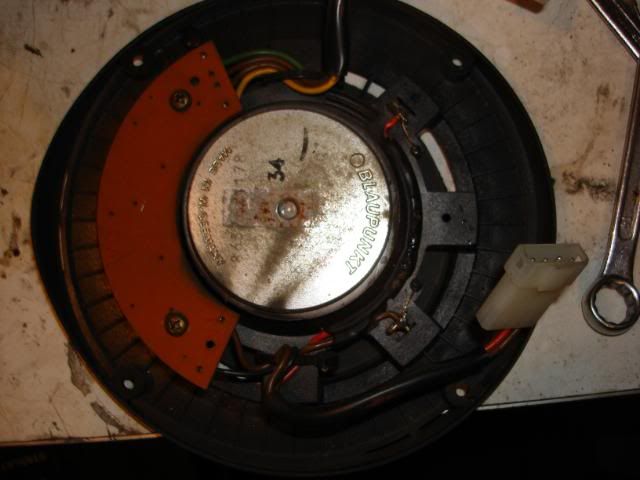
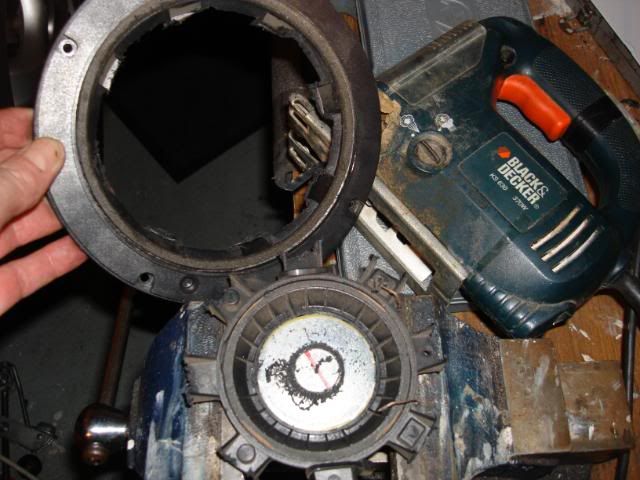
The back of the original speaker.
---------------------------------------
Jig saw.
---------
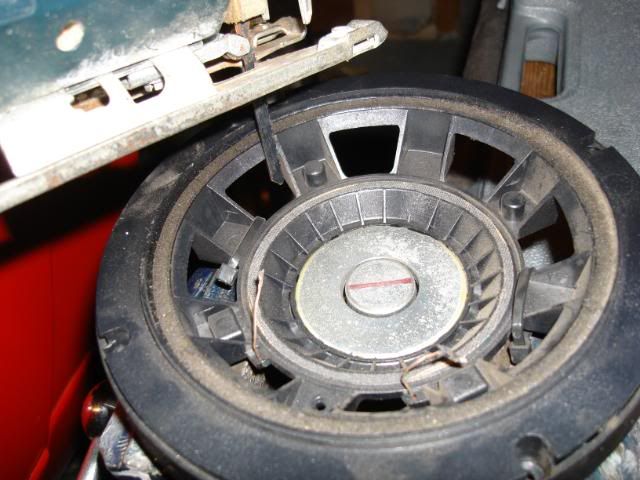
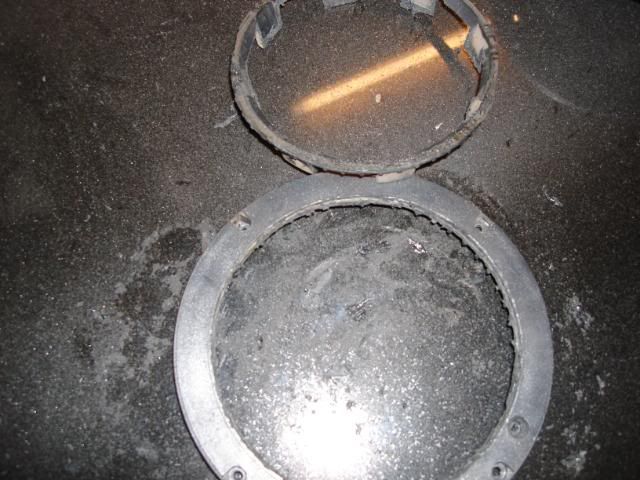
This is the piece that your after, It will now need to be trimmed and cleaned up.
-------------------------------------------------------------------------------------------
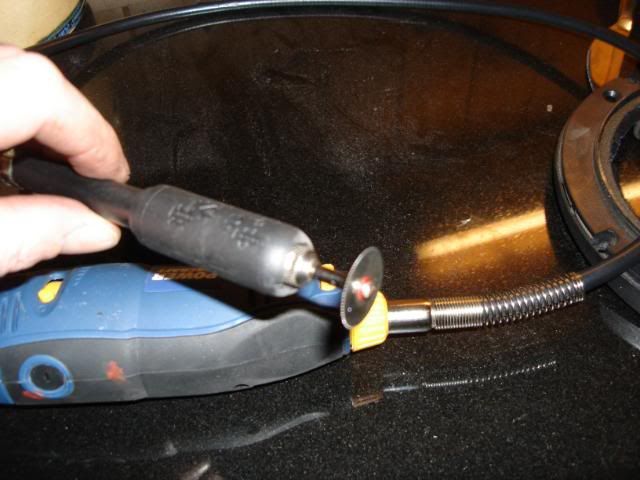
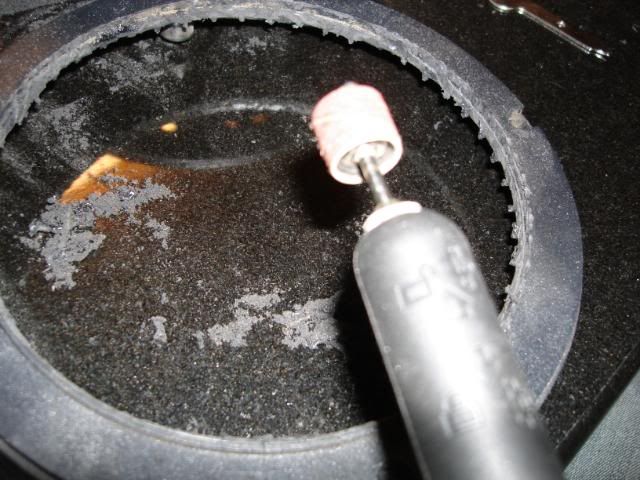
I used a Dremel type tool, with an extension piece and a circular cutting disk. To separate the outer piece from the rest of the mount.
You need to cut around the inside of the raised rib on the backing plate. Looking at the pic now, it looks like I'm cutting on the outside of the raised edge but the cut is actually on the inside.
-------------------------------------------------------------------------------------
You will end up with just the outer ring, like this.
-------------------------------------------------------
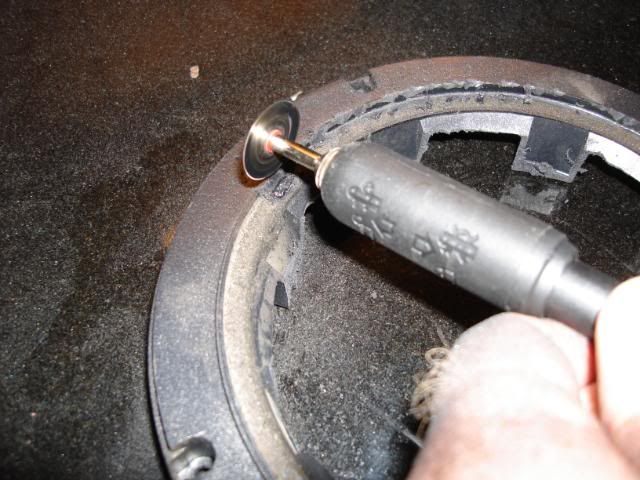
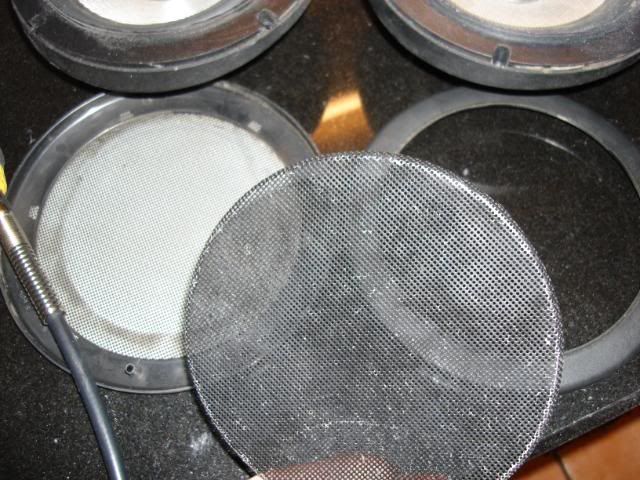
You'll then need to clean up all the rough edges with the Dremel using one of the grinding/sanding bits.
-------------------------------------------------------------------------------------------
Now the tricky part,
To get the speaker to sit flush against the inside of the mount, I had to make two small cuts in the metal speaker frame to accommodate the mounting points. I used the cutting disk in the Demel again for this.
This does mean that the speaker is very slightly off center ,but you can't tell from the front and also, if your careful, you can make the speaker a nice snug fit with the mount.
---------------------------------------------------------------------------------------
These wont be needed.
---------------------------
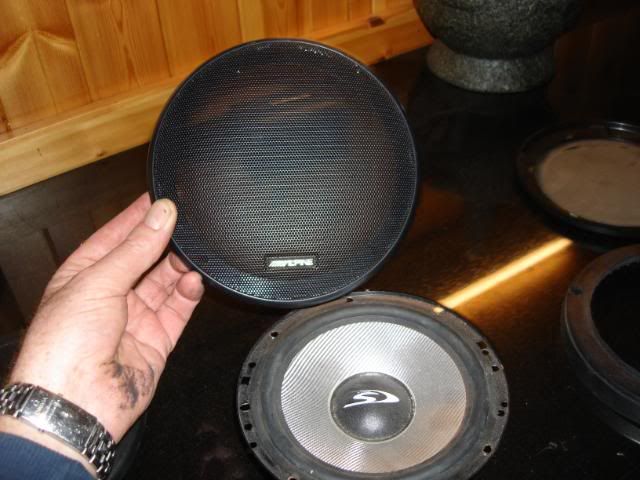
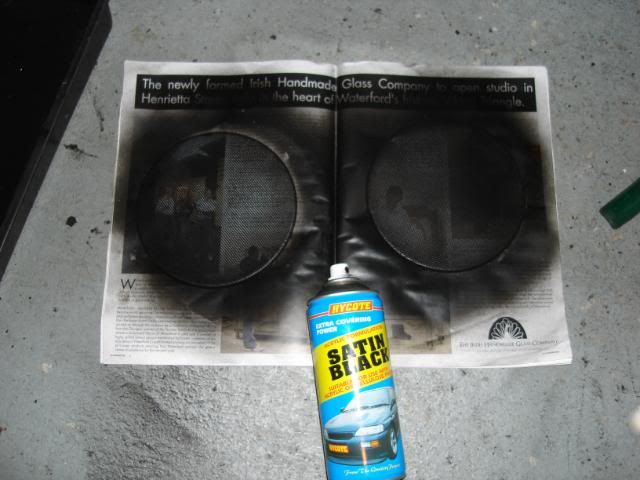
My original grilles were a bit tatty, so I bent up the tabs at the rear to remove the grills from the mounts and gave them a light sanding and a few coats of satin black.
----------------------------------------------------------------------------------
As I mentioned, earlier I am no expert at audio wiring, but looking at the originals, I could see that there was an �in� connector coming from the speaker loom and an �out� connector going to the rearmost speakers in the rear panel. The two wires, red and brown, that power the woofer which I was replacing, came straight from the loom and did not connect to the circuit board, so thats where I connected the new speaker. I was able to mount the electronic gubbins around the new speaker.
--------------------------------------
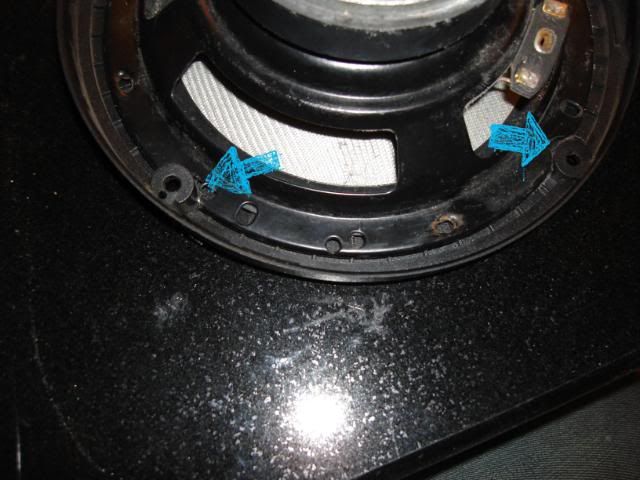
When fitting the speakers and mounts to the car I had a small clearance issue which required the use of some more, eh, robust tools to overcome, basically I beat the crap out of the lower inside panel (arrowed in the pic) with a lump hammer! Very sophisticated! However I only needed a little bit of extra clearance and now they fit just fine.
-----------------

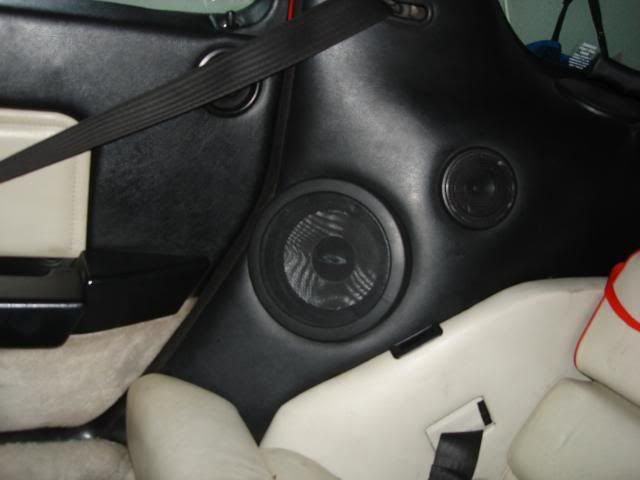
Finished article. I was well chuffed as they sounded fantastic, with a nice rich bass sound.
----------------------------------------------------------------------------------
Hope this is of some use to other rennlisters. The forum has been a fantastic help to me, during my current timing belt replacement/tensioner rebuild project.
Regards,
Mark.
Ireland
If anyone's contemplating replacing the rear (bass) speakers in their 928 you'll probably have quickly realized that it's not easy to make replacements fit properly due to the curved nature of the mounting surface and the fact that the original speaker units and the curved mounting/backing plate are molded as one unit
The rear speakers on my '89, with the 10 speaker system, were buzzing annoyingly. On removing the covers, (tough in itself!) I found that the outer foam/rubber ring, between the cone and the speaker frame had perished and in fact, had completely disintegrated.
My car has an after market head unit fitted and I guessed it would be OK just to use a more common, 4 ohm replacement speaker unit instead of the 2 ohm originals.
From reading the forum here, I realized I needed a 6.5 inch (16cm) speaker so I used a set of appropriately sized 150 watt Alpines which matched the existing head unit.
I can make no claims about fully understanding the whole 2 ohm/4 ohm, crossover wiring thing,
I did however, have a good go at installing the the new speakers in the old mountings and I thought I'd share the process here.
Excuse me If this has already been posted before, but I while I found several references to cutting the old speakers out of their mountings, I couldn't find a guide with photos.
My system.
Alpine radio cassette and 6 CD changer. Old but still good.
---------------------------------------------------------------------
To mount the new speakers, you want to separate the old speaker core from the outer curved plastic piece. I threw caution to the wind, mounted the speakers in the bench vise and used the trusty ol' black & decker jig saw. A bit agricultural, but it did the trick.
The back of the original speaker.
---------------------------------------
Jig saw.
---------
This is the piece that your after, It will now need to be trimmed and cleaned up.
-------------------------------------------------------------------------------------------
I used a Dremel type tool, with an extension piece and a circular cutting disk. To separate the outer piece from the rest of the mount.
You need to cut around the inside of the raised rib on the backing plate. Looking at the pic now, it looks like I'm cutting on the outside of the raised edge but the cut is actually on the inside.
-------------------------------------------------------------------------------------
You will end up with just the outer ring, like this.
-------------------------------------------------------
You'll then need to clean up all the rough edges with the Dremel using one of the grinding/sanding bits.
-------------------------------------------------------------------------------------------
Now the tricky part,
To get the speaker to sit flush against the inside of the mount, I had to make two small cuts in the metal speaker frame to accommodate the mounting points. I used the cutting disk in the Demel again for this.
This does mean that the speaker is very slightly off center ,but you can't tell from the front and also, if your careful, you can make the speaker a nice snug fit with the mount.
---------------------------------------------------------------------------------------
These wont be needed.
---------------------------
My original grilles were a bit tatty, so I bent up the tabs at the rear to remove the grills from the mounts and gave them a light sanding and a few coats of satin black.
----------------------------------------------------------------------------------
As I mentioned, earlier I am no expert at audio wiring, but looking at the originals, I could see that there was an �in� connector coming from the speaker loom and an �out� connector going to the rearmost speakers in the rear panel. The two wires, red and brown, that power the woofer which I was replacing, came straight from the loom and did not connect to the circuit board, so thats where I connected the new speaker. I was able to mount the electronic gubbins around the new speaker.
--------------------------------------
When fitting the speakers and mounts to the car I had a small clearance issue which required the use of some more, eh, robust tools to overcome, basically I beat the crap out of the lower inside panel (arrowed in the pic) with a lump hammer! Very sophisticated! However I only needed a little bit of extra clearance and now they fit just fine.
-----------------
Finished article. I was well chuffed as they sounded fantastic, with a nice rich bass sound.
----------------------------------------------------------------------------------
Hope this is of some use to other rennlisters. The forum has been a fantastic help to me, during my current timing belt replacement/tensioner rebuild project.
Regards,
Mark.
Ireland
 11-21-2010, 08:19 PM
#2
Rennlist Member
Outstanding
 11-22-2010, 12:50 PM
#6
Racer
Join Date: Jan 2008
Location: Coppell TX
Posts: 441
Likes: 0
Received 0 Likes
on
0 Posts
I took the redneck approach. Wanted the stock look. I used a siliconized latex clear caulk and caulked mine into the origional covers. Once they are in, looks factory.
Did a bead around the mounting face of speaker, set it in the cover and let it cure. Then went around the edge and sealed it up. So far so good.
Did a bead around the mounting face of speaker, set it in the cover and let it cure. Then went around the edge and sealed it up. So far so good.