
Powder coating intake/cam covers/etc. best practices (for the zillionth time!)
 09-08-2010, 08:11 PM
#31
Addict
Rennlist Member
Rennlist Member
Thread Starter
Hey Ed. I want to chime in here as I just did this whole job a couple days ago. Strangely familiar this is.. I used fiberglass tape to mask off the threads for the fuel rail studs. Tapered silicon plugs for underneath as well as temp sensor. You can either pull them before or after baking. I pulled mine before. I masked off the cavity for the flappy but I dont' see why you couldn't plug it.
From some research on a few pc forums, the basic principle seams to be that 'nothing good happens to a part after it comes out of the blast cabinet.' I mean the longer it sits exposed to air the more contamination it will absorb. My own, limited experience is that Mag will oxidize overnight. It comes out of the blaster appearing nearly white, but will fade to a dull grey after about 12 hrs. I've never waited that long to PC anything so I don't know how it would affect the finish. Blasting will remove, say 90-95% of the original coating. Thats just my personal experience and I'm learning a ton about this stuff. Its an artform. I'm really anxious to hear how your shop does and what steps they follow. Thanks for your write-up and continued updates.
From some research on a few pc forums, the basic principle seams to be that 'nothing good happens to a part after it comes out of the blast cabinet.' I mean the longer it sits exposed to air the more contamination it will absorb. My own, limited experience is that Mag will oxidize overnight. It comes out of the blaster appearing nearly white, but will fade to a dull grey after about 12 hrs. I've never waited that long to PC anything so I don't know how it would affect the finish. Blasting will remove, say 90-95% of the original coating. Thats just my personal experience and I'm learning a ton about this stuff. Its an artform. I'm really anxious to hear how your shop does and what steps they follow. Thanks for your write-up and continued updates.
Note that Caswell has a whole bunch of silicone plugs and caps (including flanged ones, which should be really useful where bare metal needs to be maintained under washers for electrical or sealing reasons); I'm expecting that the PCers will have an ample supply of these on hand.
Thanks again, everyone for your comments so far. My knowledge on this topic has increased immensely over the last day or so, and my confidence in being able to provide details to the PCers that will (I hope) raise the probability of getting good results has gone way up.

I'd really appreciate hearing any "That's it!" or "Uh... do that differently" on the guide examples I put in posts #28 and #30.
 09-08-2010, 08:20 PM
#32
Drifting
You need to shop for a cheaper powder coater. I got my whole intake done for about $200 and the 2v version is 9 pieces in total.
09-08-2010, 08:57 PM
#33

(in case you're wondering, Sean has that manifold now. He cleaned up my old S4 manifold which I painted ahead of time to speed up the job. There wasn't anything on the inside of that manifold, either because it never had it, or because Sean blew it all out, don't know which ;-)
 09-09-2010, 03:27 AM
#34
Addict
Rennlist Member
Rennlist Member
Thread Starter
Here's another one:
Part Name: Intake End Plates
General Information
Warnings!
(Note: I'd like to list anything really important here, like "avoid this kind of stripping chemical", or "avoid this kind of blast media")
Cleaning
Masking
Mask and plug using the following annotated photos as a guide.
Front view:

Rear view:
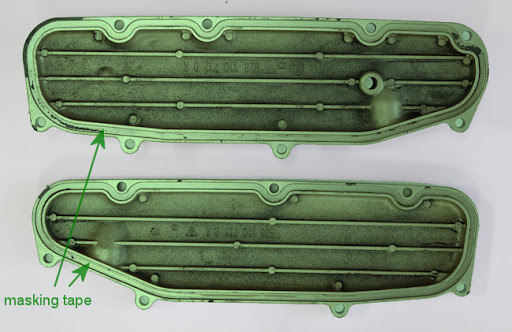
Part Name: Intake End Plates
General Information
- Material: aluminum/magnesium alloy
Warnings!
(Note: I'd like to list anything really important here, like "avoid this kind of stripping chemical", or "avoid this kind of blast media")
- Coat this part promptly after cleaning; it oxidizes quickly.
Cleaning
- Strip all interior and exterior surfaces using chemical strippers and media blasting.
- Bake until you are sure all oils and contaminants have been outgassed.
Masking
Mask and plug using the following annotated photos as a guide.
Front view:
Rear view:
Last edited by Ed Scherer; 11-06-2010 at 07:29 PM.
09-09-2010, 03:36 AM
#35
Addict
Rennlist Member
Rennlist Member
Thread Starter
And yet another one:
Part Name: Water Bridge
General Information
Cleaning
Masking
Mask and plug using the following annotated photos as a guide.
Top view:
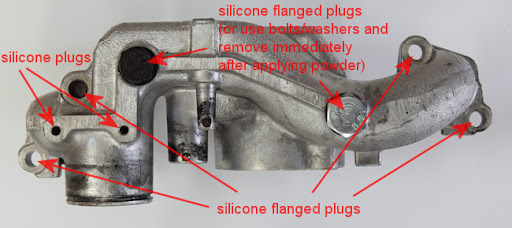
Bottom view:

Front view:
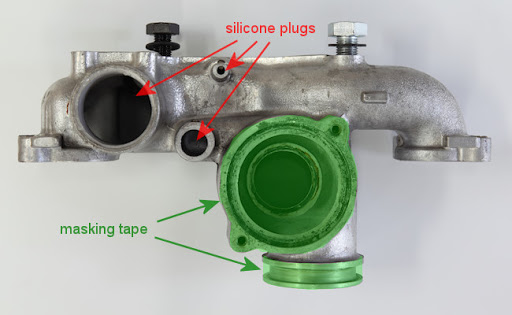
Part Name: Water Bridge
General Information
- Material: aluminum
Cleaning
- Strip all interior and exterior surfaces using chemical strippers and media blasting.
- Bake until you are sure all oils and contaminants have been outgassed.
Masking
Mask and plug using the following annotated photos as a guide.
Top view:
Bottom view:
Front view:
09-09-2010, 03:40 AM
#36
Addict
Rennlist Member
Rennlist Member
Thread Starter
And, finally:
Part Name: Thermostat Elbow
General Information
Cleaning
Masking
Mask and plug using the following annotated photo as a guide.
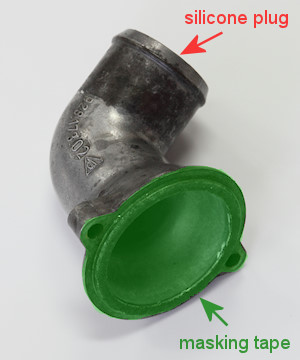
Part Name: Thermostat Elbow
General Information
- Material: aluminum
Cleaning
- Strip all interior and exterior surfaces using chemical strippers and media blasting.
- Bake until you are sure all oils and contaminants have been outgassed.
Masking
Mask and plug using the following annotated photo as a guide.
09-22-2010, 03:07 AM
#37
Addict
Rennlist Member
Rennlist Member
Thread Starter
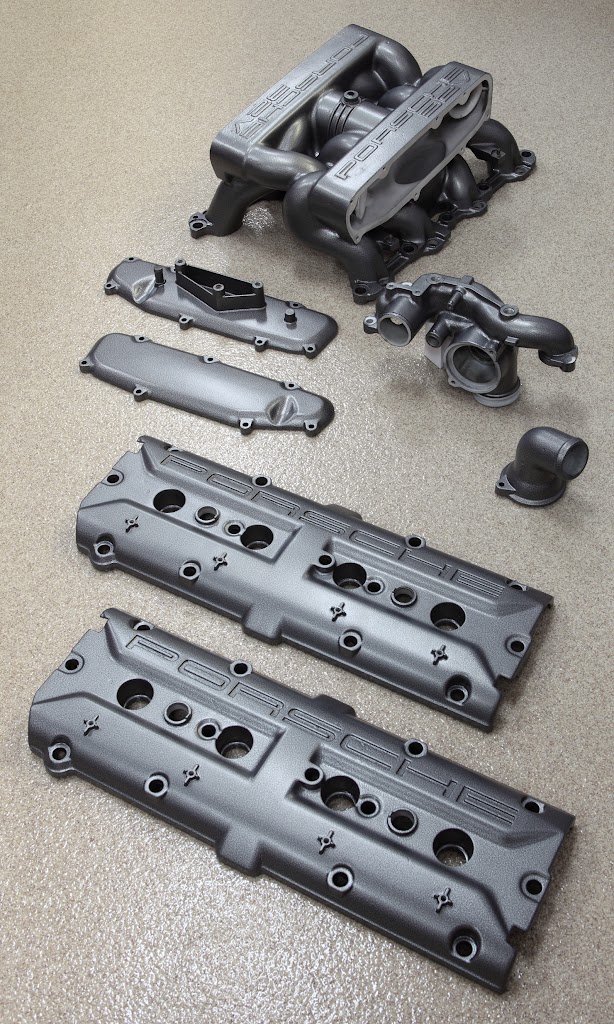
Well, mine is done. See the post #65 "Powder coated parts are done" (and/or post #1 in this thread) for more comments and photos.
Now that I've been through this experience myself, when I have some more time, I'll update post #1 in this thread based on these experiences. Some of the stuff I was worried about I probably didn't need to be. On the other hand, just being thorough and specifying in writing what I wanted and talking the powder coater guy through it when I met him seems to have worked quite well.
Since I did write up a 12-page guide that I gave to the powder coater, I'll see if I can rework that such that it would be of general use for fellow Rennlisters and then include a link to it in post #1 of this thread. It was kind of cool that pretty much everything was done right without so much as one additional phone call.

Last edited by Ed Scherer; 05-09-2011 at 11:51 PM.
11-06-2010, 08:46 PM
#38
Addict
Rennlist Member
Rennlist Member
Thread Starter
Since there have been a number of posts over the last few days about powder coating or otherwise refinishing the intake/cam covers/etc., I figured it was about time to go back and update post #1 in this thread with the guide I promised more than a month ago. Perhaps it will be of use to somebody.
It's there now.
It's there now.
11-07-2010, 08:44 AM
#41
Team Owner
Ed that looks great from your finished picture, I like the color choice. A few things i would suggest
your looks Airfilter upside down, picture below indicates correct way
Replace the Power Steering reservoir with new part, and both of the short hoses, new part will match your intake, its black.
Get some blue masking tape put it on the foil stickers on the radiator then with some mothers polish the top of the radiator,
it will shine great, then some wax.
Note I put some 3M paint film over my foil stickers to preserve them after polishing
Good job on your post
11-07-2010, 09:12 AM
#42
Addict
Rennlist Member
Rennlist Member
Thread Starter
As you can tell from the photo, I actually hadn't cleaned much in the engine bay; it's actually a lot better now. I was planning on taking another photo once I've done even more cleaning. And maybe a few more replacement parts (coolant reservoir tank is kind of nasty, too).
Thanks, and thanks again for your help along the way.
11-07-2010, 09:52 AM
#43
Team Owner
the top radiator panel will sparkle with minimum effort it will take about 45 mins start to finish to remove the coating,
dont paint it
dont paint it
11-21-2011, 12:37 PM
#44
Addict
Lifetime Rennlist
Member
Lifetime Rennlist
Member
I guess I'm doing it wrong, but the word file is a zip file - when extracted I get a lot of xml files but no word file.
11-21-2011, 01:02 PM
#45
Addict
Rennlist Member
Rennlist Member
Thread Starter
I've now added a .doc format document as well; it should work with older versions of word.
You'll have to be patient downloading these; they're hosted on a web server at my home and there's not much upstream bandwidth.