HID Install without glare
 10-24-2009, 02:36 PM
#16
Rennlist Member
Thread Starter
Right now it's just sitting in there. It's held in place fairly well by the front shield and the bulb base itself, but I'll probably epoxy it in place, or use some double sided tape.
 10-24-2009, 07:15 PM
#17
Chronic Tool Dropper
Lifetime Rennlist
Member
Lifetime Rennlist
Member

Window cleaner aerosol cans have, in the past, been the weapon of choice for 928 re-engineering efforts done on the fly. That selection has been predicated on a need to survive, when the aluminum might have come up short. We probably need to write a new engineering directive, then translate that into a TSB for field use, before aluminum pieces can be considered as more than prototyping/test/verification pieces.
My memory is that all the critical pieces in the headlight related to beam pattern, glare, brightness and color, need to have an official DOT acceptance numver on them. Don't forget! Wouldn't want to have to explain to the officer that 'Shiner' is German for "DOT Approved".

My memory is that all the critical pieces in the headlight related to beam pattern, glare, brightness and color, need to have an official DOT acceptance numver on them. Don't forget! Wouldn't want to have to explain to the officer that 'Shiner' is German for "DOT Approved".
10-24-2009, 07:26 PM
#18
Electron Wrangler
Lifetime Rennlist
Member
Lifetime Rennlist
Member
I think the DOT probably considers Cibie to be one of the rebel leaders while of course the DOT is the Master of the Dark Side (pretty literally actually).
Alan
10-24-2009, 07:59 PM
#19
Owns the Streets
Needs Camber
Lifetime Rennlist
Member
Needs Camber
Lifetime Rennlist
Member
Will clear silicone sealant be enuff to hold the glare shield in place?
I love silicone.
Remember to let the headlight air after silicone use as it outgases mild acetic acid fumes. Not sure what acid does to the reflective coating.
Not really structural so not sure if the shield needs something heavy duty like epoxy or 3M double side.
10-24-2009, 08:02 PM
#20
Nordschleife Master
You could use some metal polish or even toothpaste to improve the reflective surface of your soda can - would push slightly more light onto the top reflective surface.
10-24-2009, 10:17 PM
#21
Rennlist Member
Thread Starter
Actually the Cibies do say "DOT" on them, that's the strange thing. I think they are US legal e-codes? if there's such a thing.
Good idea on the silicon. Good holding power, easy to remove.
I like the polish idea too.
Good idea on the silicon. Good holding power, easy to remove.
I like the polish idea too.
10-24-2009, 10:30 PM
#22
Chronic Tool Dropper
Lifetime Rennlist
Member
Lifetime Rennlist
Member
I recommend that you find a silicon that's labelled oxy sensor safe, and more specifically one that doesn't use acetic acid as the curing agent. The acetic acid will make short work of the silvering used on the glass envelope to make it reflective.
10-24-2009, 10:42 PM
#23
Rennlist Member
Most silicone or RTV type adhesives are very corrosive to anything metal, wiring, aluminum and the silver coating on the headlight reflectors. A good way to tell if it's acidic is the smell. If it smells like vinegar it should NOT be used in a corrosive area.
 10-26-2009, 05:40 PM
#24
Pro
Join Date: Jun 2008
Location: Buffalo N,Y
Posts: 632
Likes: 0
Received 0 Likes
on
0 Posts
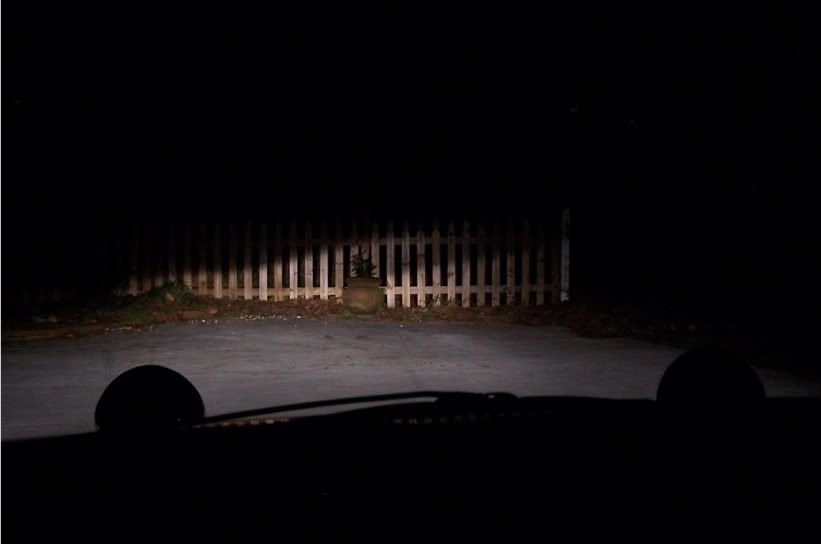
Here are a couple picks .... And have you tried to use the bulbs without the alum thing you made and just slowly pull the bulb out of the back to see what the pattern does it just might be inside to much
1st one is with the pass side covered
2nd one a little farther back both lights
Plus there is more light then the pics show
1st one is with the pass side covered
2nd one a little farther back both lights
Plus there is more light then the pics show
10-26-2009, 05:49 PM
#26
Rennlist Member
Thread Starter
Wow, that's an interesting pattern. Very nice cutoff. I do see a slight amount of light above the cutoff. I wonder if with a longer exposure, your picture would look like mine.
I have not tried pulling the bulbs back, but I don't think it will make a pattern like that since my lights didn't have that pattern with halogen bulbs.
After thinking about it more, I think I understand where the stray light at 10 and 2 came from, but I haven't tested the theory. I think the inside of the front round shield focuses light down to the lower half of the reflector to cause that effect. Bulbs being in too far could contribute to this as well. Halogens have a built in shield on the tip that the HIDs don't have, so that could explain why it doesn't happen with halogens. Painting the inside of that cup black might help, but the new aluminum is doing the trick too.
Last edited by Don Carter; 10-26-2009 at 08:34 PM.
10-26-2009, 08:18 PM
#27
Electron Wrangler
Lifetime Rennlist
Member
Lifetime Rennlist
Member
Here are a couple picks .... And have you tried to use the bulbs without the alum thing you made and just slowly pull the bulb out of the back to see what the pattern does it just might be inside to much
1st one is with the pass side covered
2nd one a little farther back both lights
Plus there is more light then the pics show
1st one is with the pass side covered
2nd one a little farther back both lights
Plus there is more light then the pics show
I had already noted that its worth evaluating the HID bulb next to the halogen H4 - with the bases aligned you want the middle of the low beam filament to match the middle of the ARC space. If they aren't perfectly aligned see if you can improve it - e.g. a rubber/plastic washer/spacer in the bulb socket can compensate if the HID bulb base to arc is a little longer than ideal.
Alan
10-26-2009, 08:37 PM
#28
Rennlist Member
Thread Starter
Alan,
The HIDs have a half circle shield under the bulb. It's in my first pic, but it's hard to see since it's a bit dark. They don't have a "cap" shield though.
I agree about comparing the bulbs but haven't had time to pull them out again.
The HIDs have a half circle shield under the bulb. It's in my first pic, but it's hard to see since it's a bit dark. They don't have a "cap" shield though.
I agree about comparing the bulbs but haven't had time to pull them out again.
10-26-2009, 11:54 PM
#29
Rennlist Member
Thread Starter
Just pulled one of the bulbs and compared it to the previous halogen.

Zooming in, and adding two red lines along each edge of the halogen filament, you can see that the HID is not in perfect alignment. It's not that it's too far in the housing, but not far in enough. Probably about an 1/8". Not sure how much difference this would make.
Also, you can see the cap on the end of the halogen bulb. This keeps most, if not all light from hitting the round front shield. The HID has no cap, hence the reflections at 10 and 2 I saw initially.
10-27-2009, 12:04 AM
#30
Had to go check, my Cibies definitely do not say DOT anywhere so not sure what you have. For comparison's sake, here's my pattern with both lights. These are standard H4s, not HID.