
New Rear Hatch Reciever Insert Install
 04-27-2010, 06:04 PM
#16
Three Wheelin'
Join Date: Apr 2010
Location: Virginia Beach, VA
Posts: 1,295
Likes: 0
Received 0 Likes
on
0 Posts
I wrapped Gorilla duct tape around the male latch on the door. I figured I'd try something until I can get a proper insert. The duct tape worked like a champ. I had to cut out around the latch mechanism on the male part. Works great, looks like crap. 
 07-03-2012, 11:19 AM
#18
Drifting
Another successful 928's R US rear hatch insert install� works flawlessly now.
I can assure you removing the two hex bolts buys you nothing on this job� unless of course you want to give them a quick shine.
Even then I�d recommend do them one at a time so to keep the mechanism in place. Otherwise, you might have to remove this metal shield behind the rear panel (and in my case the sub and amp rack system), to get it reassembled properly.
07-03-2012, 01:07 PM
#19
Rennlist Member
Just so ya know, Jerry's piece is ABS. Not that it's an issue, it works great, just doesn't look stock.
Due to councour class rules, I swapped out for Roger's, which looks more original.
If PCA concours preservation division isn't part of your plan... then either piece will work fine.
Make sure you closely inspect your hatch lock as well, i.e. the male piece of the equation on the hatch itself. I found that mine was cracked, thus causing the rattle. Replaced it and now it's silent.
Last edited by GeorgeM; 07-07-2012 at 08:37 PM.
07-03-2012, 10:21 PM
#20
Rennlist Member
Thanks, George, for the plug on my insert. Here is a picture of one of them installed in one of my spare latch receivers. You are right that they do not look stock, but they sure seem to look good and they actually fit. They even install without having to break off the front corners that go around the two little pins in the later receivers.
Also shown is one of my unique versions of this receiver insert that is made for the 78 and 79 only 928s. There is no other insert available for those latch receivers which are different from everything later. I admit that you can use one of the later inserts for the early cars, but they are not correct.
Mine are still $40 plus a little for S&H. I can't remember what I have charged before, but I use a flat rate box and I think they are just under $5; so $6.00 for S&H will do it.
ReDesign by FEATHER
02-20-2016, 02:00 PM
#21
Advanced

Join Date: Jan 2009
Posts: 88
Likes: 0
Received 0 Likes
on
0 Posts
Guys, greetings from Italy! Admitedly I am a bit of a dummie but I have just bought a new back latch plastic insert for my 928/S4 on e-bay, same as those in the pictures above but it sounds a bit complicated to remove the old one and replace with the new one... definitely not a 2 minutes job for me... and I am scared of msking some damages... any one willing to teach me step-by-step maybe with a couple of pictures to illustrate? Can the part be replaced leaving the mechanism of the latch in place or this has to be dismantled from the car? I guess that the old one which has become quite brittle will get into pieces whilst being removed, should the new one be lubricated prior to placing (Molykote plastic grease...) or not? Thanks in advance for your help...
02-20-2016, 07:35 PM
#22
Team Owner
here you go i just posted this in another thread
to install the new insert dropping it into a cup of hot water isnt a bad idea.
So to remove the old part,
get a flat blade screwdriver,
a leather glove ,
and a 12 inch 3/8 drive extension.
put on the glove, then take the fat end of the extension and press the center of the hatch latch down with the gloved hand.
With the your other hand use the screw driver to pry out the old crumbly insert.
NOTE the spring piston in the center of the latch is strong you must be stronger and hold the extension firmly so you dont get hurt if the extension should somehow slip.
Once this is done remove the extension and verify that all of the old parts have come out,
especially the little tabs at the bottoms of the sides of the insert.
NOTE these can sometimes get stuck and will prevent the new part from seating.
To install the new insert ,
with your gloved hand and extension with the fat end pressing the piston,
press the piston down again.
Get the warmed up insert and carefully slide it into the opening,
use the flat blade if necessary.
NOTE the piston needs to be pressed down enough so the lower tabs will fit into the slots,
Be careful the extension doesnt slip.
NOTE once these lower tabs are into place then fit the small ends where two little round holes are,
these will let you know the insert has seated.
Carefully release the extension.
Get a flashlight and shine it onto the closing of the latch,
see that the latch looks centered front to back and side to side
02-21-2016, 03:17 AM
#23
Advanced
Join Date: Jan 2009
Posts: 88
Likes: 0
Received 0 Likes
on
0 Posts
Many thanks, I think this will help a lot. For example it was not obvious to me to press down the white piston at the center of the latch to be able to release the old insert and fit the new in place. ALso the idea of warming up the new one sounds nice. I will try to do it later this week... the rrason why I decided to replace the aged insert is that my latch release does not work... the motor runs when pulling the **** but it does not release. The other issue was the horrible squeaking coming from the hatch, specially during the warm season (this is what I read somewhere... I believe that the warmer temp softens the aged insert and loses up the latch mechanism).
02-21-2016, 05:26 PM
#24
Instructor
My car is missing this insert completely but works fine with the key.
My latch will not release with the motor despite doing the fixes suggested in other posts and the hatch rattles and creaks. Just wondering if the insert will help solve any of these problems. I expect it may help the rattle but can't see how it could help the latching.
My latch will not release with the motor despite doing the fixes suggested in other posts and the hatch rattles and creaks. Just wondering if the insert will help solve any of these problems. I expect it may help the rattle but can't see how it could help the latching.
03-26-2016, 03:09 PM
#25
Advanced
Join Date: Jan 2009
Posts: 88
Likes: 0
Received 0 Likes
on
0 Posts
I did finally manage to mount the new plastic insert which I got from an Asian supplier on Ebay... easy job, literally five minutes to remove the old one and fit the new one but I had t get someone to help. The good news is that the electric switch **** now finally does the job... and, surprise-surprise that squeaky noise which I was wondering since many month where it was coming from all of a sudden disappeared... great stuff!
03-26-2016, 05:42 PM
#26
Team Owner
Paul in order for the hatch latch to perform properly the collar needs to be in position.
03-29-2016, 03:49 PM
#28
Advanced
Join Date: Jan 2009
Posts: 88
Likes: 0
Received 0 Likes
on
0 Posts
Paul, believe me, I could not just imagine that such a simple fix would yield such a great result. And trust me the old insert was still there and it did not even look that bad... THe electric latch opening works as it should (it never did before...) and that horrible squeak noise is gone!!! I was running crazy thinking of dismantling the whole rear suspensions to try and get it fixed! I did it all with 25 USD and 5 min of work.
01-12-2024, 12:27 PM
#29

Any replacement or cleaning/whitening solutions
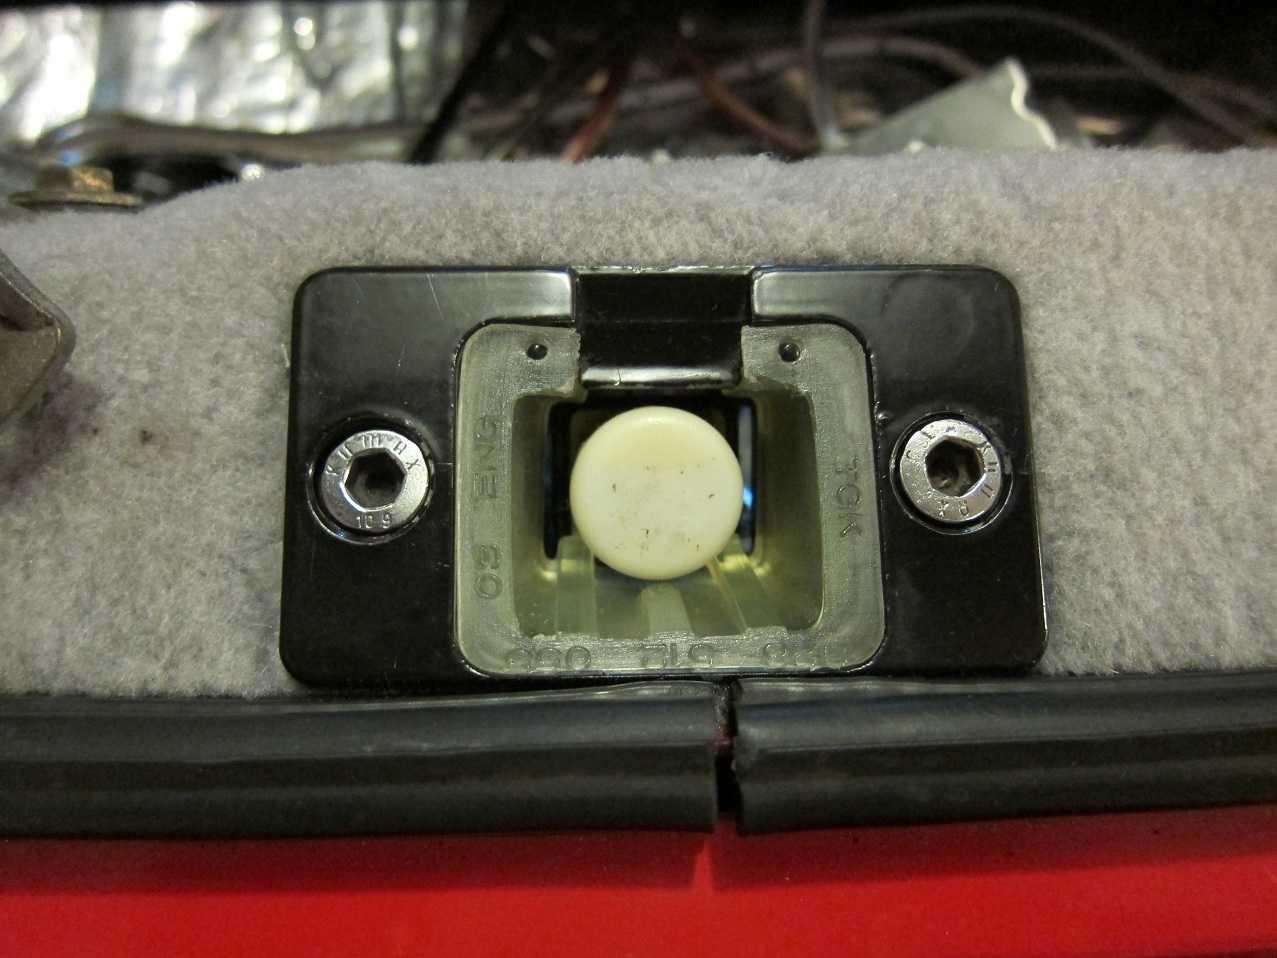
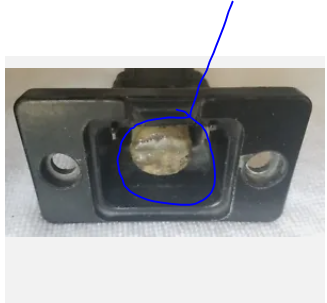
Anyone have any thoughts on how to whiten/clean this plug?
or instructions on how to replace?
I put in a new lining and now the contrast between the insert and round plug is too inconsistent. I gently sanded the plug and it helped but my OCD wants the plug looking bright white or new.
01-12-2024, 12:40 PM
#30
Basic Sponsor
Rennlist
Site Sponsor
Rennlist
Site Sponsor
Buy a new one
__________________

Does it have the "Do It Yourself" manual transmission, or the superior "Fully Equipped by Porsche" Automatic Transmission? George Layton March 2014
928 Owners are ".....a secret sect of quietly assured Porsche pragmatists who in near anonymity appreciate the prodigious, easy going prowess of the 928."
Does it have the "Do It Yourself" manual transmission, or the superior "Fully Equipped by Porsche" Automatic Transmission?
George Layton March 2014928 Owners are ".....a secret sect of quietly assured Porsche pragmatists who in near anonymity appreciate the prodigious, easy going prowess of the 928."