

Metal Gas Cap Pawl Installed
 11-30-2007, 06:09 PM
#31
Rennlist Member
I made 3 alloy pawls the hard way - cut a blank shape out of 10mm/.375" plate, file down to ~9.5mm, file/hacksaw teeth on one end, file half the sides down to 8.5mm for the step, then drill the top hole, dremel to fit lock tumbler, round the back end, fine tune to fit nylon tumbler body, test, assemble.
I gave a good nylon pawl to our toolmakers, they scanned a profile into a computer driven wirecutter - cuts profiles in toolsteel with 50V DC brasswire underwater - load a stick of mild steel into holder , program as many copies as will fit on the stick (looks like 23), and go for coffee. I believe some hand work was needed to get the step on the side done.
Anyway, mild steel was all we had on hand, and as we dont have experience using the wirecutter on alloy or brass (and these are roughly 6 and 8 times the cost of steel), I couldnt really press them. I suspect that a touch of vaseline or white grease will prevent corrosion for as long as anybody here will be around. Note that you dont want enough lube in there to work its way into the lock tumbler and attract dust that may eventually jam the lock action. A non-sprung version should incur very little wear if any. Your choice between potential rust, a known broken lock mechanism, and $150 + rekeying.
FWIW when I last had my cap open, I rekeyed it to the same as doors and ignition so I only carry one key.
jp 83 Euro S AT 51k
Last edited by jpitman2; 12-16-2009 at 05:04 PM.
 11-30-2007, 06:11 PM
#32
Rennlist Member
I've had a 928 for 12 years now and always a daily driver and I've NEVER locked the gas cap. Don't even know if the current one will lock.
Jim Mayzurk
93 GTS 5-spd
Jim Mayzurk
93 GTS 5-spd
11-30-2007, 06:37 PM
#33
Electron Wrangler
Lifetime Rennlist
Member
Lifetime Rennlist
Member
Thread Starter
Jim you are right the pawl is most stressed when its actually locked (when the 2 parts spin freely against each other).
If you leave it unlocked all the time there is no stress on the pawl(but it might as well be broken - since its not protecting your tank and when it is broken - thats exactly how it behaves)...
JP is right - its a lot of work to make these from scratch. He sent me one and just adjusting it for my use was quite a bit of fiddling - I have all the tools needed (drill press, dremmel, power file, files, burrs, vice etc) and have done some similar things before... many will struggle with this though - its would be very difficult without the appropriate tools.
Alan
Last edited by Alan; 11-30-2007 at 10:05 PM.
12-10-2007, 03:33 PM
#34
Electron Wrangler
Lifetime Rennlist
Member
Lifetime Rennlist
Member
Thread Starter
Bump!
If any of you just want me to send you the blanks - I can do that but you will need to supply a name & address by PM.
Note these are not directly usable without further fabrication... See my previous message below. My offer still stands for one lock - first come first served. Send me your lock part (either complete with a key or note the numbers & sequence of the tumblers and remove them & send me just the inner & outer barrel parts. I will need your broken nylon pawl parts and spring if you want that re-installed - see below...
Once I do one I will measure it and photograph it and the rest of you are on your own to copy this.
Alan
Well folks I have the mild steel ones in hand from John.
word of warning here - these need work to fit. The body size should be good - But I no longer have a dissassembled gas cap body to try it on...
You will need to drill or cut the cam space - this needs to be done in exactly the correct position - you could not do this by hand and will need a drill press (and/or patience & a file perhaps).
To reinstall the spring you will need to drill a deep hole through the body of the pawl from the end.
If you have the broken nylon version you will have a pretty good idea of what you will need to do. For some of you this may be easy - for others maybe not.
I'd be willing to fabricate one for someone as a test - but I will need from you - your dissassembled gas cap lock mechanism & key to fit it (to test operation) - including the broken nylon pawl parts and spring* (* see below options)
I do not need the red outer part or the white inner parts (I have a spare white part I can use to test with). This means you can leave the white part on the car as a temporary solution.
I do not want to dissassemble your gas cap so it must already be apart.
I will make one pawl for reference (and measurement) and the rest of you who have requested pawls can model changes off that version. I'd propose you each make a voluntary contribution to jp for this assuming it works out for you - I'll send details when I figure out how - I'd say about $10 would be nice?
There are actually two options:
1) Replicate the stock nylon part:
Normal spring ratchet operation in the unlocked position (& spins freely in the locked position).
2) An alternate design:
This permanently locks the inner & outer shells (w/ no ratchet) in the unlocked position (still spins freely in the locked position).
(yes I know this sounds backwards but think about it...)
The advantage of the alternate version is:
- Its a little simpler to fabricate - less steps
- You don't need the original spring (In case its gone/broken)
- The spring pressure is hard to get right (depth of drilled hole) and can only really be fully tested with the cap reassembled
- Ratcheting mode with steel toothed pawl may eventually chew up the nylon teeth on the inside white part of the cap - esp if the spring pressure is set too high - this version avoids that risk..
Do I have a volunteer?
Alan
12-16-2009, 12:02 PM
#35
Electron Wrangler
Lifetime Rennlist
Member
Lifetime Rennlist
Member
Thread Starter
Well its been a good long while here - 2 years! - but I just shipped out a pawl blank to Mike (ammonman) for his Gas Cap repair. Hopefully he will post photos and notes on the fit/finishing and end results.
Mike made a paypal contribution to jpitman2 as I suggested earlier... nice.
Alan
Mike made a paypal contribution to jpitman2 as I suggested earlier... nice.
Alan
12-16-2009, 12:10 PM
#36
Electron Wrangler
Lifetime Rennlist
Member
Lifetime Rennlist
Member
Thread Starter
Well - I think I may have ignored a couple of earlier requests for these (somehow...) I'll follow-up and see if there are still needed. I have a few more available - if you need one please send me your details... (please read what you will still need to do - its not plug & play for sure...).
Alan
Alan
12-16-2009, 05:08 PM
#37
Rennlist Member
Mike's contribution has arrived, thank you bath, Alan and Mike. Its been a while since this issue surfaced...maybe something pointing to this solution could go in the newcomers FAQ?
jp 83 Euro S AT 52k.
jp 83 Euro S AT 52k.
12-27-2009, 02:16 AM
#38
Rennlist Member
I tried to document a process to finish the pawl blank (thanks Alan and JP) that does not require any special tooling like a milling machine, end mills, etc. I tried to stick to basic tools most of us inhabitants of the Shark Tank already have in the cabinet or are waiting for an excuse to buy. I was able to do everything but drill the hole for the stock spring using hand tools and a Dremel. Since I had access to a drill press I used it to drill the spring hole. If you don't have access to a drill press I recommend you NOT try and drill the hole by hand unless you are VERY steady with a hand drill. The margin for error when drilling a hole for the stock spring is pretty small and I think it would be easy to drill through the bottom of the blank without a press. You could possibly use a smaller diameter spring and hole, thereby reducing the possibility of drilling through the bottom of the blank. To complete the blank I used the following list of tools: flat jewelers file (also called an �equaling� file, square jewelers file, dental pick, 6� metal pocket ruler, Dremel w/carbide burr, hacksaw, misc. screwdrivers, small vise. Now on with the show.
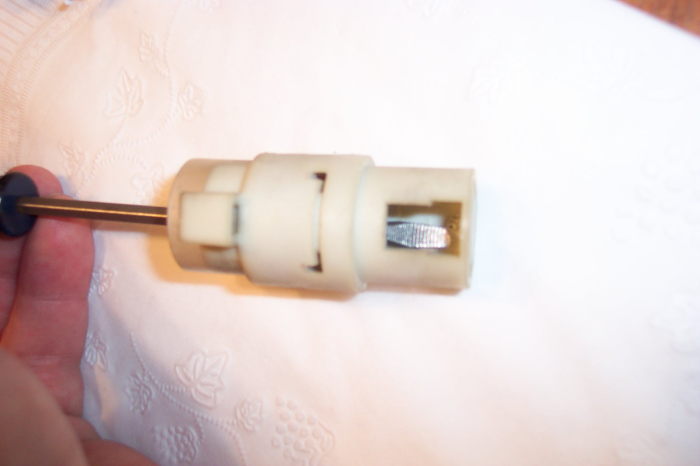
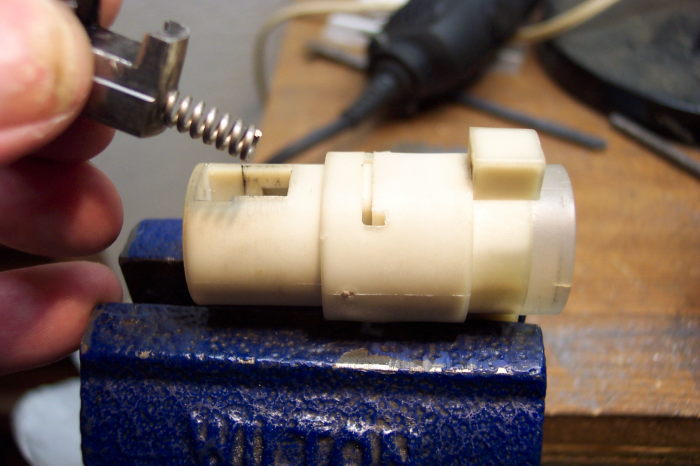
Use whatever method you prefer to disassemble your fuel cap. The component parts are shown below. Notice that the ratchet pawl is broken in the typical fashion.
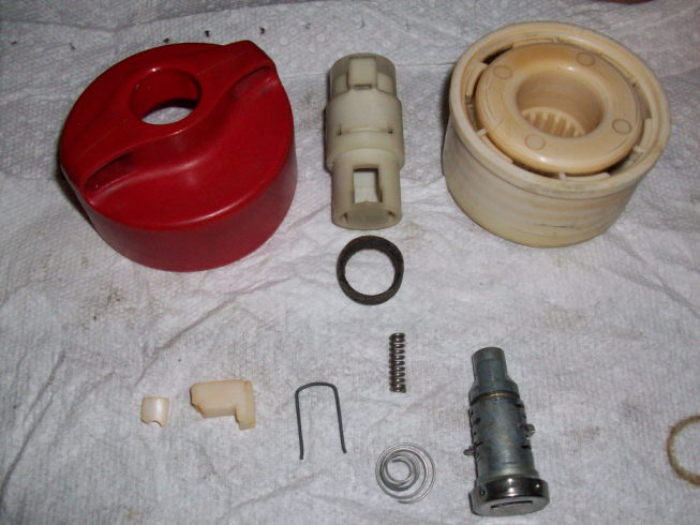
The first thing I did was tested the fit of the pawl blank in the plastic lock body. It felt like the teeth on the pawl were protruding slightly above the surface of the lock body, so I dropped the lock body with pawl into the white center piece of the cap. Sure enough, the pawl teeth were engaged with the teeth inside the cap center piece even with the pawl seated as far back in the lock body as possible. At first I thought the pawl blank was slightly too long, so I did a quick comparison with the broken piece from my cap. The length of the blank was correct. The blank would not seat fully because of a plastic pin made on the inside of the lock body, I assume to locate the back end of the pawl spring.
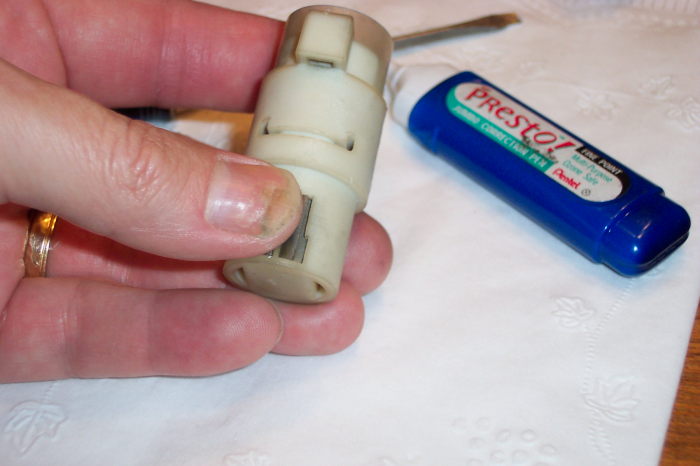
I decided right then to use this pin to locate the center of the hole for the spring on the blank. To transfer a mark from the pin to the blank you need some white paint (I used White-Out ) and a magic marker.
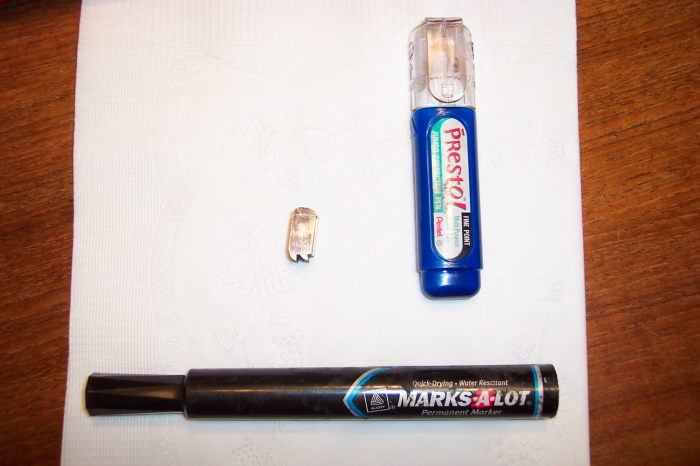
Coat the back end of the pawl blank with black ink from the magic marker. Magic marker is about the cheapest, easiest to use layout ink for small parts.
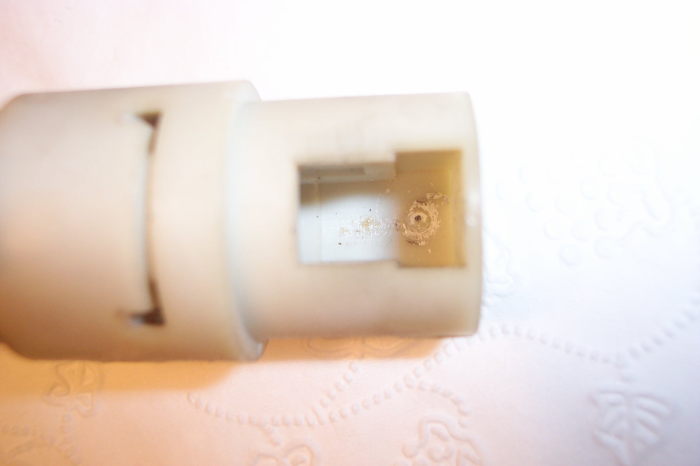
Apply some white paint to the tip of a small screwdriver and insert it down through the end of the lock body. Put a small dab of the paint on the end of the plastic pin.
Next, remove the screwdriver and insert the blank into the lock body. Press the blank firmly in place and rock it around to transfer the paint from the pin to the blank.
Remove the blank from the lock body and center punch a start for drilling the spring hole.
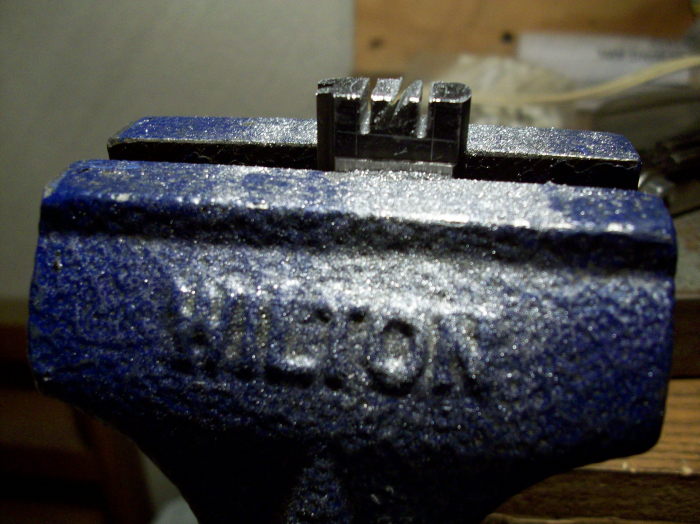
Next, we need to layout the cut lines to start removing the material in the center of the blank where the tip of the lock tumbler mechanism interacts with the pawl. Coat the top and sides of the blank with magic marker ink.
Clamp the blank in the vise and place the plastic pawl upside down on top of the blank. Carefully align the plastic pawl with the sides and ends of the blank to ensure the tops of both pawls are matched. Use a dental pic or other fine scribe to transfer the shape of the top of the plastic pawl to the top of the steel blank by scribing lines in the magic marker ink using the plastic pawl as a guide.
Now that we have the top layout done, we need to do the sides. Use a small straight edge to transfer the end of each line on the top of the pawl blank down the side of the blank. My 6� steel pocket scale worked perfect as the end of the pocket scale rested on the shoulder on the side of the blank and helped ensure the transferred lines were square. Next, insert the plastic pawl into the vise right beside the pawl blank. Again, take your time and align the two parts carefully so that we can transfer the layout from the plastic pawl to the blank.
Once you have the two parts aligned, use your scribe to transfer the position of the bottom of the cutout to one side of the blank. Repeat for the other side of the blank.
When finished you should have some guide lines to use when removing the un-needed material in the center of the blank.
Now that we have our layout marks we can start removing the material in the center of the blank. You could use the Dremel and carbide burr to remove the material, but it can be quite hard to control the tool. I prefer to do the work by hand and use the burr only when necessary and to remove only small amounts of material.
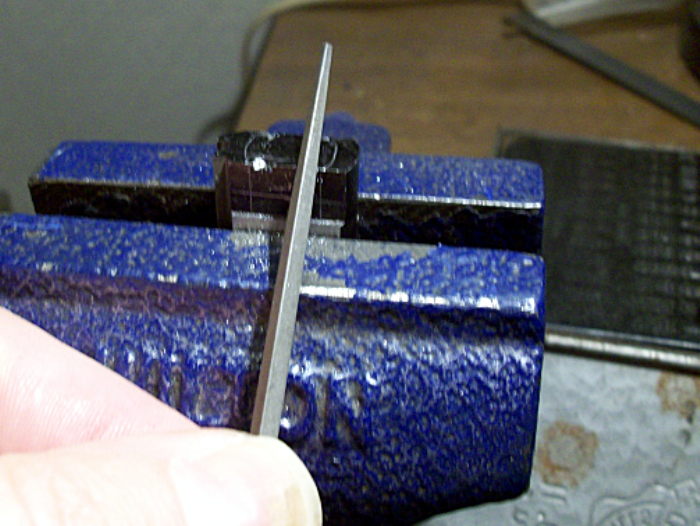
Clamp the blank in the vise sideways with the top of the blank facing up. Use a square or triangular jewelers file to score a line across the corner where the top and side meet, adjacent to the layout mark. Do not try to score on the line. Rather, score just inside the line. Repeat for the remaining three positions on the top of the blank.
Use whatever method you prefer to disassemble your fuel cap. The component parts are shown below. Notice that the ratchet pawl is broken in the typical fashion.
The first thing I did was tested the fit of the pawl blank in the plastic lock body. It felt like the teeth on the pawl were protruding slightly above the surface of the lock body, so I dropped the lock body with pawl into the white center piece of the cap. Sure enough, the pawl teeth were engaged with the teeth inside the cap center piece even with the pawl seated as far back in the lock body as possible. At first I thought the pawl blank was slightly too long, so I did a quick comparison with the broken piece from my cap. The length of the blank was correct. The blank would not seat fully because of a plastic pin made on the inside of the lock body, I assume to locate the back end of the pawl spring.
I decided right then to use this pin to locate the center of the hole for the spring on the blank. To transfer a mark from the pin to the blank you need some white paint (I used White-Out ) and a magic marker.
Coat the back end of the pawl blank with black ink from the magic marker. Magic marker is about the cheapest, easiest to use layout ink for small parts.
Apply some white paint to the tip of a small screwdriver and insert it down through the end of the lock body. Put a small dab of the paint on the end of the plastic pin.
Next, remove the screwdriver and insert the blank into the lock body. Press the blank firmly in place and rock it around to transfer the paint from the pin to the blank.
Remove the blank from the lock body and center punch a start for drilling the spring hole.
Next, we need to layout the cut lines to start removing the material in the center of the blank where the tip of the lock tumbler mechanism interacts with the pawl. Coat the top and sides of the blank with magic marker ink.
Clamp the blank in the vise and place the plastic pawl upside down on top of the blank. Carefully align the plastic pawl with the sides and ends of the blank to ensure the tops of both pawls are matched. Use a dental pic or other fine scribe to transfer the shape of the top of the plastic pawl to the top of the steel blank by scribing lines in the magic marker ink using the plastic pawl as a guide.
Now that we have the top layout done, we need to do the sides. Use a small straight edge to transfer the end of each line on the top of the pawl blank down the side of the blank. My 6� steel pocket scale worked perfect as the end of the pocket scale rested on the shoulder on the side of the blank and helped ensure the transferred lines were square. Next, insert the plastic pawl into the vise right beside the pawl blank. Again, take your time and align the two parts carefully so that we can transfer the layout from the plastic pawl to the blank.
Once you have the two parts aligned, use your scribe to transfer the position of the bottom of the cutout to one side of the blank. Repeat for the other side of the blank.
When finished you should have some guide lines to use when removing the un-needed material in the center of the blank.
Now that we have our layout marks we can start removing the material in the center of the blank. You could use the Dremel and carbide burr to remove the material, but it can be quite hard to control the tool. I prefer to do the work by hand and use the burr only when necessary and to remove only small amounts of material.
Clamp the blank in the vise sideways with the top of the blank facing up. Use a square or triangular jewelers file to score a line across the corner where the top and side meet, adjacent to the layout mark. Do not try to score on the line. Rather, score just inside the line. Repeat for the remaining three positions on the top of the blank.
12-27-2009, 02:23 AM
#39
Rennlist Member
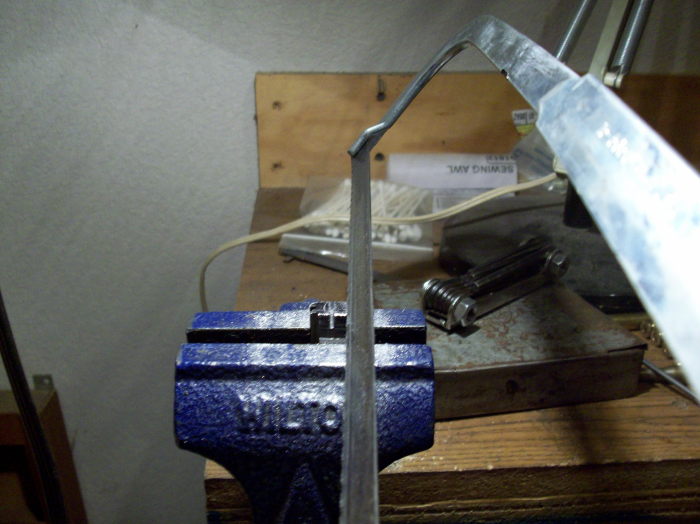
Now that starter cuts are scored, use a regular hacksaw with a fine tooth blade to cut down from the top of the blank to the depth line on the side. Cut through the corner where you made the starter scorings with the file, holding the hacksaw blade perpendicular to the edge where the top and side of the blank meet. Do not try and start cutting across the full width of the top of the blank. Cut a short ways on one end of each line, then rotate the blank in the vise to cut the opposite side. Repeat, making a few strokes on each of the four cuts until each cut joins the cut on the opposite side of the top of the blank.
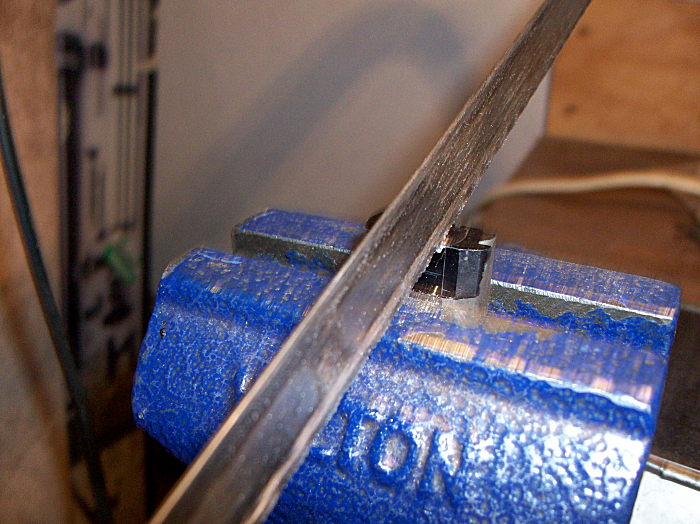
Follow the layout lines carefully to connect the cuts across the top of the blank.
Continue the cuts down toward the depth line on both sides of the blank, carefully staying inside the layout lines. Periodically remove the blank from the vise and check the depth of the cuts.
Be sure to stop the cuts just short of the layout lines on the sides of the blank. Once the bulk of the material is removed from the center of the blank files will be used to remove the remaining material right up to the layout lines.
Now that the rough cuts for length are done, make an angled cut from the top of the blank down toward the bottom of one of the rough cuts just completed. This will allow removal of a large piece of the center material.
Be sure you don't cut outside the layout lines. If the angled cut does not exactly meet the earlier end cut to let the piece of material out, use a screwdriver as a wedge to start moving the triangular piece back and forth until it breaks off. make another angled cut in the opposite direction to remove another large piece of material. It helps to tilt the blank in the vise to get a better angle to the cut.
Once as much material has been removed with the hacksaw as is practical, the remaining material is removed using a jewelers file.
Carefully file the remaining material from the cut right up to the layout lines for both the depth and length. For the highest level of precision, file until the layout line just disappears. Be sure to turn the piece in the vise periodically so that filing is done in both directions across the cutout. This will help ensure the cut stays even. remove the blank from the vise periodically throughout he entire cutting and filing process to check progress.
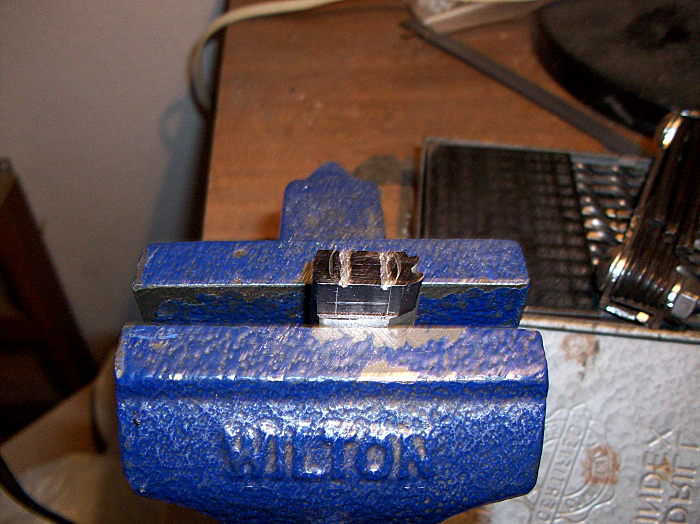
To cut the semicircular areas in the ends of the center section cut I used a Dremel with a carbide burr. The burr is very hard and sharp, but very brittle. Care must be taken not to break the burr. If you don't have a Dremel, go buy one as it is a necessary tool for all mechanical tinkerers, DIY-ers, and students or graduates of WECSOG. If you can't bring yourself to buy a Dremel (seriously, they will revoke your MAN-card if you don't have one) you should be able to use the flat file to slowly lengthen the center cut in both directions until the end of the lock tumbler will fit into the cutout and properly actuate the pawl. Since I had both Dremel and carbide burr I chose to carefully mill out the recesses.
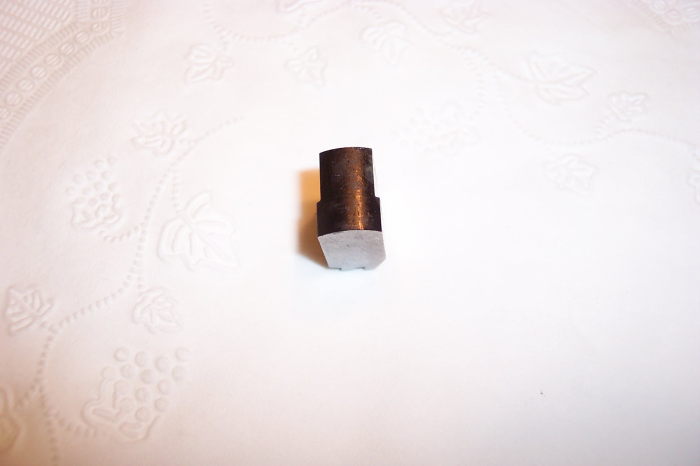
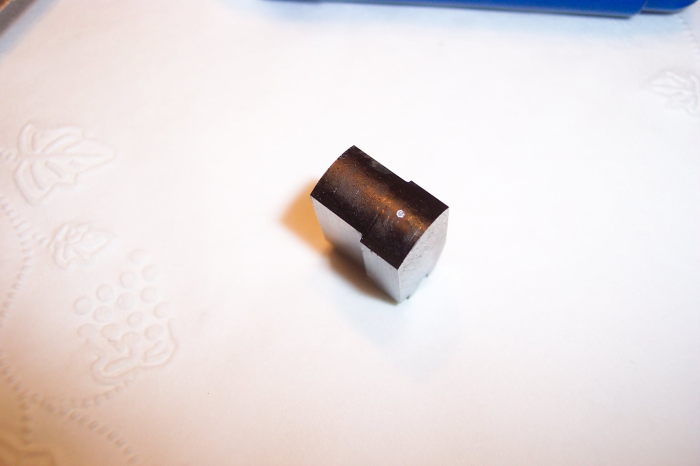
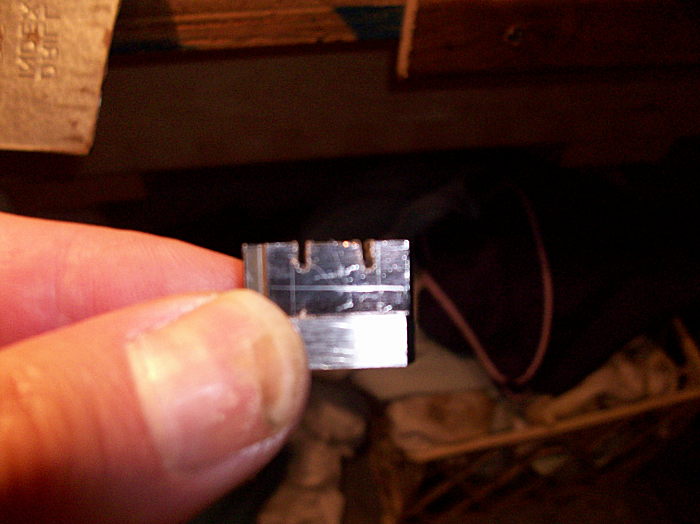
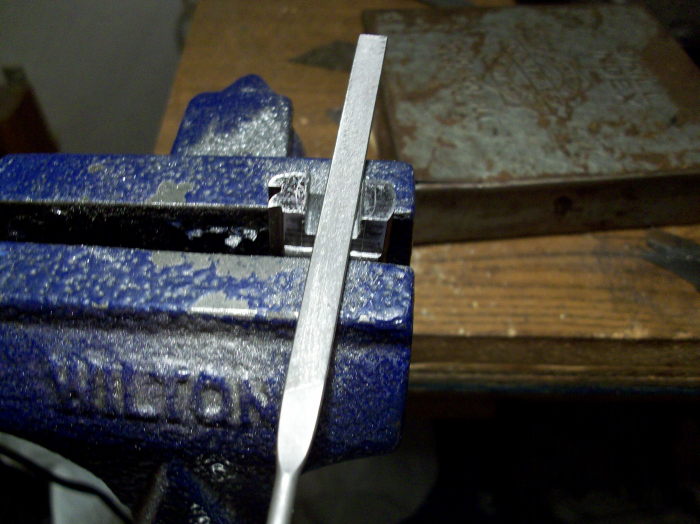
If you have never used a carbide burr find a piece of scrap metal to practice on first. They can grab and go into the most uncomfortable places in a hurry. Also, be sure to use safety glasses when running a carbide tool. Carbide is tough but brittle and can shatter easily, sending razor-sharp fragments flying at Warp Factor 3. If one contacts your eyeball it will ruing your plans for the weekend. Once the recesses are cut, use the file to round over all the sharp edges to prevent them gouging the plastic of the lock body. If you have access to a drill press now is the time to drill the hole for the spring. I did not take any pics of the process to set up the press or the blank and drill the hole to the correct depth. I figure if you have a drill press you know how to do the set-up and if you are using a friends press, they can help you get set up. If you don't have a drill press you can try to drill the hole by hand, but I would recommend against it. If the hole is not straight you could end up having the drill break out of the bottom of the blank or worse yet, drill all the way through the blank. You will need to either drill a small dimple in the back end of the blank to allow clearance for the plastic pin at the back of the slot for the pawl or remove the plastic pin from the lock body so the pawl can retract into the lock body enough to disengage the pawl teeth from the inner cap. Below is a pic of the hole drilled in my pawl for the stock spring.
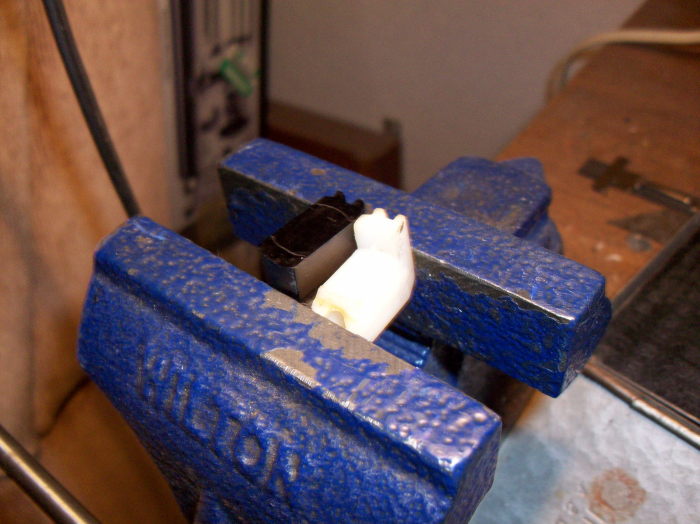
Now that the shaping is complete it's time to test the fit and function of the new pawl. Insert the pawl into the lock body without the spring.
Now insert the lock body into the inner portion of the fuel cap. Hold the cap so that the pawl slides out into position to engage the teeth on the inside of the inner cap. Turn the lock body as if trying to unscrew the cap. Do the pawl teeth engage the teeth inside the inner cap? Next, rotate the entire unit so that the pawl slides back into the lock body, disengaging the pawl teeth with those of the inner cap. Try again to �unscrew� the cap by turning the lock body. If the lock body just spins, congratulations you are almost done.
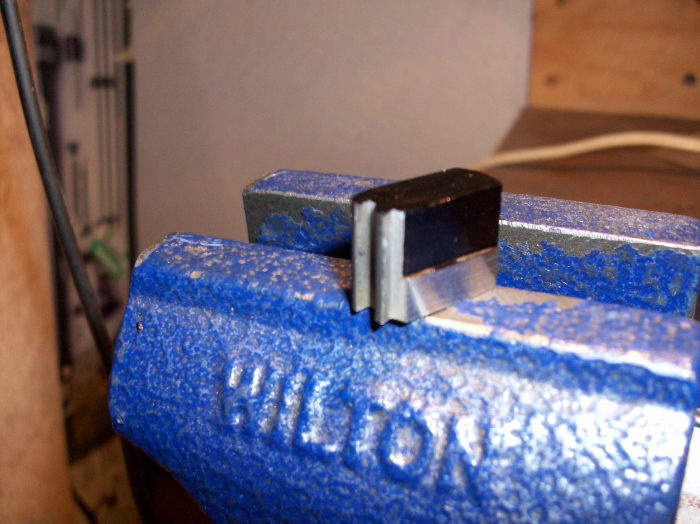
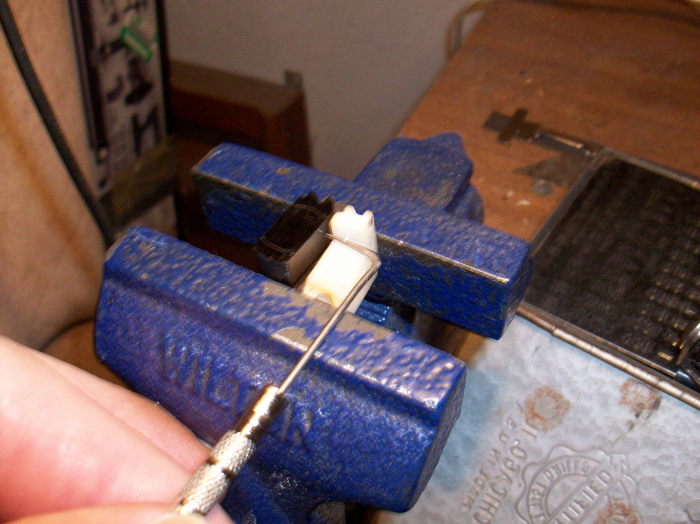
Clean and coat the entire upper surface of the pawl with magic marker ink. Be sure to also coat the inner surfaces of the �legs� that the end of the lock tumbler will engage to push the pawl back from the inner cap teeth. Install the spring in the hole, if you drilled one, and insert the pawl into the lock body.
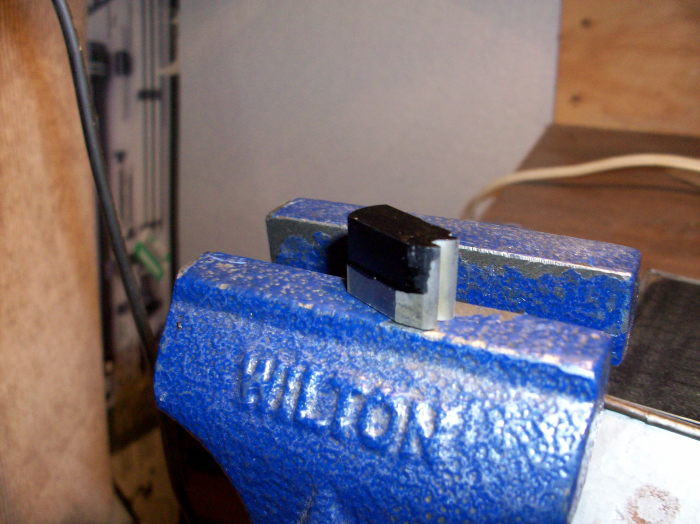
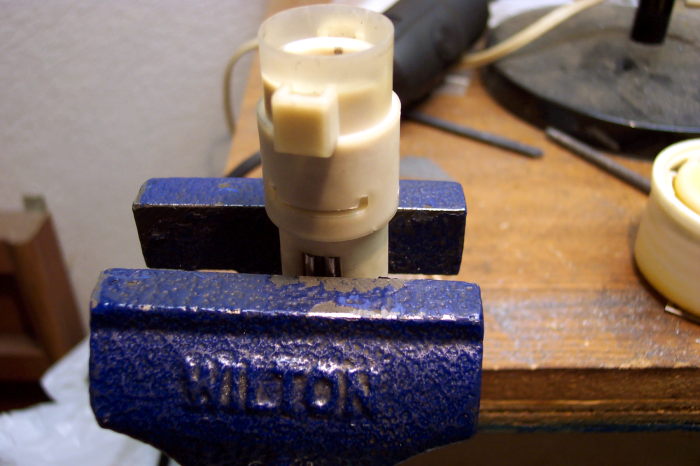
Use the vise to compress the pawl and spring into the lock body.
Follow the layout lines carefully to connect the cuts across the top of the blank.
Continue the cuts down toward the depth line on both sides of the blank, carefully staying inside the layout lines. Periodically remove the blank from the vise and check the depth of the cuts.
Be sure to stop the cuts just short of the layout lines on the sides of the blank. Once the bulk of the material is removed from the center of the blank files will be used to remove the remaining material right up to the layout lines.
Now that the rough cuts for length are done, make an angled cut from the top of the blank down toward the bottom of one of the rough cuts just completed. This will allow removal of a large piece of the center material.
Be sure you don't cut outside the layout lines. If the angled cut does not exactly meet the earlier end cut to let the piece of material out, use a screwdriver as a wedge to start moving the triangular piece back and forth until it breaks off. make another angled cut in the opposite direction to remove another large piece of material. It helps to tilt the blank in the vise to get a better angle to the cut.
Once as much material has been removed with the hacksaw as is practical, the remaining material is removed using a jewelers file.
Carefully file the remaining material from the cut right up to the layout lines for both the depth and length. For the highest level of precision, file until the layout line just disappears. Be sure to turn the piece in the vise periodically so that filing is done in both directions across the cutout. This will help ensure the cut stays even. remove the blank from the vise periodically throughout he entire cutting and filing process to check progress.
To cut the semicircular areas in the ends of the center section cut I used a Dremel with a carbide burr. The burr is very hard and sharp, but very brittle. Care must be taken not to break the burr. If you don't have a Dremel, go buy one as it is a necessary tool for all mechanical tinkerers, DIY-ers, and students or graduates of WECSOG. If you can't bring yourself to buy a Dremel (seriously, they will revoke your MAN-card if you don't have one) you should be able to use the flat file to slowly lengthen the center cut in both directions until the end of the lock tumbler will fit into the cutout and properly actuate the pawl. Since I had both Dremel and carbide burr I chose to carefully mill out the recesses.
If you have never used a carbide burr find a piece of scrap metal to practice on first. They can grab and go into the most uncomfortable places in a hurry. Also, be sure to use safety glasses when running a carbide tool. Carbide is tough but brittle and can shatter easily, sending razor-sharp fragments flying at Warp Factor 3. If one contacts your eyeball it will ruing your plans for the weekend. Once the recesses are cut, use the file to round over all the sharp edges to prevent them gouging the plastic of the lock body. If you have access to a drill press now is the time to drill the hole for the spring. I did not take any pics of the process to set up the press or the blank and drill the hole to the correct depth. I figure if you have a drill press you know how to do the set-up and if you are using a friends press, they can help you get set up. If you don't have a drill press you can try to drill the hole by hand, but I would recommend against it. If the hole is not straight you could end up having the drill break out of the bottom of the blank or worse yet, drill all the way through the blank. You will need to either drill a small dimple in the back end of the blank to allow clearance for the plastic pin at the back of the slot for the pawl or remove the plastic pin from the lock body so the pawl can retract into the lock body enough to disengage the pawl teeth from the inner cap. Below is a pic of the hole drilled in my pawl for the stock spring.
Now that the shaping is complete it's time to test the fit and function of the new pawl. Insert the pawl into the lock body without the spring.
Now insert the lock body into the inner portion of the fuel cap. Hold the cap so that the pawl slides out into position to engage the teeth on the inside of the inner cap. Turn the lock body as if trying to unscrew the cap. Do the pawl teeth engage the teeth inside the inner cap? Next, rotate the entire unit so that the pawl slides back into the lock body, disengaging the pawl teeth with those of the inner cap. Try again to �unscrew� the cap by turning the lock body. If the lock body just spins, congratulations you are almost done.
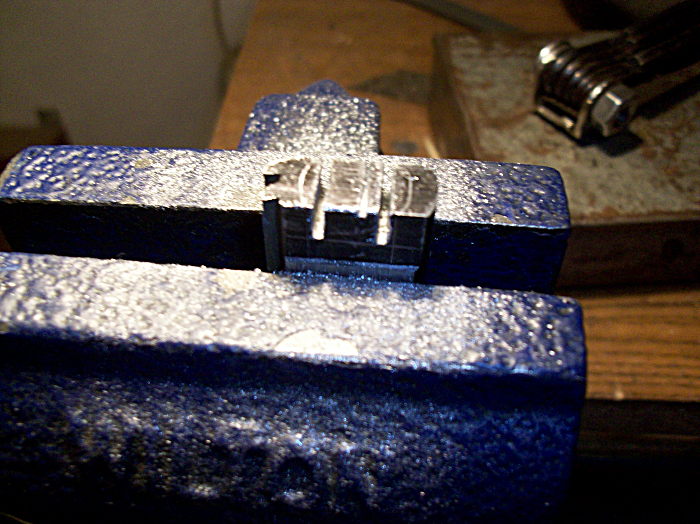
Clean and coat the entire upper surface of the pawl with magic marker ink. Be sure to also coat the inner surfaces of the �legs� that the end of the lock tumbler will engage to push the pawl back from the inner cap teeth. Install the spring in the hole, if you drilled one, and insert the pawl into the lock body.
Use the vise to compress the pawl and spring into the lock body.
12-27-2009, 02:27 AM
#40
Rennlist Member
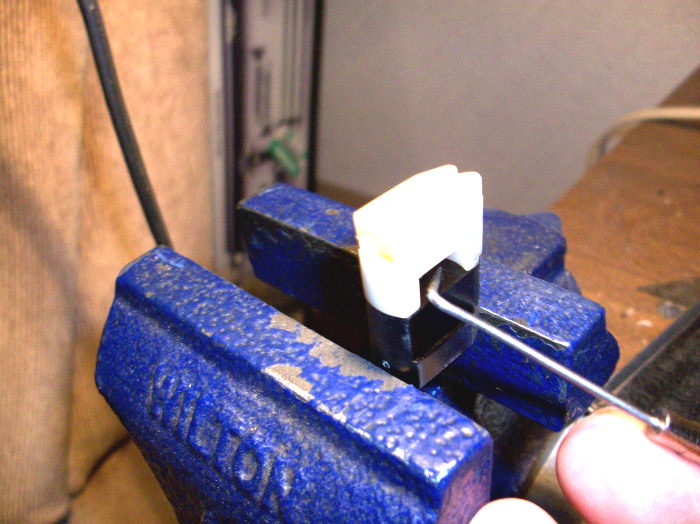
Insert your key into the tumbler and insert the tumbler into the lock body. Be sure to orient the tumbler correctly. In the bottom of the lock body there is a protruding rib. This rib is the stop that limits how far the tumbler can turn. There is a corresponding protrusion on the side of the end of the tumbler. Once the tumbler is in the lock body correctly, insert the entire unit into the inner portion of the fuel cap. Test the function of the mechanism, making sure that the pawl engages the inner cap teeth when the lock is released and releases the inner cap teeth when the lock tumbler is in the opposite position.
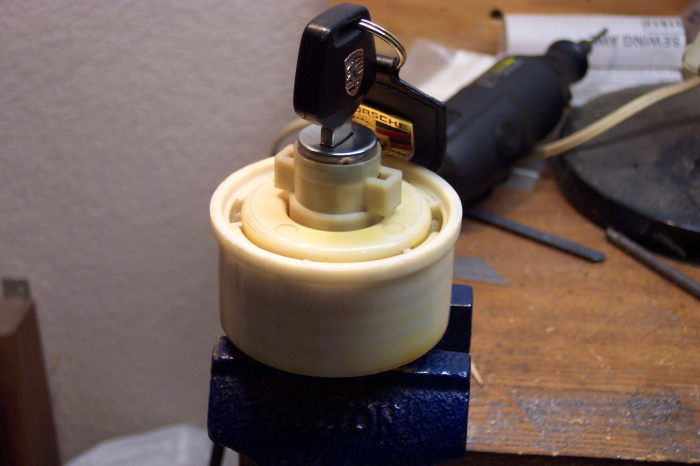
Disassemble the mechanism and remove the pawl from the lock body. Inspect the magic marker ink coating on the pawl. The only contact between the pawl and tumbler should be at the concave portion of the �legs� on the pawl where the tumbler cams the pawl back and forth in the lock body. If there are signs of contact between the end of the tumbler and the bottom of the cutout in the pawl use the file to deepen the cutout until there is no contact. Once this is achieved, you can put a coat of grease on the new pawl to prevent rust and re-assemble the cap. When I completed my blank it dropped right in and functioned perfectly, but YMMV.
Mike
12-27-2009, 04:30 AM
#41
Rennlist Member
Another happy customer, and good at taking pics of progress too! In case the work seems too hard for some, let me say that I have made and installed a few locally, making the top cut out simply with the right sized drill. So far I have only ruined one blank this way. If you look at the original pawl, the cut out face nearest the teeth is round, but the opposite or rear face is straight , with small 'ears' at the edges. The straight face is the one acted on by the cam end of the lock tumbler casting, so its all that matters. If if you drill such that the front face is correct, and the deepest part of the 'hole' at the rear is the correct distance from the rear face of the pawl (ie rear wall thickness matches original), and file that face nearly flat, it will work.
Original unbroken pawl rear face is 3.5mm thick. Top cavity along the centre is 11mm front to rear, 5mm deep. I would suggest drilling a 10mm hole on the centre line, centred 9mm from the rear face, 4mm deep + the drill's end cone height. Getting a TRUE centre and holding it the critical part - the ruined blank was caused by the drill wandering off centre. This will give a rear wall of 4mm thickness. Then test that lock tumbler cam will both turn completely, and operate smoothly without the spring. If the rear wall is too thick, it will stop the cam from being able to retract the pawl fully. File down the inner face of the rear wall until the tumbler turns smoothly, with some lubrication. Spring hole is 13mm deep, 5mm diameter.
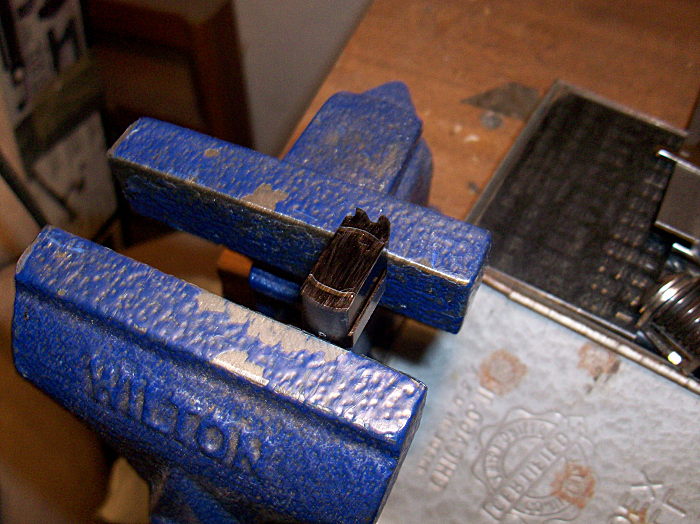
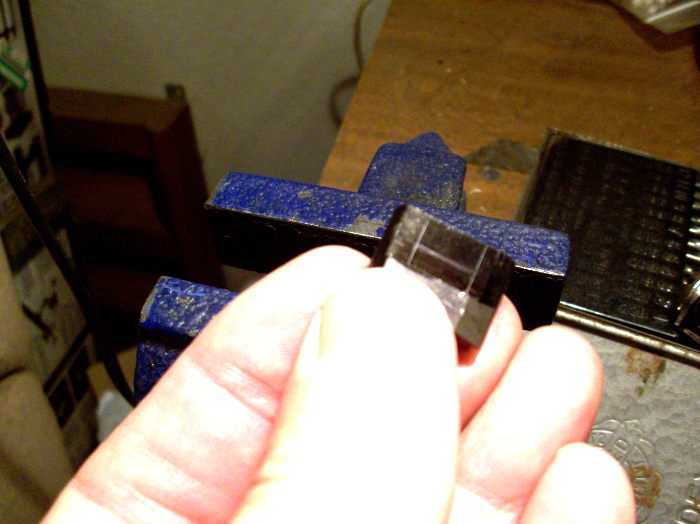
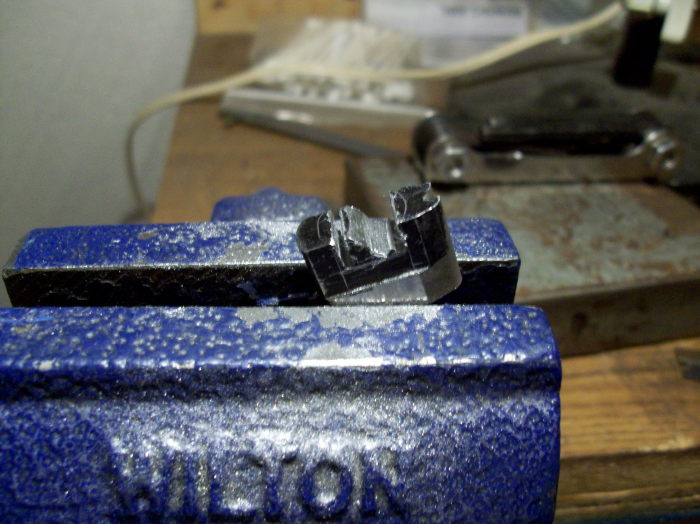
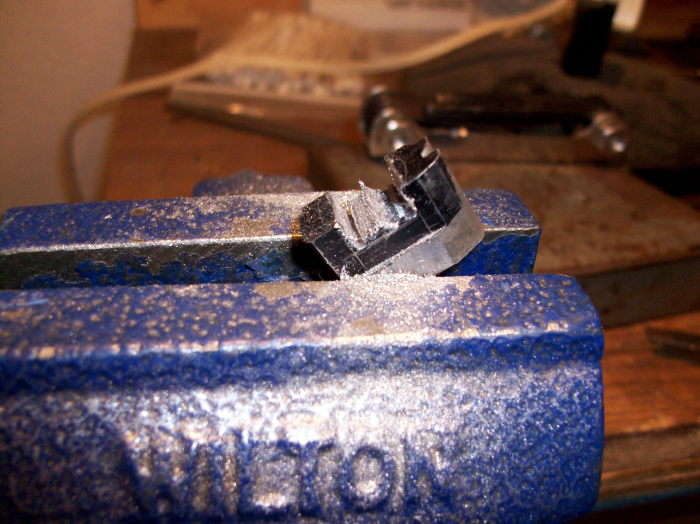
In one case of mine the spring hole wandered off a bit, and broke through the bottom face. I just cleaned up the breakthrough debris with a file, and it worked fine. Not sure if this has been raised before , but I recently did the pawl on an early car (79,80?), and it was DIFFERENT - see attached. Its like a tiny 2 seat bench. It has no teeth, just a square edge at one and a small ramp at the the other for the ratchet. Anyway, with a fair bit of filing, I managed to get one of the steel pawls to fit (down from 9 to 7.8mm thick), and it worked fine.
jp 83 Euro S AT 52k
Original unbroken pawl rear face is 3.5mm thick. Top cavity along the centre is 11mm front to rear, 5mm deep. I would suggest drilling a 10mm hole on the centre line, centred 9mm from the rear face, 4mm deep + the drill's end cone height. Getting a TRUE centre and holding it the critical part - the ruined blank was caused by the drill wandering off centre. This will give a rear wall of 4mm thickness. Then test that lock tumbler cam will both turn completely, and operate smoothly without the spring. If the rear wall is too thick, it will stop the cam from being able to retract the pawl fully. File down the inner face of the rear wall until the tumbler turns smoothly, with some lubrication. Spring hole is 13mm deep, 5mm diameter.
In one case of mine the spring hole wandered off a bit, and broke through the bottom face. I just cleaned up the breakthrough debris with a file, and it worked fine. Not sure if this has been raised before , but I recently did the pawl on an early car (79,80?), and it was DIFFERENT - see attached. Its like a tiny 2 seat bench. It has no teeth, just a square edge at one and a small ramp at the the other for the ratchet. Anyway, with a fair bit of filing, I managed to get one of the steel pawls to fit (down from 9 to 7.8mm thick), and it worked fine.
jp 83 Euro S AT 52k
Last edited by jpitman2; 12-30-2009 at 07:59 PM.
12-27-2009, 12:20 PM
#42
Three Wheelin'
Jeez guys, that is a great article and an awesomly detailed write-up and instructional photo effort. It IS what typicaly makes this site so cool; BUT, how much real time does all this take and what is that time worth? I'm seriously not dissing what you did but what is the most $$$$ you can save by doing all that work? I'm figure I'm gonna get flamed for this (or worse yet, have the pawl on my gas cap break next time I fill up) but there is no disrespect intended. Just sayin.
Paul Barrera '91 $$$$4
Paul Barrera '91 $$$$4
12-27-2009, 12:25 PM
#43
Rennlist Member
Join Date: Sep 2003
Location: Mansfield, TX
Posts: 669
Likes: 0
Received 0 Likes
on
0 Posts
BUT, how much real time does all this take and what is that time worth?
This is one of those cases where it's "better than designed", therefore it's pretty cool

I've wasted countless hours chasing tiny little things like this.