
Another headlight question
 03-09-2002, 11:49 AM
#1
Instructor
Thread Starter

Join Date: Jun 2001
Posts: 231
Likes: 0
Received 0 Likes
on
0 Posts
Can the position of the headlight be adjusted? My driverside headlight barely clears the hole/cowl when turned on. In fact there are slight rub marks on the right side of the cowl. I would like to center the light.
Has anyone done this? <img src="graemlins/c.gif" border="0" alt="[ouch]" />
Has anyone done this? <img src="graemlins/c.gif" border="0" alt="[ouch]" />
 03-09-2002, 01:43 PM
#2
Addict
Lifetime Rennlist
Member
Lifetime Rennlist
Member
Yep - did it two weeks ago. It's relatively easy to center the light in the hole, as well as to adjust how high the light sits in the fender cut-out while in the retracted position.
To whom should I address my response?
To whom should I address my response?
03-10-2002, 12:38 PM
#4
Addict
Lifetime Rennlist
Member
Lifetime Rennlist
Member
Always nice to know who's on the other end. Thanks Patrick.
As I indicated, adjusting the light position is relatively easy.
Each light 'pod' is attached to a rigid steel bar that passes through a bushing that is bolted through slotted holes in the bulkhead between the fender area and the engine compartment. Each light bar attaches to the central control tube (my terminology) that is actuated by the headlight control motor.
To center the light, the bushing on each side must still be in good condition. These are made of a plastic polymer and tend to self-destruct over time.
Assuming yours are OK, loosen the two 10 mm bolts that run through the bushing - do not remove them or you'll have lots o' fun trying to get them back in. Loosening these allows front-to-back adjustment of the light assembly.
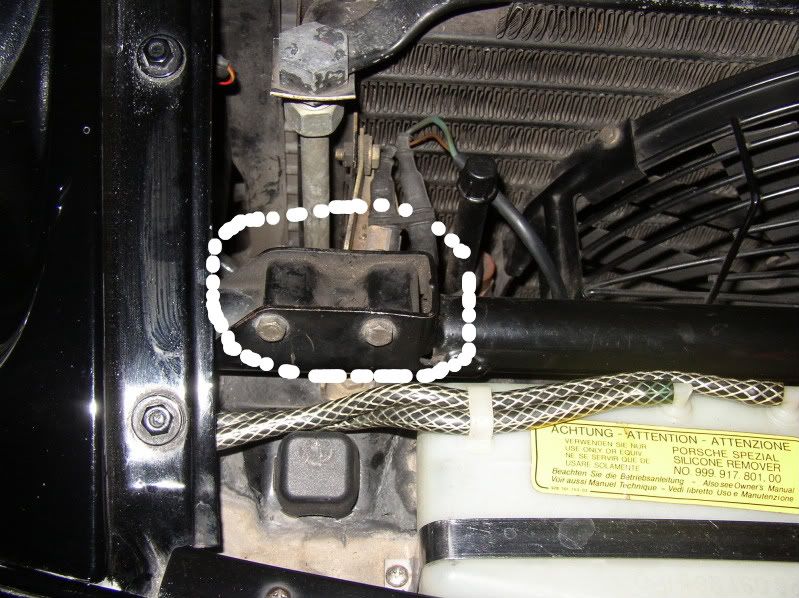
Now, loosen the two bolts that connect the light rod to the central control tube. These are funky through-bolts that require a wrench on each end. You will see the boltheads on the other side only when the lights are raised (or is it retracted - well, one of the two). Loosening these allows some lateral left-to-right adjustment of the light.
Now you can wiggle the light front/back and left/right to where it looks best. - It may take a bit of coaxing to get it to move the first time - if I recall, I got it loose with the lights up, then centered them when they were retracted.
When you get them where you want 'em, tighten everything back up, being careful not to overtighten the bushing bolts.
Now that they are centered in the cut-outs, they may be too low or too high when retracted, causing a big gap between the pod and the fender opening. To measure for proper retraction height i used a straight edge across the fender at the top (rear) of the cut-out. The top edge of the 8" lights should just touch that straight edge. With the 7" lights, adjust them to minmize the gap between the fender opening, with the lights not protruding above the fender profile.
Adjusting the depth of the retracted position is easy. On the driver's side you will need to remove the tire and the forward wheelwell liner. Access on the passenger side is much easier - you can work from under the car without the need to raise the front end.
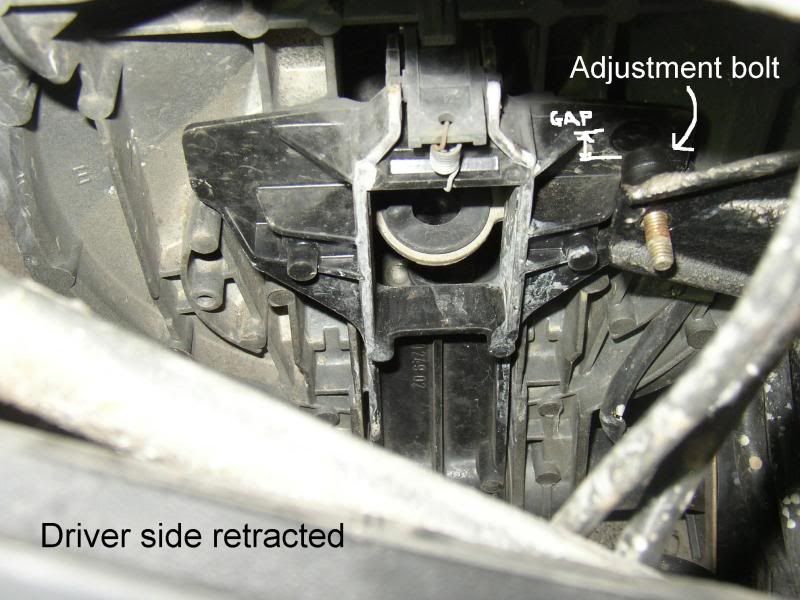
In the retracted position, there is a metal flange on the light assembly that contacts an adjustment bolt head. Raise the headlights (then turn off the key - remove the key to prevent an accidental retraction - then switch the lights to 'off'). Using a 10mm socket or wrench, turn that bolt head in to lower the retracted position, out to raise the retracted position. Adjust each side so both headlights are at the same retracted height.
As I indicated, adjusting the light position is relatively easy.
Each light 'pod' is attached to a rigid steel bar that passes through a bushing that is bolted through slotted holes in the bulkhead between the fender area and the engine compartment. Each light bar attaches to the central control tube (my terminology) that is actuated by the headlight control motor.
To center the light, the bushing on each side must still be in good condition. These are made of a plastic polymer and tend to self-destruct over time.
Assuming yours are OK, loosen the two 10 mm bolts that run through the bushing - do not remove them or you'll have lots o' fun trying to get them back in. Loosening these allows front-to-back adjustment of the light assembly.
Now, loosen the two bolts that connect the light rod to the central control tube. These are funky through-bolts that require a wrench on each end. You will see the boltheads on the other side only when the lights are raised (or is it retracted - well, one of the two). Loosening these allows some lateral left-to-right adjustment of the light.
Now you can wiggle the light front/back and left/right to where it looks best. - It may take a bit of coaxing to get it to move the first time - if I recall, I got it loose with the lights up, then centered them when they were retracted.
When you get them where you want 'em, tighten everything back up, being careful not to overtighten the bushing bolts.
Now that they are centered in the cut-outs, they may be too low or too high when retracted, causing a big gap between the pod and the fender opening. To measure for proper retraction height i used a straight edge across the fender at the top (rear) of the cut-out. The top edge of the 8" lights should just touch that straight edge. With the 7" lights, adjust them to minmize the gap between the fender opening, with the lights not protruding above the fender profile.
Adjusting the depth of the retracted position is easy. On the driver's side you will need to remove the tire and the forward wheelwell liner. Access on the passenger side is much easier - you can work from under the car without the need to raise the front end.
In the retracted position, there is a metal flange on the light assembly that contacts an adjustment bolt head. Raise the headlights (then turn off the key - remove the key to prevent an accidental retraction - then switch the lights to 'off'). Using a 10mm socket or wrench, turn that bolt head in to lower the retracted position, out to raise the retracted position. Adjust each side so both headlights are at the same retracted height.
 03-10-2002, 01:13 PM
#6
Instructor
Thread Starter
Join Date: Jun 2001
Posts: 231
Likes: 0
Received 0 Likes
on
0 Posts
Thanks Randy. I have a quest. Purchase 8" H4's (euro spec), reposition them and align.
Finding the lights at a reasonable cost will be a challenge. However, time is on my side.
I like the pointy front ends on early models. I also like the headlights on the later models. They seem to belong (on all models).
Finding the lights at a reasonable cost will be a challenge. However, time is on my side.
I like the pointy front ends on early models. I also like the headlights on the later models. They seem to belong (on all models).
Trending Topics
03-10-2002, 06:46 PM
#8
Addict
Rennlist Member
Rennlist Member
Join Date: May 2001
Location: Seattle - it's not Hell, but you can see it from here!
Posts: 3,679
Likes: 0
Received 2 Likes
on
2 Posts
excellent post randy. now you got me thinking i need to go dork around with my lights.
the retracted hight is pretty spot on, but when they go up sometimes they stop straight up and sometimes they bounce off the stop and aim up about 15-20 degrees. if i pull on the light i can pull it against the stop but it won't stay there. if i keep flipping them up and down they'll get closer to the correct position and eventually [randomly] stop straight up.
any guesses? i'm thinking a warn motor, as it used to do the opposite, stop up correctly, but when retracted, they'd go all the way down then rotate back up slightly, protruding above the fender profile. i adjusted the arm on the motor which sent the bad adjustment to the up side
i think the stops in the motor are wearing and it's turning to much, instead of turning 180�, it's turning more, so the linkage over-centers, which draws the light back off the stop.
i'm thinkig replace the motor...
03-11-2002, 01:10 PM
#9
Addict
Lifetime Rennlist
Member
Lifetime Rennlist
Member
Dave, my understanding of the actuator motor is either it works, or it doesn't.
I'd suspect a problem with the actuator linkage instead. Next time it misbehaves, keep the lights switched on, raise the hood, pull that black rubber cap off the top of the actuator motor and turn the manual control wheel on the top. If the lights fully extend on their own after a turn or so, I'd look for binding somewhere in the assembly.
Another thing to check is the headlight control relay on the main power board. A balky relay could also result in the symptoms you describe.
06-14-2010, 02:24 PM
#10
Rennlist Member
Holy thread revival!! 8 years!!
My passenger's side headlight when retracted sits lower than the driver's side. So, this weekend I had a little time between yard work and I thought I would see if I could adjust this. I did a search (I couldn't find anything in the WSM) and this thread was the most helpful, yet still didn't solve my minor problem.
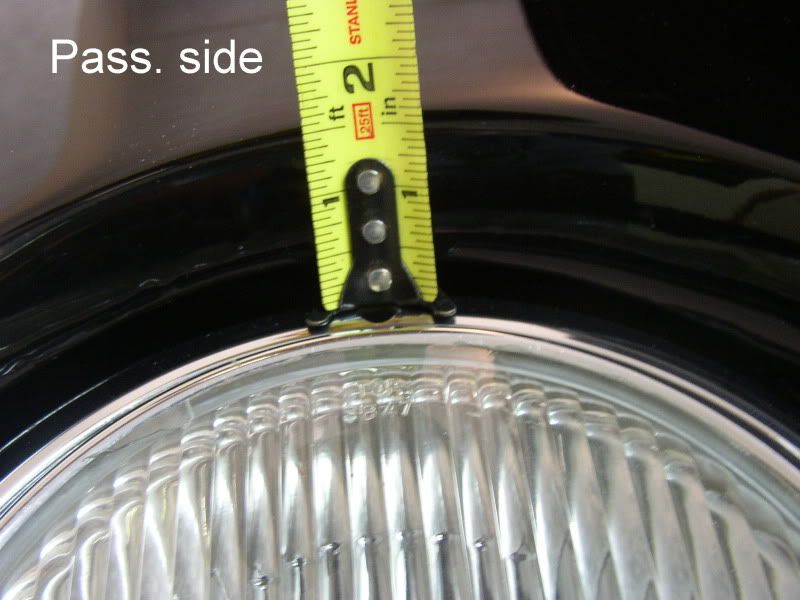
Passenger's side (after I adjusted the bolt as high as it would go)
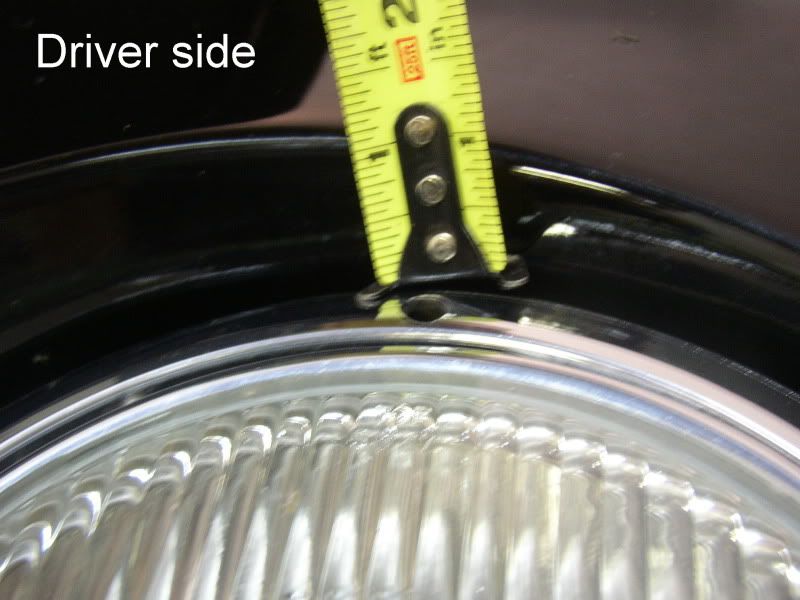
Driver's side (after I lowered the bolt, which really didn't do anything as shown in the following pictures)
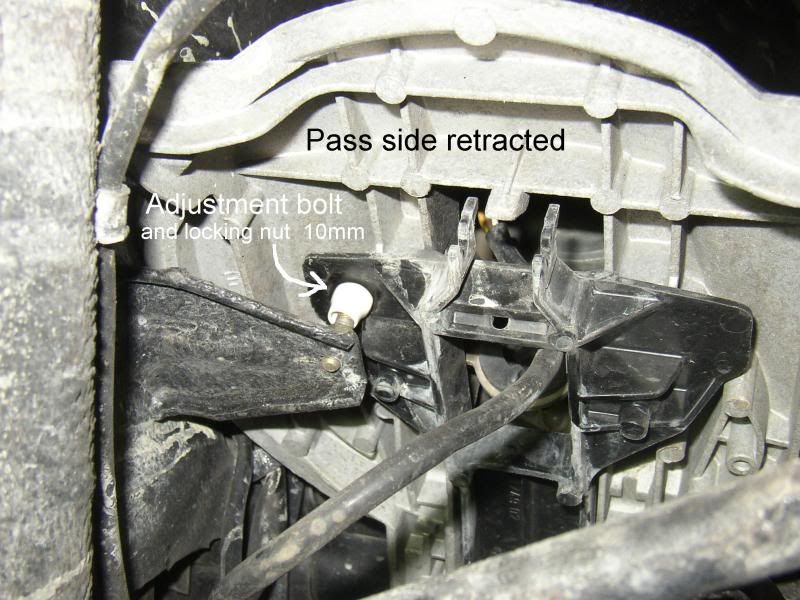
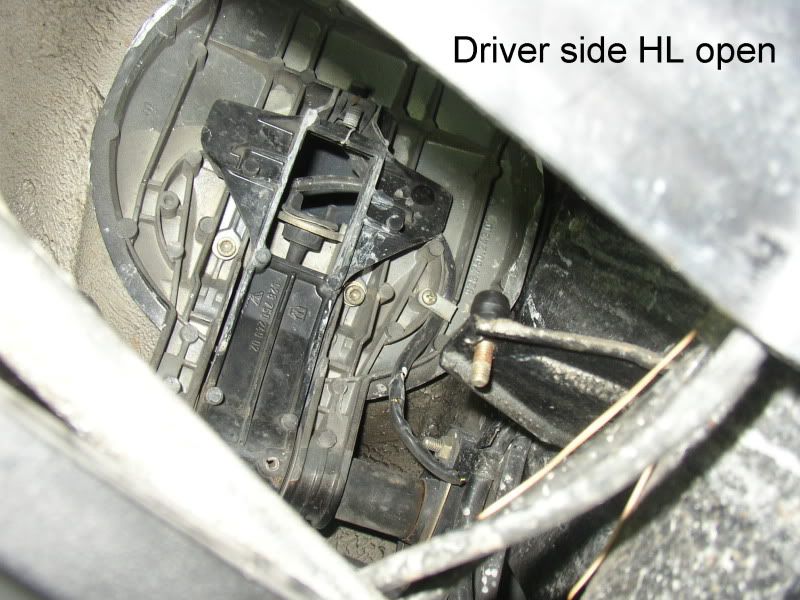
Here's pictures looking up from the floor with the front lifted and the brake air duct removed or as in the driver's side the air duct slid back.
Passenger's side
Driver's side
So as you can see the bolt adjustment did stop the Passenger's side from lowering somewhat but adjusting (lowering the bolt) the Driver's side didn't really do anything. The only thing I could think of why, is because I didn't loosen the side to side adjustment bolts as mentioned Randy V's response. Do you think that's it? I didn't try this yet.
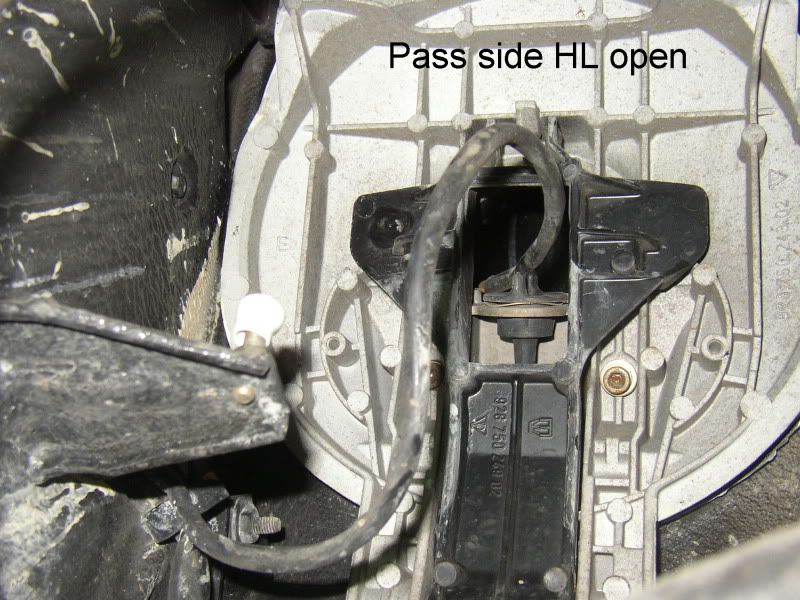
Side to side adjustment bolts (passenger's side) on the "central control tube" (Randy's terminology) with headlights up.
Any help on this? Am I interpreting Randy's response correctly?
My passenger's side headlight when retracted sits lower than the driver's side. So, this weekend I had a little time between yard work and I thought I would see if I could adjust this. I did a search (I couldn't find anything in the WSM) and this thread was the most helpful, yet still didn't solve my minor problem.
Passenger's side (after I adjusted the bolt as high as it would go)
Driver's side (after I lowered the bolt, which really didn't do anything as shown in the following pictures)
Here's pictures looking up from the floor with the front lifted and the brake air duct removed or as in the driver's side the air duct slid back.
Passenger's side
Driver's side
So as you can see the bolt adjustment did stop the Passenger's side from lowering somewhat but adjusting (lowering the bolt) the Driver's side didn't really do anything. The only thing I could think of why, is because I didn't loosen the side to side adjustment bolts as mentioned Randy V's response. Do you think that's it? I didn't try this yet.
Side to side adjustment bolts (passenger's side) on the "central control tube" (Randy's terminology) with headlights up.
Any help on this? Am I interpreting Randy's response correctly?
10-23-2010, 05:42 PM
#11
Team Owner
FWIW you can also adjust the lamp height by moving the bar up and down there are 2 10mm bolts that attach to the fenderwell these hold the bar bushings they are adjustable
10-23-2010, 08:02 PM
#12
Rennlist Member
I have a broken bushing on the passengers side. Parts manual is a bit confusing and almost makes it look like the bushing is only used on one side. Anybody sell these?
10-23-2010, 10:12 PM
#13
Team Owner
928 INTL should have a used parts these would work