
Rear Quarter Panel Repair FINISHED PICs!
 03-02-2007, 09:40 PM
#1
Addict
Rennlist Member
Rennlist
Site Sponsor
Rennlist Member
Rennlist
Site Sponsor
Thread Starter
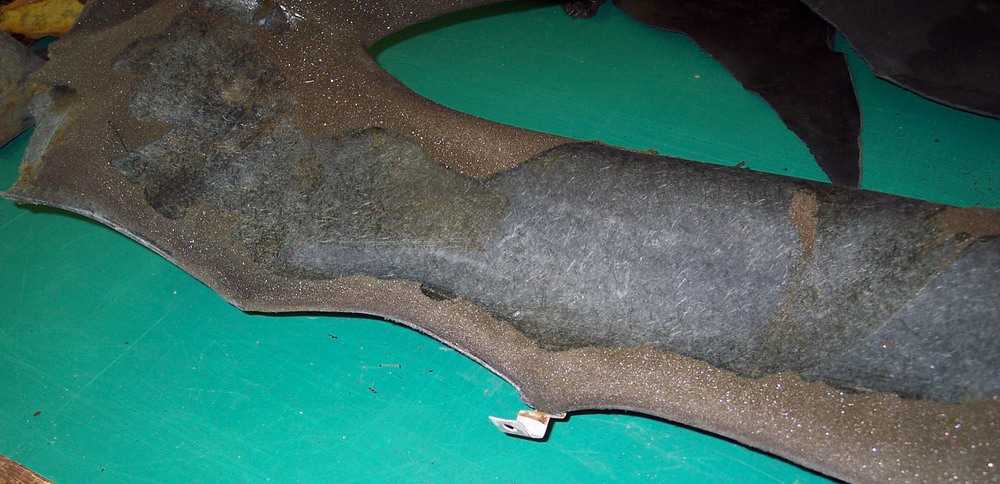
I've run across some pretty bad RQPs and often they look like they're beyond hope. This one was warped and busted up pretty well, but I managed to get it straight. I figured I'd pass along a few tips.
Take the mounting brackets off. You can rivet them back later.
Take the foam off. It won't survive the repair process and its cheap and easy to replace.
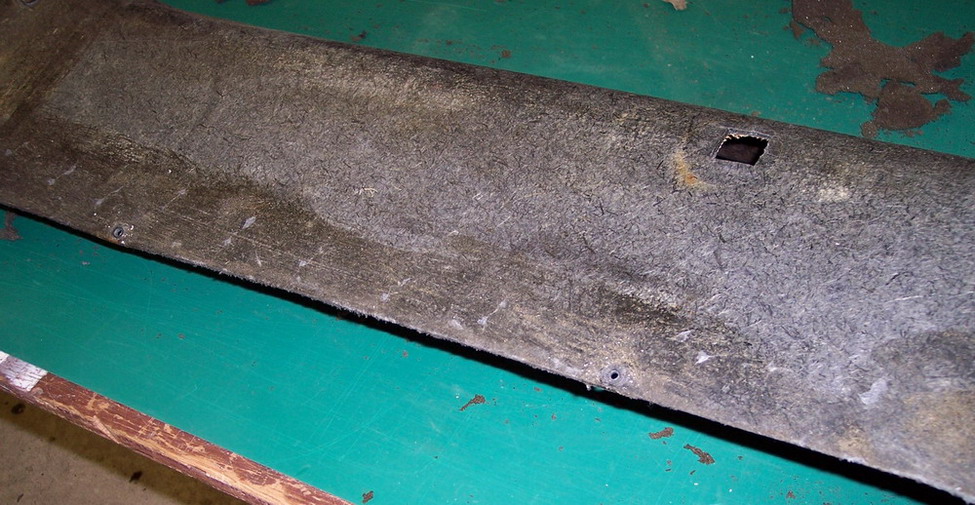
Heat the warped area along the edge and toward the inside about 6-10 inches.
Use a real heat gun. A hair dryer doesn't get hot enough.
Get it hot enough so you can't touch it but not enough to burn it.
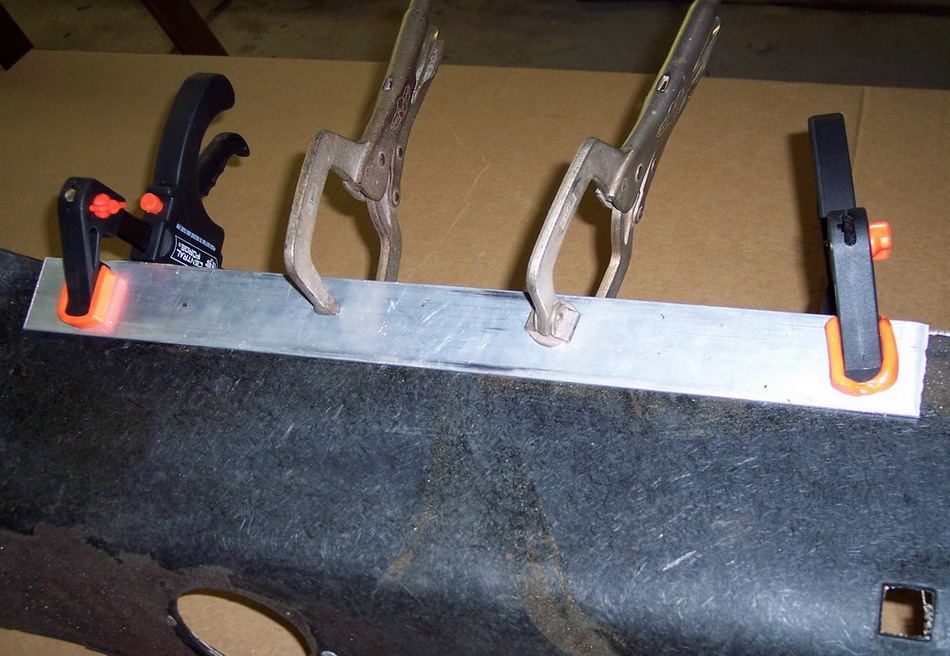
Clamp two pieces of 3 inch flat metal stock to each side.
Tighten the clamps enough to hold the metal in place.
While its still hot, slowly tighten the clamps.
Turn on some music and have a couple beers nearby.
If you hear cracking, stop and apply more heat.
Take your time. It took years for them to warp. It'll take a few hours to get them straight.
Once the clamps are tight, reheat the entire area.
Let it cool overnight.
Repeat the process if it didn't get it completely straight the first time.
If the curved B pillar or top section is warped, the same process works using a 2 inch pipe clamped into the concave area and a piece of sheet metal on the opposite side.
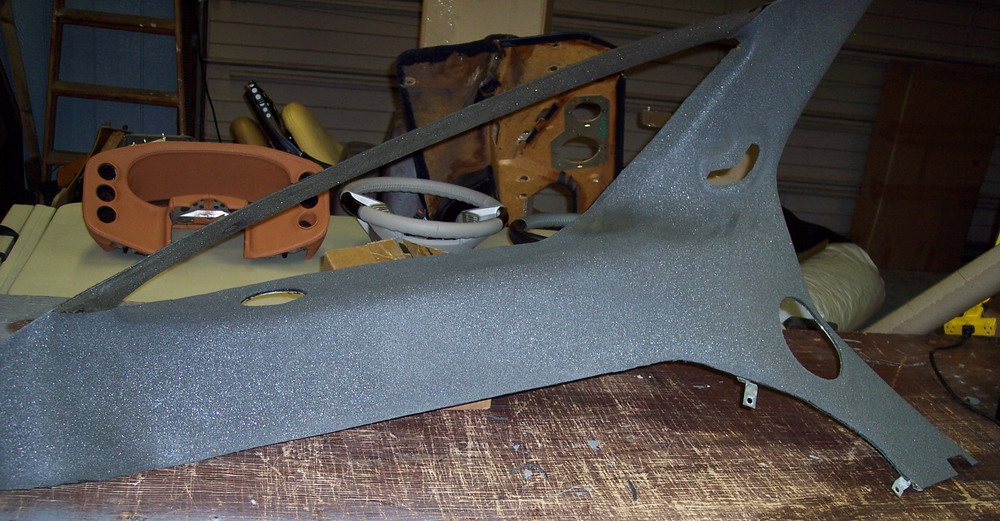
Replace the foam and mounting brackets & cut out the speaker holes
I didn't get a pic of adding resin and fiberglass to repair the cracks and adding broken sections back. Laying fiberglass is a whole other project for another time.
I've yet to add the leather cover but will post a pic when its done.
Take the mounting brackets off. You can rivet them back later.
Take the foam off. It won't survive the repair process and its cheap and easy to replace.
Heat the warped area along the edge and toward the inside about 6-10 inches.
Use a real heat gun. A hair dryer doesn't get hot enough.
Get it hot enough so you can't touch it but not enough to burn it.
Clamp two pieces of 3 inch flat metal stock to each side.
Tighten the clamps enough to hold the metal in place.
While its still hot, slowly tighten the clamps.
Turn on some music and have a couple beers nearby.
If you hear cracking, stop and apply more heat.
Take your time. It took years for them to warp. It'll take a few hours to get them straight.
Once the clamps are tight, reheat the entire area.
Let it cool overnight.
Repeat the process if it didn't get it completely straight the first time.
If the curved B pillar or top section is warped, the same process works using a 2 inch pipe clamped into the concave area and a piece of sheet metal on the opposite side.
Replace the foam and mounting brackets & cut out the speaker holes
I didn't get a pic of adding resin and fiberglass to repair the cracks and adding broken sections back. Laying fiberglass is a whole other project for another time.
I've yet to add the leather cover but will post a pic when its done.
Last edited by Rob M Budd; 03-09-2007 at 10:46 AM.

The following 2 users liked this post by Rob M Budd:
Hey_Allen (06-29-2019),
LargeFarva (05-03-2020)
03-03-2007, 12:10 AM
#4
Instructor

Join Date: Mar 2006
Location: Hattiesburg, MS
Posts: 205
Likes: 0
Received 0 Likes
on
0 Posts
Rob, your way of fixing sounds really good. Thanks for sharing. These types of writeups are indispensable for seeing what works. It would be nice if there was a sticky thread at the top that we could consolidate all the write ups for different things. Just a thought.
Below are two links that one might find helpful. One is for taking out the quarter panels. The second is how I fixed mine.
1. http://www.928s4.info/interior/quarter_panel_removal/
2. http://www.928s4.info/interior/quarter_panel_warp_fix/
Below are two links that one might find helpful. One is for taking out the quarter panels. The second is how I fixed mine.
1. http://www.928s4.info/interior/quarter_panel_removal/
2. http://www.928s4.info/interior/quarter_panel_warp_fix/
03-03-2007, 12:20 AM
#5
Rennlist Member
Originally Posted by 0utlier
Rob, your way of fixing sounds really good. Thanks for sharing. These types of writeups are indispensable for seeing what works. It would be nice if there was a sticky thread at the top that we could consolidate all the write ups for different things. Just a thought.
Below are two links that one might find helpful. One is for taking out the quarter panels. The second is how I fixed mine.
1. http://www.928s4.info/interior/quarter_panel_removal/
2. http://www.928s4.info/interior/quarter_panel_warp_fix/
Below are two links that one might find helpful. One is for taking out the quarter panels. The second is how I fixed mine.
1. http://www.928s4.info/interior/quarter_panel_removal/
2. http://www.928s4.info/interior/quarter_panel_warp_fix/
03-03-2007, 09:03 AM
#7
Addict
Rennlist Member
Rennlist
Site Sponsor
Rennlist Member
Rennlist
Site Sponsor
Thread Starter
Thanks guys.
BTW If you can get any of the cheap clamps from Harbor Freight to work at all, note trhat the plastic ones melt.
I picked up a set of metal ones the other day from Home 'Despot' that work OK.
Even in simple clamps, you get what you pay for.
BTW If you can get any of the cheap clamps from Harbor Freight to work at all, note trhat the plastic ones melt.
I picked up a set of metal ones the other day from Home 'Despot' that work OK.
Even in simple clamps, you get what you pay for.
Trending Topics
03-03-2007, 09:12 AM
#8
Drifting
Great write-ups!
Has anyone done this without replacing the leather?
My leather appears to be in pretty good shape... just the typical warping under the quarter window. I was hoping to pull the leather back a little, flatten/reinforce the fiberboard and reapply the existing leather.
Has anyone done this without replacing the leather?
My leather appears to be in pretty good shape... just the typical warping under the quarter window. I was hoping to pull the leather back a little, flatten/reinforce the fiberboard and reapply the existing leather.
03-03-2007, 09:59 AM
#10
Addict
Rennlist Member
Rennlist
Site Sponsor
Rennlist Member
Rennlist
Site Sponsor
Thread Starter
Originally Posted by ceedee
i think it is the shrinking of the leather that does the benging. so it'll prolly brake or the thing will look the same again, in pretty short time
Of course, if leather is not cared for it will shrink. I've seen some early 928s with original leather interiors in excellent condition. The owners obviously kept the leather clean and treated the leather with conditioners.
That same advice and instruction is being given to the customer with the panels.
You can use the same process on door panels. Its a matter of finding the right size metal stock to clamp in place.
03-03-2007, 05:36 PM
#12
Addict
Rennlist Member
Rennlist Member
OK I'm confused (And I need to do this repair on both 928s)
I had in my mind that the RQP's were some kind of fibreboard and that people had had success wetting them with water (tomake them flexible) then clamping back to the correct shape.
Rob demonstrates that heat works which makes them some kind of thermoplastic ?
I had in my mind that the RQP's were some kind of fibreboard and that people had had success wetting them with water (tomake them flexible) then clamping back to the correct shape.
Rob demonstrates that heat works which makes them some kind of thermoplastic ?
03-03-2007, 06:05 PM
#13
Rennlist Member
Jon,
I did a similar repair about 5 years ago on an '87 S4, and used both moisture and heat. I do believe they have at least some thermoplastic nature. Holding that top outer edge in place as Rob has indicated was the key.
Cheers, and to Rhonda as well,
Gary Knox
West Chester, PA
I did a similar repair about 5 years ago on an '87 S4, and used both moisture and heat. I do believe they have at least some thermoplastic nature. Holding that top outer edge in place as Rob has indicated was the key.
Cheers, and to Rhonda as well,
Gary Knox
West Chester, PA
03-03-2007, 08:12 PM
#14
Addict
Rennlist Member
Rennlist
Site Sponsor
Rennlist Member
Rennlist
Site Sponsor
Thread Starter
Originally Posted by jon928se
OK I'm confused (And I need to do this repair on both 928s)
I had in my mind that the RQP's were some kind of fibreboard and that people had had success wetting them with water (tomake them flexible) then clamping back to the correct shape.
Rob demonstrates that heat works which makes them some kind of thermoplastic ?
I had in my mind that the RQP's were some kind of fibreboard and that people had had success wetting them with water (tomake them flexible) then clamping back to the correct shape.
Rob demonstrates that heat works which makes them some kind of thermoplastic ?
I didn't want to use water because I thought it would break down the whatever is used to hold it together.
03-03-2007, 08:28 PM
#15
Addict
Rennlist Member
Rennlist Member
Mmmm thanks for the answers. I'll try carefully and patiently.
The leather on mine is quite dry but intact. I'm thinking that I should try and condition it before trying to remove it to guard against cracking. But if I "fill the leather full of conditioner" thinking it will be nigh impossible to get contact adhesive to sork to refit it.
The leather on mine is quite dry but intact. I'm thinking that I should try and condition it before trying to remove it to guard against cracking. But if I "fill the leather full of conditioner" thinking it will be nigh impossible to get contact adhesive to sork to refit it.