

Spoiler rust -> bumper delete
 08-11-2005, 03:31 AM
#1
Inventor
Rennlist Member
Rennlist Member
Thread Starter
I finally removed the spoiler to check for any rust.
There was, and worse after scraping, holes!

Rust killer and body filler applied.
I then pulled the bumper cover to check there. Whew! Just a couple surface spots.
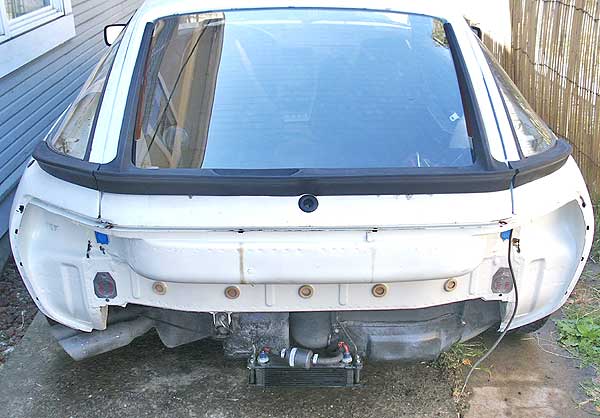
After washing.
Well now that the metal bumper's out, no hurry to put it back in...
Cover + lights = 20 lbs, Bumper + 'ettes + shocks = 40 lbs
It was interesting to look into the holes where the bumper shocks go with a flashlight. The shocks are bolted into boxed frame rails (which I never realized were there), inside, the rails are pristinely clean and the anti-rust plating is still shiny.
Now I'll just have to check the front for, uh, rust, too.
There was, and worse after scraping, holes!
Rust killer and body filler applied.
I then pulled the bumper cover to check there. Whew! Just a couple surface spots.
After washing.
Well now that the metal bumper's out, no hurry to put it back in...
Cover + lights = 20 lbs, Bumper + 'ettes + shocks = 40 lbs
It was interesting to look into the holes where the bumper shocks go with a flashlight. The shocks are bolted into boxed frame rails (which I never realized were there), inside, the rails are pristinely clean and the anti-rust plating is still shiny.
Now I'll just have to check the front for, uh, rust, too.
 08-12-2005, 04:20 AM
#2
Inventor
Rennlist Member
Rennlist Member
Thread Starter
Good thing I had a spare bumper cover with passable studs I could transfer - all the studs were trashed on mine. If you take off your cover, keep in mind you probably will have to replace the studs, which are on 3 separate brackets on each side. The brackets are riveted to the edge and top corner of the cover.
Oops! Looks like the gas tank has to come out to put the nuts back on the right side. You can get the nuts off with an extension, but no way to get them to thread back on, at least with used studs.
The cover sits fine without the metal bumper there. The cover is independent of the bumper, there are no attachment points.
...
In case you were wondering - like I was, how the S-spoiler is attached:

There are 4 posts with 4mm studs at the top, and 12 sheet metal nuts with plastic spacers. The factory screws are 32mm long, but 1" are just long enough. (I switched to big head stainless steel #8 screws.)
The upper aluminum trim pops onto plastic clips, which are attached with short screws. These same clips are used as glass spacers in 3 places on the bottom of the spoiler (the spoiler is not attached to these clips). One of my PO's used 32mm screws on these clips, and the one between the wiper holes was sticking through out of the spoiler!
...
Taking a peek under the spoiler should be part of the PPI, I think. Pull up the bottom of the spoiler a little and look for any visible rust. If you see any signs, it's probably a lot worse next to the glass...
Oops! Looks like the gas tank has to come out to put the nuts back on the right side.
You can get the nuts off with an extension, but no way to get them to thread back on, at least with used studs.The cover sits fine without the metal bumper there. The cover is independent of the bumper, there are no attachment points.
...
In case you were wondering - like I was, how the S-spoiler is attached:
There are 4 posts with 4mm studs at the top, and 12 sheet metal nuts with plastic spacers. The factory screws are 32mm long, but 1" are just long enough. (I switched to big head stainless steel #8 screws.)
The upper aluminum trim pops onto plastic clips, which are attached with short screws. These same clips are used as glass spacers in 3 places on the bottom of the spoiler (the spoiler is not attached to these clips). One of my PO's used 32mm screws on these clips, and the one between the wiper holes was sticking through out of the spoiler!
...
Taking a peek under the spoiler should be part of the PPI, I think. Pull up the bottom of the spoiler a little and look for any visible rust. If you see any signs, it's probably a lot worse next to the glass...
08-12-2005, 11:16 PM
#3
Inventor
Rennlist Member
Rennlist Member
Thread Starter
I cleaned up the original sealant around the hatch window, then resealed all 'round with 3M 'Window Weld'. She should be leak free now.
I managed to get the cover back on without removing the gas tank. I jacked up the right side for more clearance between the tire and the fender, removed the (ex) side marker, and used my left arm to reach up in thar to get the nuts started.
Hard to tell the metal bumper's gone, but, boy howdy, it made a huge difference in cornering! Forty pounds that far out must equal some big time centripetal weight.
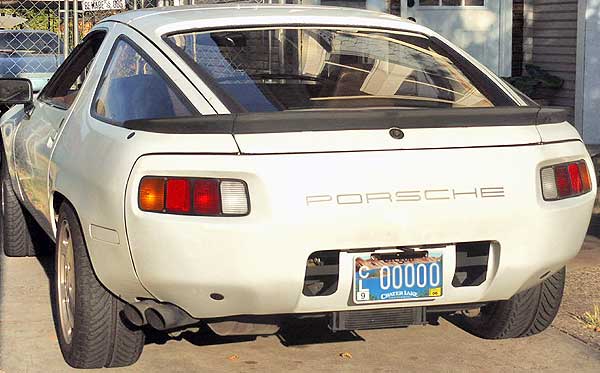
I'm hot to do the front, now. It won't be quite as easy, though. I'll have to fab a bracket to hold the grill legs, and the turn signals, etc.
I managed to get the cover back on without removing the gas tank. I jacked up the right side for more clearance between the tire and the fender, removed the (ex) side marker, and used my left arm to reach up in thar to get the nuts started.
Hard to tell the metal bumper's gone, but, boy howdy, it made a huge difference in cornering! Forty pounds that far out must equal some big time centripetal weight.
I'm hot to do the front, now. It won't be quite as easy, though. I'll have to fab a bracket to hold the grill legs, and the turn signals, etc.
Last edited by PorKen; 08-12-2005 at 11:43 PM.
08-13-2005, 01:31 AM
#5
Inventor
Rennlist Member
Rennlist Member
Thread Starter
Weight! I'm down to about 2950lbs now.
An unplanned benefit is the awsome handling. It makes sense that all that weight at the poles makes the car swing more than without. Just the rear one gone makes the car so much more 'flickable'.
I have two dim rationales for the loss of the impact absorbers. One, I don't commute, in fact, I rarely drive during any rush hours, so I'm hardly ever in bumper to bumper traffic. Two, I think of it as being, for example, a Euro BMW, back when Euro meant no bumpers, or at most some minor appendages, and the equivalent US versions had big steel girders, front and rear.
08-13-2005, 08:52 AM
#6
Gluteus Maximus
Rennlist Member
Rennlist Member
Join Date: Nov 2004
Posts: 6,365
Likes: 0
Received 0 Likes
on
0 Posts
Originally Posted by G Man
If you get hit, there will be nothing there to soak up the impact. Good luck with the project
08-15-2005, 02:50 AM
#7
Inventor
Rennlist Member
Rennlist Member
Thread Starter
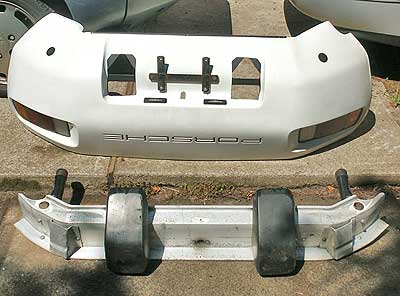
The front cover was much easier to remove.
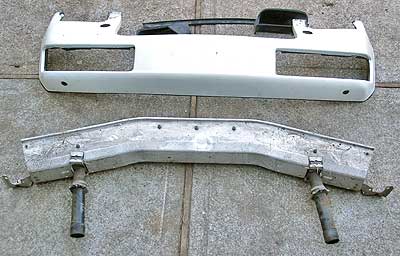
Bare S-cover = 10lbs, One bumper shock = 5lb, Bumper + shocks = 25lbs
The bumper weighs less than I thought, but 25lbs is still a pretty good number off the front.
Bare S-cover = 10lbs, One bumper shock = 5lb, Bumper + shocks = 25lbs
The bumper weighs less than I thought, but 25lbs is still a pretty good number off the front.
Trending Topics
08-15-2005, 02:55 AM
#8
I'm thinking about pulling mine and drilling a bunch of large 'lightening holes' in them. I can't just pull them in good consciencse. I drive the car in a big city full of idiots on an almost daily basis.
08-15-2005, 02:59 AM
#9
928 Barrister
Rennlist Member
Rennlist Member
Victor, aren't the bumpers meant to absorb up to 5 mph without damage, and any more with damage? So they still function to prevent intrusion, though probably trashed after 5 mph.
08-20-2005, 05:29 PM
#11
Inventor
Rennlist Member
Rennlist Member
Thread Starter
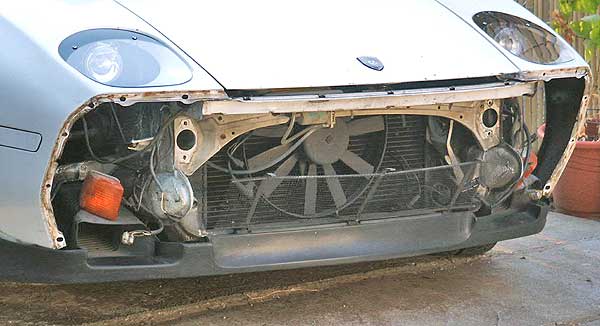
I was leaning towards putting the front bumper back in, but as I was making the brackets for the turn signals, I remembered why it's so nice to lots of things removed. It's so much simpler to work on the car!
It's a little difficult to see in these pics, but I have one plate with two arms per side; one for the turn signals, and one for the laser detector/jammers.
Next up is some sort of chicken wire cover, and eventually, a bracket for the high beams to mount in between the turn signals and the sensors.

If you ever need a free mount point under the headlights, I found that there are two bolt holes per side with M6 weld nuts (where the non-S fender bracket attaches). On my S-type body, they were covered with tape, then the undercoat and paint were sprayed over the tape.
It's a little difficult to see in these pics, but I have one plate with two arms per side; one for the turn signals, and one for the laser detector/jammers.
Next up is some sort of chicken wire cover, and eventually, a bracket for the high beams to mount in between the turn signals and the sensors.
If you ever need a free mount point under the headlights, I found that there are two bolt holes per side with M6 weld nuts (where the non-S fender bracket attaches). On my S-type body, they were covered with tape, then the undercoat and paint were sprayed over the tape.