
Steering Wheel Restoration Ideas
 06-01-2005, 09:37 PM
#1
Pro
Thread Starter
Join Date: Oct 2004
Location: Brentwood, TN
Posts: 740
Likes: 0
Received 0 Likes
on
0 Posts
OK Guys and Gals, I'm open to recommendations. FYI I know how to sew leather but have never done upolstery, just equestrian stuff.
Cheers!
Dave
Cheers!
Dave

 06-01-2005, 10:18 PM
#5
Addict
Rennlist Member
Rennlist Member
Join Date: Nov 2001
Location: Endwell, New York
Posts: 620
Likes: 0
Received 0 Likes
on
0 Posts
Dave - I recovered mine with a replacement kit 6 years ago. Best interior upgrade I ever did. It took me approx. 6 hours to stitch the wheel and lots patience. Good Luck!
06-01-2005, 10:22 PM
#6
Rennlist Member
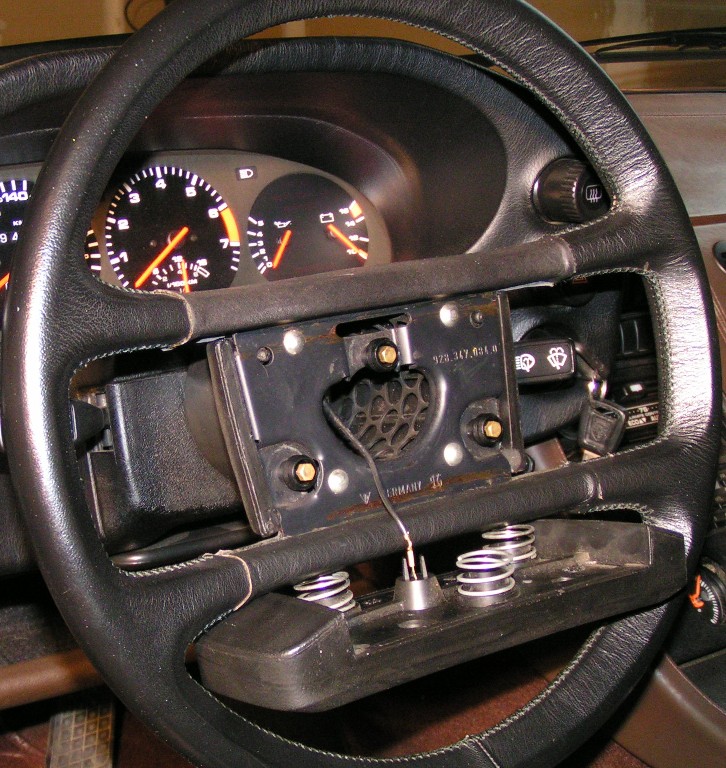
Restitching is possible, but a well fitted cover is essential: this was the original leather shown below. The 4-spoke approach mentioned above would take fewer stitches ... and is likely close to the cost of a recover kit.
06-01-2005, 10:27 PM
#7
Nordschleife Master
I've done the 4-spoke Agla kit. Looks great now, but took 8 hours of work.
The three-spoke unit is cheaper and should be easier. I'd do that. Agla offers a trade-in program for re-covering them.
The three-spoke unit is cheaper and should be easier. I'd do that. Agla offers a trade-in program for re-covering them.
Trending Topics
06-01-2005, 10:48 PM
#8
Pro
Thread Starter
Join Date: Oct 2004
Location: Brentwood, TN
Posts: 740
Likes: 0
Received 0 Likes
on
0 Posts
Originally Posted by Paul D
Dave - I recovered mine with a replacement kit 6 years ago. Best interior upgrade I ever did. It took me approx. 6 hours to stitch the wheel and lots patience. Good Luck!
I want to reuse the original wheel else I would go for a Momo.
Thanks!
Dave
06-02-2005, 12:55 AM
#10
I just got a Wheelskin cover from Vertex in the two tone leather, $35+/-. I havent put it on yet, I was hoping to have time to get it done before SITM. Its a simple stitch on cover. I'm sure it wont look anything like the factory look above, but being that its leather, it should still look much better than my original wheel and the brown portion almost matches my interior perfectly.
06-02-2005, 03:29 AM
#12
928 Barrister
Rennlist Member
Rennlist Member
Here are two shots of a wheel I recently did:
http://forums.rennlist.com/upload/wheel_1_copy5.jpg
http://forums.rennlist.com/upload/wheel_2_copy4.jpg
I re-stiched and re-dyed using SEM leather dye. Took more than a couple of hours.
http://forums.rennlist.com/upload/wheel_1_copy5.jpg
http://forums.rennlist.com/upload/wheel_2_copy4.jpg
I re-stiched and re-dyed using SEM leather dye. Took more than a couple of hours.
06-02-2005, 09:47 AM
#13
Pro
Thread Starter
Join Date: Oct 2004
Location: Brentwood, TN
Posts: 740
Likes: 0
Received 0 Likes
on
0 Posts
Originally Posted by Ron_H
Here are two shots of a wheel I recently did:
http://forums.rennlist.com/upload/wheel_1_copy5.jpg
http://forums.rennlist.com/upload/wheel_2_copy4.jpg
I re-stiched and re-dyed using SEM leather dye. Took more than a couple of hours.
http://forums.rennlist.com/upload/wheel_1_copy5.jpg
http://forums.rennlist.com/upload/wheel_2_copy4.jpg
I re-stiched and re-dyed using SEM leather dye. Took more than a couple of hours.
This looks like OEM ... awesome! Now which kit is this?
Your job looks the best of all to me ...
... (OMG! That sounds so ungrateful to the others ... sorry guys ... ALL of yours look great and you are all great and everything is great .... oh my .. time for more coffee ...)

Cheers,
Dave
06-02-2005, 04:32 PM
#14
928 Barrister
Rennlist Member
Rennlist Member
The wheel was done using SEM products and much labor/patience.
Step one is removal of all of the bad stiching. This is necessary because the leather must be scuffed prior to dyeing using a grey scuff pad (available from an auto paint store). Scuffing will damage the threads.
Next step is to use SEM soap (auto paint store) and give it a throrough cleaning. Then the scuffing which will remove old crud and prep the surface to receive dye.
Then the stiching. This takes the longest time, and I did it over several separate sessions to keep from getting bored. Get the thread from a sewing store; ask for leather thread which is much stronger, because you will be pulling it taut and stressing it as you go. Use a curved needle, also available from the sewing store. Ask the girls there for this stuff; they know all about it.
The part just above and below the horn button must be removed and the old threads pulled from under the leather and then that part is sewn separately. As you complete each pass, remember to cross over your stiches to the other piece of leather(at the break where your thumb will be placed when you drive the car)and then return to the center section so that it will appear that the stiches are continuous and the ends of each side are held in place. Then apply some non-hardening glue to the back of that piece of leather and hold it in place until it sets. I used "Barge Cement" available at OSH.
Once the stiching is complete to your satisfaction and ended securely, you can resume preparation for dyeing. I re-stiched several times. Remember to allow 4 times the run for thread length or you will not have sufficient thread length and will not complete your pass at the end (where your thumbs are placed when you are driving). The pattern is diagonal stitch across each side of leather and then back across under the leather at 90 degrees, then diagonal pass stitch across each side of the leather and then back across under....etc, etc, until you reach the end; don't stop there, but continue in the mirror image of stitch pattern in the reverse direction filling in the alternate empty holes you missed on the first pass.
At the end, reverse the stitch pattern direction again for a few holes and then firmly cram the thread end under a stitch and cut the thread. If you are careful, you won't be able to detect the end and it won't pull out.
Next, scream and yell and jump up and down to release all the tension in yourself.
Next, apply a product from SEM called "Plastic Prep" (part number 38354)which will clean all remaining oils and crap from the surface of the leather. I know it says "plastic" but I used it anyway per their instructions. It works. You will be amazed at all the crud that it removes and the surface will be dull and uniform and scuffed lightly for a good bond. Wear a respirator when you do this; it is bad stuff.
Just take a lint free rag and wipe down the entire wheel. Don't forget to mask the parts of the wheel you don't want to paint prior to doing this prep because you don't want to touch the leather once it is prepped. Have a coat hanger ready and an open breeze free place available OUTside in which to spray the dye. The hanger is used to hang the wheel so you can spray all around it and then let it hang while it is drying. Use latex gloves.
After the plastic prep has evaporated the leather will appear awful. It is fine. Don't worry about it's appearance at this stage. Next, place the SEM dye into your sprayer. The dye you want is SEM Sure Coat, which is used for leather. If you want to spray vinyl or plastic (dash and pod), use SEM color coat. Either can be mixed by a SEM provider (auto paint store). It is expensive.
I used the rear seat visors for a color match because they are not exposed so much to sunlight over time and the match was perfect. Specify satin or low gloss finish. I also used two sprayer devices: for the base coats I used a "SprayTool" sprayer, which is a propellant in a can that also has an attachment which accomodates the reservoir of dye and allows several different types of interchangeable nozzles for governing pattern. It is easy to clean with acetone which you should have handy. You should keep two or three cans available because once the can feels cold, it will lose its force and you must reload another can to continue uninterrupted. This will be used for the base (ultra thin and coarse coat) I used two coats each within 15 minutes of each other.
Then, after 30 to 45 minutes but no more than 60 minutes, switch to using a Preval sprayer for your finish coats, because it allows a much better and denser application of the dye. Have at least three sprayers handy in case you exhaust the first cannister or it goes cold. have a couple of reservoirs of SEM SureCoat handy as well.
Spray the finish coat on within one hour (no more) of the base coats. Apply it reasonably heavy almost to the point of running. Then hang the wheel up to dry in a place where you won't be bothered by the odor or vapors and no bugs or dust will land on it. I keep tweezers handy to pluck the buggers off just in case. Go out and breathe freely for awhile respirator free. Wait for 24 hours.
Next apply a second finish coat using the Preval sprayer tool and hang the wheel again and wait for 24 hours. Then unmask and it should be done. You will need to let it cure in the sun and it will feel coarse until you use it for awhile and the coarseness will go away.
Happy restoring.
06-02-2005, 09:03 PM
#15
Addict
Rennlist Member
Rennlist Member