
Journal of TB replacement
 03-31-2005, 07:04 PM
#1
Advanced
Thread Starter

Join Date: Mar 2005
Location: Burlington, NJ
Posts: 78
Likes: 0
Received 0 Likes
on
0 Posts
I am sure not everyone has read my "Timing belt by a Newbie" thread so let me update you. I have a 1983 with AT.
The shoulder bolt in my tensioner snapped. Most like the new 928 owner ran his car too hard in the first week of ownership.
Last night I order new TB and tensioner parts from Jim and Tom at 928intl.com. They were great in answering my questions. They helped me decide not to do the WP. We figured the first time taking the front of the engine off would be tough. The second time a charm.
I tackled the front of the engine today using John Pirtle's guide and the shop manuals. (I got mine in a download and apparently pages are out of order and missing!)
I got through the first part up to "Removing the Timing Belt"
Some things I noticed:
1. The engine block drain plugs were hard to find using pictures from the manual and when they opened....wow...had to use 6 newspapers to clean the garage floor.
2. Getting of the belts (alt., ac, etc.) was a lot hard then John's page made it seem. Also my 83 is not configured the same way as his 87.
3. Getting the fan shroud off was a lot easier.
4. Either I can't read or his steps didn't specifically say to remove the fan. I did it anyway.
Finally, and most importantly. I cannot use his guide to find TDC on the camshafts. I had to go back to the service manually and low and behold there were 3 different pages on how to find TDC on the cams.
Correct me if I am wrong. There is a V shaped notch in the cam that must be lined up with the little triangle on the camshaft bearing caps, right?
If so, the belt slipped so badly tha my cams are off by about 9 teeth.
I am going to keep you updated....I am not trying the next step until the parts come in from 928intl.
 03-31-2005, 07:50 PM
#2
Inventor
Rennlist Member
Rennlist Member
This pic shows the right and left cam tower alignment points. The left (US driver's side) is on the distributor shaft. These should line up with the notches in the back of the cam gears.
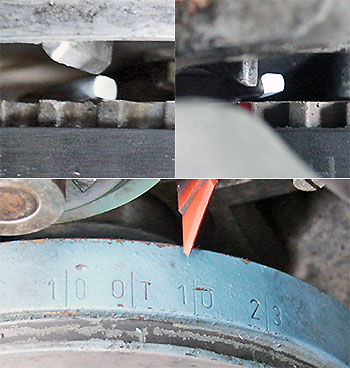
Note: ignore the white spots, and the balancer should be at O|T.
Note: ignore the white spots, and the balancer should be at O|T.
03-31-2005, 08:02 PM
#3
Banned
Join Date: May 2001
Location: The Great Northwest
Posts: 12,264
Likes: 0
Received 3 Likes
on
3 Posts
You are going to see differences since the Pirtle write up is for a 32 valve.
Here is a write up on retenioning the belt on 16 valve. Might help a little.
http://members.rennlist.com/blueshark/page14.html
Here is a write up on retenioning the belt on 16 valve. Might help a little.
http://members.rennlist.com/blueshark/page14.html
Originally Posted by KAmey1970
I am sure not everyone has read my "Timing belt by a Newbie" thread so let me update you. I have a 1983 with AT.
The shoulder bolt in my tensioner snapped. Most like the new 928 owner ran his car too hard in the first week of ownership.
Last night I order new TB and tensioner parts from Jim and Tom at 928intl.com. They were great in answering my questions. They helped me decide not to do the WP. We figured the first time taking the front of the engine off would be tough. The second time a charm.
I tackled the front of the engine today using John Pirtle's guide and the shop manuals. (I got mine in a download and apparently pages are out of order and missing!)
I got through the first part up to "Removing the Timing Belt"
Some things I noticed:
1. The engine block drain plugs were hard to find using pictures from the manual and when they opened....wow...had to use 6 newspapers to clean the garage floor.
2. Getting of the belts (alt., ac, etc.) was a lot hard then John's page made it seem. Also my 83 is not configured the same way as his 87.
3. Getting the fan shroud off was a lot easier.
4. Either I can't read or his steps didn't specifically say to remove the fan. I did it anyway.
Finally, and most importantly. I cannot use his guide to find TDC on the camshafts. I had to go back to the service manually and low and behold there were 3 different pages on how to find TDC on the cams.
Correct me if I am wrong. There is a V shaped notch in the cam that must be lined up with the little triangle on the camshaft bearing caps, right?
If so, the belt slipped so badly tha my cams are off by about 9 teeth.
I am going to keep you updated....I am not trying the next step until the parts come in from 928intl.
The shoulder bolt in my tensioner snapped. Most like the new 928 owner ran his car too hard in the first week of ownership.
Last night I order new TB and tensioner parts from Jim and Tom at 928intl.com. They were great in answering my questions. They helped me decide not to do the WP. We figured the first time taking the front of the engine off would be tough. The second time a charm.
I tackled the front of the engine today using John Pirtle's guide and the shop manuals. (I got mine in a download and apparently pages are out of order and missing!)
I got through the first part up to "Removing the Timing Belt"
Some things I noticed:
1. The engine block drain plugs were hard to find using pictures from the manual and when they opened....wow...had to use 6 newspapers to clean the garage floor.
2. Getting of the belts (alt., ac, etc.) was a lot hard then John's page made it seem. Also my 83 is not configured the same way as his 87.
3. Getting the fan shroud off was a lot easier.
4. Either I can't read or his steps didn't specifically say to remove the fan. I did it anyway.
Finally, and most importantly. I cannot use his guide to find TDC on the camshafts. I had to go back to the service manually and low and behold there were 3 different pages on how to find TDC on the cams.
Correct me if I am wrong. There is a V shaped notch in the cam that must be lined up with the little triangle on the camshaft bearing caps, right?
If so, the belt slipped so badly tha my cams are off by about 9 teeth.
I am going to keep you updated....I am not trying the next step until the parts come in from 928intl.
03-31-2005, 08:13 PM
#4
Rennlist Member
Store the fan assembly upright - as installed: otherwise, the silicone clutch fluid may escape.
With the dipstick hole plugged, consider cleaning up everything you've uncovered with varosol/paint thinner, a paint brush, and more newspapers.
If you ordered the tensioner boot and O-ring, open it up by pushing the internals out by a probe in the adjuster bolt hole: you can do this on the car if the rear gasket was tight and you choose to not disturb it.
Spin the pump shaft and all rollers to verify their condition, and so on. Then you will be ready for the parts order ....
03-31-2005, 09:06 PM
#5
Shameful Thread Killer
Rennlist Member
Rennlist Member
Okay, this is an easy job on the non-interference. You've got the hard part done. Look at the photo in the second post. Use the big socket on the crank nut and set the red timing mark to 0|1 this is top dead center on cylinder 1. Install the flywheel lock tool as written in the Pirtle write up. Now using the big socket and breaker bar, remove the crank nut, and pull the balancer which is that thing with the timing marks on it. You may need to pry on it, or use a three jaw puller if it's really stuck.
The tensioner is already slack, so don't worry about that. Now look at the top photos in the 2nd post. There is a raised notch in the timing cover backing plate as seen on the photo. Use a 17mm wrench and rotate the cam around so the indented notch on the BACK side of the cam gear is lined up with the raised notch. The cam won't stay there by itself, because it's sitting on a cam lobe and will flaot off, just get it close now.
Repair the tensioner per the Pirtle write up, and route the new belt around the crank pulley, oil drive, and left side cam pulley. Use a wrench and line up the back cam gear notch with the raised notch. Route the belt around the WP, and thent the right side cam pulley. Use a 17 wrench on the cam bolt to line it up as well. Now route it around the tensioner, and guide roller, and back to the crank gear. Install the tensioner, and adjust it for moderate tension.
Now look at the timing marks on the cams. They MUST both be lined up with the raised mark on the cam cover backing plate. Take off the flywheel lock, and put on the front balancer with the big crank bolt. Use a little grease on the shaft of the crank under the balancer location. Using the big socket and rotate the engine by hand two revolutoins clockwise to the 0|1 mark again. Recheck the timing marks on the cams. They MUST be lined up with the raised notch. If they are, now set the tension using the Kempf tool between the tensioner and the right cam gear. Rotate it two more revs by hand, and recheck.
Don't forget to fill the tensioner with gear oil per the write up. Put the lock back on and torque the crank nut. Reassemble the front of the engine with all new belts. Fill with coolant, use distilled water, and try er out! You will need to fill with coolant as the engine warms, and the engine passages fill. Work clean. And clean as you go. Look at the belt again once the car is running, and check the tension after 1500 miles.