
Supermodel Install in Phases, coming along
 12-11-2004, 10:18 PM
#1
Three Wheelin'
Thread Starter
In preparation of Monday's offical installation, I've been working this week on some of the preliminary tasks. Earlier this week, I installed my Nordskog guages in the 3-pod A-pillar guage holder with the AFM wired up and working. The FP guage and Boost gauge are just waiting for the sending units to be installed and wires run.
Today I went to my local harbor freight and purchased:
View more Pittsburgh items
3/4'' SQUARE DRIVE TORQUE WRENCH
Click-stop type accurate within +/- 4%. Heavy duty cam & pawl mechanism. Reversible.
Drive: 3/4''
Torque range: 50 to 300 ft. lbs.
Length: 33-1/2''
Weight: 8 lbs.
ITEM 808-6VGA
$67.99 Email link to a friend
The pic didn't come through, but it's a monster, 33 inches long. I bought a step down 3/4 to 1/2 adaptor, which with my shallow depth 27mm socket was a perfect fit. Made the crank bolt the easiest part of the job. I torqued it pretty much up to 300 lbs with Loctite Red (there are 2 kinds at NAPA, I had to order the red stuff designed for hi-temp; it specifically said it could be used for crank bolts, $12.00)
The PS pulley was another issue. I first installed it with the flat side out, (and hadn't read on Andy's site the magic about pulling up on the PS pump during tensioning, so that it doesn't rub on the Alternator bolt), so when it DID rub, I figured it needed to be on the other way (with the dished side facing out). I plan to use the smog pump, so this was the right thing anyway. When I did THAT, however, the belt threatens to rub on the lower rad hose. I got sorta creative with zipties, but it's literally only a couple MMs away from the hose, and I know the rad mounts allow a little play fore and aft. Maybe I'll turn the pulley around the other direction and not run the smog pump. Anyone else have any experience with running the pulley to accommodate the smog pump, and figure out a way not to jeopardize the lower rad hose? If it was a couple inches longer, I think it could be routed wider of the fan shroud, and tucked a bit further away. I welcome any suggestions about how to address this, I still have concerns. There isn't much room, in either orientation.
Is there a reason, Andy, why the PS pulley can't be made a few MM smaller? It seems like that might alleviate the gymnastics necessary to tighten the PS pump w/o tugging upwards on it. I guess it keeps the turning ratio matched to the new crank pulley...?
Anyway, supposedly this was the "hard part". Hard to believe it's all downhill from here...
Stay tuned for updates and pix. Time for a frostie.
 12-11-2004, 11:27 PM
#2
Three Wheelin'
Thread Starter
I think I'll get a 4" or so piece of metal tubing the same size as the hose, and just lengthen the distance that the hose travels between the inlet and the bend where the hose starts to angle down towards the radiator. Currently, it doesn't make a 90 degree turn, but sort of angles up from the rad, across the fan shroud, and into the inlet. With more length along the top, it would allow the hose to be run around the shroud, rather than sort of across it.
Any ideas about where I might source it and what kind of metal it should be? I guess it needs to be flanged on both sides so as to not leak. Thanks in advance.
Any ideas about where I might source it and what kind of metal it should be? I guess it needs to be flanged on both sides so as to not leak. Thanks in advance.
12-11-2004, 11:44 PM
#3
Addict
Lifetime Rennlist
Member
Lifetime Rennlist
Member
When I did THAT, however, the belt threatens to rub on the lower rad hose.
In short i had some spare aluminum sheet stock and made a protective sheild and retainer for the hose. It holds it back and also the metal protects it in case it does rub. Id rather loose the PS vs the rad hose. Since i had modified my fan shroud for quick and easy removal/install anyway, i took my grinder to the support bracket on the raditoer shroud where the hose rests/runs on. With little effort i ground away some plastic to..
1) give the hose some more room
and..
2) when the hose, under pressure and "restrained via zip ties" would rest on a smooth surface.
So far so good.
When you zip tie it, remember that your hose WILL SWELL under pressure and heat and can either
1) bust your zip tie...so...
a) get good zip ties
b) dont rely on them either
2) put undo pressure on the hose where the zip tie runs on it. This is why i made a metal shroud to better distrubute those forces along the hose.
Keeps the updates coming.
 12-12-2004, 09:19 PM
#4
Three Wheelin'
Thread Starter
Fateful words.
I ate through the hose today with the PS belt. It was right by my house when I started to smell coolant. No explosion or anything dramatic, just a leak. I'm hoping Andy can run by 928 Int'l tomorrow on his way down here and pick up a couple, or else I'm not quite sure how I'm going to solve the problem in a timely fashion. I doubt any of the shops around here are going to have one in stock.
Drat drat drat.
12-13-2004, 03:03 AM
#5
Addict
Lifetime Rennlist
Member
Lifetime Rennlist
Member
 dang.
dang.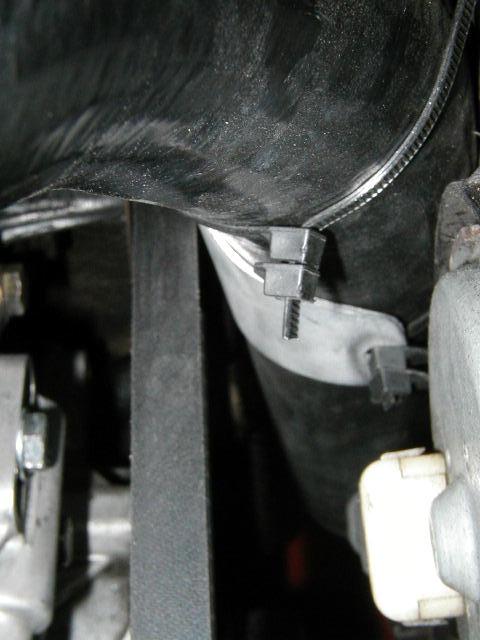
I can guarentee i had a lot more room to work with when getting the clearnace on the belt. The fact that i ground away some plastic on the shroud made a huge difference. Its the little things that will get ya!..trust me BTDT
Im sure you will get a spare tomorrow..dont worry.
When i get around to it im going to have an anluminum piece made for that section of pipe so i never have to worry about it at all. I really dont worry about it now anyway...but..**** happens, right!
have fun wit the install!
 12-13-2004, 03:54 PM
#6
Three Wheelin'
Join Date: Nov 2003
Location: Los Angeles, CA
Posts: 1,577
Likes: 0
Received 0 Likes
on
0 Posts
another little trick is to loosen the hoseclamp for the hose, then rotate the hose on the water-bridge a little (or pull it on/off a little). It'll give you another few MMs. I think its got something to do with the S4s and newer... I didn't have to do any special 'gymnastics' with my hose, and the belt isn't near close enough to even worry.
12-13-2004, 04:03 PM
#7
928 Collector
Rennlist Member
Rennlist Member
Brian ... very good to hear it's going well. About the hose ... Tony has a good solution, only make 110% sure the edges are smooth and round or it will eat through the hose. As an alternative I suppose you could just ziptie, I always do that on my cars anyway.
All the best, glad you're doing well
Heinrich
... very good to hear it's going well. About the hose ... Tony has a good solution, only make 110% sure the edges are smooth and round or it will eat through the hose. As an alternative I suppose you could just ziptie, I always do that on my cars anyway.All the best, glad you're doing well
Heinrich
Trending Topics
12-16-2004, 03:56 PM
#11
Addict
Lifetime Rennlist
Member
Lifetime Rennlist
Member
Its Thursday, any updates?
Good idea on the hose Rob, I wasnt aware that they were different in that respect. My LM-1 Aux box is waiting for me when i get home tomorrow..ill be calling for install tips
Good idea on the hose Rob, I wasnt aware that they were different in that respect. My LM-1 Aux box is waiting for me when i get home tomorrow..ill be calling for install tips
12-16-2004, 04:06 PM
#12
Three Wheelin'
Join Date: Nov 2003
Location: Los Angeles, CA
Posts: 1,577
Likes: 0
Received 0 Likes
on
0 Posts
last i heard from andy before he left to go back to atlanta, it was working on monday night. brian is probably having too much fun with the car to post anything =)
12-16-2004, 04:49 PM
#13
Three Wheelin'
Thread Starter
I wanted to have some time to digest the whole experience before I posted anything. Thanks very much to Andy for helping out; I would've been buried without his guidance. Pete and I started about 9am, got the intake off around 1pm, ate lunch, started wiring in the IC pump. Andy was delayed, didn't get there until 4 or 5. I wasn't sure which parts he was bringing, he didn't know what parts I already had, so there was a trip to a couple parts shops.
Finally got the car mostly back together around 3am!! I was totally frazzled, but the car fired right up. We got the whole thing almost all the way back together before noticing that one of the knock sensors wasn't plugged in--I've got to take of the SC at some point to find it and connect it. I know I'm running around retarded (double entendre intended). I need some help with tuning the RRFPR. Still need to run some hoses for the breather, and tie up a few loose ends (get the heat exchanger perm. mounted, etc.) but the car is very very smooth and very fast, even with one knock sensor disconnected and the EZK mapping conservatively.
Without Andy's help, I definitely would've paid someone to do the install, mostly out of convenience. I don't have a good place to keep my car half apart for the several days it would've taken to figure out what goes where. I need to find a solution re: smogging, too, since I *REALLY* don't want to reinstall the old intake again.
 Cheers Brian! So... very powerful eh ...
12-16-2004, 05:01 PM
Cheers Brian! So... very powerful eh ...
12-16-2004, 05:01 PM
#15
Addict
Lifetime Rennlist
Member
Lifetime Rennlist
Member
Originally Posted by bd0nalds0n
We got the whole thing almost all the way back together before noticing that one of the knock sensors wasn't plugged in--I've got to take of the SC at some point to find it and connect it. .
Great! glad its up an running!
As far as the knock sensor...Why would you have to pull the SC off? You didnt need to un hook them from the block to begin with? Dont you just have to find the wire and connect it? One goes out the back..one out the front.
What injectors are you running?
Enjoy it
