When you click on links to various merchants on this site and make a purchase, this can result in this site earning a commission. Affiliate programs and affiliations include, but are not limited to, the eBay Partner Network.
Hi all. I am struggling with the replacement of my defrost flap unit. I have the pod apart, removed the original leaky flap and arm (kept the original mounting bracket in place), and was able to place the new unit in the area. Having extreme difficulty getting the arm attached to the flap �pin� end where it looks like it is a press on fit. There is no way I know of to get my hand in there and it is so dark I can�t see in well. Is there a trick? It keeps slipping off.
Also if I miraculously achieve that, I would line to add the rubber washers and pressed on grommets to hold the actuator in place, but not sure how to do that in that small space.
i haven�t had to replace Defrost flap, but when I changed comb flap which is also tricky to attach arm I found it was ridiculously easy using a cheap inspection camera tool and long-nosed pliers. The inspection camera provides its own lighting too.
Would this approach work for Defrost flap? Without looking it up I�m not sure exactly what access/room is possible.
Last edited by StratfordShark; Jun 7, 2025 at 02:15 PM.
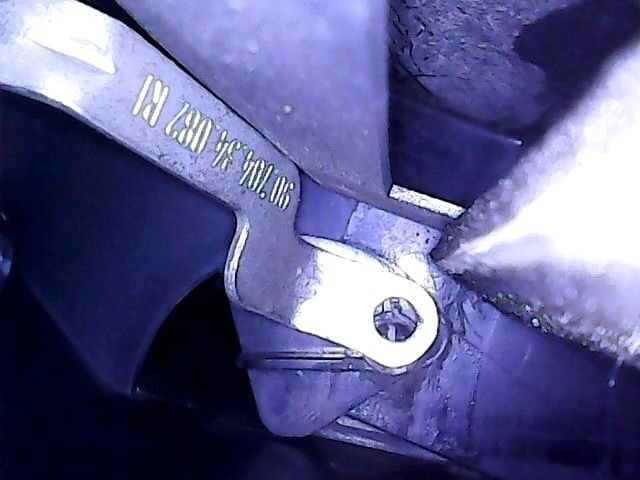
So I figured it out, and the endoscope cameras helped. The reason why the arm was not staying on the lever pin is because the pin is split in quarters so or can insert and expand. However, mine lost a few quarters since they were brittle and plastic. 😩
To replace the plastic lever arm it would take removal of the entire blower unit or removal of the dash. I chose a less desirable but functional option where I got the metal actuator arm on what was left of the plastic pin, then dabbed some JB weld on the tip of the plastic pin. That way the actuator arm would have enough tension to stay on during normal use�at least for now. If the plastic arm breaks again, I�ll address it when it happens.
After allowing enough time for drying the repair, the vacuum testing I did on the actuator had it functioning correctly, and when I got it all buttoned up, the AC worked as desired.
Agree, endoscope and a long screw driver did the trick for me, but not with the extra stuff you had to do. Had to do it on two cars(likely getting ready for another one)and understanding how to line it up really helped. Glad you got it!