When you click on links to various merchants on this site and make a purchase, this can result in this site earning a commission. Affiliate programs and affiliations include, but are not limited to, the eBay Partner Network.
Hello and happy holidays everyone. I spent several hours searching for a thread that addressed my issue with no luck so I thought perhaps one of you can help me out. I purchased a new to me S4 a few months ago and while the HVAC unit performs as it should, it would not light up when I turned on the headlights so I replaced it with a new unit from Suncoast Porsche, installed it and that unit also doesn't light up. I checked what I think is the correct fuse (# 44) and found it missing so I installed a new 5amp fuse but the HVAC unit still does not light up. From the threads that I have read, it appears to me that the fiber optics and bulb are housed in the HVAC unit so I would think, installing a new unit would have solved the issue; obviously not. Any ideas will be greatly appreciated!!
On a recent expedition into electrical problems with my car the issue was with the seating of the fuse; everything else that I tested was working and it wasn't until I was convinced to remove the CEB that the issue became clear.
Now, I'm not suggesting that you go there right away, but it is definitely helpful to start drawing out the connection paths using the electrical diagram, then work backwards from there. The diagrams take a little bit to figure out but are pretty clear to decode and tremendously helpful for these kinds of issues. Once you have a good idea of the electrical path, you can start testing voltages and continuity, as well as the general health of your ground points.
Good luck
Thank you for your quick reply! What does "CEB" stand for and where is it located? Sorry if this is a stupid question, I am coming from the Corvette C5 world and new to Porsche
The CEB is the central electrical board (there are probably other names for it that you'll find) and it lives in the passenger footwell behind some plywood. If you replaced a fuse, you were working on it already. The backside of it is a mess of spaghetti wiring that you won't have to mess with. However, some of the connections can get oxidized, or worse, and it can happen to the parts that make contact with the fuses, the relays, or the rectangular connectors that are on the bottom of the board. If you have to go that far, a recommended product is DeOxit, to clean and restore conductivity.
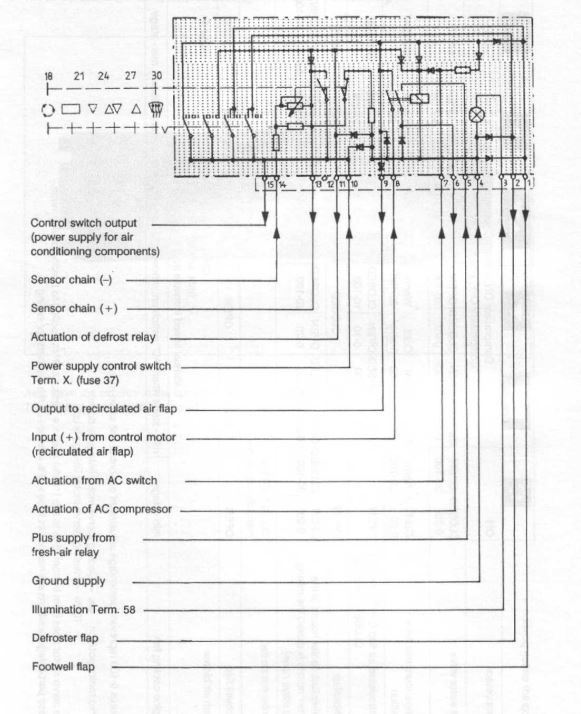
If you go to Google and enter (without the quotes) "site:rennlist.com porsche 928 workshop manual" you'll find links to copies and discussions of the WSM. One of the sections has the electrical diagrams which you can use to start tracing the circuit.
You're in the right place to get help with your car. I don't know the Corvette community but can say with some certainty that this particular Porsche community is very good about helping keep these cars working, and documenting and improving the functionality and reliability of these machines.
Caveat: I don't have an S4. Check your wiring diagram to confirm this is applicable to your model.
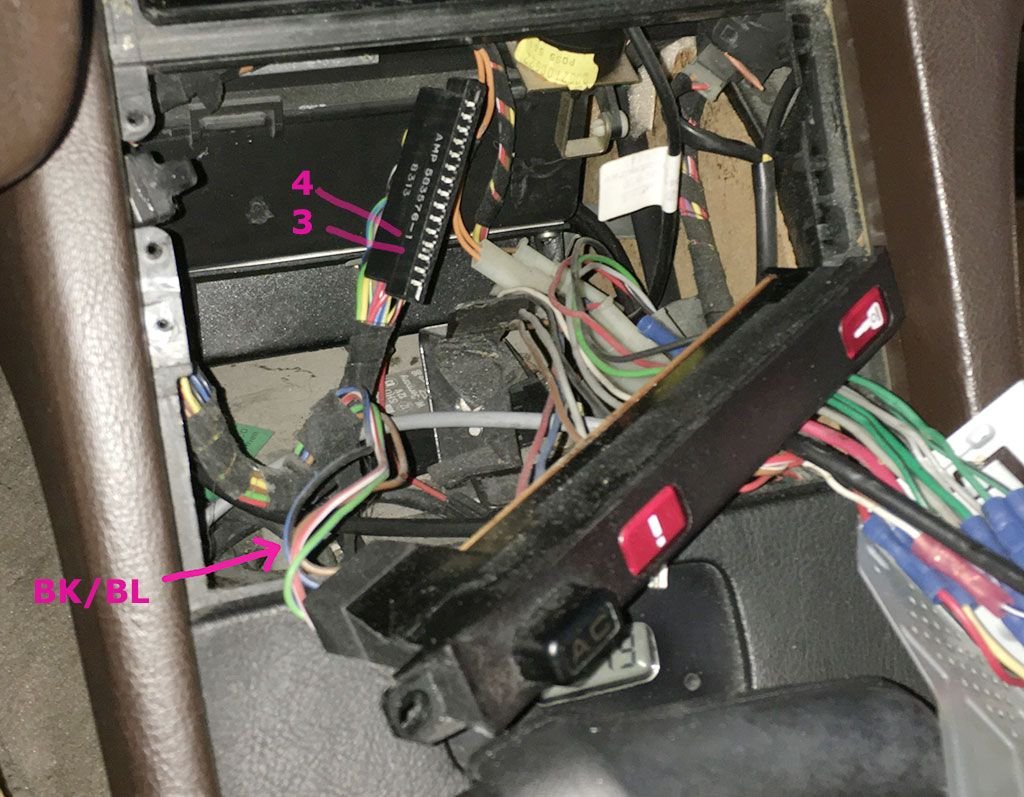
You might want to check that there is voltage to the blue-black wire heading into the control unit on pin 3. You can quickly check for voltage on the same color blue-black wire feeding the AC push button switch. This is the wire labelled "Illumination Term 58" which should light your HVAC bulb. If it is not energized to +12vdc when the headlights are on then you have to trace it back to where the break is.
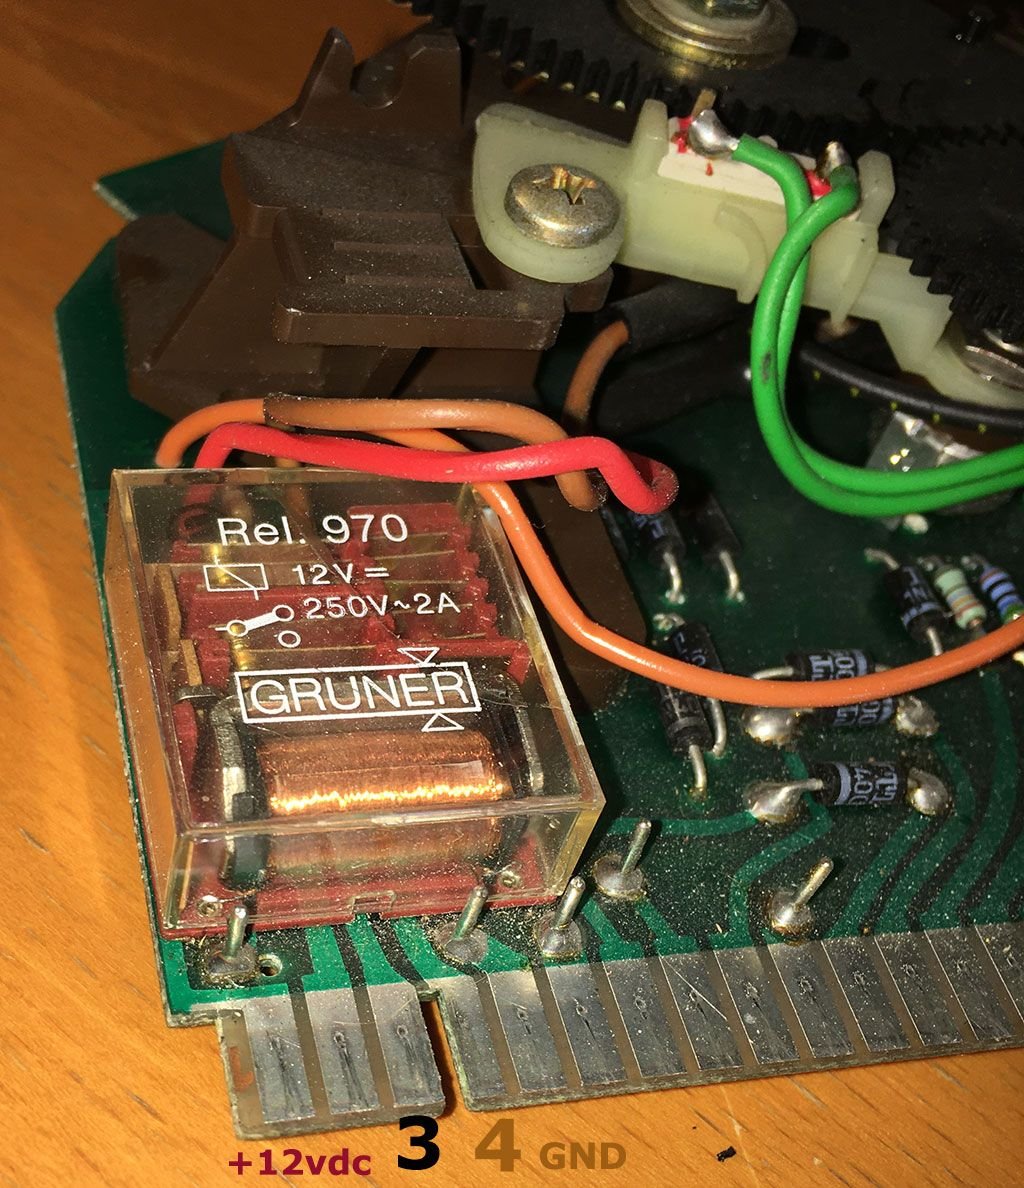
Illumination power to HVAC controller on blue black wire Place voltage from a 9-volt battery on pin 3 and ground on pin 4 to illuminate your bulb. Bulb wires are the brown/red ones above relay. Trace & verify.
This. Other than cleaning your contacts, I think this is exactly what I would do.
(If you have power at the pins on the cable, this is exactly what you need to do...assuming the corresponding prong in the plug isn't somehow bent and not making proper contact with the male side on the controller housing).
Originally Posted by copperstew
Caveat: I don't have an S4. Check your wiring diagram to confirm this is applicable to your model.
You might want to check that there is voltage to the blue-black wire heading into the control unit on pin 3. You can quickly check for voltage on the same color blue-black wire feeding the AC push button switch. This is the wire labelled "Illumination Term 58" which should light your HVAC bulb. If it is not energized to +12vdc when the headlights are on then you have to trace it back to where the break is.
Illumination power to HVAC controller on blue black wire Place voltage from a 9-volt battery on pin 3 and ground on pin 4 to illuminate your bulb. Bulb wires are the brown/red ones above relay. Trace & verify.
i don't want to complicate things, but my female plug was pretty worn out...I ended up adding a bit of solder on the male contacts on the controller unit which added enough thickness to resolve the bad contact problems. Other than waiting for my $4 harbor freight soldering iron to warm up,it literally took about 2 minutes to add thickness. the solder will flow over the contacts...if you need to do this just be sure to clean them good. i think i might have rubbed a layer of flux paste over them as well....I don't recall. the flow was easy.
Thank you so much for your input and most of all for the pictures and diagrams; as a visual thinker, pictures are a huge help! Here what I found:
-On my HVAC control unit the black and blue wire is located exactly where your is in the picture. The next wire in ,going towards the middle of the connector, is brown so I take it that is the ground. On the connector to the AC button, the Bl/Bk is below the brown wire both are located in the top right corner.
-When I place my multimeter probes on the female side of the bl/bl and brown wires on the connector going to the HVAC controller my multimeter is reading 38.4 Mv
-When I place my multimeter probes on the female side of the bl/bl and brown wires on the connector going to the AC button my multimeter is reading 30.9 Mv
-Yesterday my AC button would light up when pushed but today it is not.
So if I am understanding your posts, that means I have a break or bad connection somewhere between the controller and AC button and the fuse. Am I correct and if so any suggestions where to start looking first.
Once again, all of you have been a huge help, thank you so very, very much!
You're going to have to check a wiring diagram (I don't have a S4) and follow the loom back to where it is broken. It could be a bad connector contact somewhere. You could also start from the other direction if you can follow your wiring diagram.
To alleviate the tedium of following wires around, you can buy a cheap Chinese inspection camera (borescope/endoscope) for $60 or less. They are good for looking at stuff behind the dash.
What year is your S4? it really makes a difference so you should always include the year in questions for the best relevancy of answers. I would not assume a fault in the new HVAC head
Do other dash lights work correctly? pod switches, pod illumination, clock, power outlet light etc? Does the dimmer work for these? Fuse #44 is the correct fuse for a '87-'89 - but it is not correct for '90-'95 where #9 seems to be correct one for this.
Caveat: I don't have an S4. Check your wiring diagram to confirm this is applicable to your model.
You might want to check that there is voltage to the blue-black wire heading into the control unit on pin 3. You can quickly check for voltage on the same color blue-black wire feeding the AC push button switch. This is the wire labelled "Illumination Term 58" which should light your HVAC bulb. If it is not energized to +12vdc when the headlights are on then you have to trace it back to where the break is.
Illumination power to HVAC controller on blue black wire Place voltage from a 9-volt battery on pin 3 and ground on pin 4 to illuminate your bulb. Bulb wires are the brown/red ones above relay. Trace & verify.
Originally Posted by mkhargrove
i don't want to complicate things, but my female plug was pretty worn out...I ended up adding a bit of solder on the male contacts on the controller unit which added enough thickness to resolve the bad contact problems. Other than waiting for my $4 harbor freight soldering iron to warm up,it literally took about 2 minutes to add thickness. the solder will flow over the contacts...if you need to do this just be sure to clean them good. i think i might have rubbed a layer of flux paste over them as well....I don't recall. the flow was easy.
Originally Posted by Alan
What year is your S4? it really makes a difference so you should always include the year in questions for the best relevancy of answers. I would not assume a fault in the new HVAC head
Do other dash lights work correctly? pod switches, pod illumination, clock, power outlet light etc? Does the dimmer work for these? Fuse #44 is the correct fuse for a '87-'89 - but it is not correct for '90-'95 where #9 seems to be correct one for this.
Alan
Alan,
Thank you so much for answering my thread! I have a new to me 1989 S4. Right now the car is at my mechanics waiting on a new radiator, which is scheduled to arrive tomorrow (Jan 3rd). Once I have the car back I will answer the rest of your questions. -Mark
This is going to be something that helps you tremendously in the long run...you'll encounter these types of problems on occasion.
Set your multimeter to ohms as step one....in simple terms, you're going to check the ground circuit and see if it's broken. Ohms shows resistance. An open circuit would be full resistance and will show as a 1 when using the ohm setting. Zero means there is no resistance on the circuit. On the female plug, stick one of your multimeter probes in the prongs that are for GROUND. Touch the other probe to something that you know should be grounded....a screwhead for a bracket that's screwed to the body or something similar (remember, your negative side of your battery has cables bolted to the body, so everything connected to the body is part of the GROUND side of a circuit. You should get a reading of zero resistance. If you don't get a zero reading, try touching another screw head or bracket....if it seems that nothing will give you a zero resistance reading, then the ground wire is bad somewhere between the plug and ground (I can't recall off the top of my head where that circuit grounds to chassis).
If so, switch multimeter to DC voltage. When you turn your lights on, and your instruments are lit up in the dash, you will touch one probe to prongs for 3 in the female plug and one to prong 4. This should make your meter read somewhere close to 12v (possibly -12v depending on which probes are touching which prongs). If you don't get 12 v, your problem is probably between the light switch and the plug.
Kevin,
Thank you so much for that tip! The mechanic that is replacing my radiator and reworking the wiring harness became a new first time daddy on New Years Eve and wont be back to work until January 9th but once I have the car back, I will follow your instructions and report back.
Note if you are trying to check for disconnected grounds you must ensure there is no equipment connected to those wires. So always unplug the module and test the empty connector - also check the wiring diagrams to make sure there are no other connections paired on the connector to other equipment. If there is still equipment connected you may see a low impedance to ground even if the wire is broken - because you can be measuring the supply to supply resistance of a module. The battery is a very low impedance in this mode.
Basically for ohms mode always test to the disconnected equipment's car side plug/socket.
What year is your S4? it really makes a difference so you should always include the year in questions for the best relevancy of answers. I would not assume a fault in the new HVAC head
Do other dash lights work correctly? pod switches, pod illumination, clock, power outlet light etc? Does the dimmer work for these? Fuse #44 is the correct fuse for a '87-'89 - but it is not correct for '90-'95 where #9 seems to be correct one for this.
Alan
Well, my 89 is finally back from the mechanic with a new radiator and fan control amplifier so mechanically so, she drivetrain wise she is ready to go but first I need to get the interior light situation figured out and fixed.
Alan, to answer your question above, no only the instruments in the POD and the ceiling and door lights work. None of the ***** on the POD or any of the center console instruments light up. I did crawl under the POD to inspect the dimmer rheostat and there is some corrosion but I can't loosen the screw to slide the unit out to clean and or replace. I am thinking of just bridging the two connectors for now but I am not sure how to do so without cutting off the female connection points, any ideas on that front? In the meantime, I have the center console off and I am attempting to trace the HVAC power and ground wires to their source to see if there is a bad connection. I will keep every one posted and of course, everyone's input and suggestions are very appreciated!!-Mark
UPDATE: I bridged the dimmer rheostat wires s and the headlight **** light comes on dimly but when I non of the other lights come on (except for the instrument gages) including the HAVAC so I will continue to look for a bad connection. I am hoping that the other POD *** lights only need new bulbs.-Mark
Last edited by Barefoot Monarch; 01-15-2023 at 03:19 PM.

 12-26-2022, 02:06 PM