When you click on links to various merchants on this site and make a purchase, this can result in this site earning a commission. Affiliate programs and affiliations include, but are not limited to, the eBay Partner Network.
Doesn't that defeat the "overheat protection" part of the resistor?
No - the newer model resistor pack for '89 - '93 works differently - it has a simpler series thermal cutout switch (not the bypass to full speed bimetallic strip). The pin configuration is different so has to be adapted to work correctly - but with this configuration the blower resistor pack will work exactly as it does in a '89 - '93 car. If it overheats it just stops working until it cools down, full speed is still always available - but you have to select it on the switch.
Note '94-'95 cars have a different blower pack located ~in place of the intensive washer tank on previous models - it is not in the airflow. 0 is truly off so only 3 resistors. This has different wiring again, same series switch - but these are rare and anyway less problematic
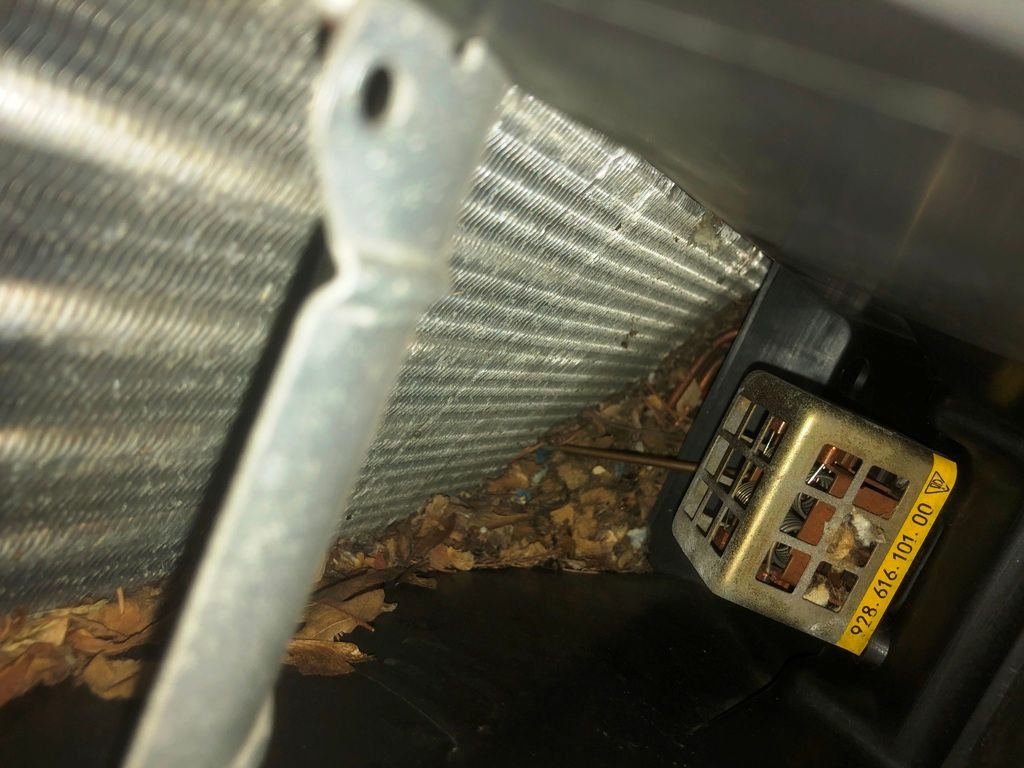
I believe I have found part of, if not all of my issue.
As you can see, some of the "debris" was inside the resistor and there was a good sized piece of it that was actually wedged on the outside between the male pins and the connector when I disconnected the plug from the resistor. Evidence of a critter obviously. Fortunately, I haven't found any permanent damage yet and very few droppings so it appears he wasn't in there for long.
1. Use a bit of clear heat-shrink in place of the blue tape - its quite secure - but you (or anyone else) can see what it is (and figure out why its needed). This is hidden by the cowl anyway.
2) Snip it off flush - if you ever need another replacement resistor pack - it will also be like this one - not the original. No more magic blower syndrome...
Simply clean the overheat safety contacts and you should be fine.
My experiences with the latest production of resistors has not been very good.
Of course this is one of the years that has the thermal switch (just on/off) not the bimetallic strip (bypass to full speed) - so there is nothing to clean there, I'm sure the thermal switch is replaceable but not sure of the thermal specs. Looks like cleaning out that mess will probably fix the issue here
Of course this is one of the years that has the thermal switch (just on/off) not the bimetallic strip (bypass to full speed) - so there is nothing to clean, I'm sure the thermal switch is replaceable but not sure of the thermal specs. Looks like cleaning out that mess will probably fix the issue here
Alan
Alan,
I pulled it out last night and hit it with some compressed air to make sure there were no more un-seen bits left in there. Would it still be worth using my can of Deoxit D5 on it?
I'd say it couldn't make any improvement here - so I'd save the D5 for somewhere it can do more good. A bit on the connector terminals on the outside could be worth it though.
Thx for the idea with the heat shrink Hose. I Don t like it to destroy connectors. The background of the Plug is pvc. The Risk of a short is low.
I think the only real Solution for the magic blower syndrom is a new resistor and the new blower motor from Roger.
The blower unit from Porsche is nla and used blowers are mostly worn out.
Karsten
I don't really agree - Roger's new blower motor may indeed work better (I have one) - but it is not the cause of magic blower syndrome. Lets also be clear that Magic Blower Syndrome can only happen on 1977-1988 cars - after that malfunctions of the resistor pack cause it to shut off except in max speed mode, a different failure all together (so with your new resistor pack you will never experience it). Magic Blower Syndrome (blower suddenly switches to full speed mode - all on its own) is usually caused by physical clogging in the plenum so the blower resistor pack doesn't get enough air (like Brent posted), icing up of the evaporator or clogging of the evaporator itself can also cause this. Once the bimetallic strip operates it seems to start to degrade and if repeatedly activated it is never quite the same again, so if this happens its best to sort it out right away - there is usually a real physical problem. Cleaning and realigning it will probably get you much more service if the airflow root cause is solved. Brent's picture above is not uncommon as is a highly clogged up "furry" evaporator.
All blower Units I use on my two 928 S had Bad bearings in it and If I recall the Troubleshooting over the years than making a clean cut is the economical way to go.
I had 4 used blower Units Till yet.
...I think the only real Solution for the magic blower syndrom is a new resistor and the new blower motor from Roger....
Karsten
My point is just that a poor blower motor usually has nothing to do with Magic Blower Syndrome - it may mean your blower motor is noisy or doesn't run at full speed which are for sure valid reasons to consider a new one. But if you have Magic Blower Syndrome - I don't think JUST changing the blower motor will likely fix it, but just cleaning the plenum/resistor pack or changing the resistor pack very likely will fix that issue without changing the motor.
From: Jacksonville and sometimes St. Aug Beach, FL
This is 100% why Rennlist is so great. I installed the resistor pack and got full speed (failure mode). Turns out I needed to move the wiring to make the pack work with my 88 S4.
By the way @AirtekHVAC (Ron) gave me a great and SIMPLE way to change the resistor pack....
1. Open rubber boot which provides access to the evaporator and resistor pack
2. Use magnetic pick-up tool to attach to the resistor pack
3. Loosen screws for resistor pack and attach 5 foot length of wire to resistor pack (possibly by attaching wire at screw hole)
4. Withdraw magnetic pick-up tool and pull resistor pack and a couple of feet of wire out the opening where rubber boot was previously
5. Attach wire and magnetic pick-up tool to new resistor pack, pull wire to bring resistor pack back into approximate position
6. Detach wire but leave magnetic tool attached
7. using magnetic tool, position one threaded hole on resistor pack in proper position and attach screw
8. attach other screw
9. make any mods to wiring as Alan documents
10. attach connectors and test fan on all 5 speeds


 07-22-2020 | 05:46 PM