Warning lights not working as expected.
#1
Rennlist Member
Thread Starter
Hello everyone.
Hope you are healthy and enjoying your shark.
MY 1981 5-speed with competition pack. I have the manual temp control with A/C
I am questioning the central warning unit. I am trubleshooting a number of warning lights not operating as the manual says they should.
Here's what I have discovered so far.
The following instrument lights do light up with the key in the "ignition on" position:
alternator(bottom of voltmeter)
stop lamp (coolent/fuel gauge 2nd position) (CWS/9GE to cluster/10M)
parking brake (oil pressure/voltmeter gauge 4th position) (CWS/18SW to cluster/5R)
seat belt symbol (on the CWS) comes on and after a period of time goes out.
The following instrument lights do not light up with the key in the "ignition on" position:
The "!" symbol on the CWS
central warning light in the top middle of the cluster (CWS/1SW to cluster/4M)
engine oil pressure (bottom of oil pressure gauge) (CWS/25SW to cluster/6R)
engine oil level (oil pressure/voltmeter gauge 5th position) (CWS/22SW to cluster/3R)
brake circuit (pressure) failure (oil pressure/voltmeter gauge 3rd position) (CWS/8SW to cluster/4R)
brake fluid level (oil pressure/voltmeter gauge 1st position) (CWS/11SW to cluster/12M)
brake pad wear indicator (oil pressure/voltmeter gauge 2nd position) (CWS/6SW to cluster/12M)
coolent level (coolent/fuel gauge 5th position)
coolent temperture (top of coolent gauge) (CWS/2GE to cluster/8L)
Fuel reserve level (bottom of fuel gauge) (CWS/3GE to cluster/3L)
windshield and headlight washer fluid (coolent/fuel gauge 3rd position) (CWS/17GE to cluster/9L)
tail lamp (coolent/fuel gauge 1st position) (CWS/8GE to cluster/9M)
parking light (coolent/fuel gauge 4th position)
I have measured a lot and looked all over the place. Remade grounds by the engine and rear right side (by the fuel sender).
I jumpered the connector at the fuel tank and the CWS light in the cluster came on but the feul reserve light did not.
Using a test light I checked the voltage at the connector for the fuel reserve light (3L). The bulb did light but weakly -- not very bright compared to the testing the driver's door light supply.
Does this make any sense to the group? Any common issues that these symtoms remind you of? Ideas on what to check next?
Thanks in advance.
The following users liked this post:
JBGold07 (05-25-2020)
#2
Rennlist Member
If you have the wiring diagrams for your year, the central warning box has a bunch of inputs and outputs pins. If you unplug it and ground each of the warning light pins with the ignition on you should see the bulb light up which eliminates the dash connectors, wiring and bulbs being the problem. It’s unlikely the box isnt getting any inputs it needs so that just leaves the box itself which you can open and look for burnt components and re-solder each joint. If that doesnt make a difference then you can dive deeper into its workings or buy a replacement.
The following users liked this post:
Ed Petry (06-03-2020)
#3
Team Owner
First thing what was the last thing that you fixed? IE did you remove the pod connectors?
Or touch the warning lamp computer box under the dead pedal?
I would also check the fuses,
use the multi meter on continuity.
check top and bottom fuse contact finger while each fuse is in position .
NOTE dont move the fuses,
your looking for a fuse without continuity between its fingers,
if you find one then remove the fuse and either clean or replace the fuse.
Yes use Deoxit 100 on all of the fuses
#4
Addict
Rennlist Member
Rennlist Member
Join Date: Oct 2003
Location: Gone. On the Open Road
Posts: 16,580
Received 1,692 Likes
on
1,100 Posts
You can also pull the unit, take out the guts and look at it: burned traces and melted/shorted caps are obvious.
#5
.... and back to what Stan mentioned. When some of my pod lights start acting up, I deoxit Both ends of the instrument panel loom Connector And I’m perfect again for another few years
#6
Rennlist Member
Thread Starter
An update on my adventure to regain my warning lights.
Thanks to gazfish for the tip about checking the wiring/bulbs by grounding the pins in the CWS connectors. That eliminated all the circuity 'past' the CWS. All the bulbs lit as expected except for the 'Brake Pad' bulb.
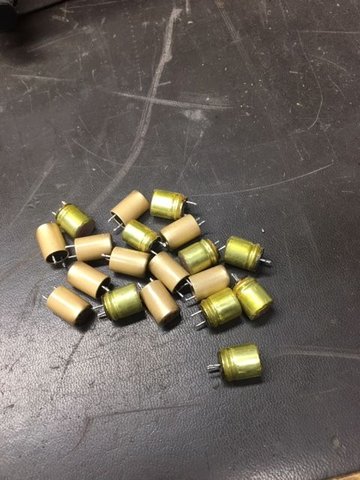
Pulled the CWS and opened it up. Looked it over and not seeing any burn on the PCB or bad components decided it must be basically okay, simply in need to some TLC. Replaced the 19 electrolytic capacitors, touched up a number of solder joints and cleaned up some flux debris (appears this unit was touched before). The unit did not need repaired, so to speak, just brought up to proper voltage/current operation levels as a source/sink for the bulb circuity.
Everything worked first time (except for the 'Brake Pad' bulb but that was expected). Now my indicators light up and go out as expected. Verified the low fuel indicator works by running it low on fuel. Not going to intentionally verify the oil and coolant indicators (lol).
To be honest, the hardest part of this repair was R&R'ing the CWS from behind the false pedal and grounding the pins in the connectors so I could look at the dash to verify the bulb was lit.
Thanks for the help everyone. Appreciate your efforts.
#7
Nordschleife Master
Just to be clear, you have solid soldering skills, particularly working on printed circuit boards, right?
None of that is terribly difficult, but it's a skill that not everyone has.
It takes some training & practice.
None of that is terribly difficult, but it's a skill that not everyone has.
It takes some training & practice.
Trending Topics
#8
Addict
Rennlist Member
Rennlist Member
Join Date: Oct 2003
Location: Gone. On the Open Road
Posts: 16,580
Received 1,692 Likes
on
1,100 Posts
Good work Ed.
Systematic prophylactic replacement of every capacitor in the car should be on everyone’s radar.
#9
Team Owner
Ed thats great your back online,
did you by chance ever get any pictures of what you replaced so we could see?
did you by chance ever get any pictures of what you replaced so we could see?
#10
Rennlist Member
Thread Starter
Thanks for asking.
Fortunately (or unfortunately) I do have soldering skills learned over 35 years in electronic engineering. From repair tech to design technician duties to electronic repair of stereo components and guitar amps.
Not saying I’m the best but able to ‘fill the hole with solder’, so to speak.
And a few years as a flat-rate wrench for local dealerships.
The solder sucker I have made the job a breeze.
#11
Rennlist Member
Thread Starter
I am truly sorry but the moment got me and I did not take enough pictures. Only a couple reference pictures to get the orientation of the unit correct on reassembly.
My bad. Sorry.
It was rather fun as I miss my repair days a bit.
Attached are the pictures I did take in case it helps anyone else.

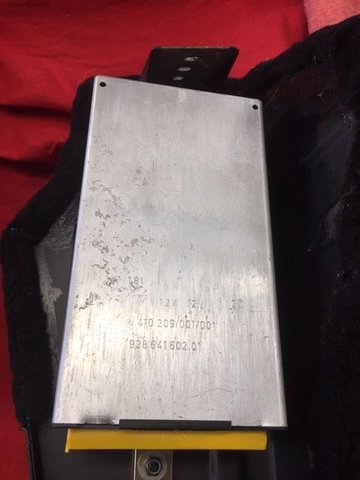
Basic part number reference picture. Shows the CES attached to the fake pedal.

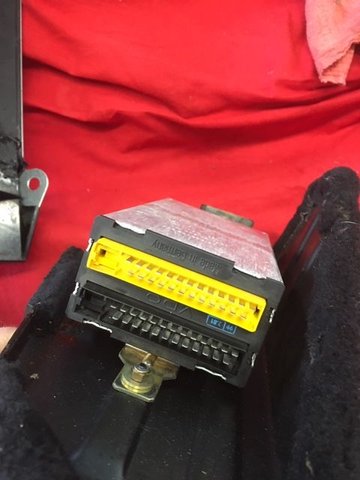
Picture to ensure correct alignment of the connectors/enclosure on reassembly. Yet, it appears to be "Ed proof" by design.

The pile of electrolytic capacitors replaced. Shipping was as much as the cost of the components. Simple repair actually.

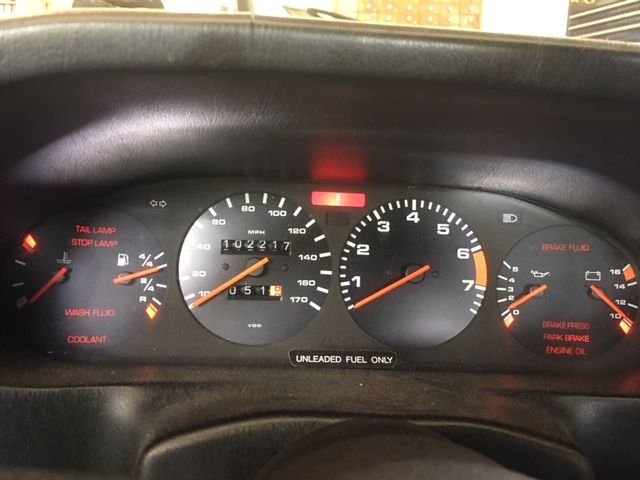
Result of the repair.
#12
Rennlist Member
Thread Starter
I think your’re a bit late as it sounds to me like @Ed Petry already did it and it works just fine!
Good work Ed.
Systematic prophylactic replacement of every capacitor in the car should be on everyone’s radar.
Good work Ed.
Systematic prophylactic replacement of every capacitor in the car should be on everyone’s radar.
I Have had stunning successes recently (the CWS for example) and what I thought were stunning setbacks (only to find out they weren't defeats).
My shark is waking up very nicely. It wall never be concourse but will supply many hours of enjoyment to my life.
Thanks, again, everybody.
#13
Addict
Rennlist Member
Rennlist Member
Join Date: Oct 2003
Location: Gone. On the Open Road
Posts: 16,580
Received 1,692 Likes
on
1,100 Posts
Thanks. Appreciate the help you all gave me. This is a great group of people.
I Have had stunning successes recently (the CWS for example) and what I thought were stunning setbacks (only to find out they weren't defeats).
My shark is waking up very nicely. It wall never be concourse but will supply many hours of enjoyment to my life.
Thanks, again, everybody.
I Have had stunning successes recently (the CWS for example) and what I thought were stunning setbacks (only to find out they weren't defeats).
My shark is waking up very nicely. It wall never be concourse but will supply many hours of enjoyment to my life.
Thanks, again, everybody.

#14
Nordschleife Master
Hi Wisconsin Joe,
Thanks for asking.
Fortunately (or unfortunately) I do have soldering skills learned over 35 years in electronic engineering. From repair tech to design technician duties to electronic repair of stereo components and guitar amps.
Not saying I’m the best but able to ‘fill the hole with solder’, so to speak.
And a few years as a flat-rate wrench for local dealerships.
The solder sucker I have made the job a breeze.
I think your’re a bit late as it sounds to me like @Ed Petry already did it and it works just fine!
Good work Ed.
Systematic prophylactic replacement of every capacitor in the car should be on everyone’s radar.
Good work Ed.
Systematic prophylactic replacement of every capacitor in the car should be on everyone’s radar.
I can solder fairly well, but this kind of work is a level or two above what I can do.


