Repair end vs replace starter batter cable?
 05-16-2020, 03:26 PM
#1
Burning Brakes
Thread Starter

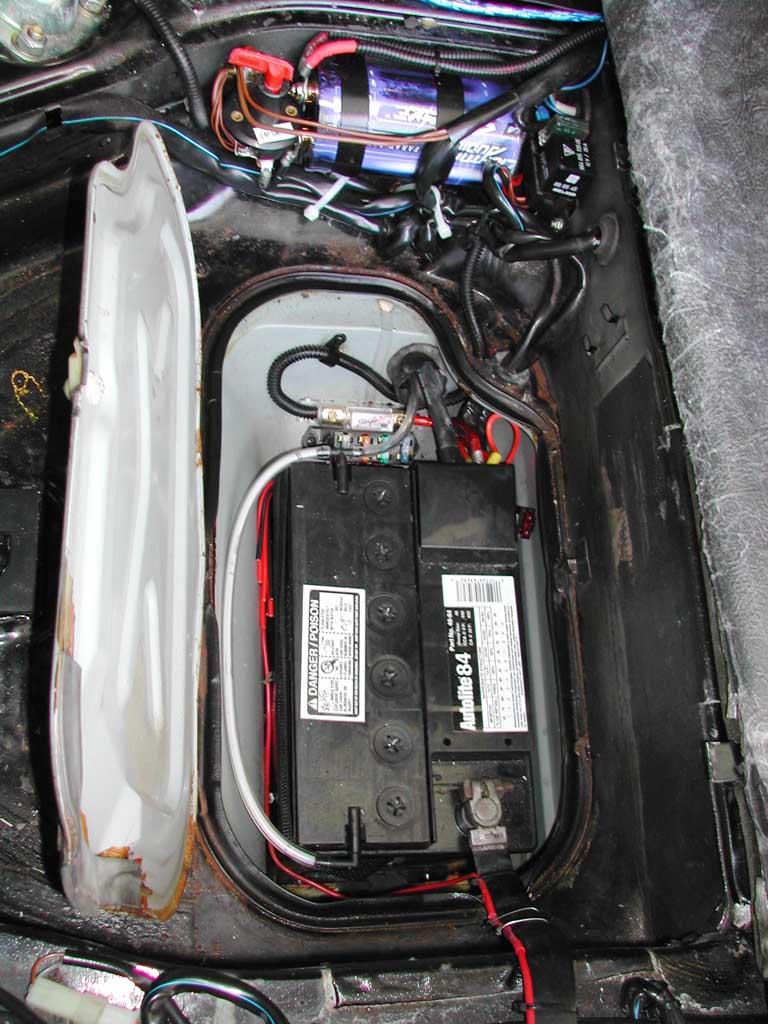
My + batter cable to starter looks like this (not my car, but looks the same). On another thread it was suggested that you can section the bad end off and replace the end that mounts on the battery rather than replacing the whole cable. Is there enough slack in the OEM installed cable to allow you to cut it back an inch or two and still reach the battery?
I understand that approach will avoid having to thread the cable under the car and through some tight spaces and the risk of breaking the tabs that locate the cable in place.
Anyone removed just the end successfully?

I understand that approach will avoid having to thread the cable under the car and through some tight spaces and the risk of breaking the tabs that locate the cable in place.
Anyone removed just the end successfully?
 05-16-2020, 06:09 PM
#2
Chronic Tool Dropper
Lifetime Rennlist
Member
Lifetime Rennlist
Member

Tom, there's a thread on here somewhere that describes my battery cable upgrade. I think that, by the time you move the exiting cable back the few inches needed to re-terminate on apparently-sound copper, the old cable will be out of the tabs and guides anyway, plus getting the stress loop right at the starter end will be a real challenge. In the past I've found that the chloride corrosion, once it starts, is an insidious cancer that can only be permanently solved with replacement.
I found the Ancor marine battery cable, the fine-strand stuff with tinned-copper. I bought it at West Marine but could have found it or similar for less had I not been a) in the store already, and b) kinda focused on getting the job done. The sleeve by the steering rack in front is sprinkler repair tubing from Home Depot, terminal ends are crimped and silver-soldered, and there's adhesive-lined heat shrink on the connections. I bought at least two of every part except the cable itself. If I knew where I stashed it all I'd send a care package.
I found the Ancor marine battery cable, the fine-strand stuff with tinned-copper. I bought it at West Marine but could have found it or similar for less had I not been a) in the store already, and b) kinda focused on getting the job done. The sleeve by the steering rack in front is sprinkler repair tubing from Home Depot, terminal ends are crimped and silver-soldered, and there's adhesive-lined heat shrink on the connections. I bought at least two of every part except the cable itself. If I knew where I stashed it all I'd send a care package.
05-16-2020, 06:39 PM
#3
Addict
Rennlist Member
Rennlist Member
Join Date: Oct 2003
Location: Gone. On the Open Road
Posts: 16,452
Received 1,615 Likes
on
1,054 Posts
Tom, there's a thread on here somewhere that describes my battery cable upgrade. I think that, by the time you move the exiting cable back the few inches needed to re-terminate on apparently-sound copper, the old cable will be out of the tabs and guides anyway, plus getting the stress loop right at the starter end will be a real challenge.
 05-16-2020, 07:45 PM
#4
Electron Wrangler
Lifetime Rennlist
Member
Lifetime Rennlist
Member
BTW if your battery cable looks like this it is likely the battery was not vented - due to the highly enclosed nature of our battery box it is important to vent the battery outside the box to protect the wiring (positive terminal wiring and ground strap) and also the integrity of the battery box itself - the battery out-gassing fumes are highly corrosive.
Also when you install the new cable make sure the battery lug end joint is airtight to the lug body with a heavy duty heat shrink extending to outside the battery box (as Dr Bob already noted). This is really important in avoiding an eventual repeat performance. Do the same on the ground strap - ensure the lug end is also fully sealed - this is where the degradation starts on those too. Given your positive cable issue - I would just replace the ground strap too as a preventative measure.
Alan
05-16-2020, 08:09 PM
#5
Burning Brakes

I replaced the battery cable on my �83 and it wasn�t as bad as I had feared. It�s really not a bad job at all.
To reiterate the above, you should replace the cable without question (and vent properly... I followed Dr Bob�s advice on that and on the Ancor cable as well... the thread below has a link back to the thread where Dr Bob discussed his cable replacement, see post 82).
By the way, those pesky battery clamps with the fold-over tabs are not going to allow you to just slide the cable anyway. They�ve got a tight grip so you�d have to go through the same work to loosen them all. But you definitely need a new cable. I�ll wager you need a new negative cable too, and why not replace the engine ground strap while you�re at it?
Some how-to�s on cable replacement on an 83 at post 96 here: https://rennlist.com/forums/928-forum/1123789-i-m-so-hosed-replacing-coolant-fuel-hoses-83-a-3.html
Take note of the pics of what your cable probably looks like up near the engine, as well. Good luck!
Last edited by rjtw; 05-16-2020 at 09:23 PM.
05-16-2020, 08:41 PM
#6
Rennlist Member

Quick question on battery cable size:
1 awg vs 1/0 awg vs 0 awg?
From my reading 0 and 1/0 are the same, and 1awg is the next size smaller. What size for the positive battery cable to starter?
Thanks,
Dave
1 awg vs 1/0 awg vs 0 awg?
From my reading 0 and 1/0 are the same, and 1awg is the next size smaller. What size for the positive battery cable to starter?
Thanks,
Dave
05-16-2020, 09:11 PM
#7
Burning Brakes
Hi Dave,
The stock cable is a metric size, I believe, and is slightly smaller in diameter than a 1 gauge cable. So theoretically a 1 gauge is �better�.
No 0 gauge cable will fit in the original old style hold downs unless you enlarge them.
Even 1 gauge cables are a tight fit and not all are the same. I did some research on various 1 gauge cables regarding conductor size, insulator thickness, and outside diameter. It turns out Ancor was one of the few I found that fits. It will fit without modification; however, I discovered my hold down plastic tabs had a rather sharp edge on the inside which I chose to smooth off. But I didn�t enlarge them.
Another major plus of Ancor is that it�s marine grade, and thus more resistant to corrosion.
Hope this helps.
Cheers,
Rick
Trending Topics
05-17-2020, 05:16 PM
#10
Burning Brakes
Thread Starter
Great discussion gentlemen, appreciate.
Was the battery box not properly vented from the factory or has a DPO messed something up? Is there a best way to make sure it is vented?
Thanks and hope everyone is having a good weekend.
Was the battery box not properly vented from the factory or has a DPO messed something up? Is there a best way to make sure it is vented?
Thanks and hope everyone is having a good weekend.
05-17-2020, 09:23 PM
#11
Chronic Tool Dropper
Lifetime Rennlist
Member
Lifetime Rennlist
Member
Tom --
Find the vent port on your battery. I added a short piece of hose to that port, and slipped in a piece of plastic tubing routed out through the positive cable grommet/gaiter to vent fumes down just below the bottom of the battery box. The batteries have all had vent capability, we just need to route the fumes outside the box. Less than 10 mins of work, most of which you have already done by getting the battery box lid open.
I was just searching for some documentary battery box pics to show the massive engineering effort that went into looping some plastic irrigation tubing out next to the positive cable. Finding the picture takes longer that the fix.
05-18-2020, 12:03 AM
#12
Burning Brakes
Thread Starter
Tom --
Find the vent port on your battery. I added a short piece of hose to that port, and slipped in a piece of plastic tubing routed out through the positive cable grommet/gaiter to vent fumes down just below the bottom of the battery box. The batteries have all had vent capability, we just need to route the fumes outside the box. Less than 10 mins of work, most of which you have already done by getting the battery box lid open.
I was just searching for some documentary battery box pics to show the massive engineering effort that went into looping some plastic irrigation tubing out next to the positive cable. Finding the picture takes longer that the fix.
Find the vent port on your battery. I added a short piece of hose to that port, and slipped in a piece of plastic tubing routed out through the positive cable grommet/gaiter to vent fumes down just below the bottom of the battery box. The batteries have all had vent capability, we just need to route the fumes outside the box. Less than 10 mins of work, most of which you have already done by getting the battery box lid open.
I was just searching for some documentary battery box pics to show the massive engineering effort that went into looping some plastic irrigation tubing out next to the positive cable. Finding the picture takes longer that the fix.
Last edited by Socal_Tom; 05-19-2020 at 05:29 PM.