When you click on links to various merchants on this site and make a purchase, this can result in this site earning a commission. Affiliate programs and affiliations include, but are not limited to, the eBay Partner Network.
we know the WSM numbers, but I would like to see actual real world numbers, especially from you guys who seem to have incredibly cold systems. would be good to confirm that your numbers are within the WSM specs, or could there be variants
They are, thats why the WSM has that data for you to compare YOUR results to. Nobody else's.
If they were not as specified, they would not work well, at all...ever.
This is physics, you have a fixed volume, a specific gas, a specific _procedure_ to manage it, a known superheat and supercool target, and all that together, a VERY specific liquid fill weight. Period. Easy peasy.
There are no "Lets see what you did"...they did it via the WSM, with results that match the WSM results.
There are no variables to back-track from.
Again, this is why AC work gets -hard- on the internet, because people want to inject variables that mean nothing, and obfuscate the reality of the only one right way to do it, and reading data points -after- that is done is highly specific to environmental conditions.
That's why there is a range in the WSM for these critical requirements.
Use the WSM, only the WSM, and if what you are getting at the vent is not aligned with the WSM, investigate what was not done correctly.
If you do it as the WSM says it needs done, do so in a sanitary method, you will get "damned cold" results. This also includes the health of the dash control vacuum systems and flapper doors, and temperature control systems.
You can NOT "adjust" your system to match someone else's readings, they wont work for you...and will, certainly, make things harder for the next person who doesn't want to follow the WSM.
AC is not hard, but it requires strict adherence to the WSM...that is the only measured result you should be comparing to, and i'm trying to HELP you...not hinder you or the next guy.
This is like a first-day track driver wanting to know how to be as fast as a 20yr veteran, and wanting to skip the knowledge part of how to be fast.
Thats happened here before..kid T-boned an exposed K-wall that "nobody could ever hit" by applying someone else's expressed "know how" but lacking any practical exposure to driving any car on a race course. He went out attempting to perform to, and then also expecting someone else's results.
Again, your goal is to have the --lowest possible-- suction pressure while maintaining liquid at the expansion valves. Look at the sight glass in the top of the receiver/drier to verify that there are few if any bubbles there. If you see foam, it's a sign that you may be undercharged. Add --just enough-- refrigerant to get the visible stream in the sight glass mostly clear. A few bubbles are OK. The risk for most is that there is air, moisture or other fugitive non-condensible vapors in the system, causing bubbles that don't go away with more refrigerant or higher pressures. Charging the system "by weight" rather than by pressures eliminates the chance of overcharging, and is by far the safest method for DIY servicers who might otherwise overfill, thinking that their bubbles are refrigerant vapor rather than non-condensibles.
The high-side pressure will vary based on the heat removed from the cabin, engine RPM, compressor efficiency, airflow from the cooling fans, and ambient temperature. --Lower Is Better--, but since you really have have no control of the variables your only concern is that it doesn't go so high that there's risk to the compressor and plumbing. The pressure safety switch should cut the compressor someplace in he 450 PSIG region IIRC, but this is still at risk of catastrophic compressor failure in my experience.
.
Compressor efficiency and engine RPM are factors you'll notice, as suction pressure follows discharge pressure to a certain extent while running with other variables constant. Suction pressure directly determines the temperature at which the refrigerant boils (evaporates), so lower pressure equals colder evaporation/boiling point. As system load goes up (more cabin heat, higher ambient temp, less cooling fan or driving airflow) the high-side pressure increases. The compressor efficiency and capacity limits cause the suction pressure to rise, and the evaporation/boiling temperature rises with it. The system depends on the "latent heat of evaporation" in the refrigerant to actually absorb cabin heat in the evaporator, and ability to carry heat away drops as the pressure goes up. It's the evaporation of the liquid to vapor that demands the cabin heat, so you can see that it's essential that the refrigerant be liquid state as it enters the evaporator at the expansion valve. The expansion valve meters refrigerant liquid flow based on evaporator outlet temperature. If there are vapor pockets (bubbles) in the liquid flow, these are passed through volumetrically, and actually steal evaporator capacity since they typically add heat (no cooler than condenser outlet temp). Plus, entrained vapor and non-condensibles (air) in the system actually raise the pressures and the boiling point for the liquid that is in there. The system--must present liquid-- to the expansion valve to get cooling.
The gauges you have on your charging manifold are calibrated in PSI, and they also include the equivalent evaporation temperature/boiling point for the refrigerants at the different pressures. Look for the ring and numbers for your refrigerant to see the temp at which liquid will boil in the evaporator. Getting those temperatures and best heat transfer depends on liquid at the expansion valve at the lowest possible pressure (in case you forgot... )
The high-side pressure will vary based on the heat removed from the cabin, engine RPM, compressor efficiency, airflow from the cooling fans, and ambient temperature. --Lower Is Better-
.
I would think that you would want the highest number within the WSM parameters? if you were at the low end of the WSM range, wouldn't that mean you might be low on Freon, and in order to obtain lowest dash temps, to add just enough to get to the higher end of that spectrum?
Carefully read my previous post #17. High side pressure is "along for the ride", slave to heat and compressor capability. Lower is better, but not directly in your control.
Charge to ideal low side conditions. Lower is better. To get maximum heat removal capbility at lowest possible evaporator temperature, you want the lowest possible pressure you can get while presenting liquid to the expansion valve. It's no more complicated than that. Really.
The high-side numbers in the WSM are good guidance, a range you should expect when everything else is correct. If you have major deviations in high-side while low-side condtions are correct, something is wrong with the system. If high side appears too low while presenting liquid to the expansion valve, rejoice in your excellent condenser performance. Or you have low heat-removal demand on the system, meaninig the evaporator isn't absorbing much cabin heat due to obstructions to airflow. So long as the system is delivering liquid to the expansion valve and the low-side pressure is low, adding refrigerant will just raise the evaporation temp and make the system less effective..
Charge to ideal low side conditions. Lower is better. To get maximum heat removal capbility at lowest possible evaporator temperature, you want the lowest possible pressure you can get while presenting liquid to the expansion valve.
.
how do I KNOW that I am presenting liquid to the expansion valve? sight glass? I thought the sight glass was somewhat useless with R134? my dash temp vent is 42' and driving can be down to 36'. not too shabby and feels nice. my low side reading is 10, and my dash temp is 42, so that is a delta of 32. that doesn't seem right? I can confirm that flaps and heater valve are proper, so why the differential?
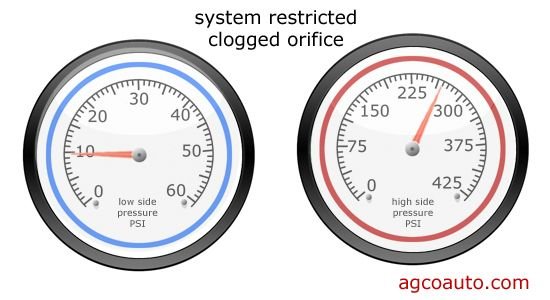
also, is the 928 HVAC system somehow different than the norm? WSM say a good number for 90'F is 10/260, but many generic internet sites say these numbers suggest a clog or blockage?
I experienced the "clogged TXV" symptoms a few years ago, and solved it by fixing a vacuum leak in the HVAC system. Convinced it was actually the TXV, I purchased new to install. But the symptoms weren't perfect for the TXV, 'just' warmer vent temp and the higher high-side pressure with low low-side pressures. Fixing the vacuum leak solved the problem for me. In my case the leak was the vacuum actuator diaphragm in the heater control valve. The valve was zip-tied closed, but the little diaphragm decided to leak anyway.
As far as "is the 928 system different?", the answer is an emphatic NO on the refrigeration side. But... since the pressure balances rely on how heat is removed, issues with airflow on the ventilation and cooling-fan sides will cause refrigeration-side issues that can be a challenge to track down. Those start out with failed actuator diaphragm(s), where a leak in any one will cause erratic action in the others even it they aren't leaking. A dirty evaporator is a common issue. Airflow in the HVAC system may include leakage due to failing foam seals in the diverter doors inside. A failing temperature sensor (thermistor) in the alternator cooling duct, failing fan in the console temp sensor assembly, dirty slider pads in the control head, all manifest as erratic or undesired operation of the temp setting motor.
All the rest of that stuff needs to be working correctly before you can see perfect numbers on the refrigeration side.
-----
In my spare time, I write software that protects power plant equipment, under the banner of power plant automation. Someone has worked in a plant that uses the software, but changes jobs to a new plant that doesn't. New plant wants to know "... just the one or two things" they need to do to get things to straighten up and fly correctly. Like the 928 HVAC, there is no simple one-two process fix that magically solves everything. I use the "symphony" analogy, where all the instruments need to play perfectly before the total effect is perfect. Maybe that applies to the 928 HVAC too. The refrigeration side is the easiest part of the system to service and repair, a well-proven technology and execution that's extremely simple in the scheme of HVAC things. Then we get into the cutting-edge at the time 'rest of the system'. The setting motor with the blend door attached and the sequencing contacts for the solenoid valves is a work of engineering art, or some Rube Goldberg torture tool, depending on your point of view at the moment.
The workshop manual offers a very comprehensive look at the design intent and the execution of the air handling side of the system. Just replace components that don't function... Greg Brown shared some insight into the blend door operation and sealing needs at least ten years ago now, framed as a discussion about finding just the right replacement seals to allow the door to open and close correctly while offering a perfect seal along the way. There are other tidbits enshrined on tips pages, but good or bad I haven't found a single all-knowledgeable write-up that's any better than the WSM to help you understand how it all plays together. Like a symphony.
It all played perfectly when someone drove it out of the dealer's showroom 30 years ago. What could possibly go wrong in 30 years of Florida heat and humidity, with dust and bugs added for good measure?
To Jeff's point and your question, the sight glass is hardly useless with R134a. Guidance for conversions specifically tells you NOT to "charge until you have solid liquid flow at the sight glass", mostly because the conversion process is seldom done correctly; ANY air or moisture remaining in the system manifests as bubbles at the sight glass. If you keep adding refrigerant while you try to condense air bubbles, you'll end up way overcharged. The penalty in high-side pressure for overcharging is severe, as the specific volume (shows up as pressure) at high temperatures is a lot higher than the R12 that was originally fitted. From this little tidbit come all the myths about poor performance relative to R12. Anyway, ANY air or other non-condensibles in the system steal space and heat transfer capacity. The gas bubbles get smaller at higher pressures, but they never go away. Uncondensed refrigerant vapor bubbles do go away as pressure increases, but looking through the little sight glass you can't tell which is gas and which is vapor. All you see is liquid and bubbles. Charging "by weight" eliminates the annoying side-effects common to overcharging after a conversion. If there are bubbles of anything, the 'only' side effect is poor performance. Compressors don't grenade from excessive head pressure, because total pressure won't be any higher than condenser vapor temp plus one heated atmosphere on the gauge.
Greg Brown shared some insight into the blend door operation and sealing needs at least ten years ago now, framed as a discussion about finding just the right replacement seals to allow the door to open and close correctly while offering a perfect seal along the way
..I gotta find that.
Doing a dash replacement next month, need to build a punch list of things to do while out.
I can finally replace the defrost pod
Replace all of the HVAC solenoids, I have one (recirc) one that had its own mind
Vent door seals in the assy
Inspect heater core, I suspect a super slow seep/leak.
Additional sound absorbing material stuffed into cavities (Melamine foam)
At this point everyone should replace the 2 o rings in the heater core pipes. Cheap insurance for not having to take out the dash and split the HVAC box again.
This also makes it easy to replace the 3 main HVAC vac pods properly without drilling holes in the box and properly adjust the blend doors according to the WSM.
I used adhesive lined 1/8th inch closed cell foam to reline the blend doors and used 3M stripcaulk to reseal the box. The foam strip you can buy from Porsche is worthless IMO.
I used adhesive lined 1/8th inch closed cell foam to reline the blend doors and used 3M stripcaulk to reseal the box. The foam strip you can buy from Porsche is worthless IMO.
^^^ This ^^^
Getting the fit and seal just right is critical to getting the blend door to work perfectly every time. There's some very small tolerance for a tiny bit of leakage, leaving the doors to move correctly on demand.
I confess that I'm more than a casual fanatic of thermal performance. I spend time in an industry where too often folks are satisfied where "good enough" is acceptible on its face. Finding the last few percent of thermal efficiency seems like a lot of work, and can easily cost a few hundred $k in Bob fees for each percent. In the power industry, that last percent is worth many $millions per year just in fuel and emissions savings, so it's not too tough to sell. In 928 HVAC performance terms, getting the last bits of cooling is a tougher sell. Is it really worth all the effort to get vent temps that freeze your fingers on the steering wheel? I thought it was when I was driving my black S4 in Los Angeles. Owners in Florida, where there is an almost continuou need for great AC, may also think so. Some spots in Texas deserve it too in my experience. There's no easy way to get there in our older cars short of fixing everything that's suffered with age. Workmanship, care, using the right equipment and proper techniques, all are critical to getting all the performance the system is able to deliver. I'd love to say it's easy. I have DAYS of work in my 928 HVAC, not all of it fun. I don't like to sweat though, and that starts at about 70 cabin degrees, lower when solar loading is added. K complains loudly at my 67 degree cabin temp setpoint. Bring a sweater if you want to ride with me. Seriously.
Still haven't done this to the 89 which Speedtoys got to feel, just the refrigerant side was serviced.
But I did it to the 81 where I replaced the foam and just about everything else. After fixing a vac leak on the pod for the blend door it was super cold with it's R134 conversion, even with it's serpentine condenser. Then the head gaskets went
As I usually say. Do it right, do it once, never do it again.
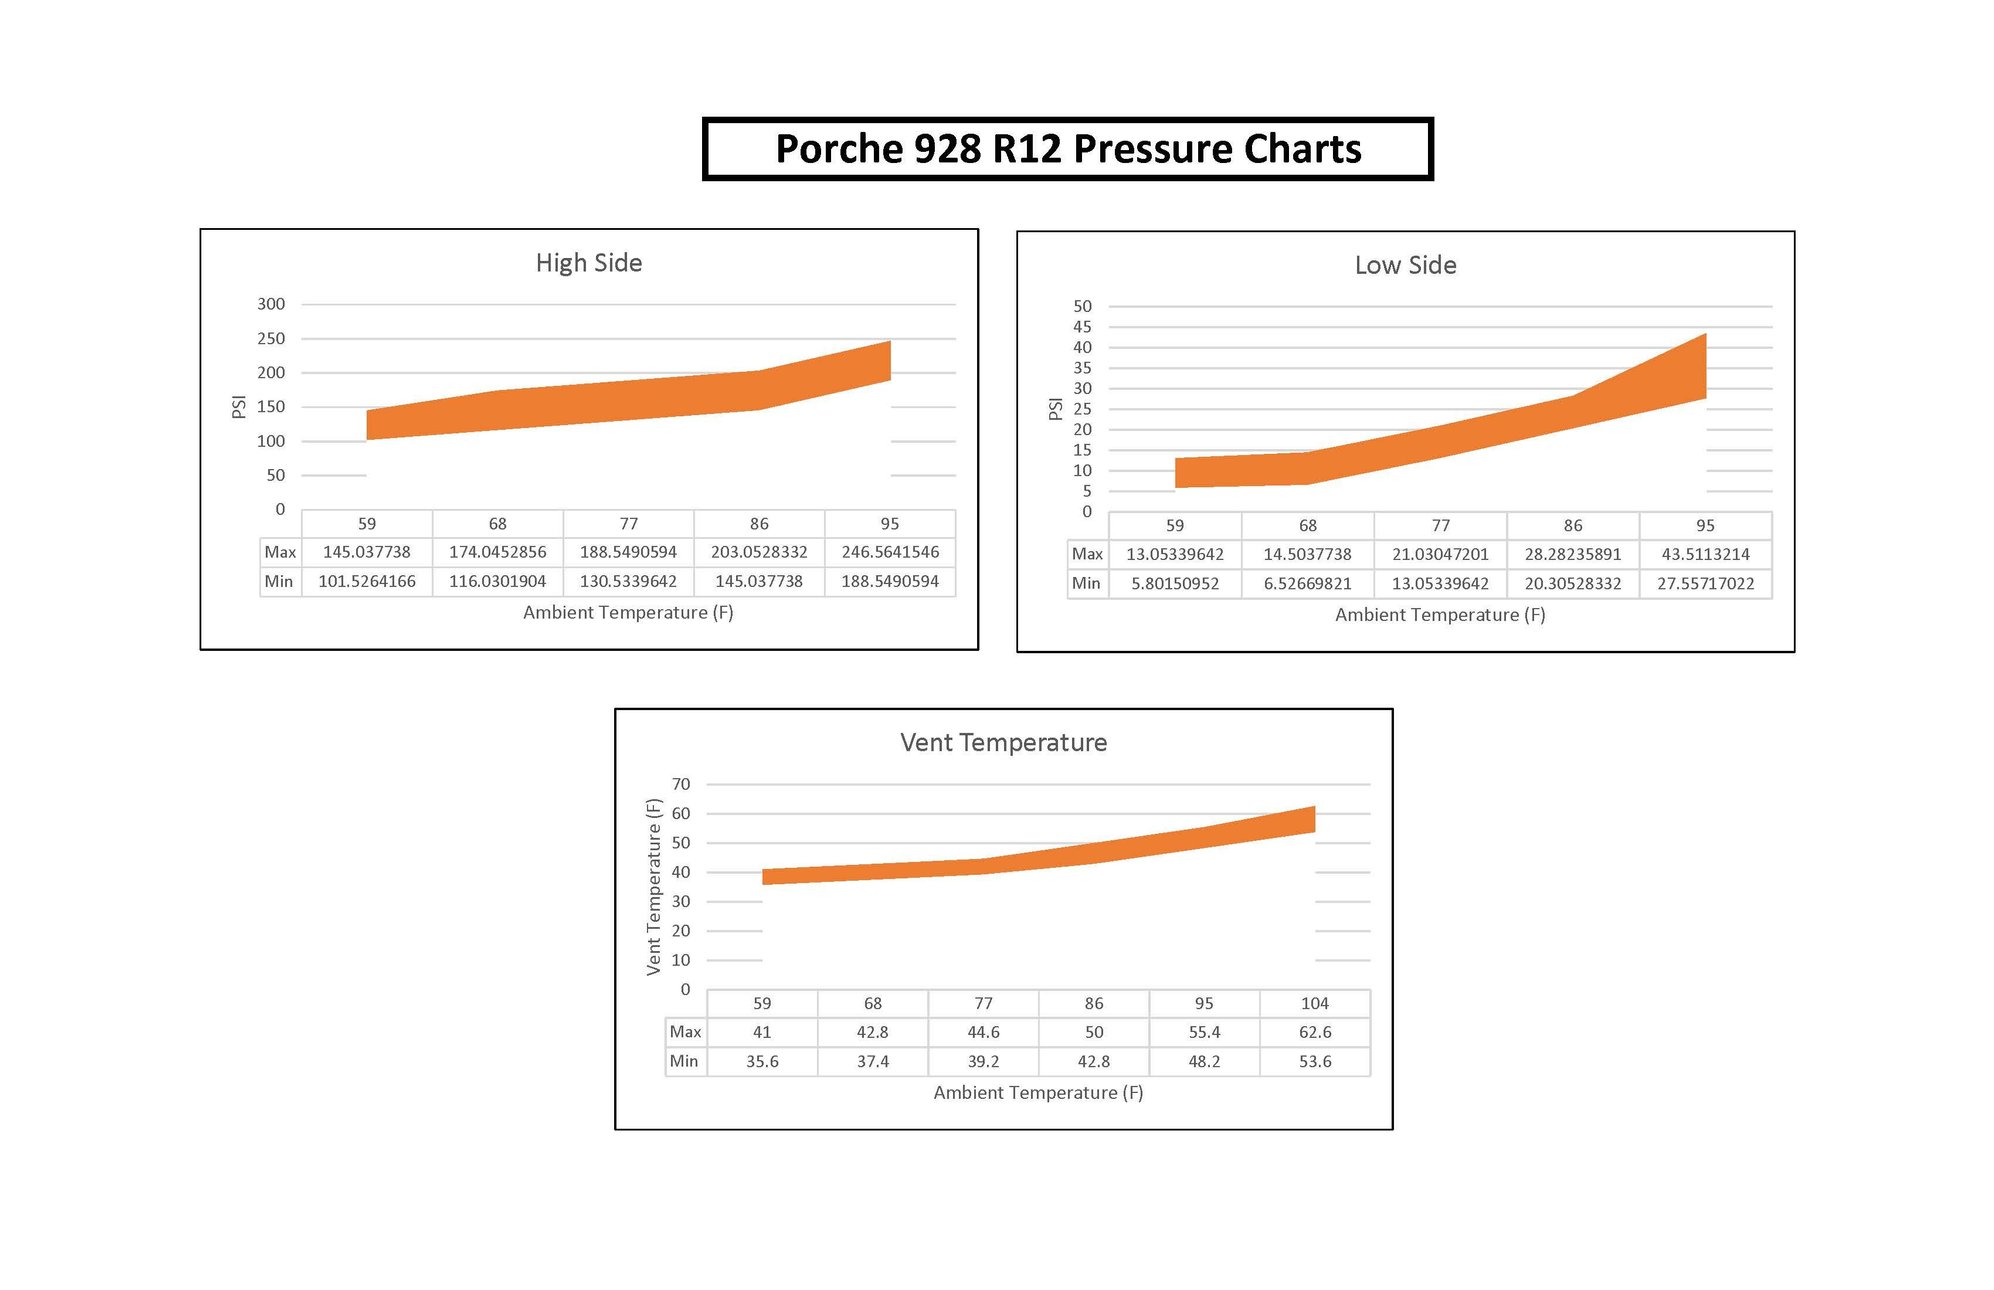
To make it a little easier on myself, I created the below charts. I used Excel, so if anyone wants the spreadsheet so that they can play with the numbers, let me know.


 05-13-2019, 03:42 PM


 )
)