When you click on links to various merchants on this site and make a purchase, this can result in this site earning a commission. Affiliate programs and affiliations include, but are not limited to, the eBay Partner Network.
Taking the door apart and prepairing it for paint - '87 S4 Auto
Taking the door apart and preparing it for paint - ’87 S4 Automatic
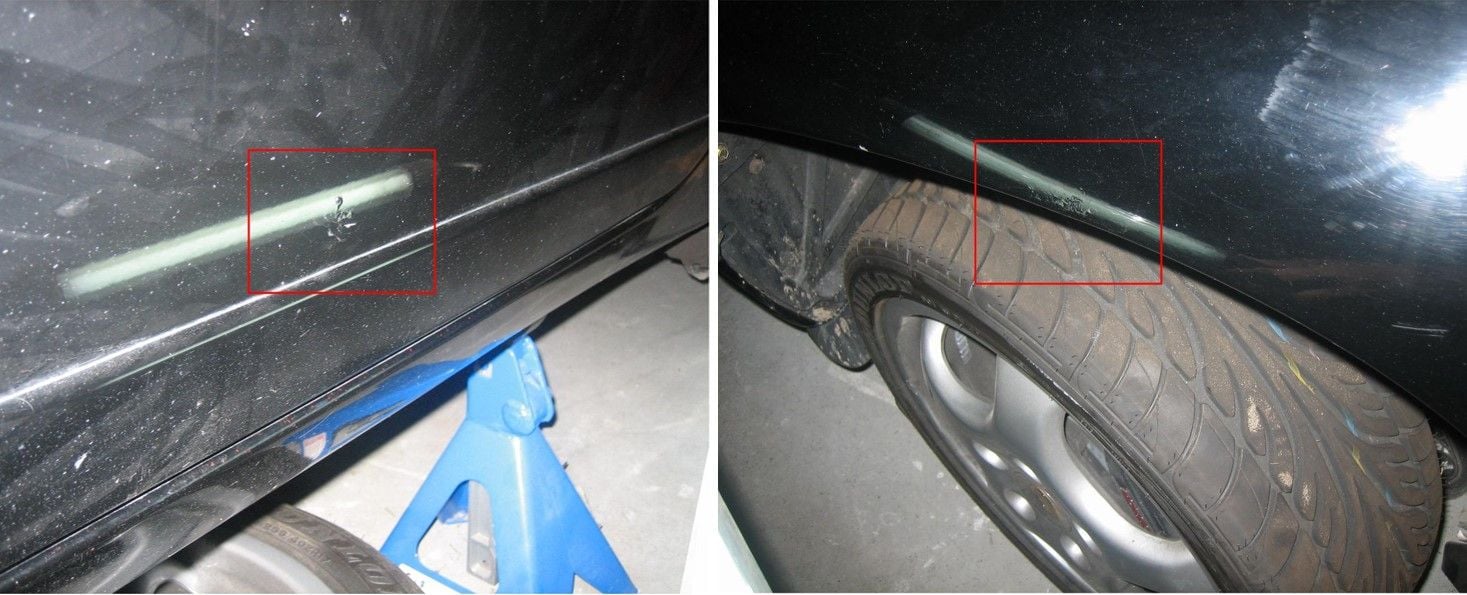
My car developed some visible aluminum corrosion on the driver’s side door and front fender:
I decided to have the car repainted but the guy who will paint it is very reluctant to address the aluminum, so I took the aluminum parts to a specialist (Radboud Restoration in Oudkarspel, The Netherlands).
How to take a door apart and transform it into an empty shell so I can have the aluminum repaired and send it of for paint?
The first job was of course to dive into Rennlist and search for -> read into -> subscribe to all relevant threads. There were a lot very useful threads with useful links but I kept switching and going back and forth so I decided to gather all the info I could get and ‘pour’ it into one write-up so I could rebuild my doors a lot easier when they are finished. I also looked at the WSM for reference. Here’s the result….
Before I start I think it’s only fair to give credits to all the thread starters and fellow Rennlist members who allowed me to gather all that information in the first place. So a big thank you to (in random order) Stan (Mrmerlin), Alan, b9boy, Speedtoys, Wisconsin Joe, Chris (z driver 88t), jpitman2, RET, Ad0911, Kiln_Red, Dean_Fuller, boomboom, Landsharkoz, Andy Evangelides , MrLexse, 928.jorj7.com, StratfordShark, SeanR, dr bob, NoVector, Rob Edwards, Roger Tyson and anyone I forgot to mention….
This write-up will contain the following chapters:
1. Removing the door
2. Mirror
3. Armrest and door panel
4. Door frame lining
5. Wiring Harness
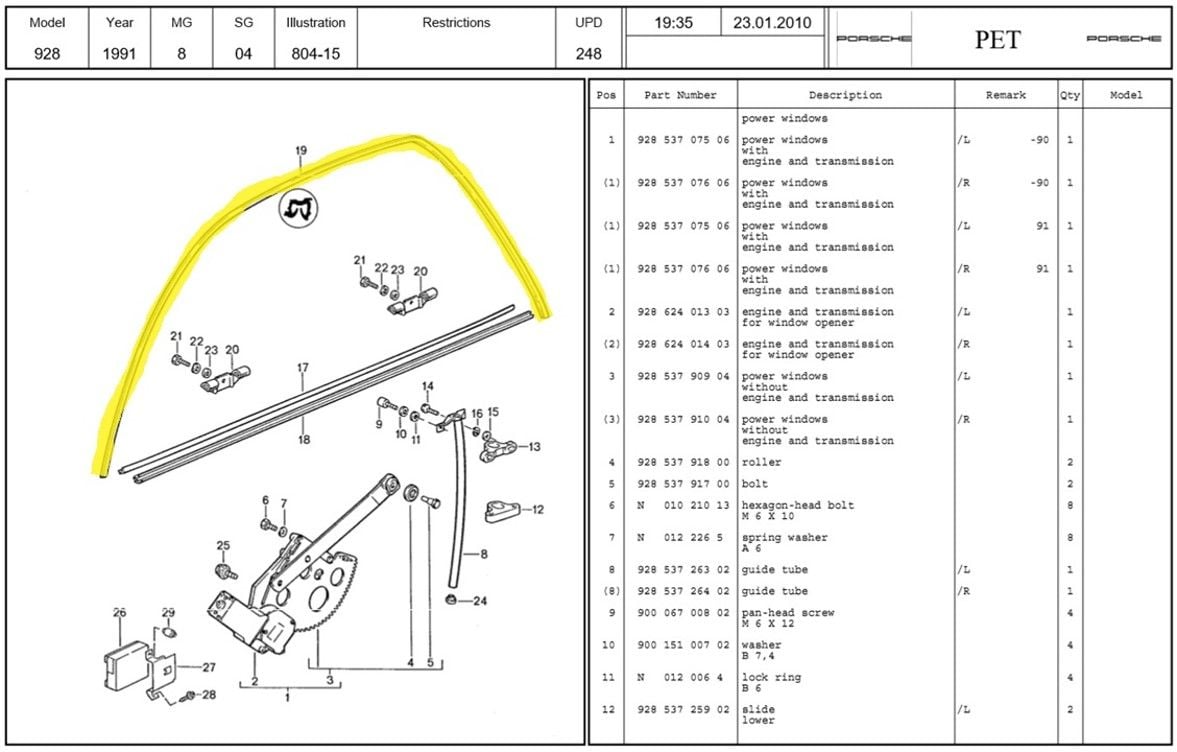
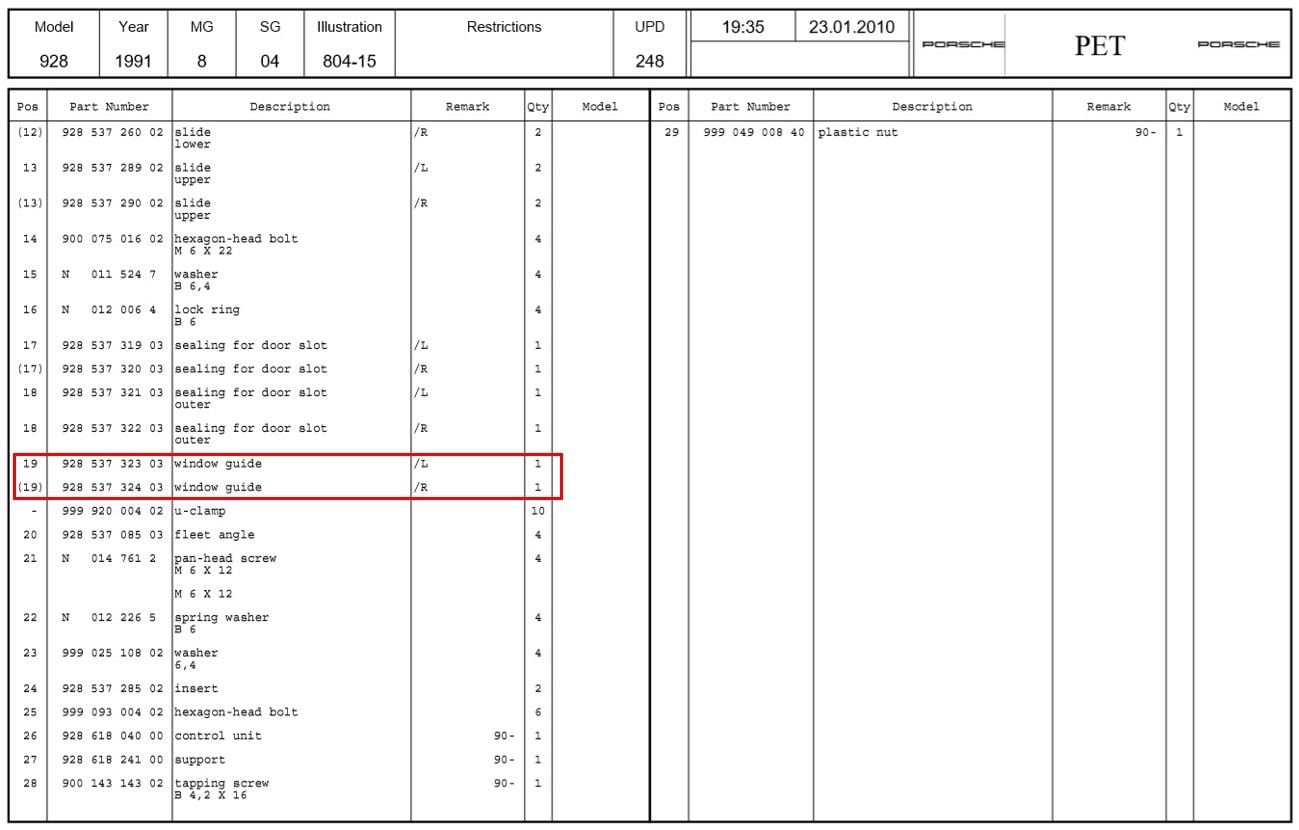
6. Window Motor & lift mechanism
7. Window guide tube, slides & felt guides
8. Glass
9. Door lock mechanism, door handle & door support
10. Window rubbers & trim
11. Rub Strip & sill cover
12. Glue and adhesive tape
I narrowed my write-up to the driver’s side door. Unfortunately not all pictures were good enough so in some cases I used a picture from the passenger’s door and mirrored it for easy reference; where that just wasn’t possible I specifically mentioned that it is the passenger’s door.
Another thing to mention is that I had the door lying flat on the kitchen table, enabling me to walk around it and not having any tension on the door from it hanging on it’s hinges. Unfortunately that might make some of the things I did not as suitable for anyone who has the door still attached to the car.
And before you start printing or copy-paste it all: I’ll try to post a PDF file at the end… :-)
1. Removing the door:
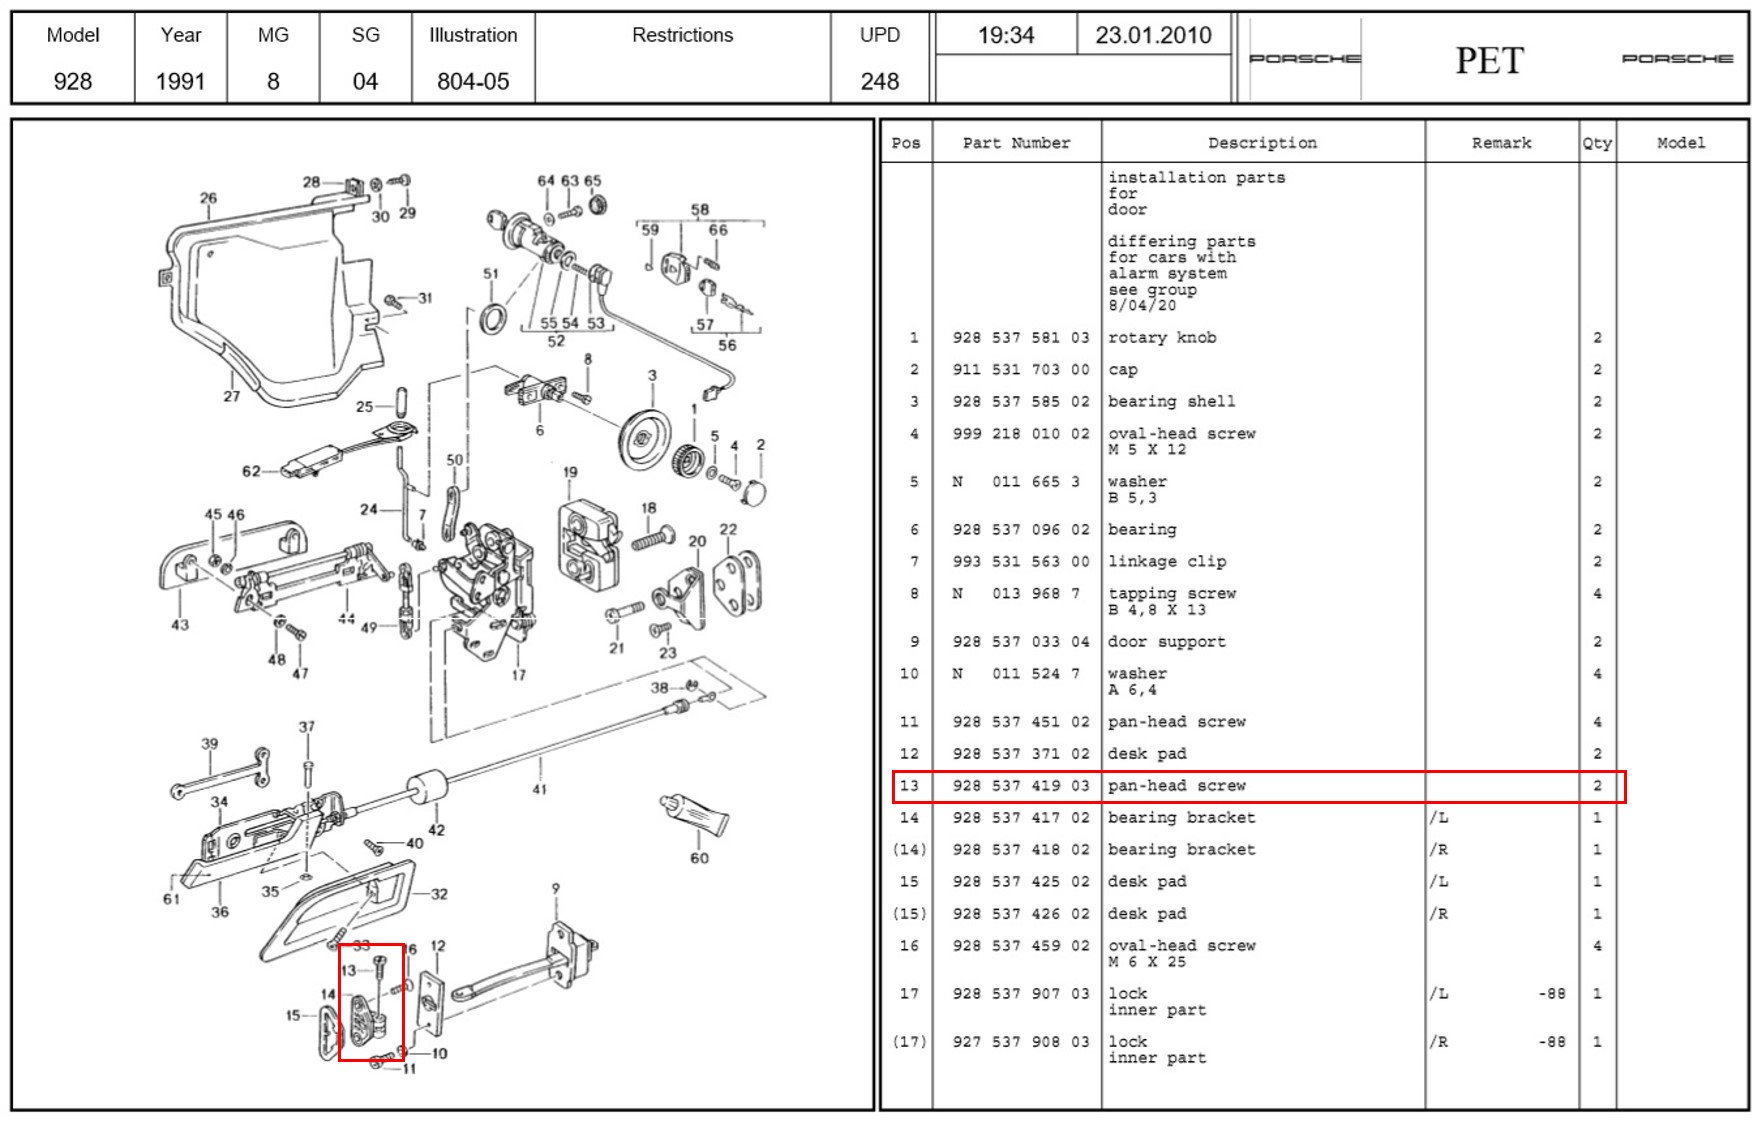
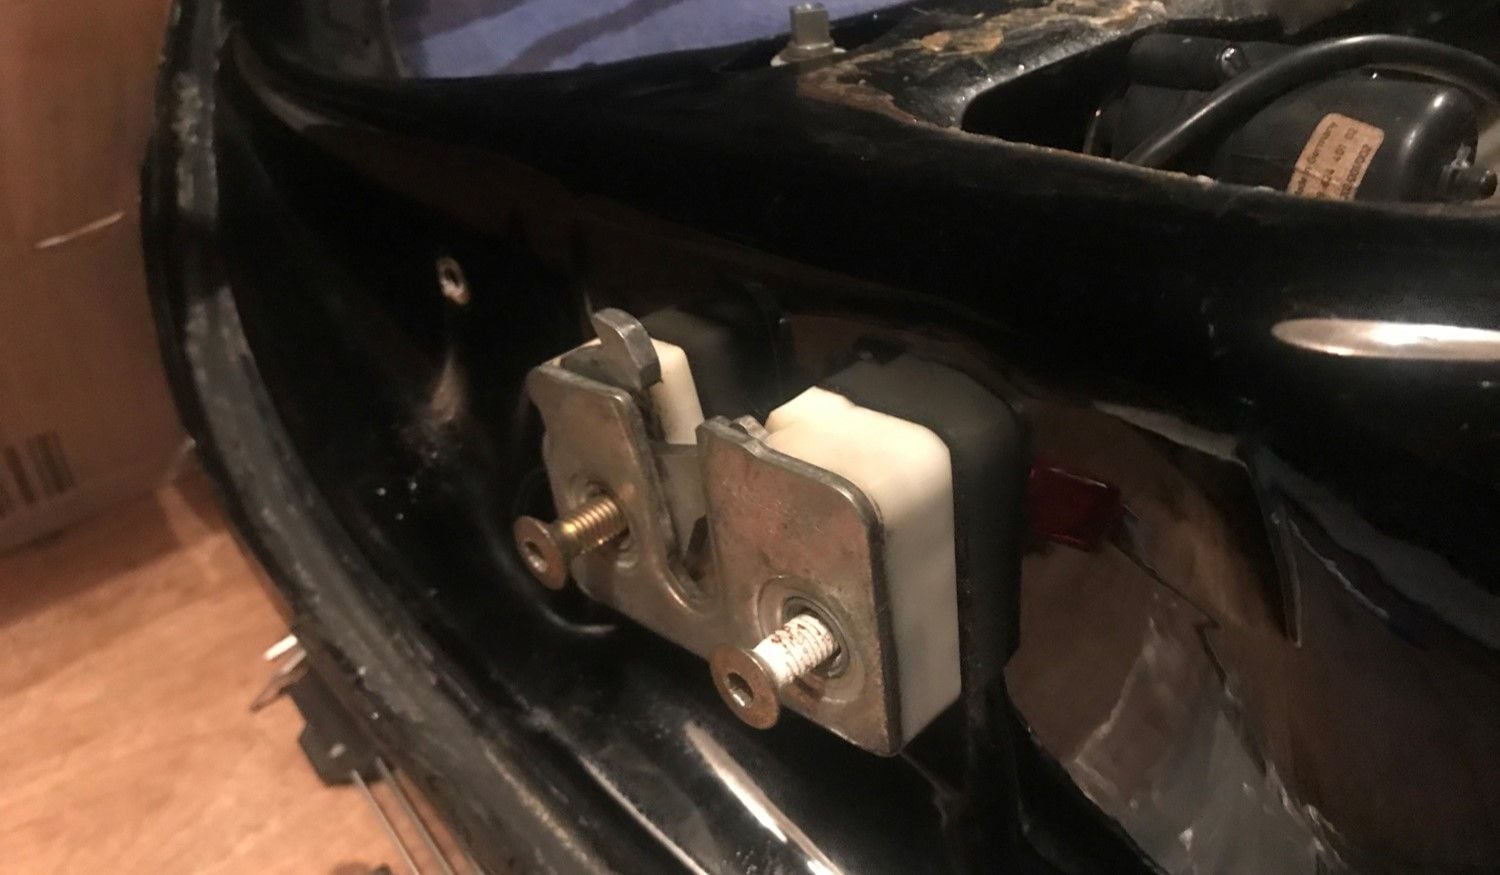
First disconnect the wiring harness: there are two connectors that easily disconnect.Next remove the pan-head screw that connects the door support to the bracket on the body.
Unscrew the 6 allen head bolts: 3 per hinge.
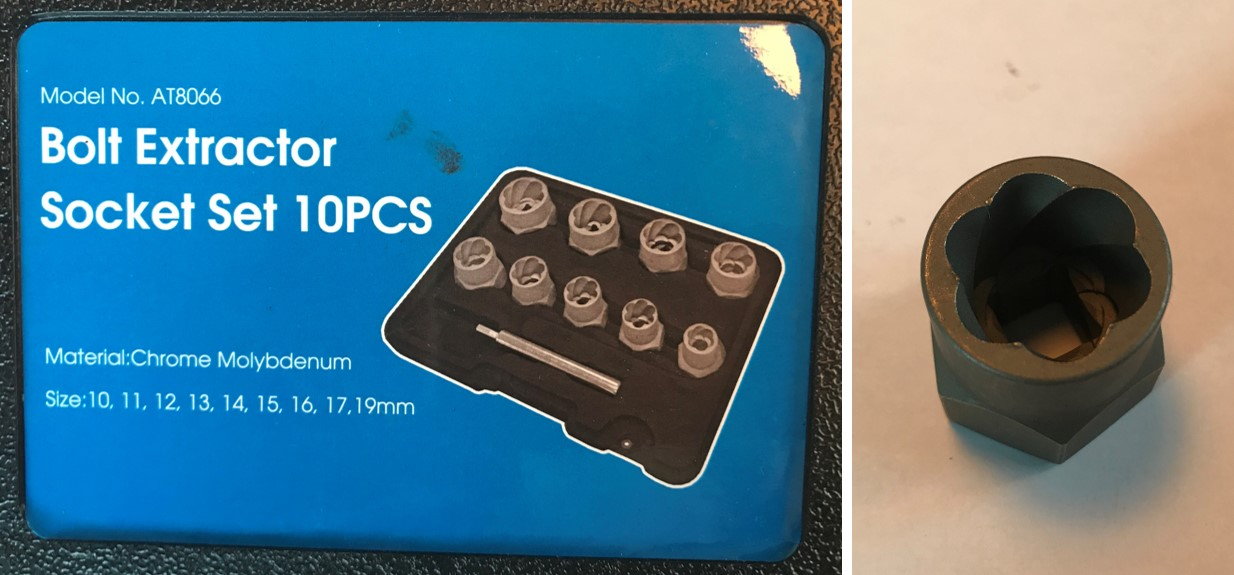
Unfortunately almost all the bolts where ‘rounded out’, so I had to use a bolt extractor to get them out. These extractors work perfectly and they came out in no time….!
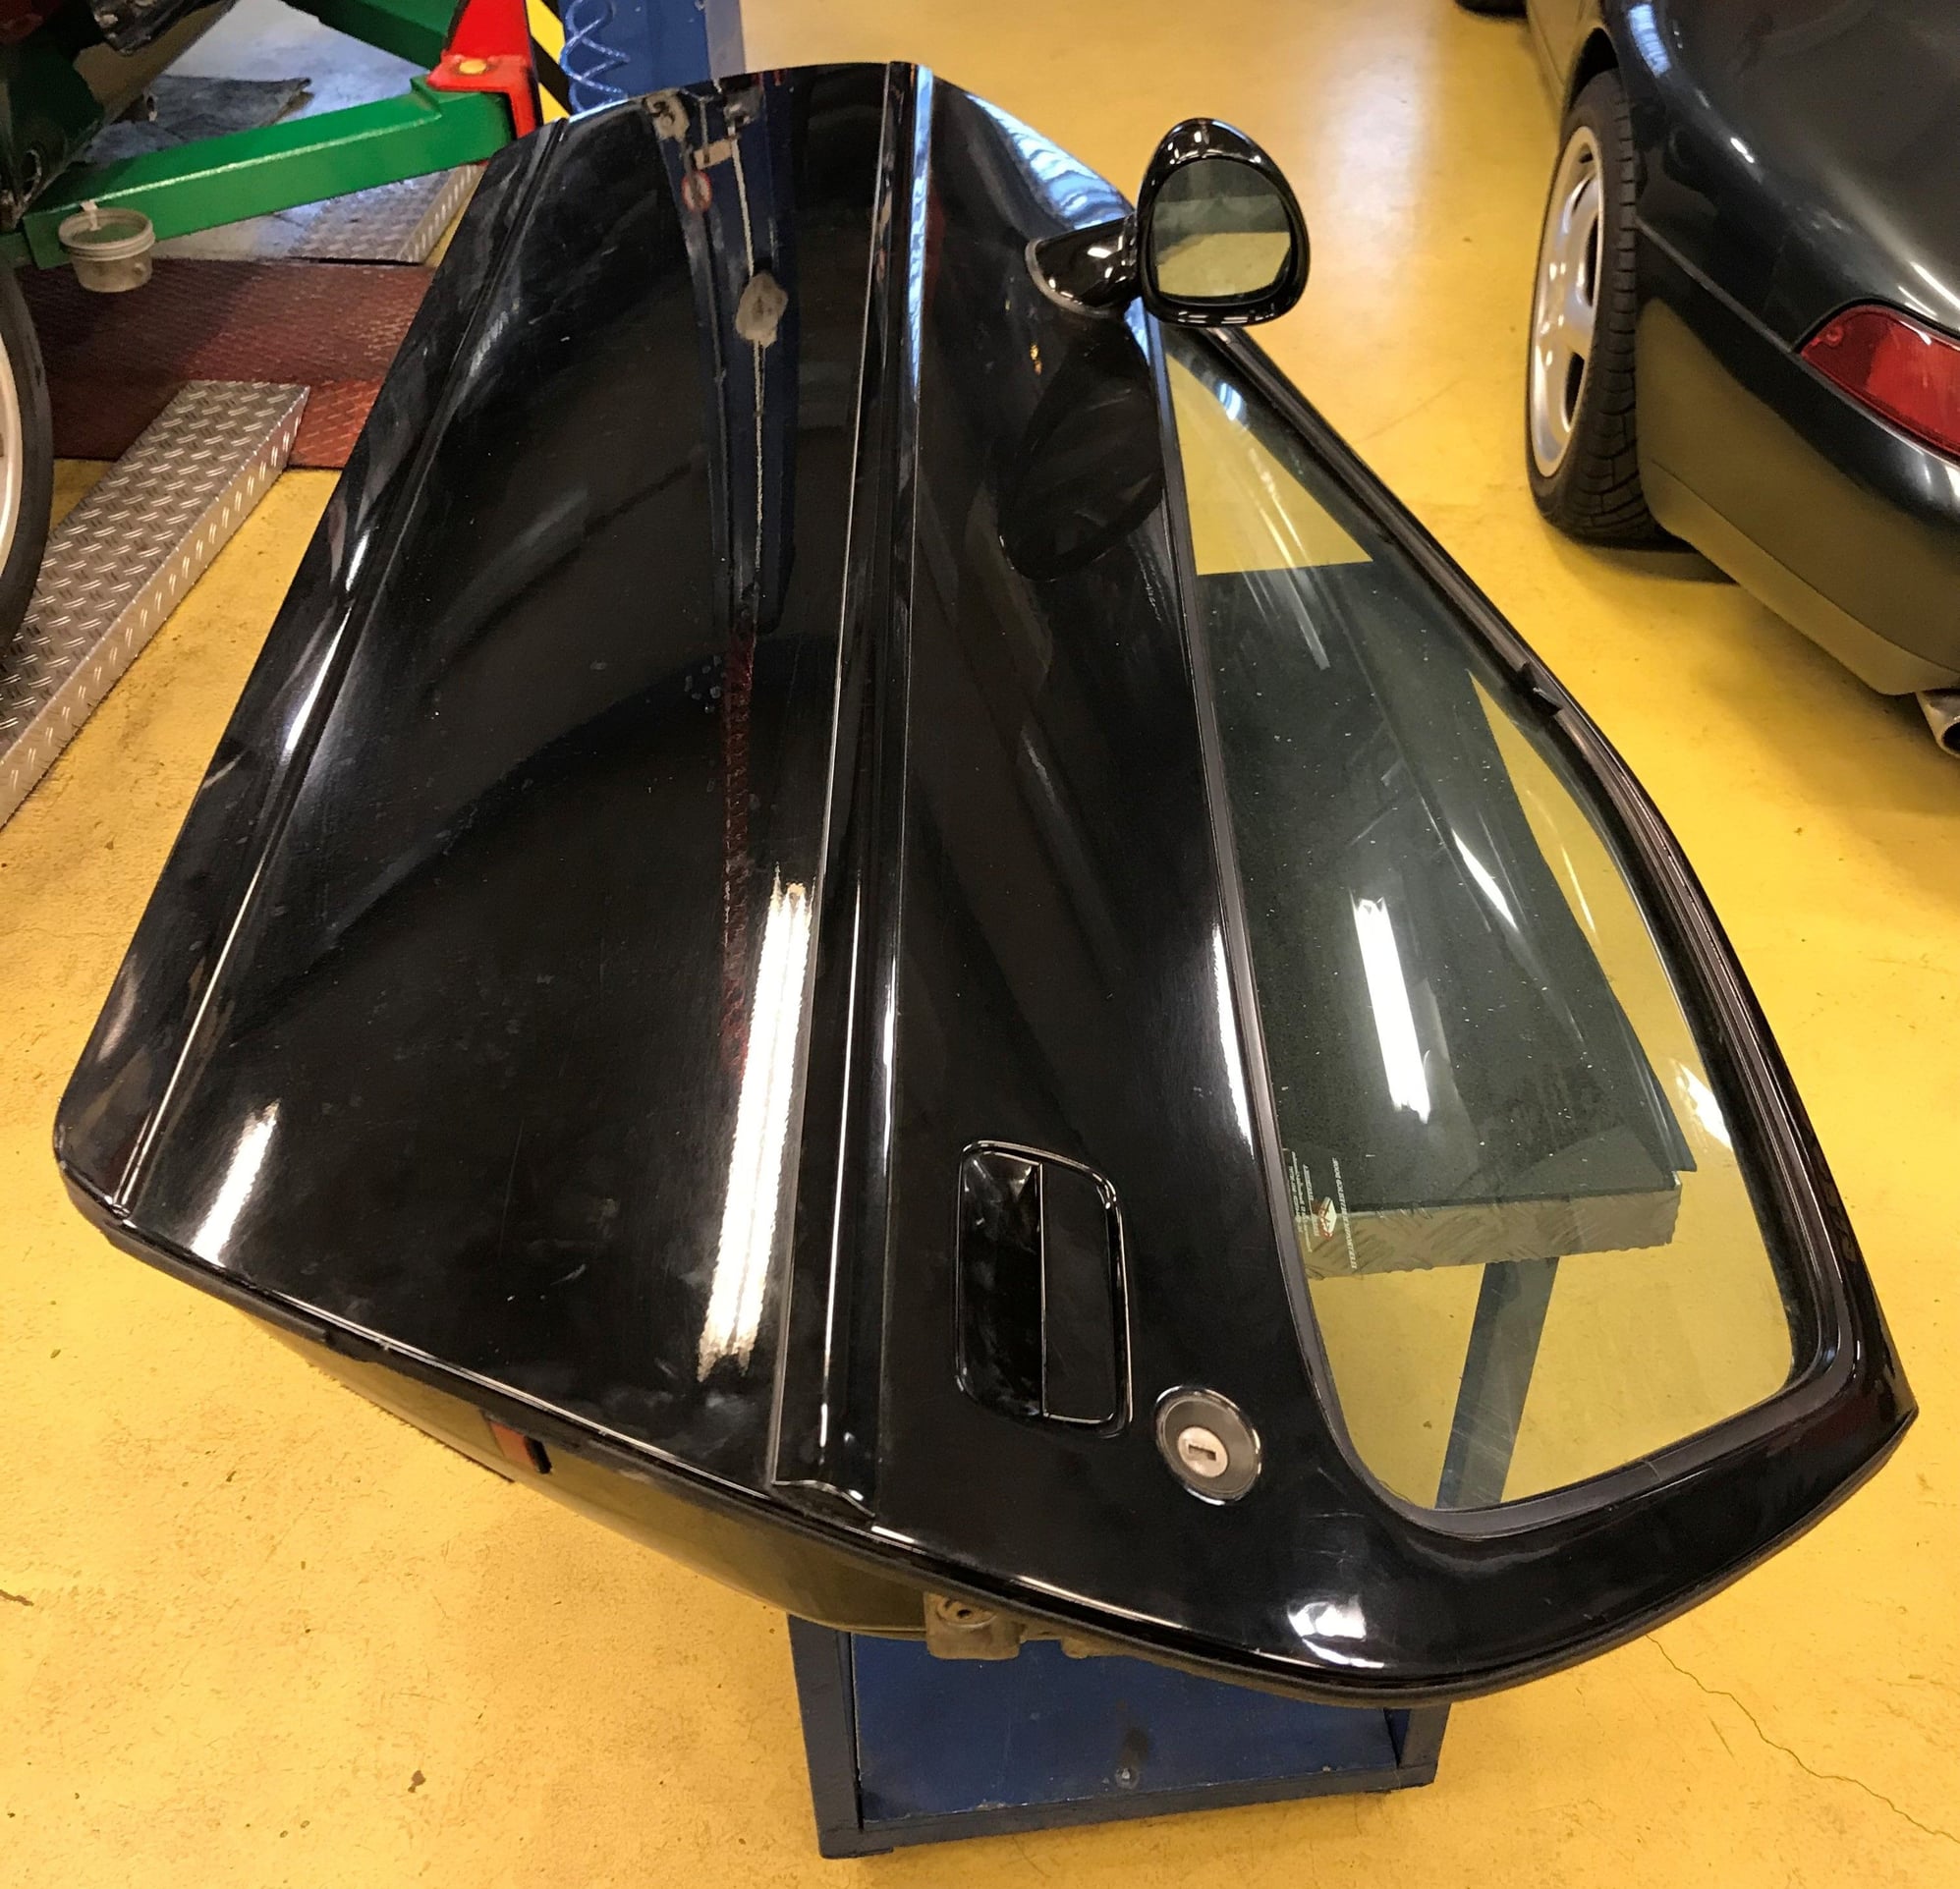
We used a floor jack to hold the door during unbolting, and 3 guys to lift it of the jack after it was loose. Pretty proud to have it on the table….:-)
.
My car has aero mirrors, so this write-up describes how to remove this type of mirror. There is however an excellent write-up on flag-to-aero conversion by Andy Evangelides:
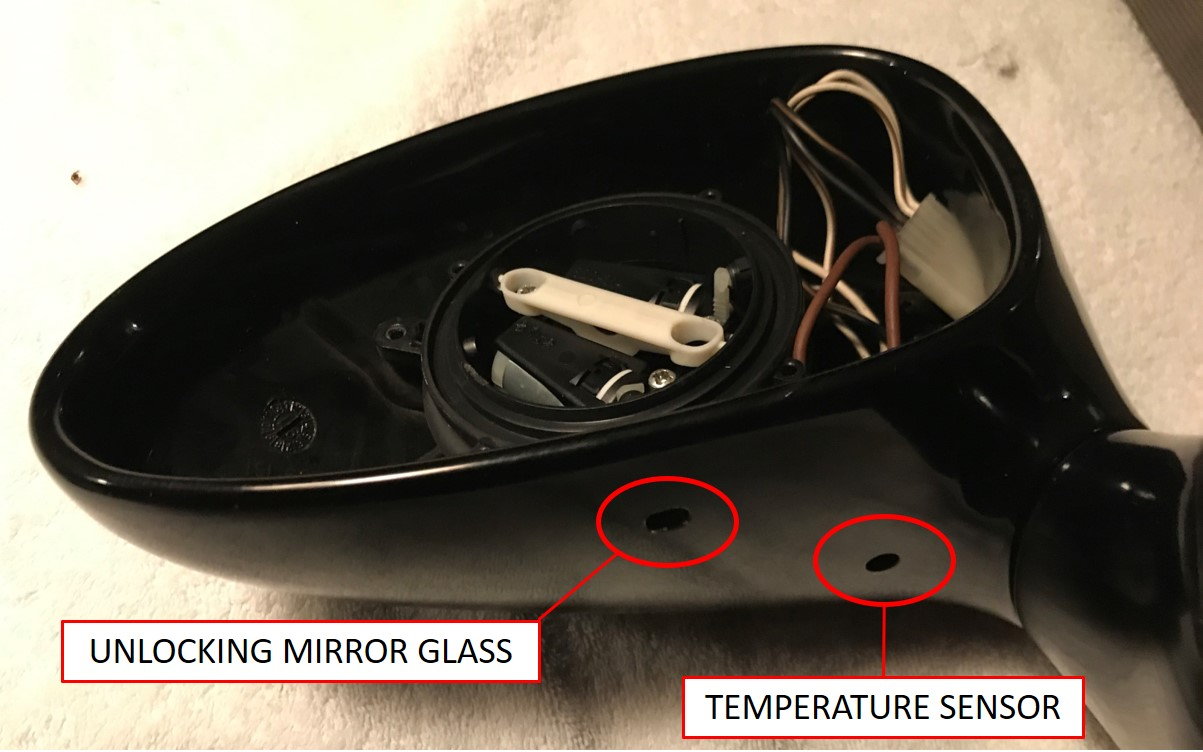
There are 2 holes on the bottom of the aero mirror: one for unlocking the glass and one for the “outside temperature sensor”. That sensor is for cars with a digital dash only, so my ’87 doesn’t have it.
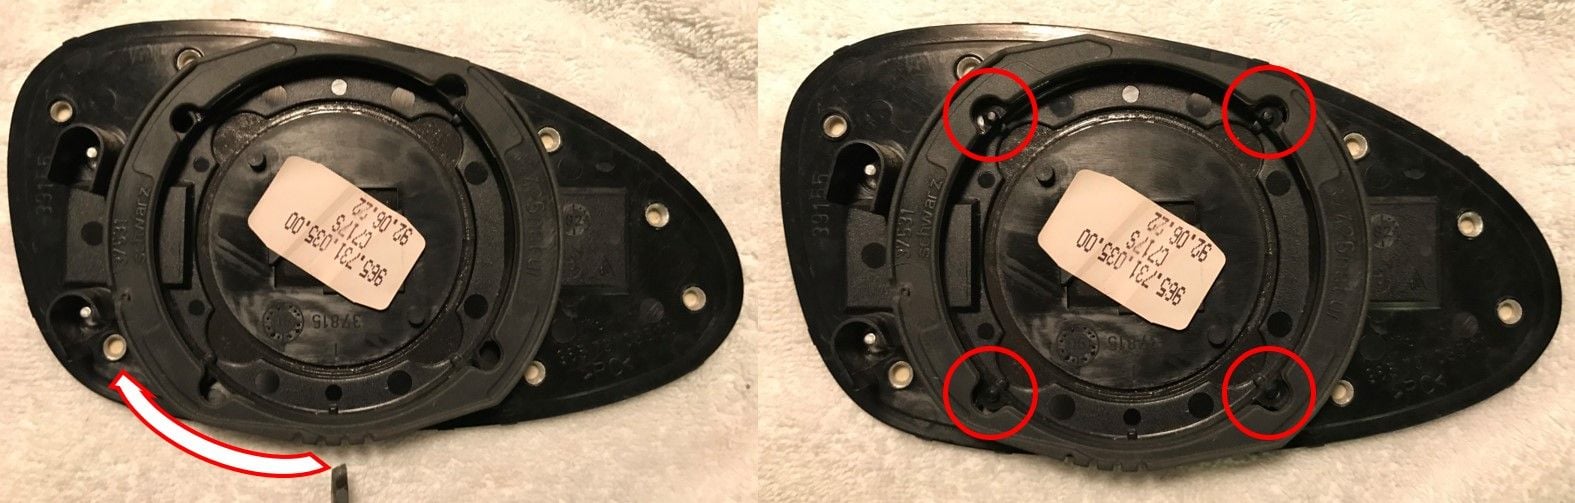
Unlock the mirror glass using a flat screwdriver to turn a plastic ring inside the mirror housing. This will release 4 pins and allow you to take out the glass.
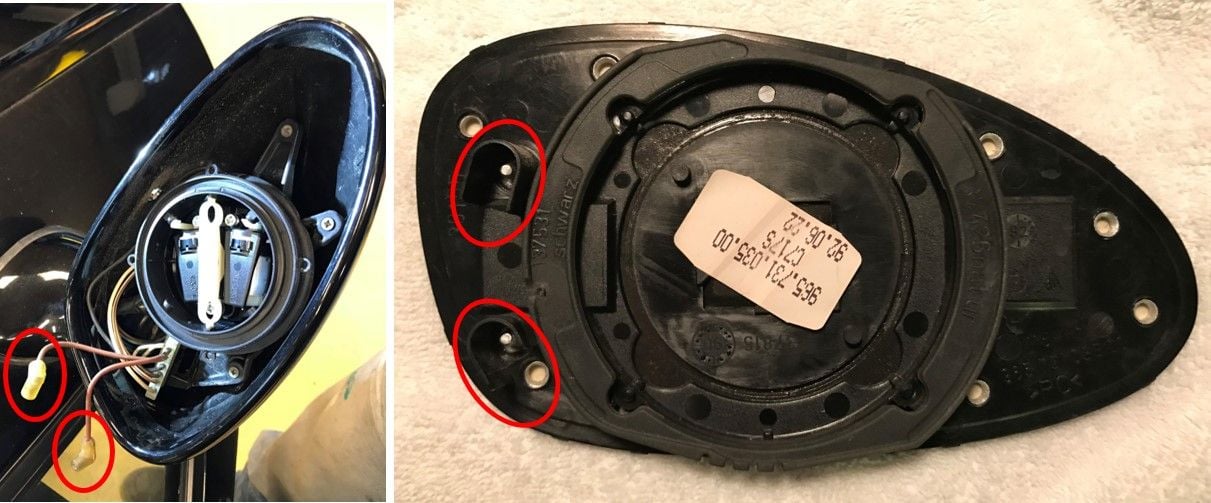
Before pulling the glass all the way out make sure to remove the heater plugs from their pins:
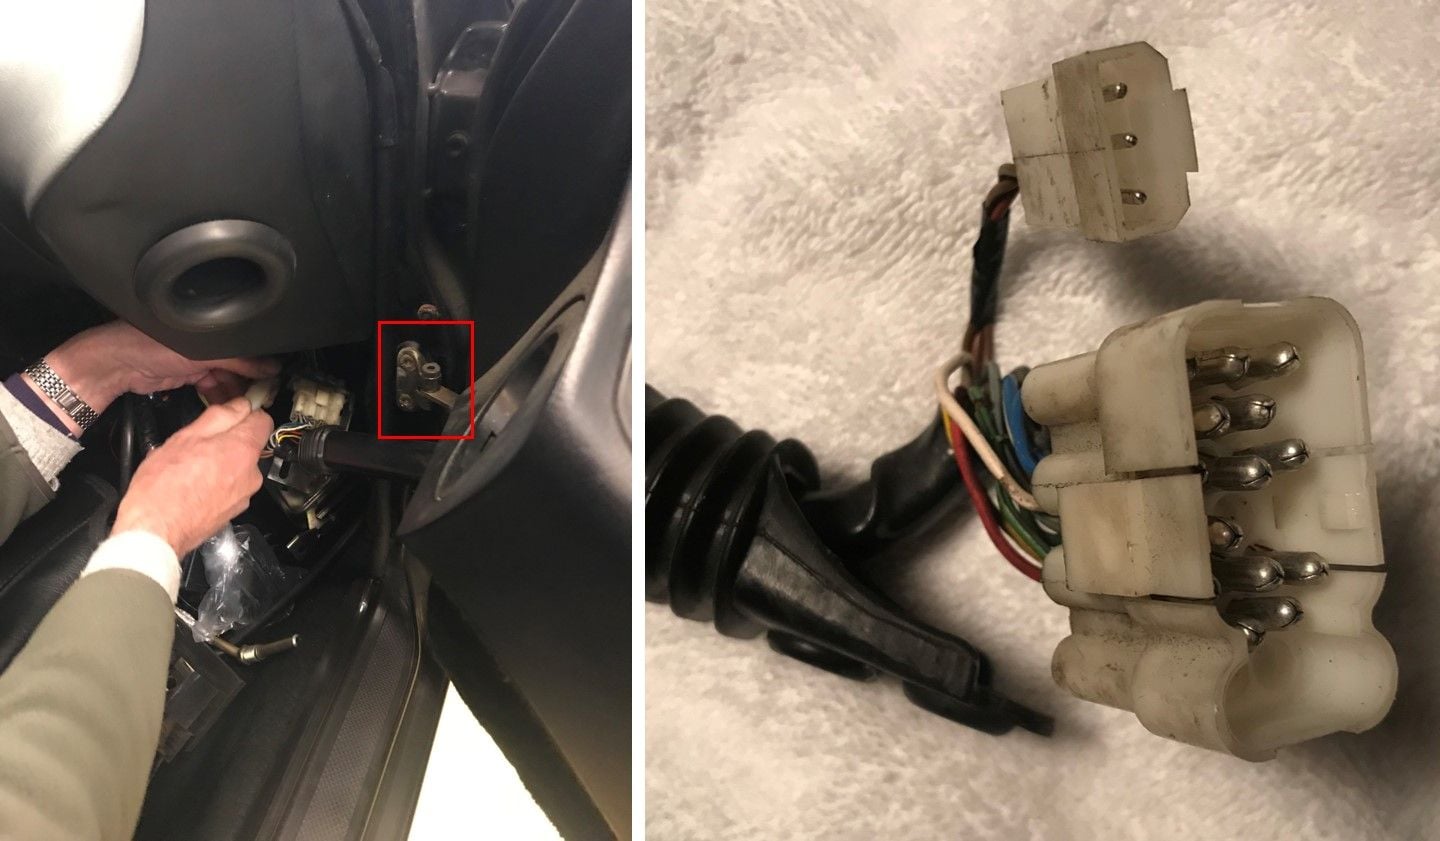
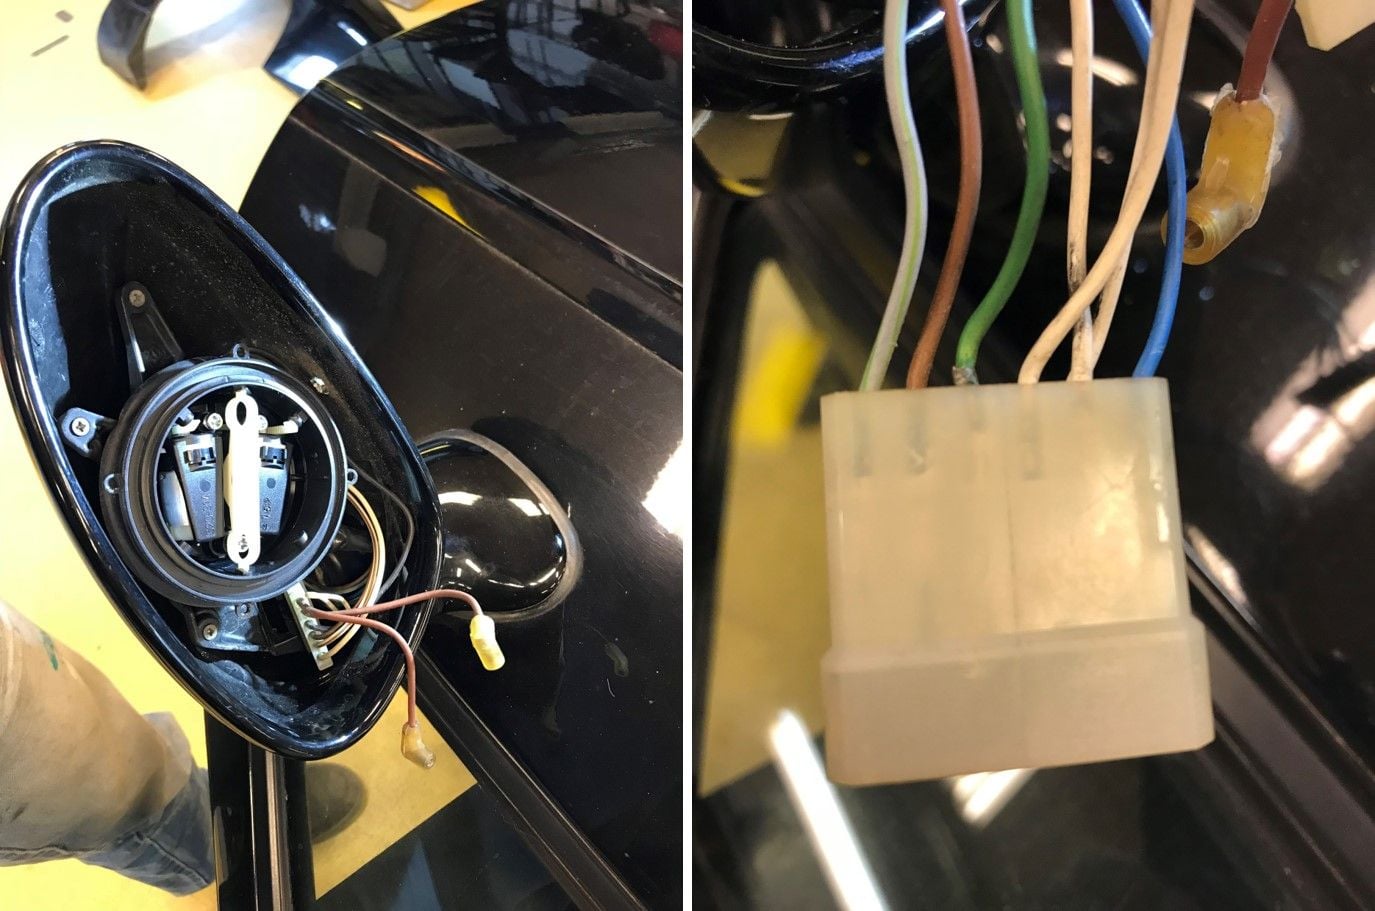
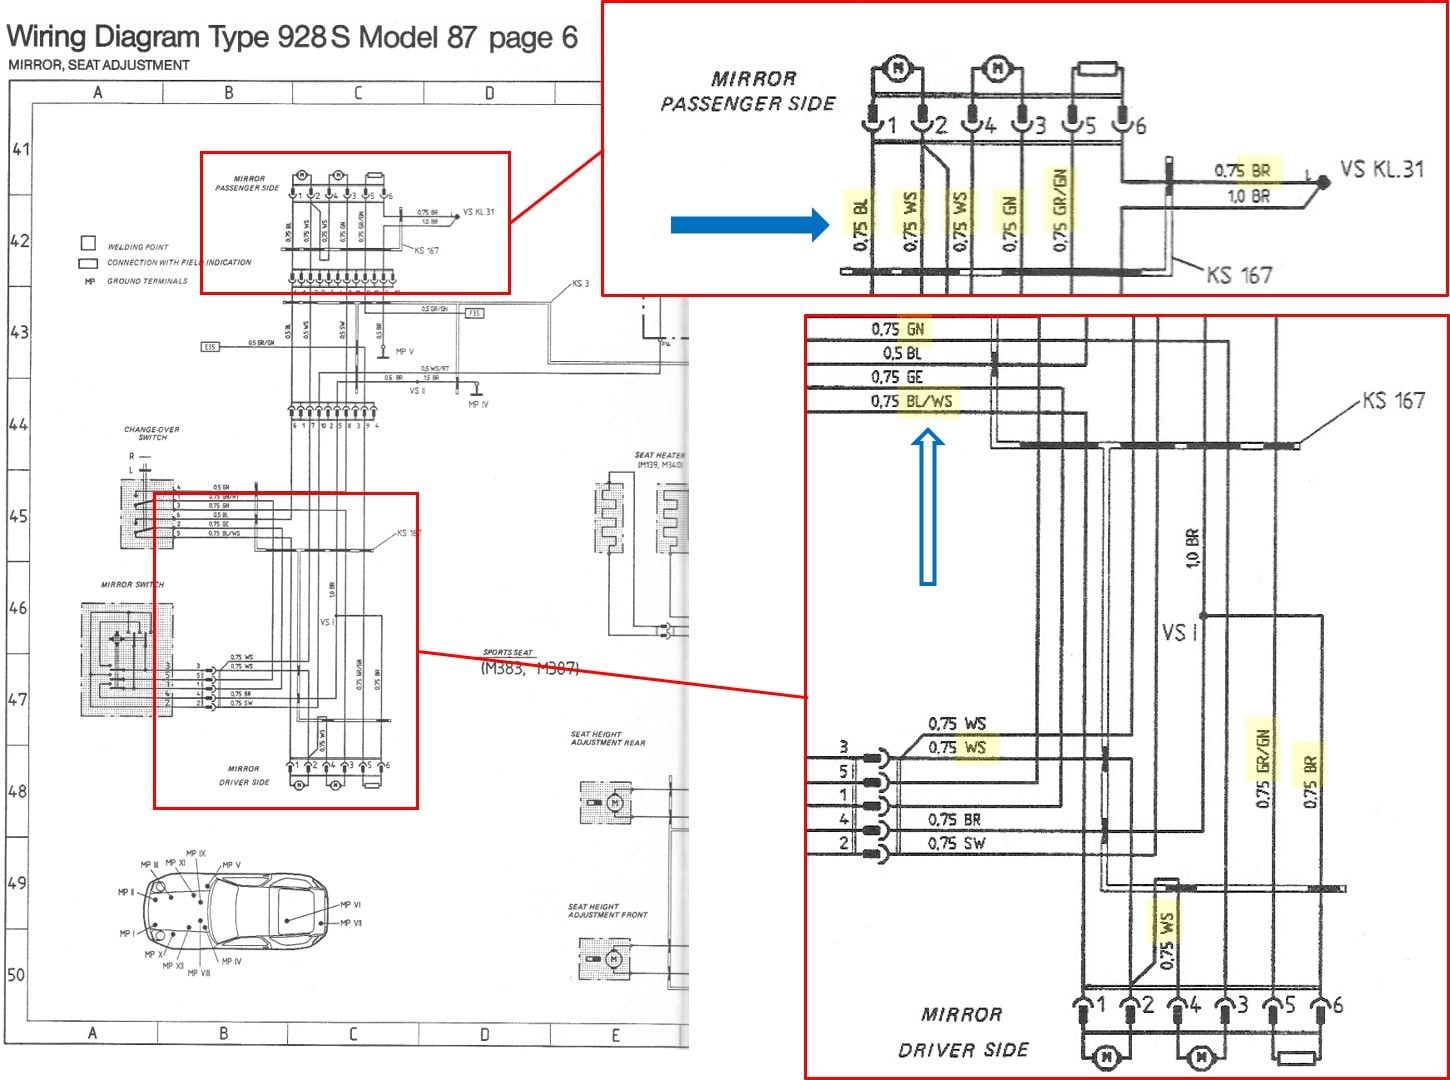
Disconnect the 6-pole pin connetors inside the mirror housing:
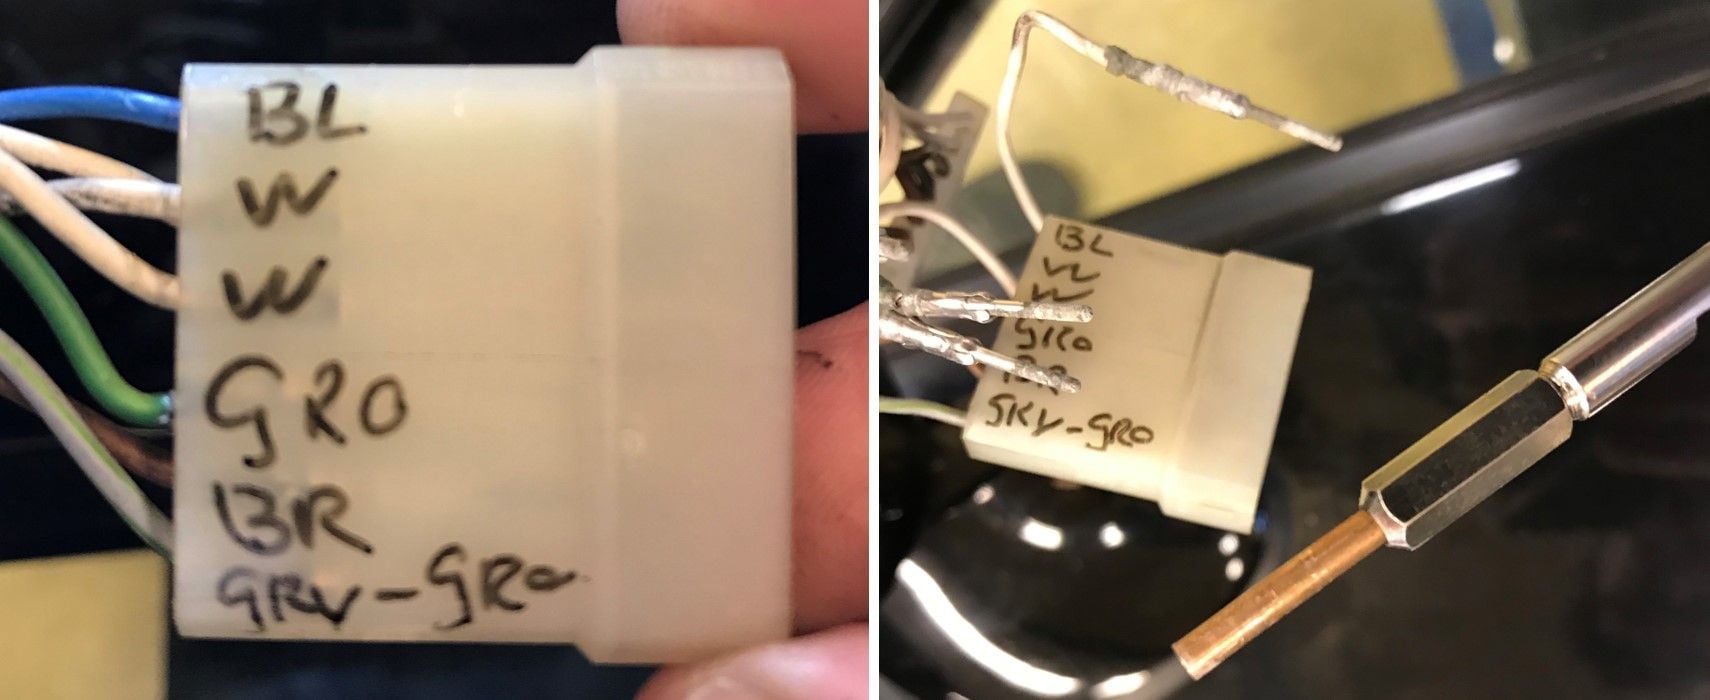
Make sure to mark the different colors on the connector for an easy install later on. Then push the pins out of the connector to enable you to pull the wiring harness into the door without having to cut any wires. We used this device on the right in the picture below; it has a hollow copper end and a spring inside the hex-shaped piece, allowing you to push the pins out without damaging them:
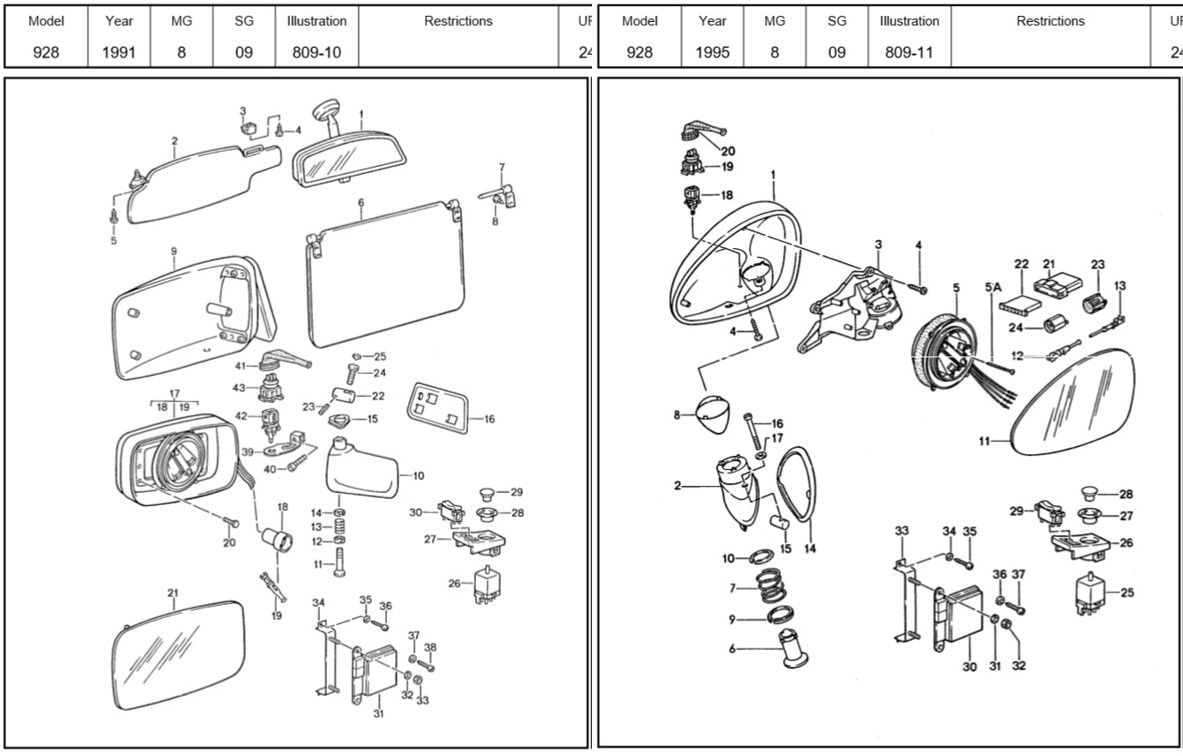
The pictures above are from the passenger’s side mirror as it has a blue wire on pin nr. 1; the mirror on the driver’s side has a blue/white wire on pin nr. 1, as can be seen in the diagram below:
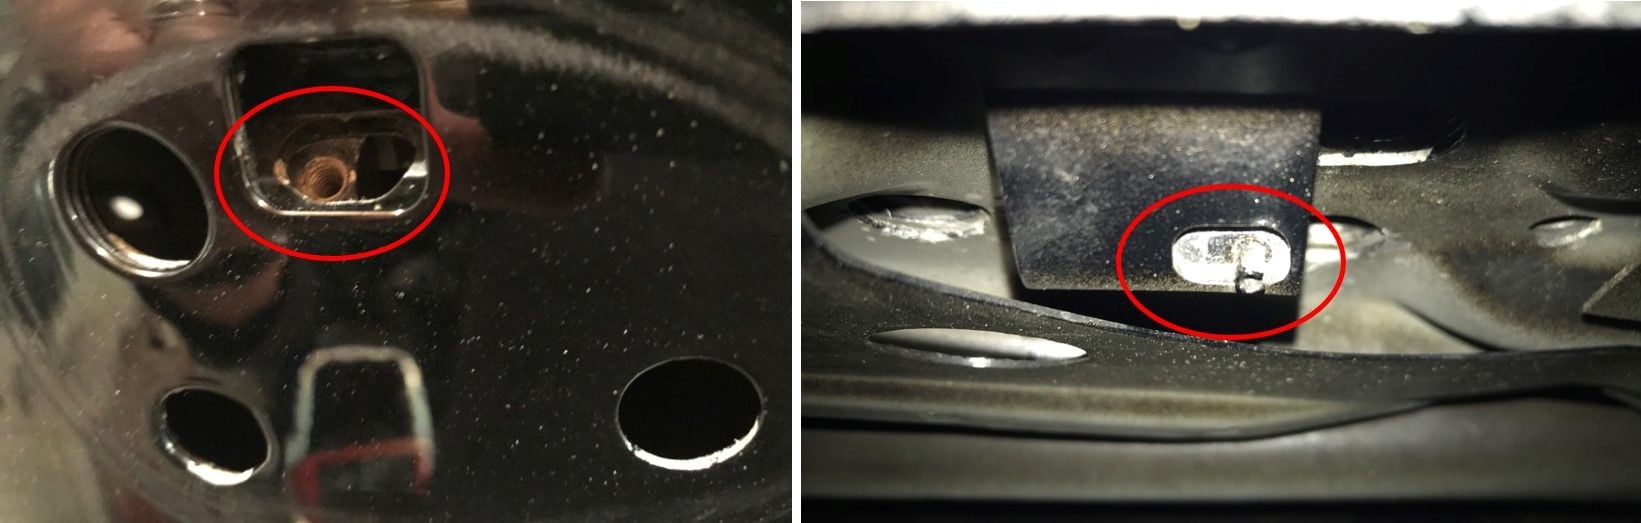
Push the mirror out to reveal a slot with an allen bolt in it. Unscrew the bold and the mirror will come loose from the body:
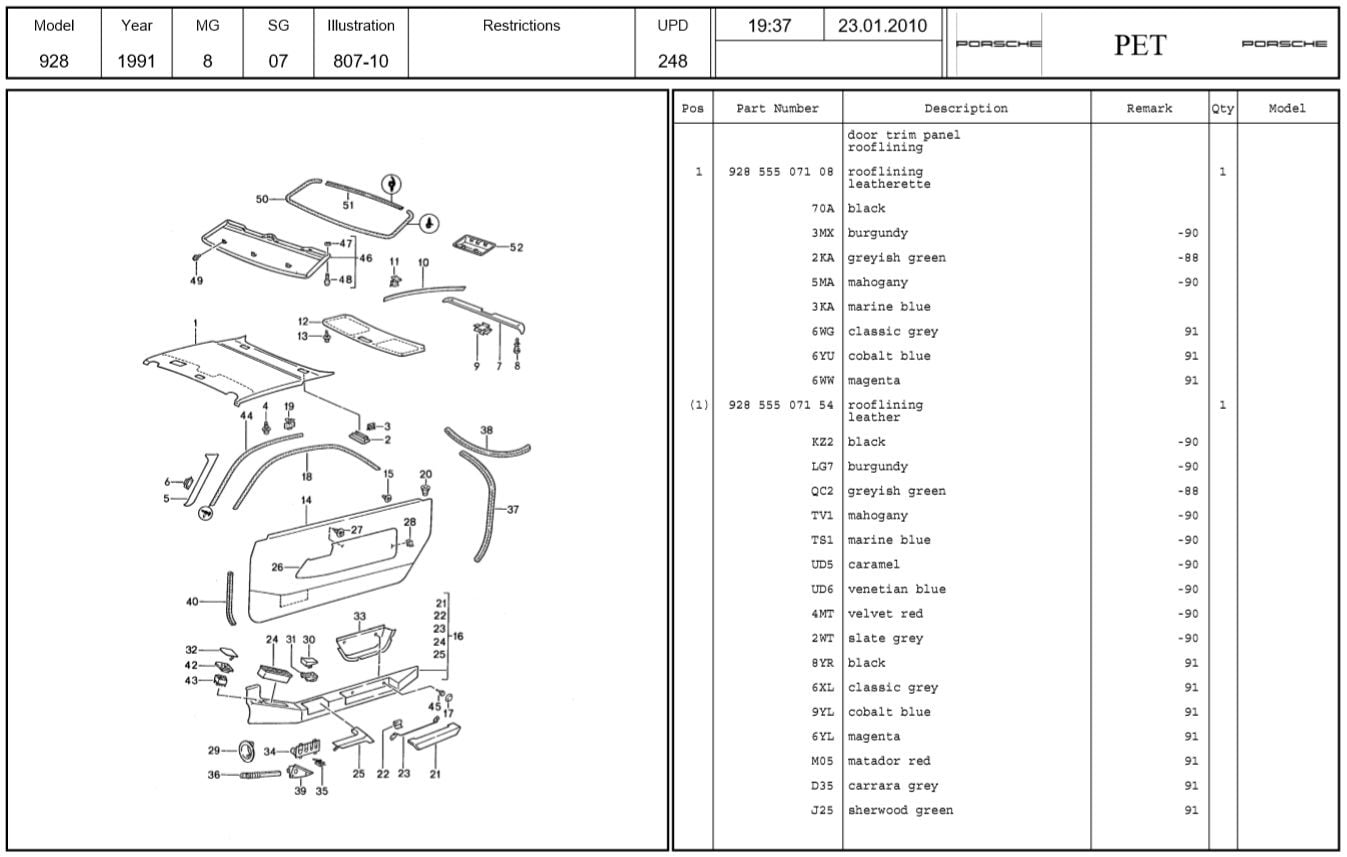
The allen bolt sits in a round threaded piece that is secured from behind by a tensioning sleeve. You can check them out in the PET picture at the beginning of this chapter: nr. 22 and 23 on the left side (the Flag mirror part):
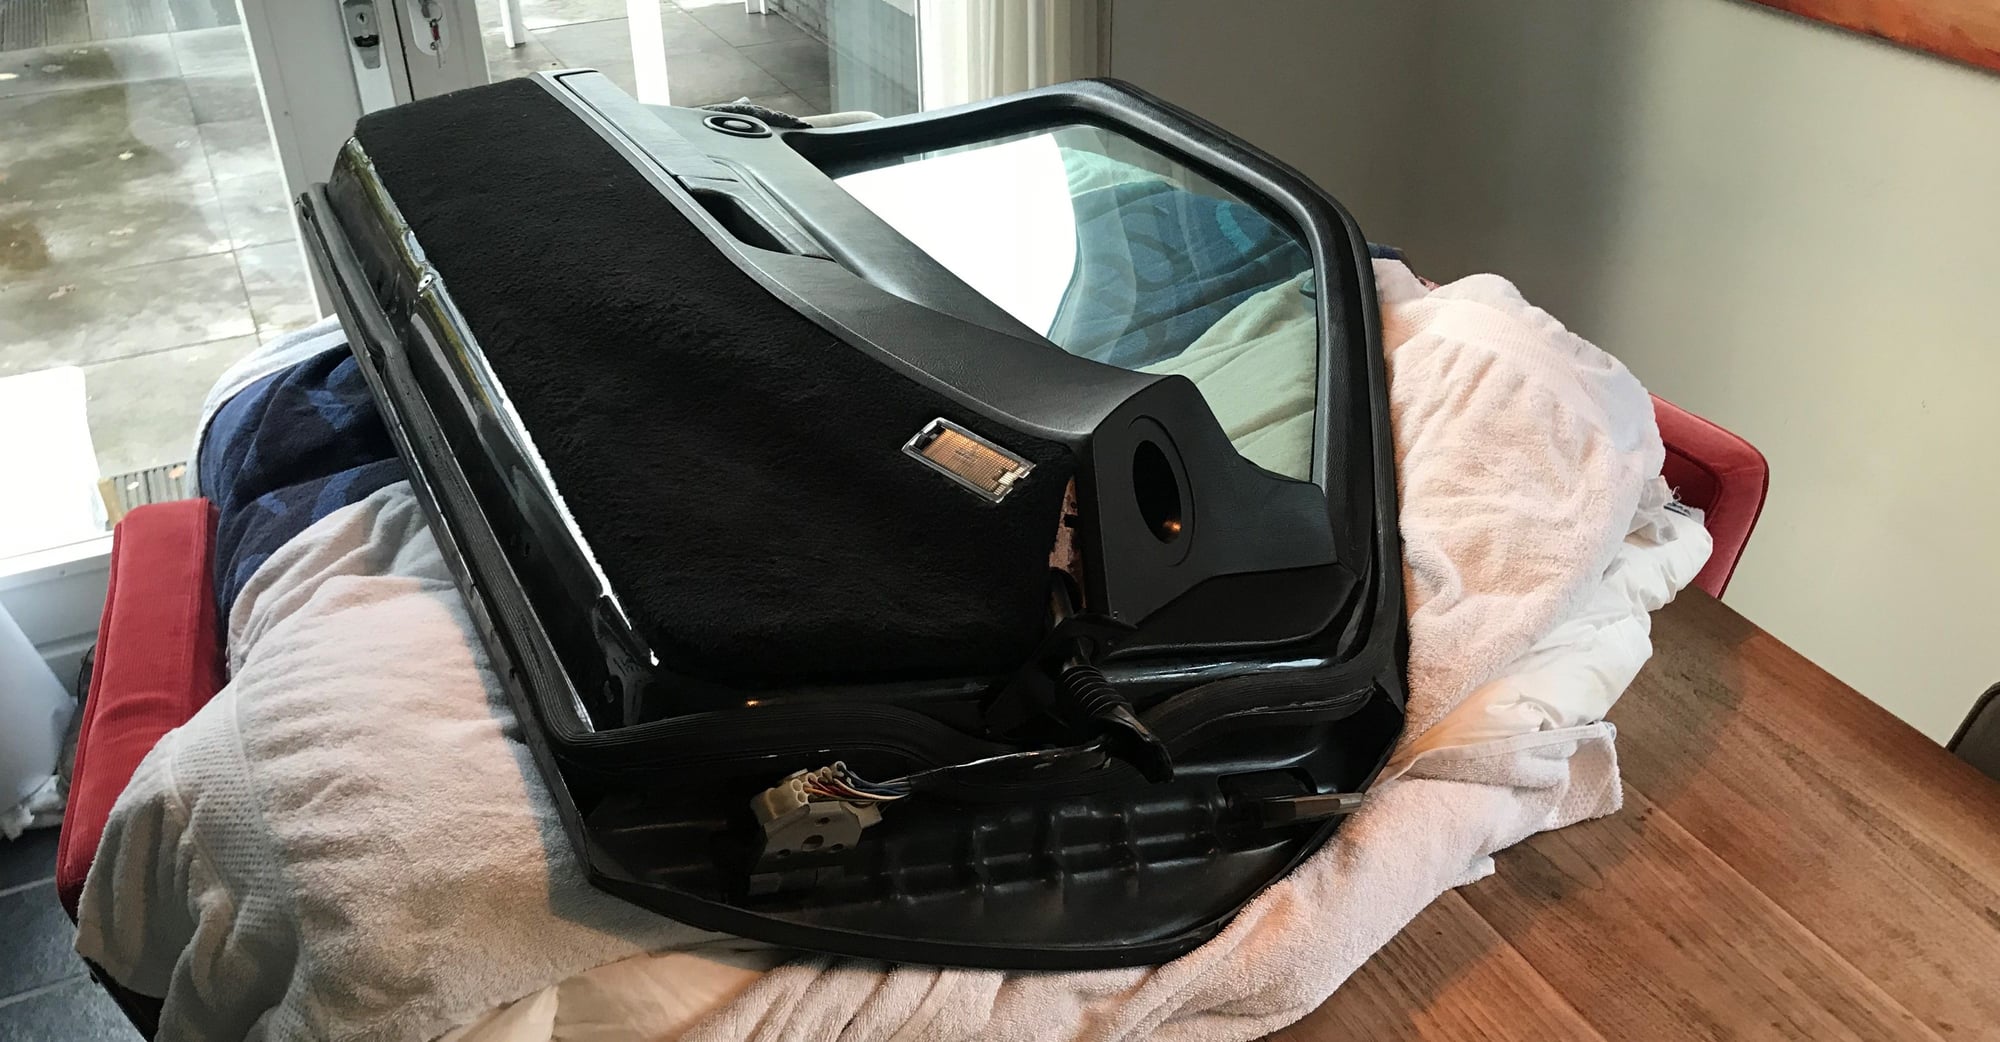
Here are the mirrors on the kitchen table. Unfortunately one of the rods snapped of the mirror base, probably a result from an attempt to steal the mirrors of my car quite some time ago. The part is still there, but I doubt it can be glued back on so I msay have to get a replacement:
.
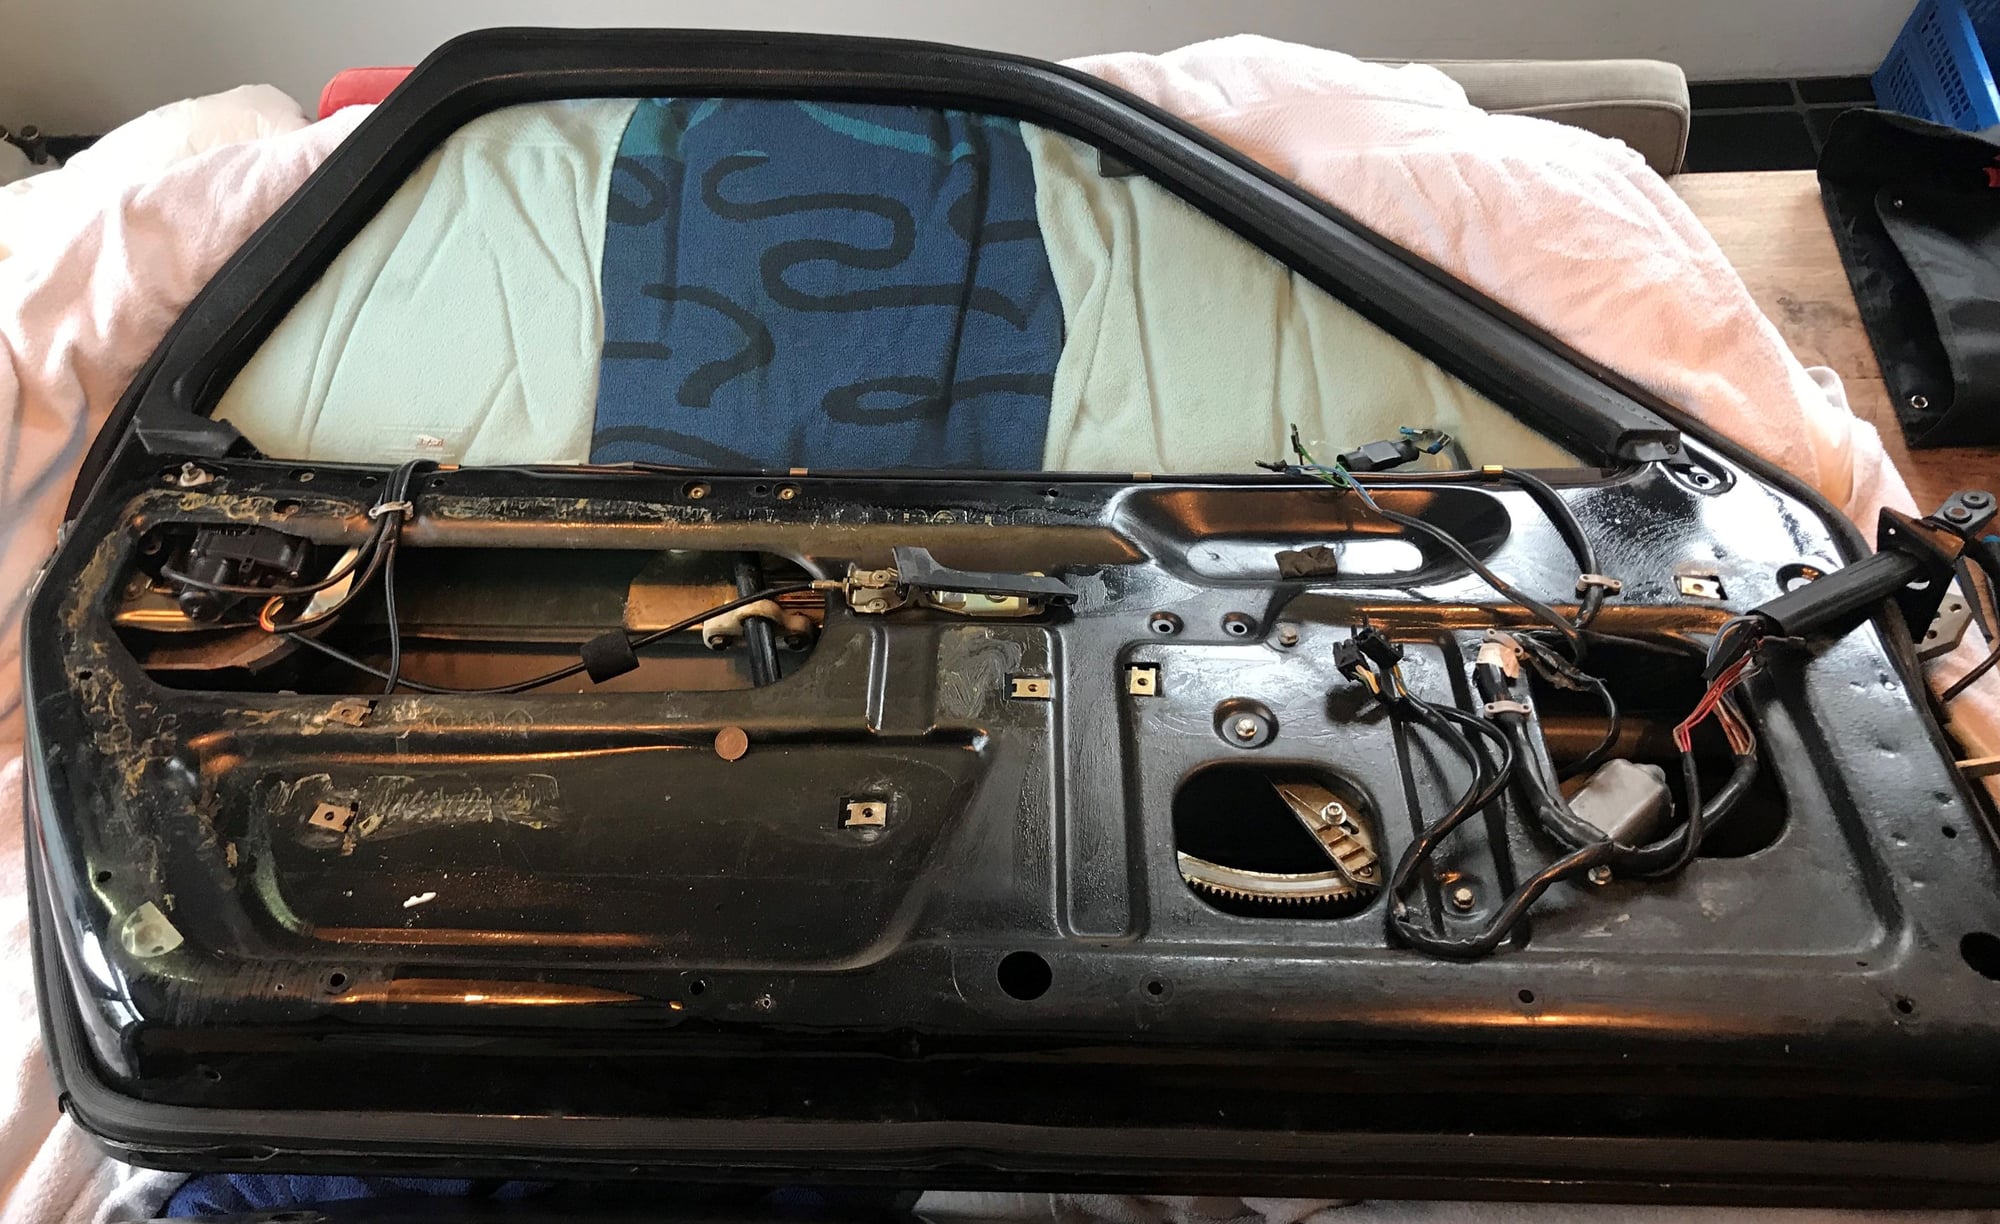
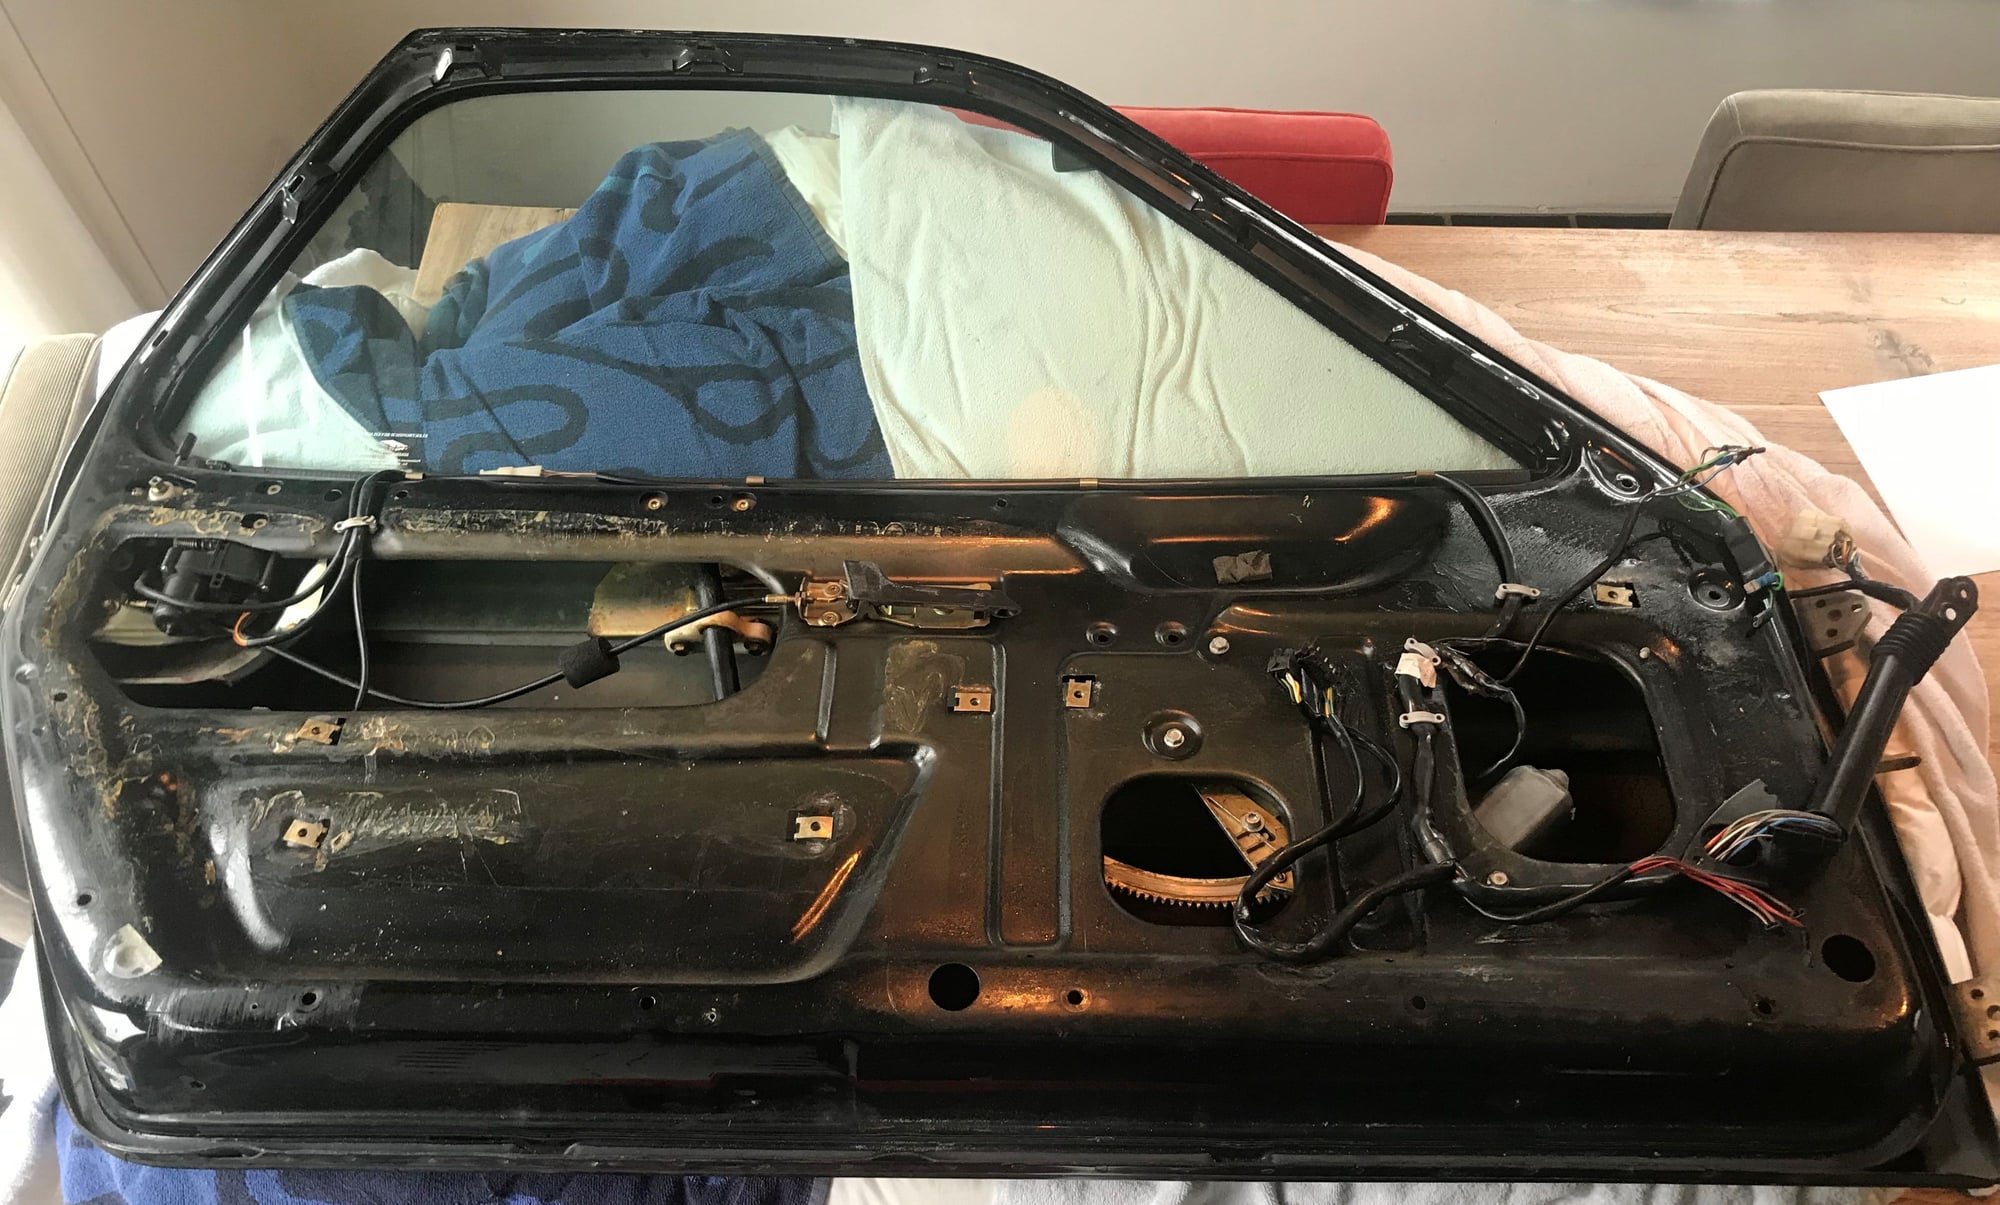
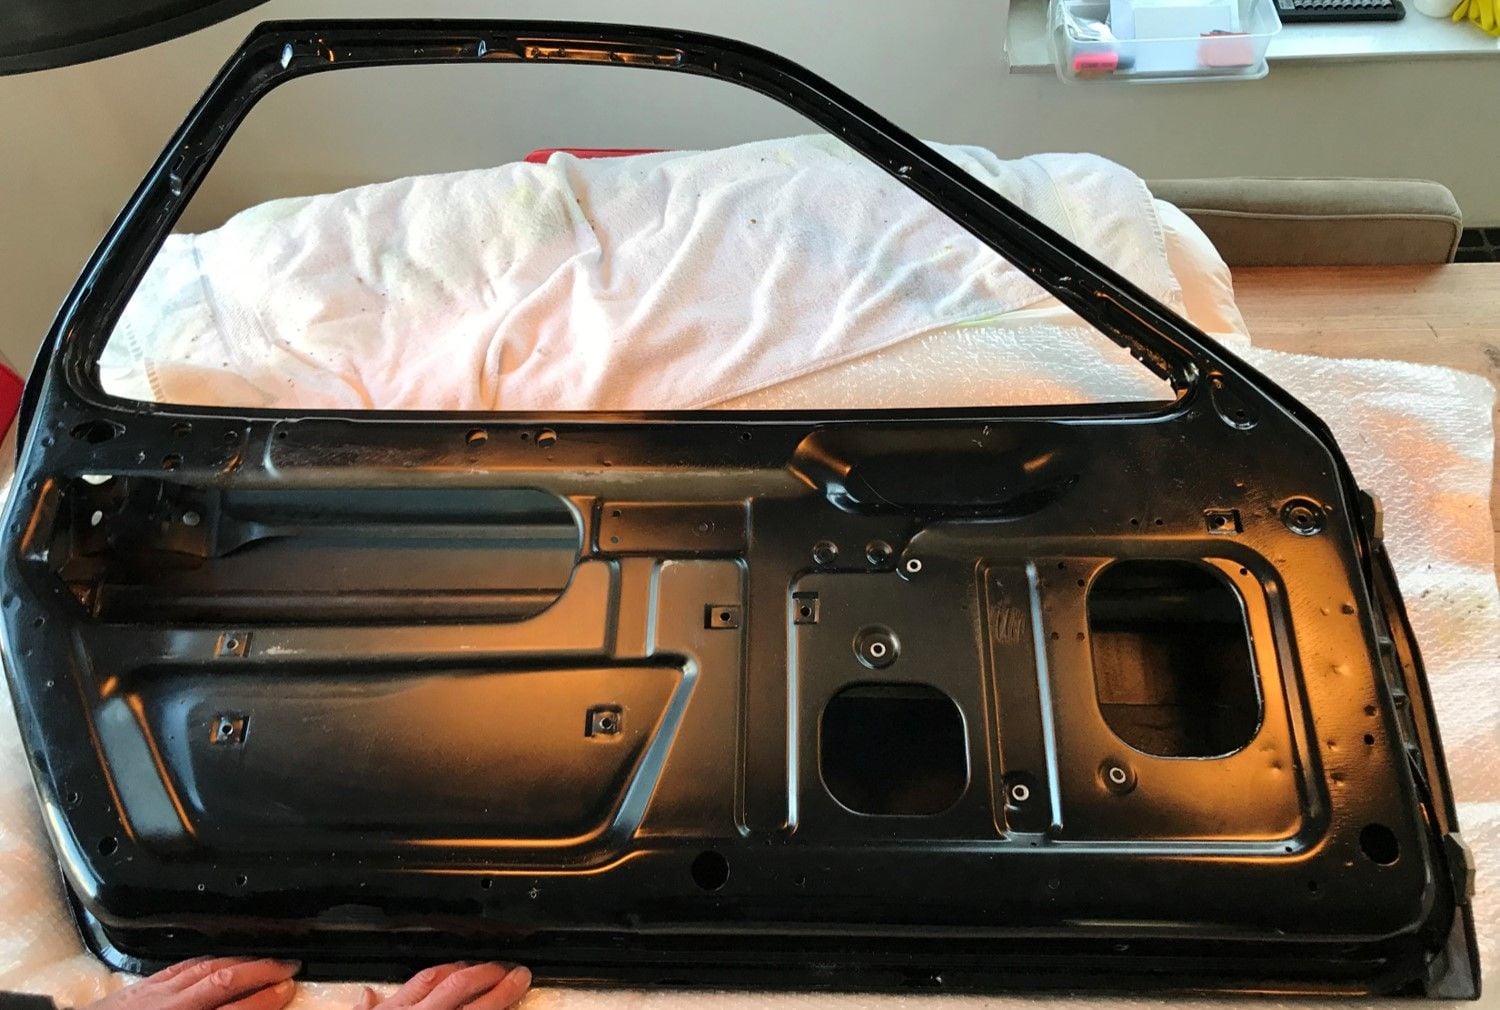
For this first step I relied heavily on the great Landsharkoz write up on removing the door panel. Here’s the driver’s door on the kitchen table:
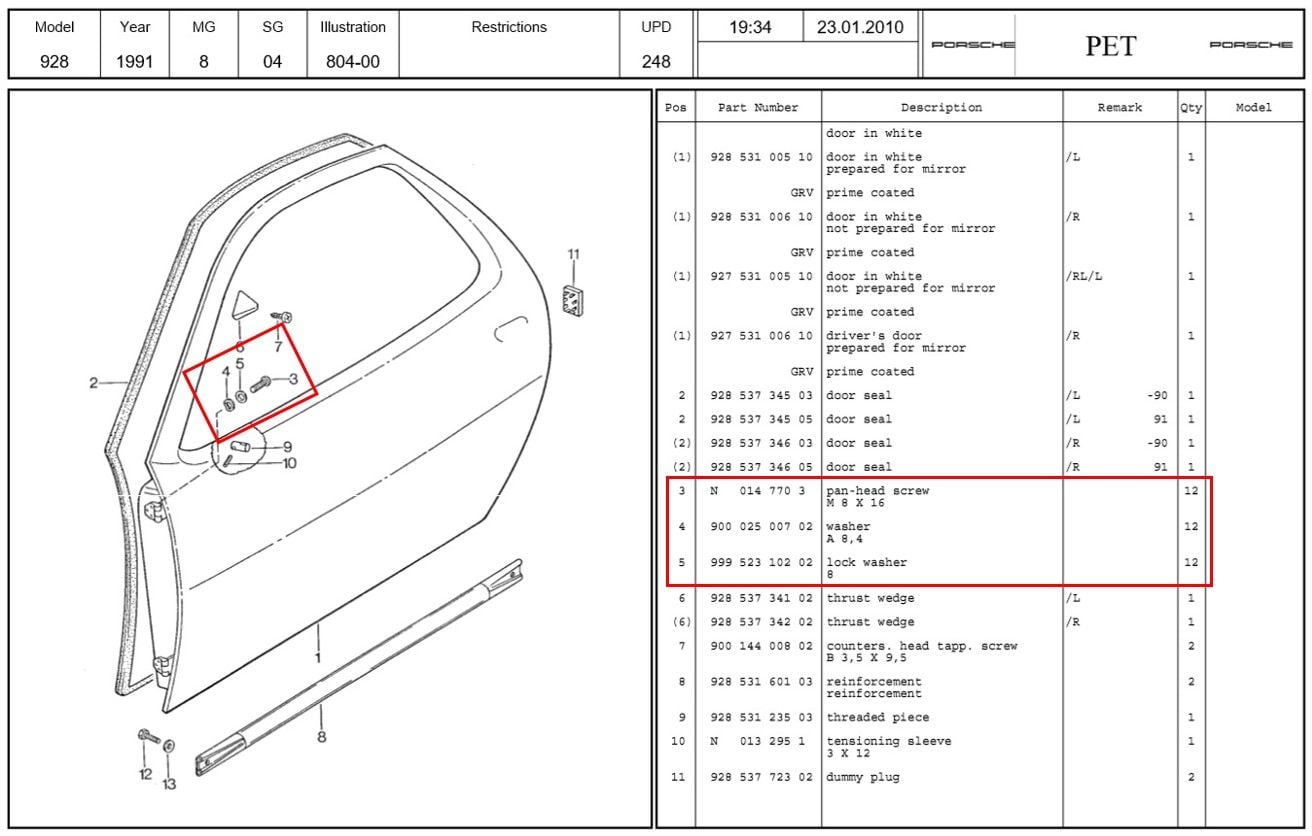
Below the relevant PET page for reference:
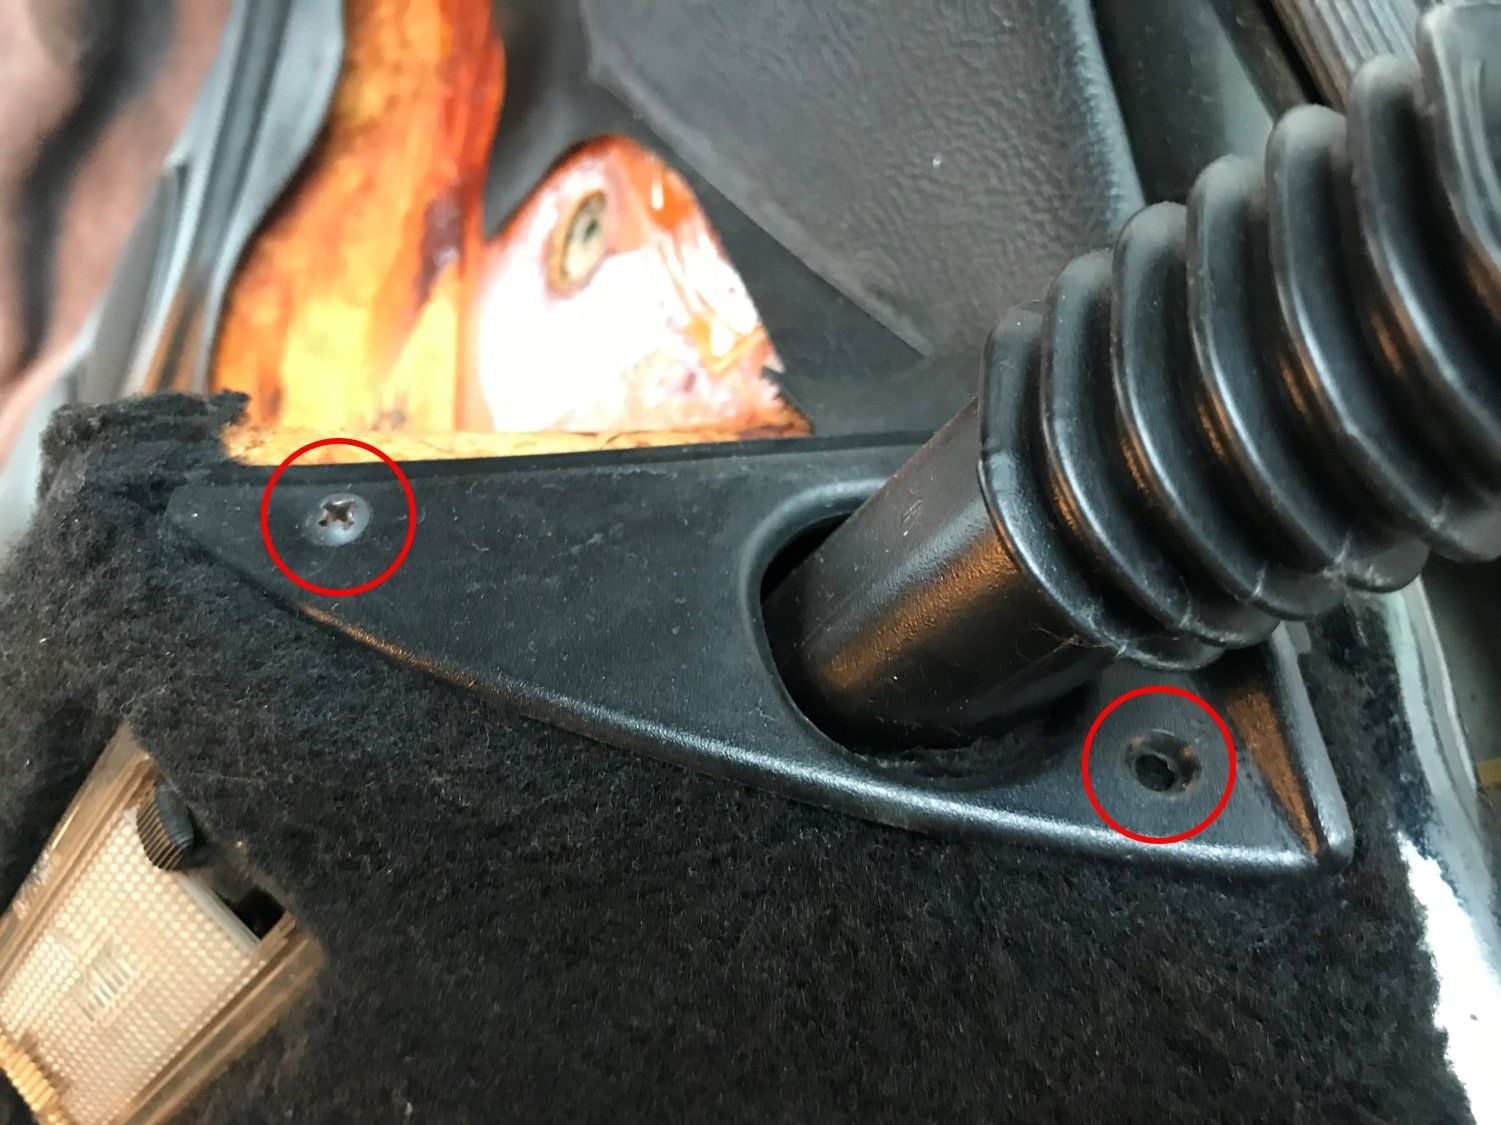
First, unbolt the cover holding the cable guide. It’s held by 2 screws, one of which is hidden behind the cable guide. Mine only held one screw, probably never put back in by a previous owner:
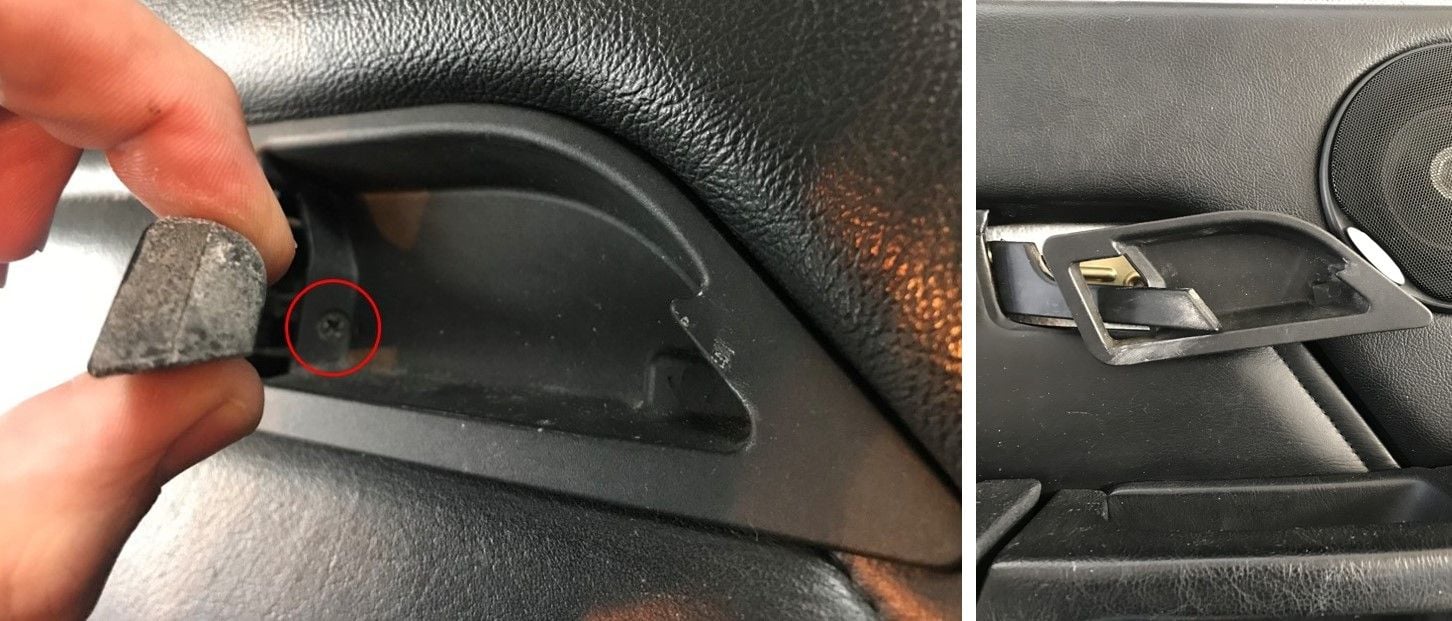
Remove the screw behind the door handle and slide out the back plate.
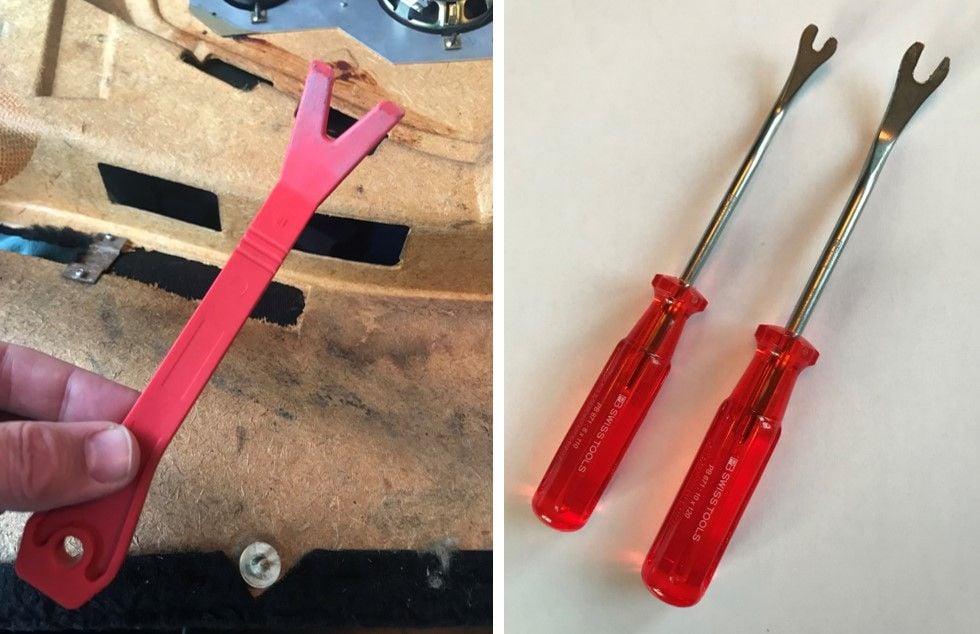
Pull the cover carefully towards you. It is held in place with two black plastic clips and mine came out without having to use one of the tools in the pictures below (I had to use these on the panel though…):
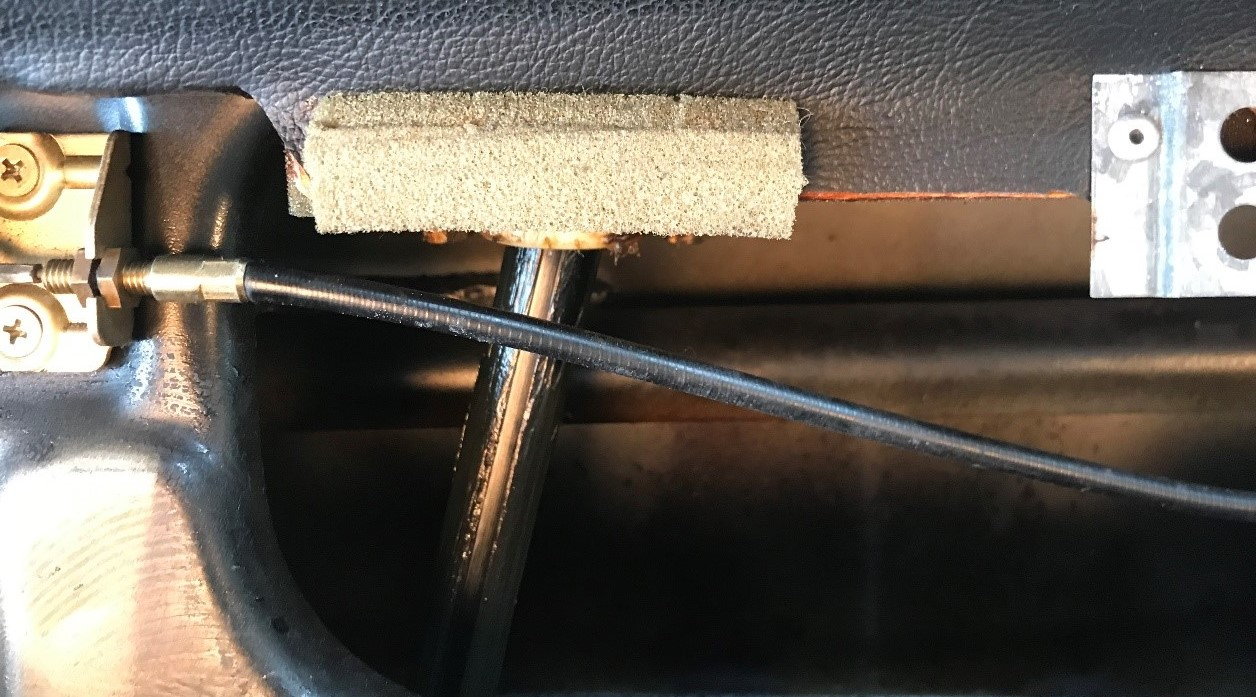
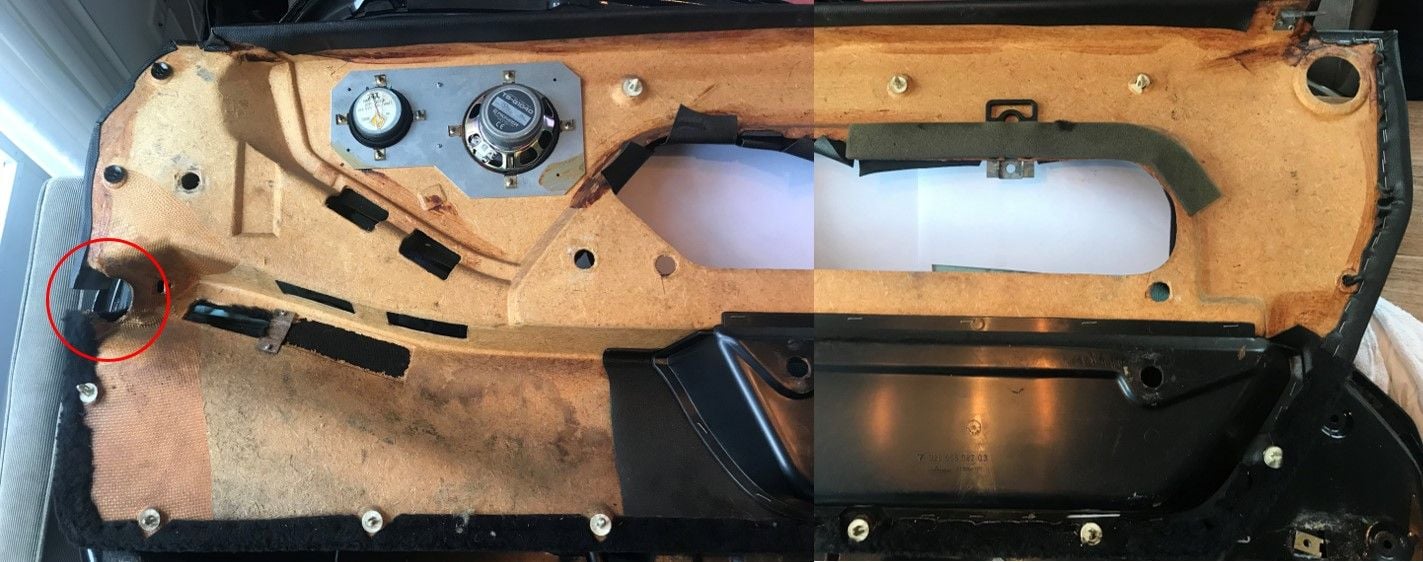
There is a small piece of foam behind the cover on the passenger’s side but not on the driver’s side. It looks pretty old, so I tend to believe it’s been there from the beginning:
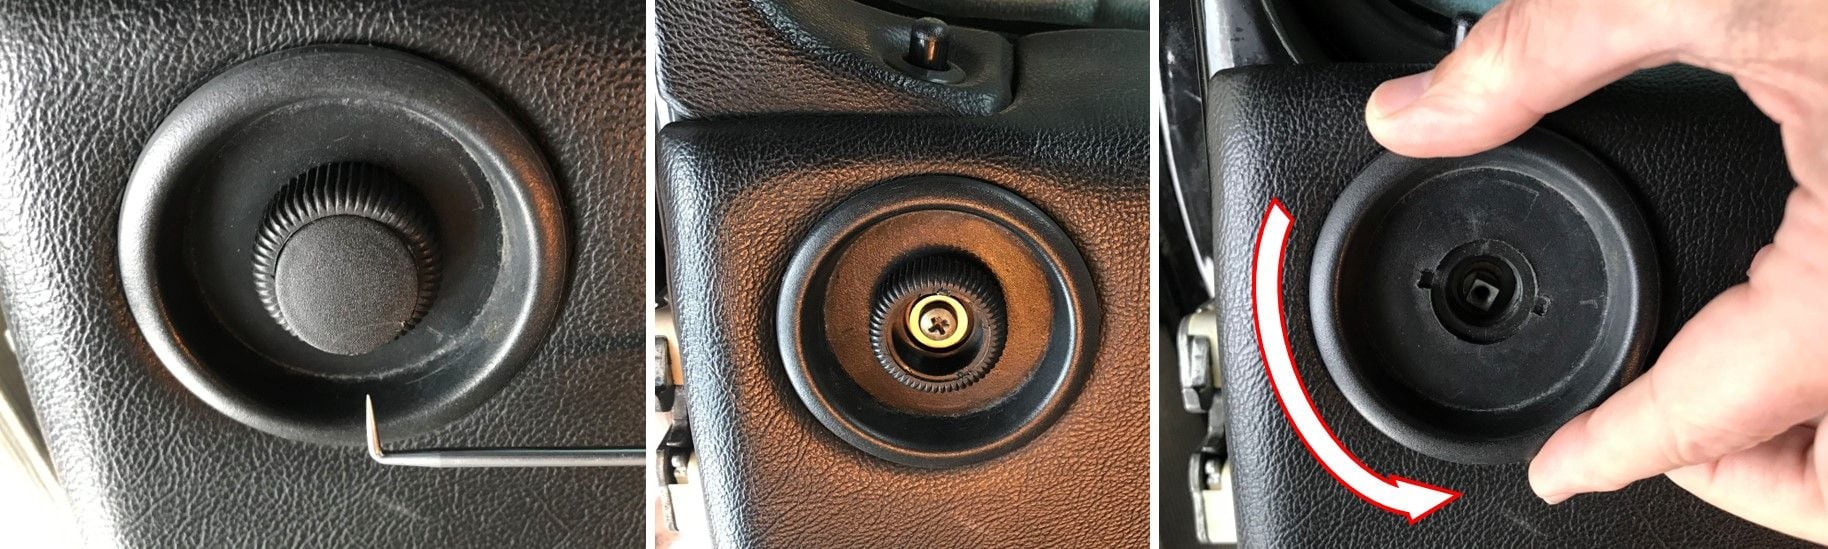
To remove the rotary **** first take the cap out; I used a small metal hook to pry it out. Next remove the screw and washer and pull out the rotary ****. The bearing shell can then be removed by turning it anti-clockwise.
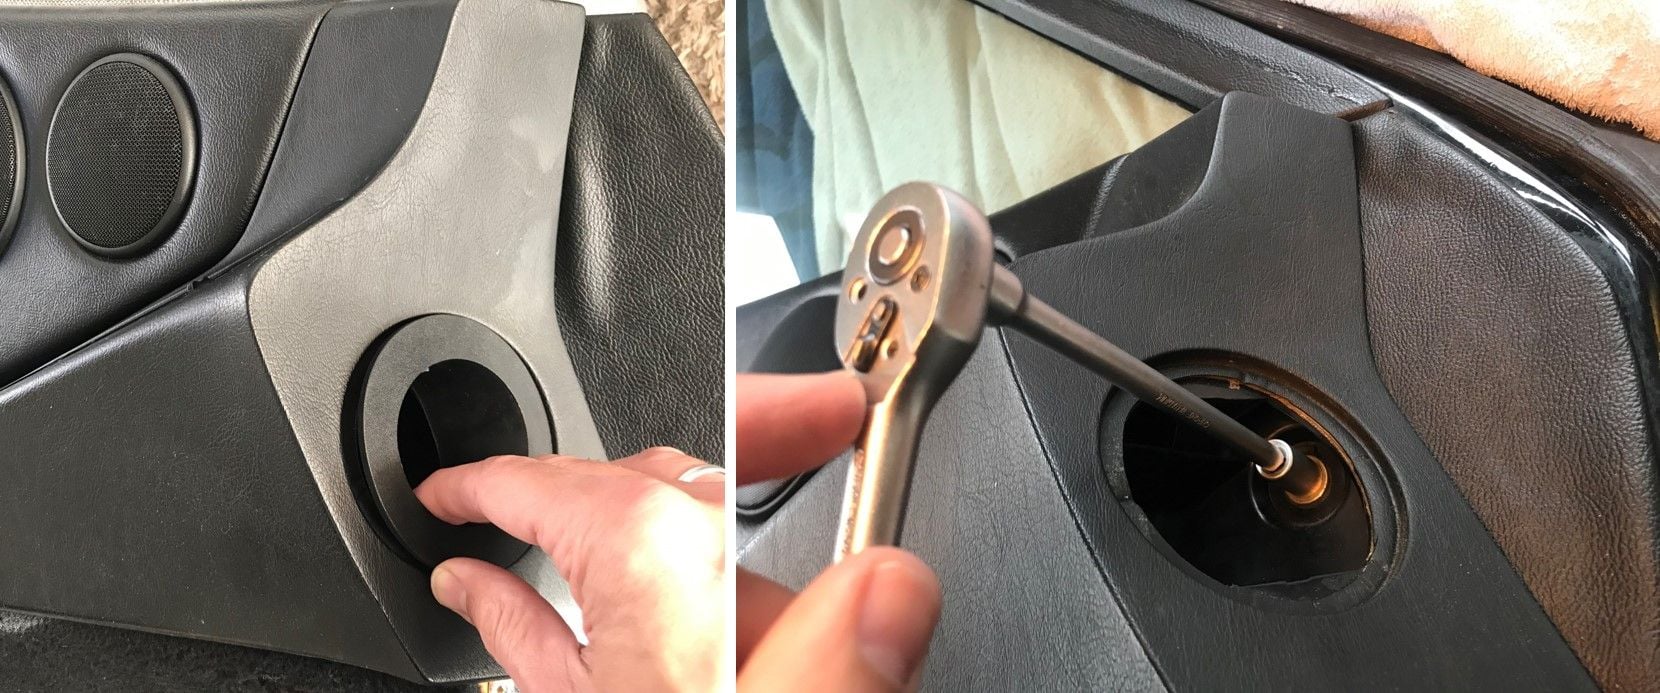
Next step is to remove the armrest. It is held in place with 6 screws; the first one is located behind the rosette of the air vent:
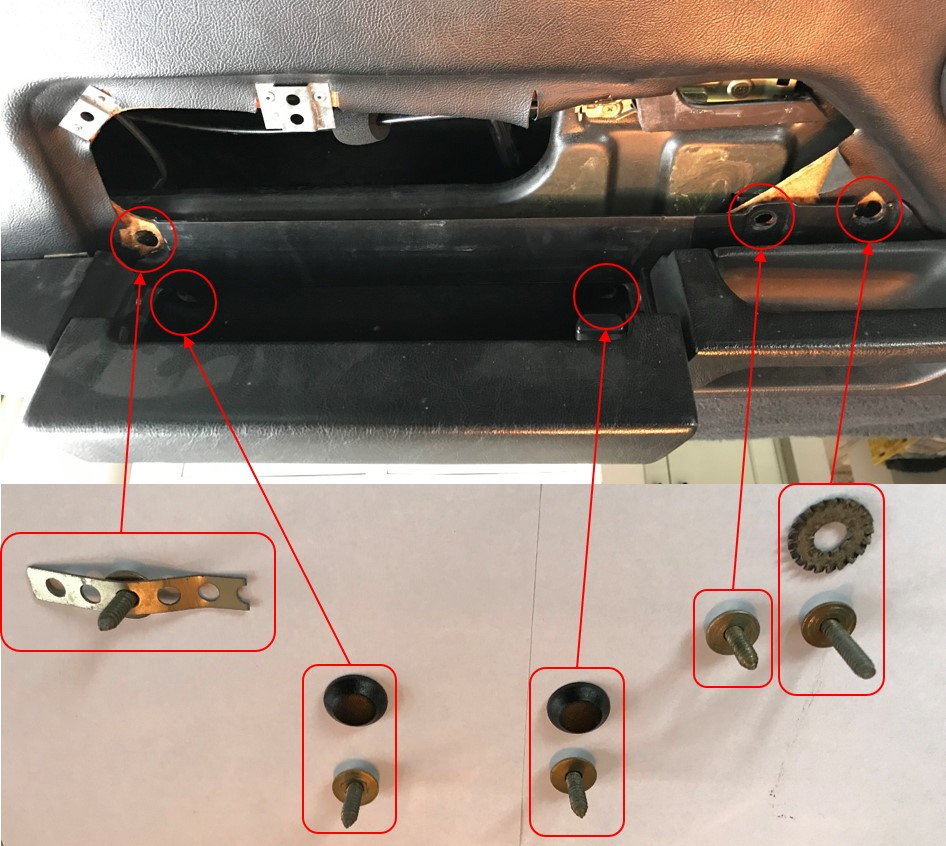
Two bolts are located inside the storage compartment, covered with a plastic cap. One bolt is above the rear end of the compartment, the remaining two are above the handle. As you can see the armrest mounts are damaged: they used a variety of washers to cover the broken off bits:
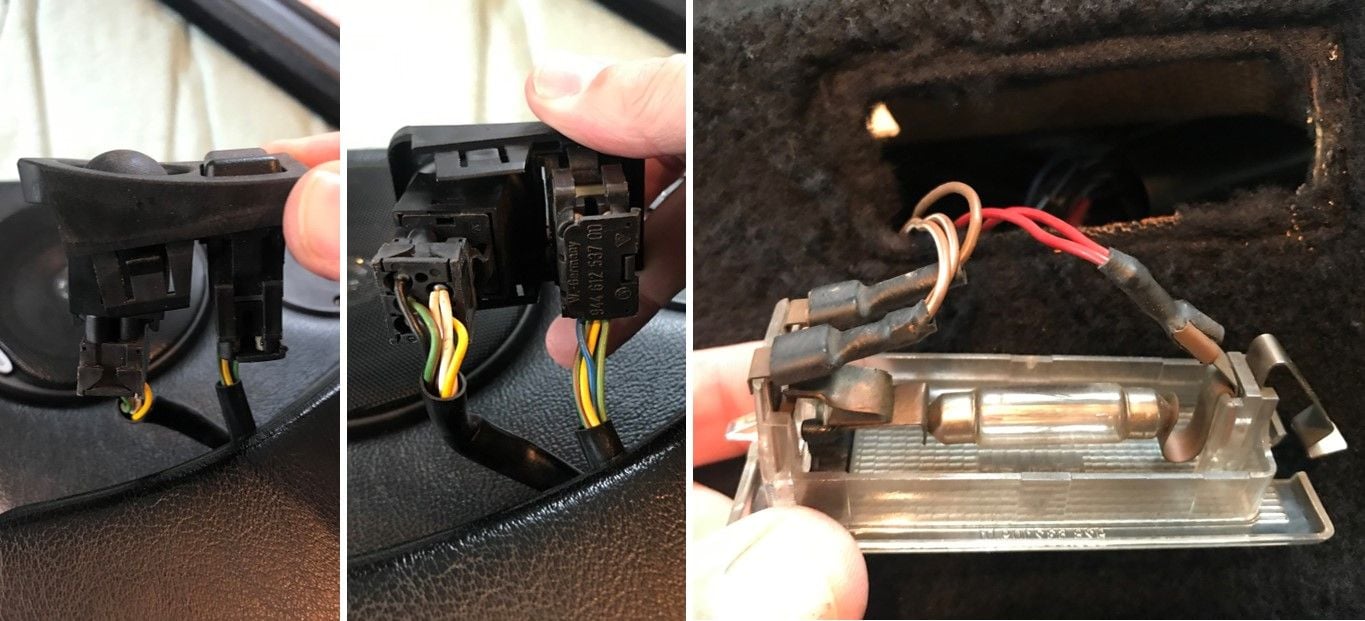
Take out the mirror switch and disconnect the two connectors from the wiring harness. It comes out pretty easily, but when in doubt just can push it our from underneath when the armrest is loose. While you are at it: take out the light underneath the armrest and disconnect it from the wiring harness:
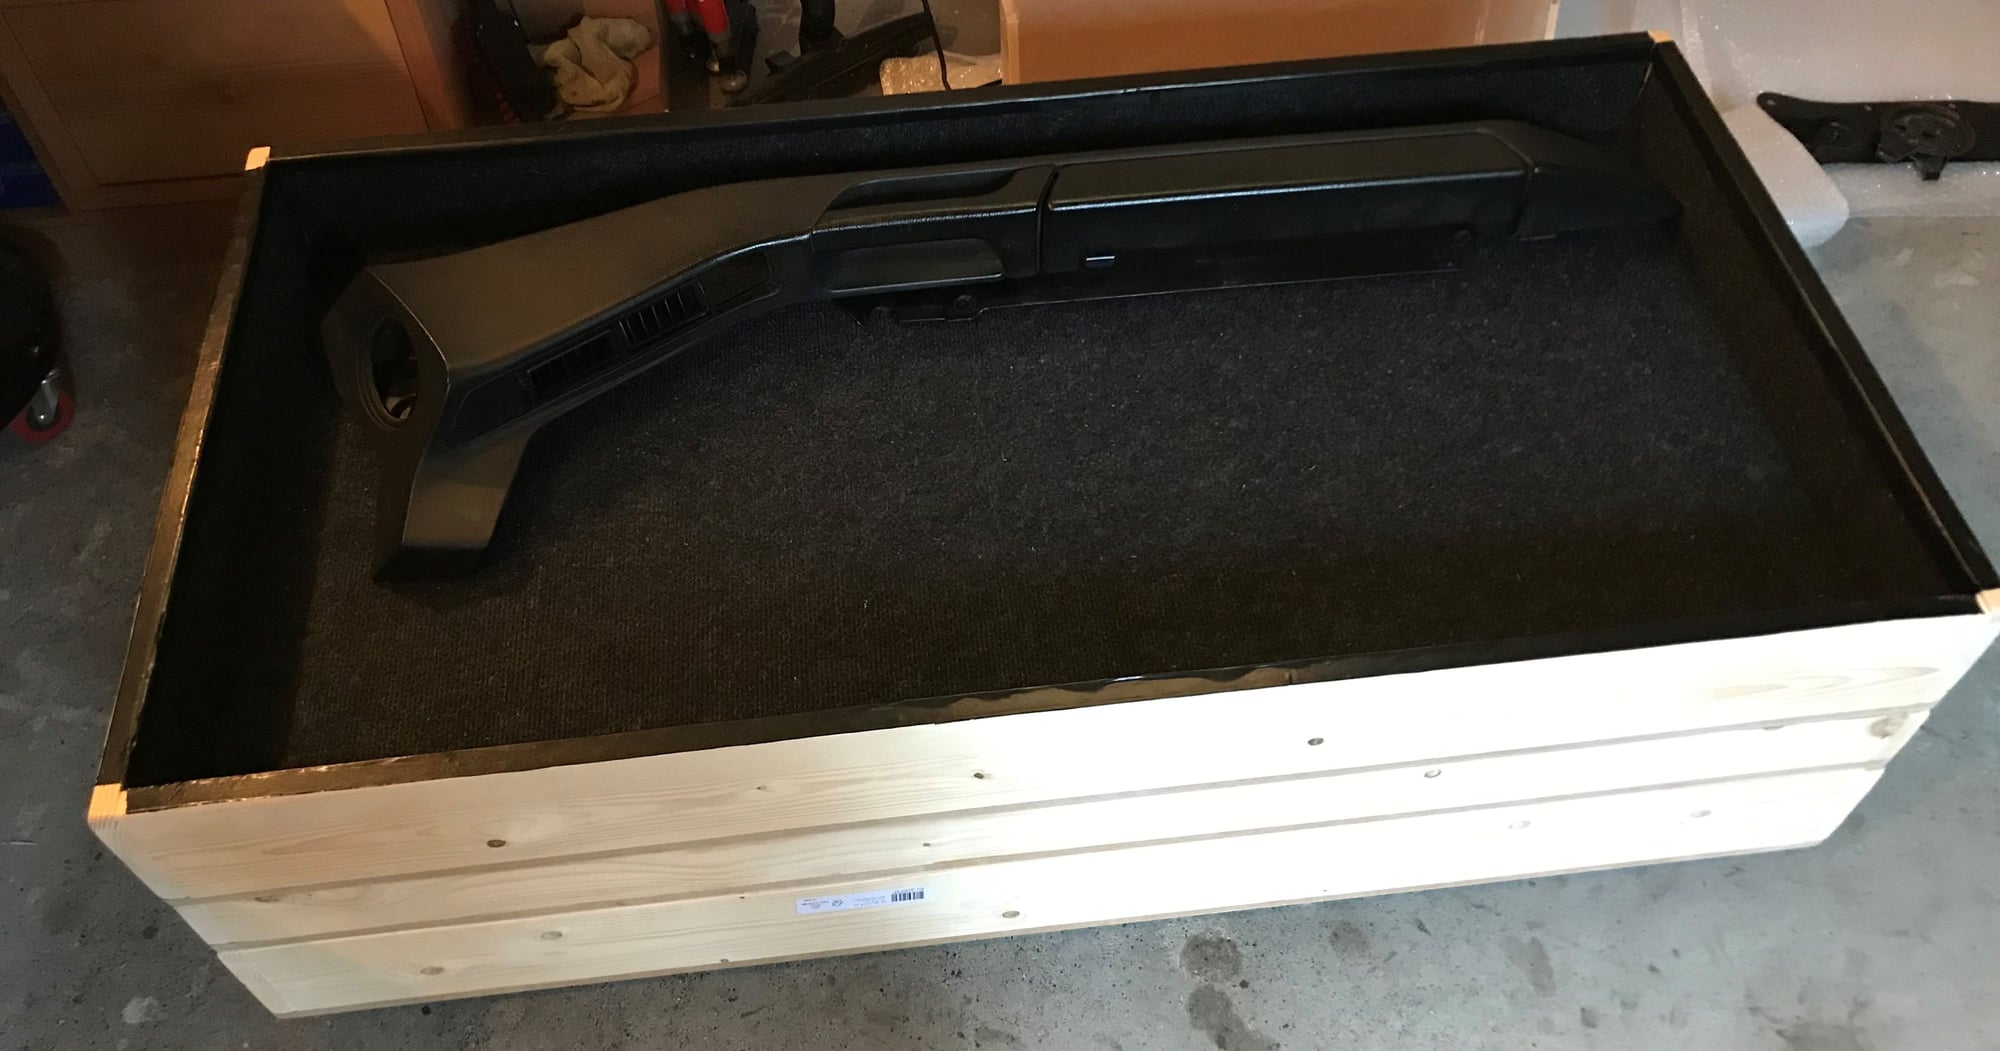
And off comes the armrest, stored in a specially made crate:
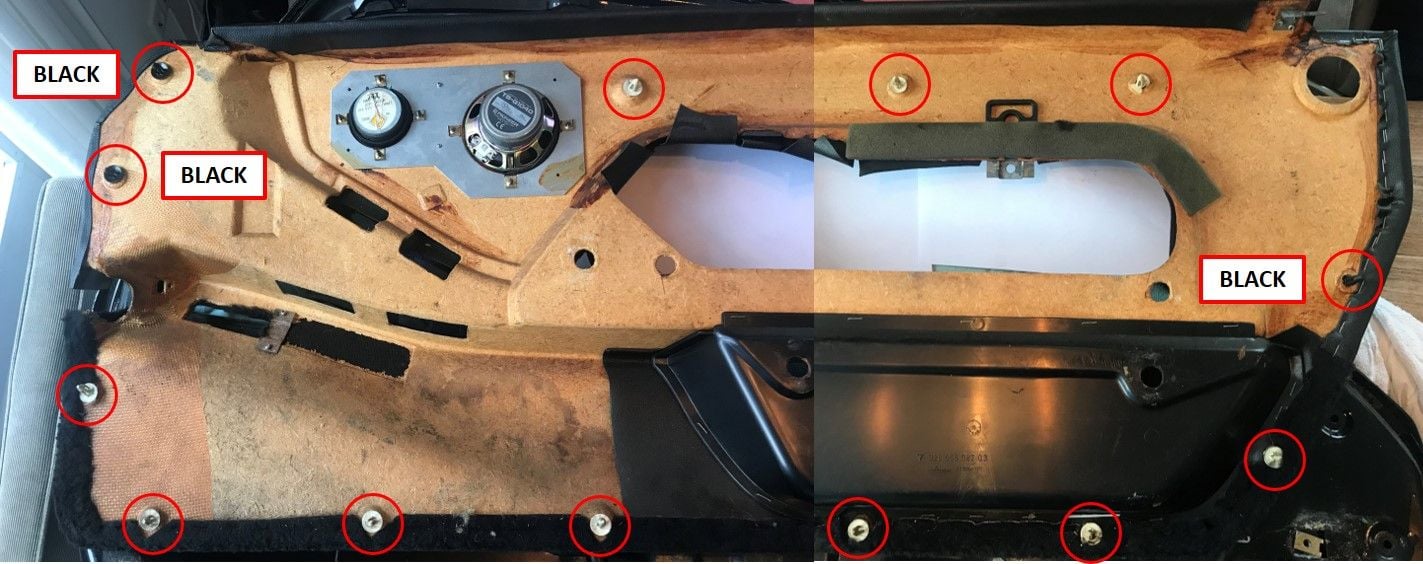
Next job is to take the door panel off…… Before you try to release the plastic clips holding the door panel to the door make sure there are no screws in the rear bottom part and rear side. You can check that by running your fingers through the carpet, if there are any you will find them this way. My driver’s side door didn’t have any although I could feel where they once were in the carpet (the holes are there in the door itself). The passenger’s side door did have 2, but the door panel was probably ripped off by a previous owner as the screws were not holding the panel anymore. They are two completely different screws as well, so I don’t think the car left the factory with these:
I started at the bottom end of the door using the red plastic tool and one by one popped the plastic clips out; I worked my way to the top of the panel. Many of the clips were damaged so they came out without any resistance.As mentioned in other threads there is a specific color arrangement of the clips, as shown
below:
There is a small metal piece that ‘locks’ the door panel to the door (it sits under the small metal strip that holds the speednut for fastening the inner door frame lining). To remove the panel from the door first move it forward by a few centimeters….
……then lift it upwards:
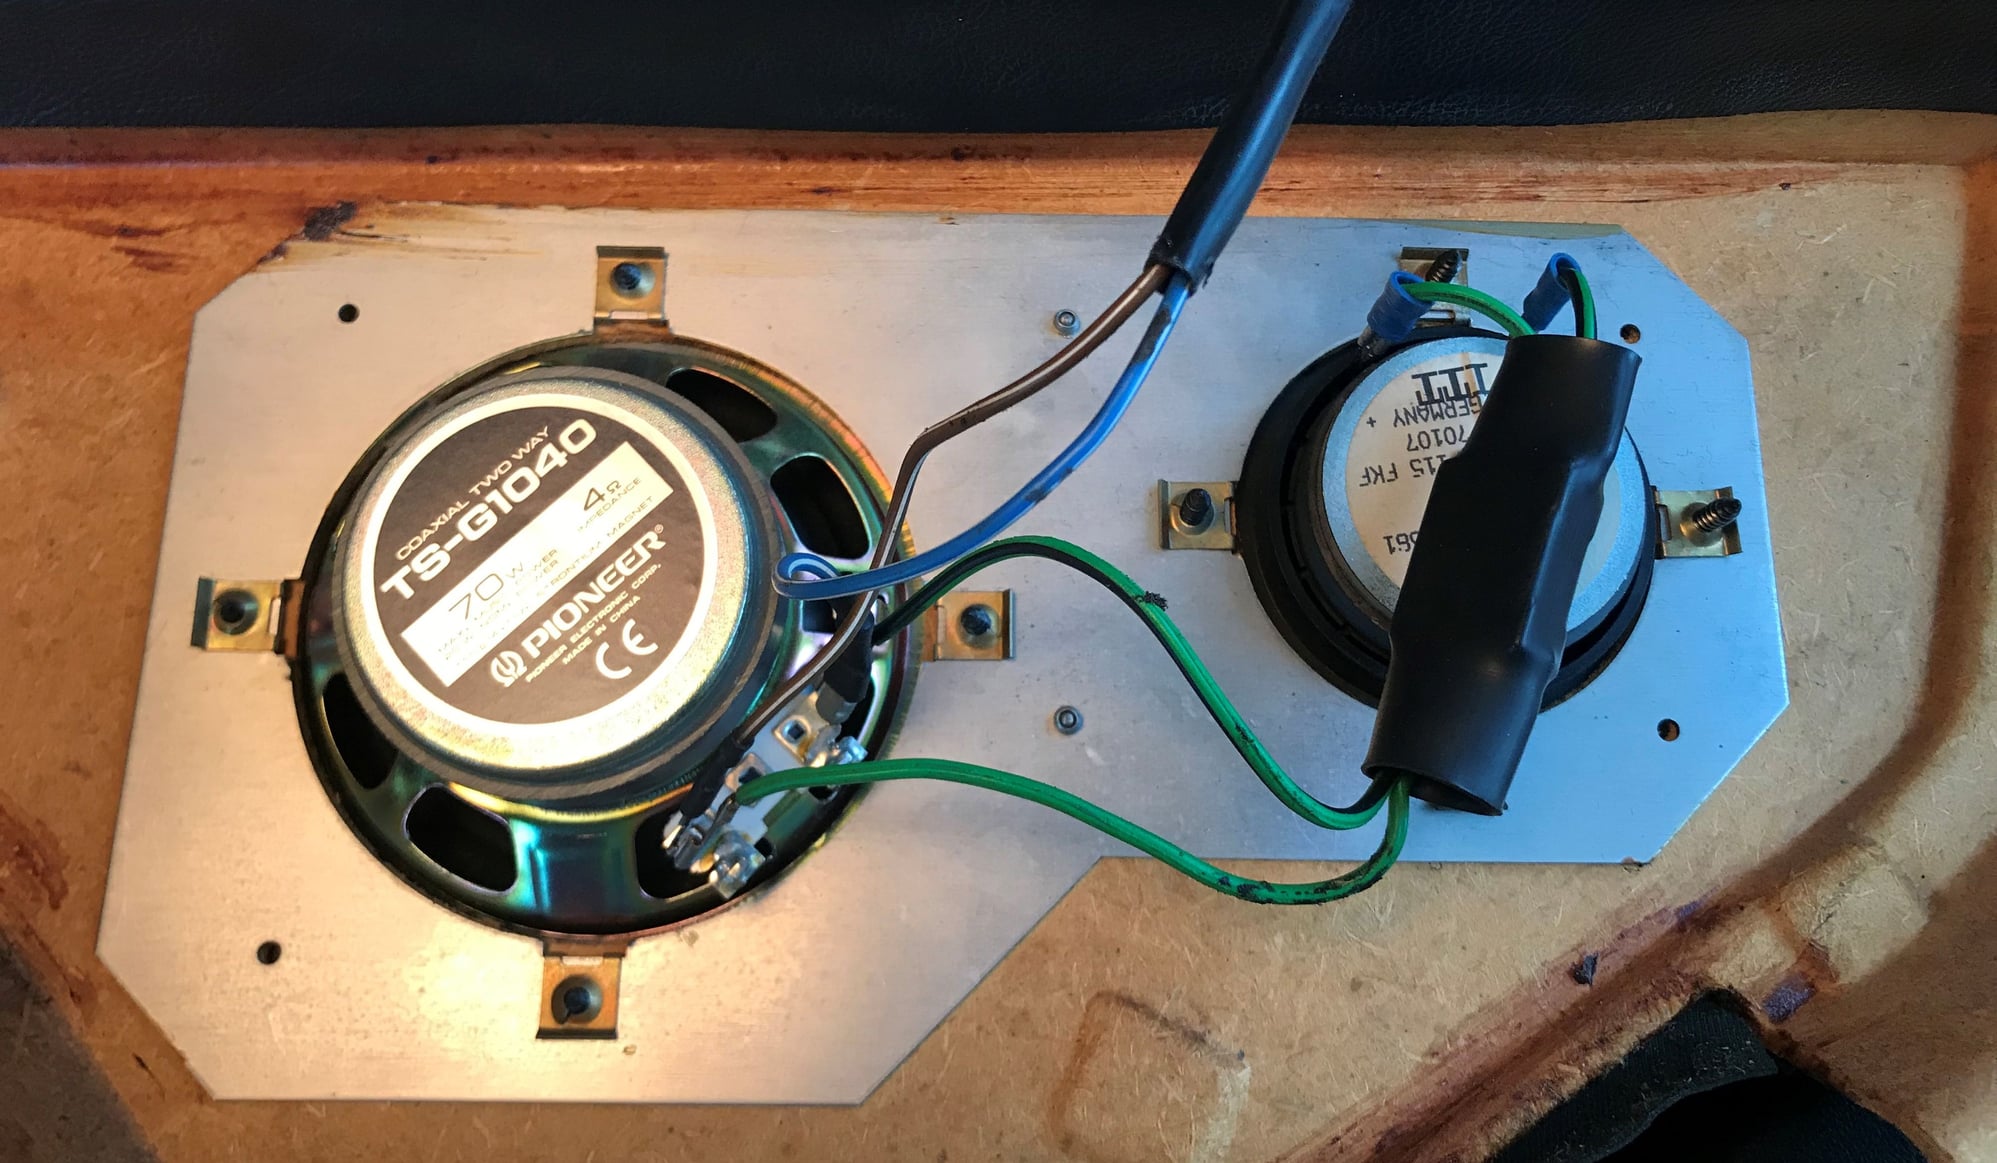
Don’t pull the panel all the way off: you need to disconnect the speakers from the wiring harness first:
Last thing is to pull the wiring harness through the gap on the left, and it’s free:
.
What I found is that none of my doors had the vapor barrier between door frame and door panel: both were missing. Later on in the write up you’ll see some parts that show signs of moisture, so I will definitely make some new barriers when I put everything back together!
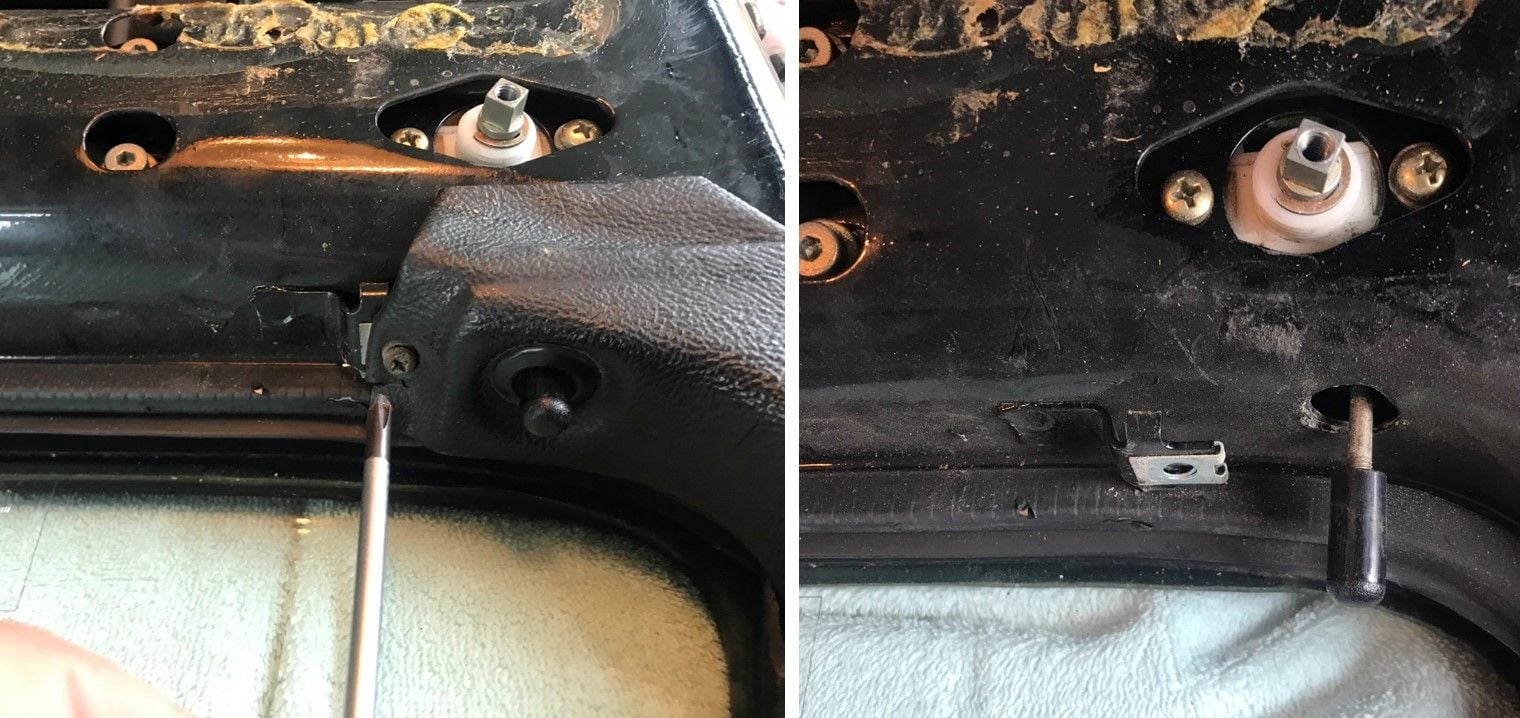
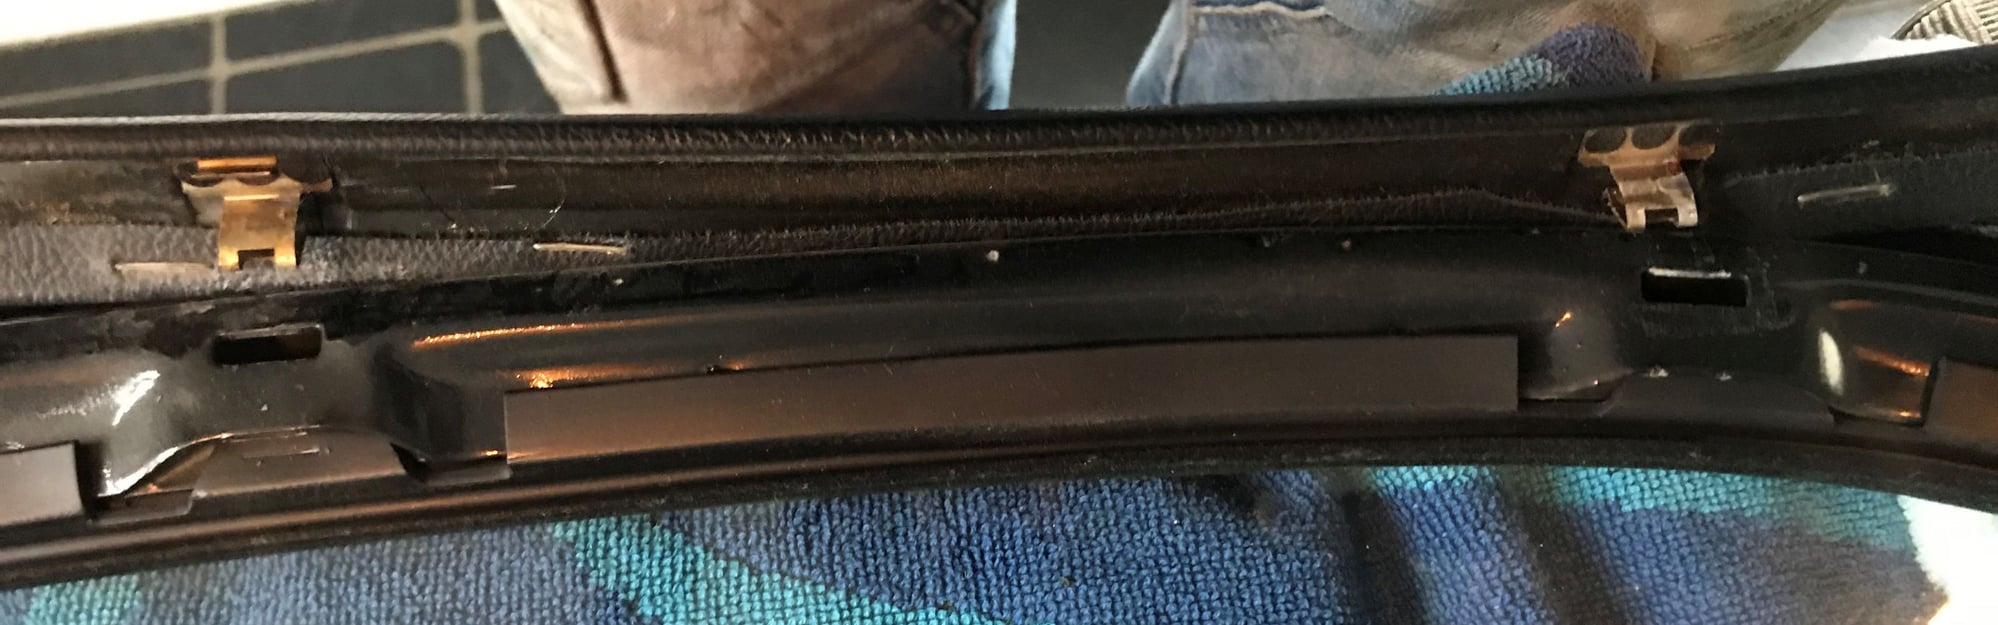
The inner door frame lining is attached to the door frame with two screws, one on each side at the bottom of the door frame:
Strangely enough on the passenger’s side door the second screw wasn’t there, and has never been there! After taking the screws out I removed the door seal to be able to stick a plastic tool between the door frame and the lining. At some stage the door seal must have come a bit loose, as sealant was used to have it stick to the door… I used an angled plastic tool from the outside in to pop the lining from the door frame. I started at one end and moved to the middle, and then did the same thing from the other side leaving the two middle clips on the top for last:
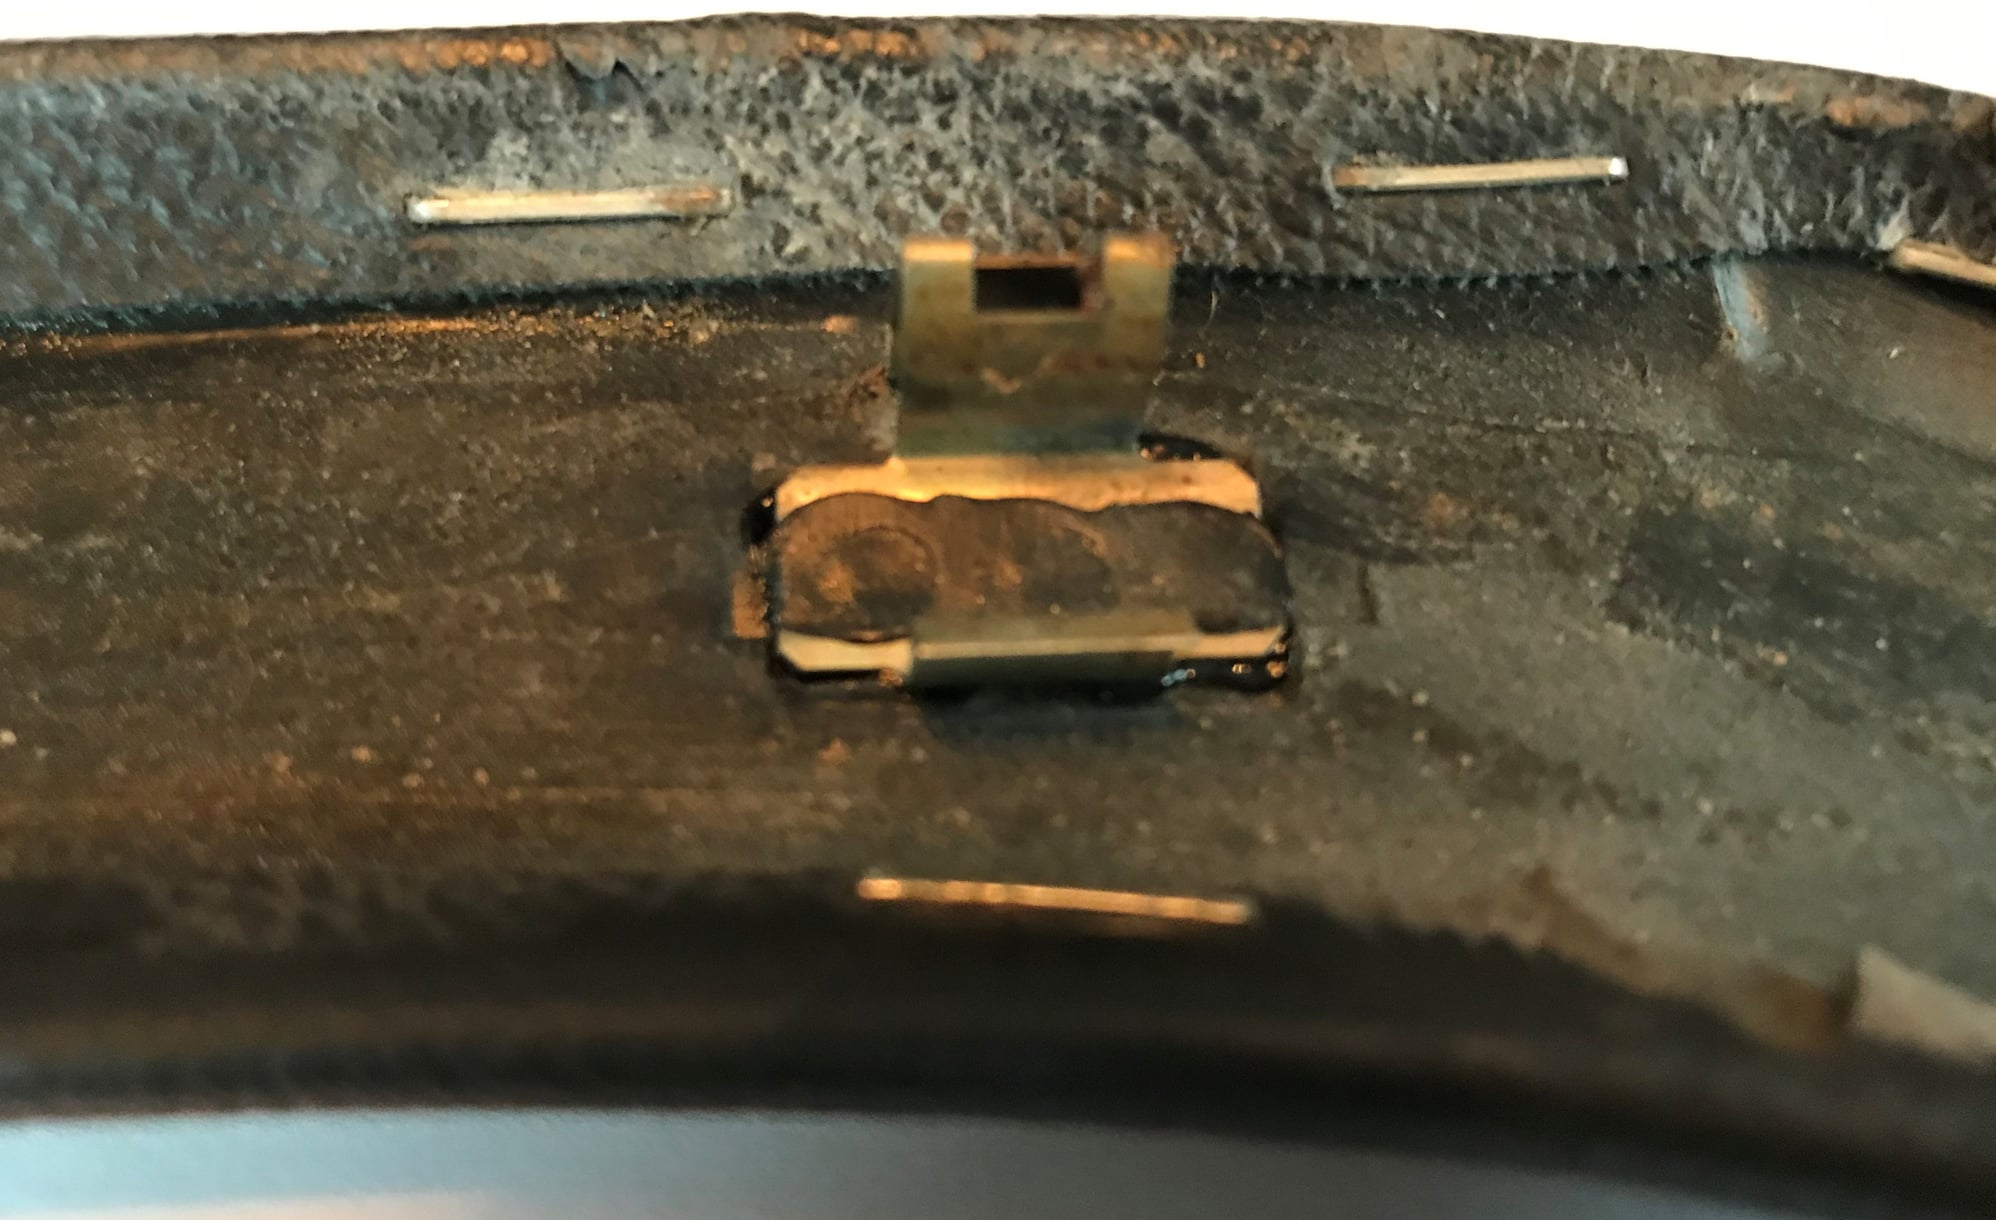
Unfortunately the metal clips are attached through (what seems to be) molten plastic from the frame itself. That has become a bit brittle after all these years, so not uncommon for them to snap off. I had one snap off on each side; luckily I could glue them back on:
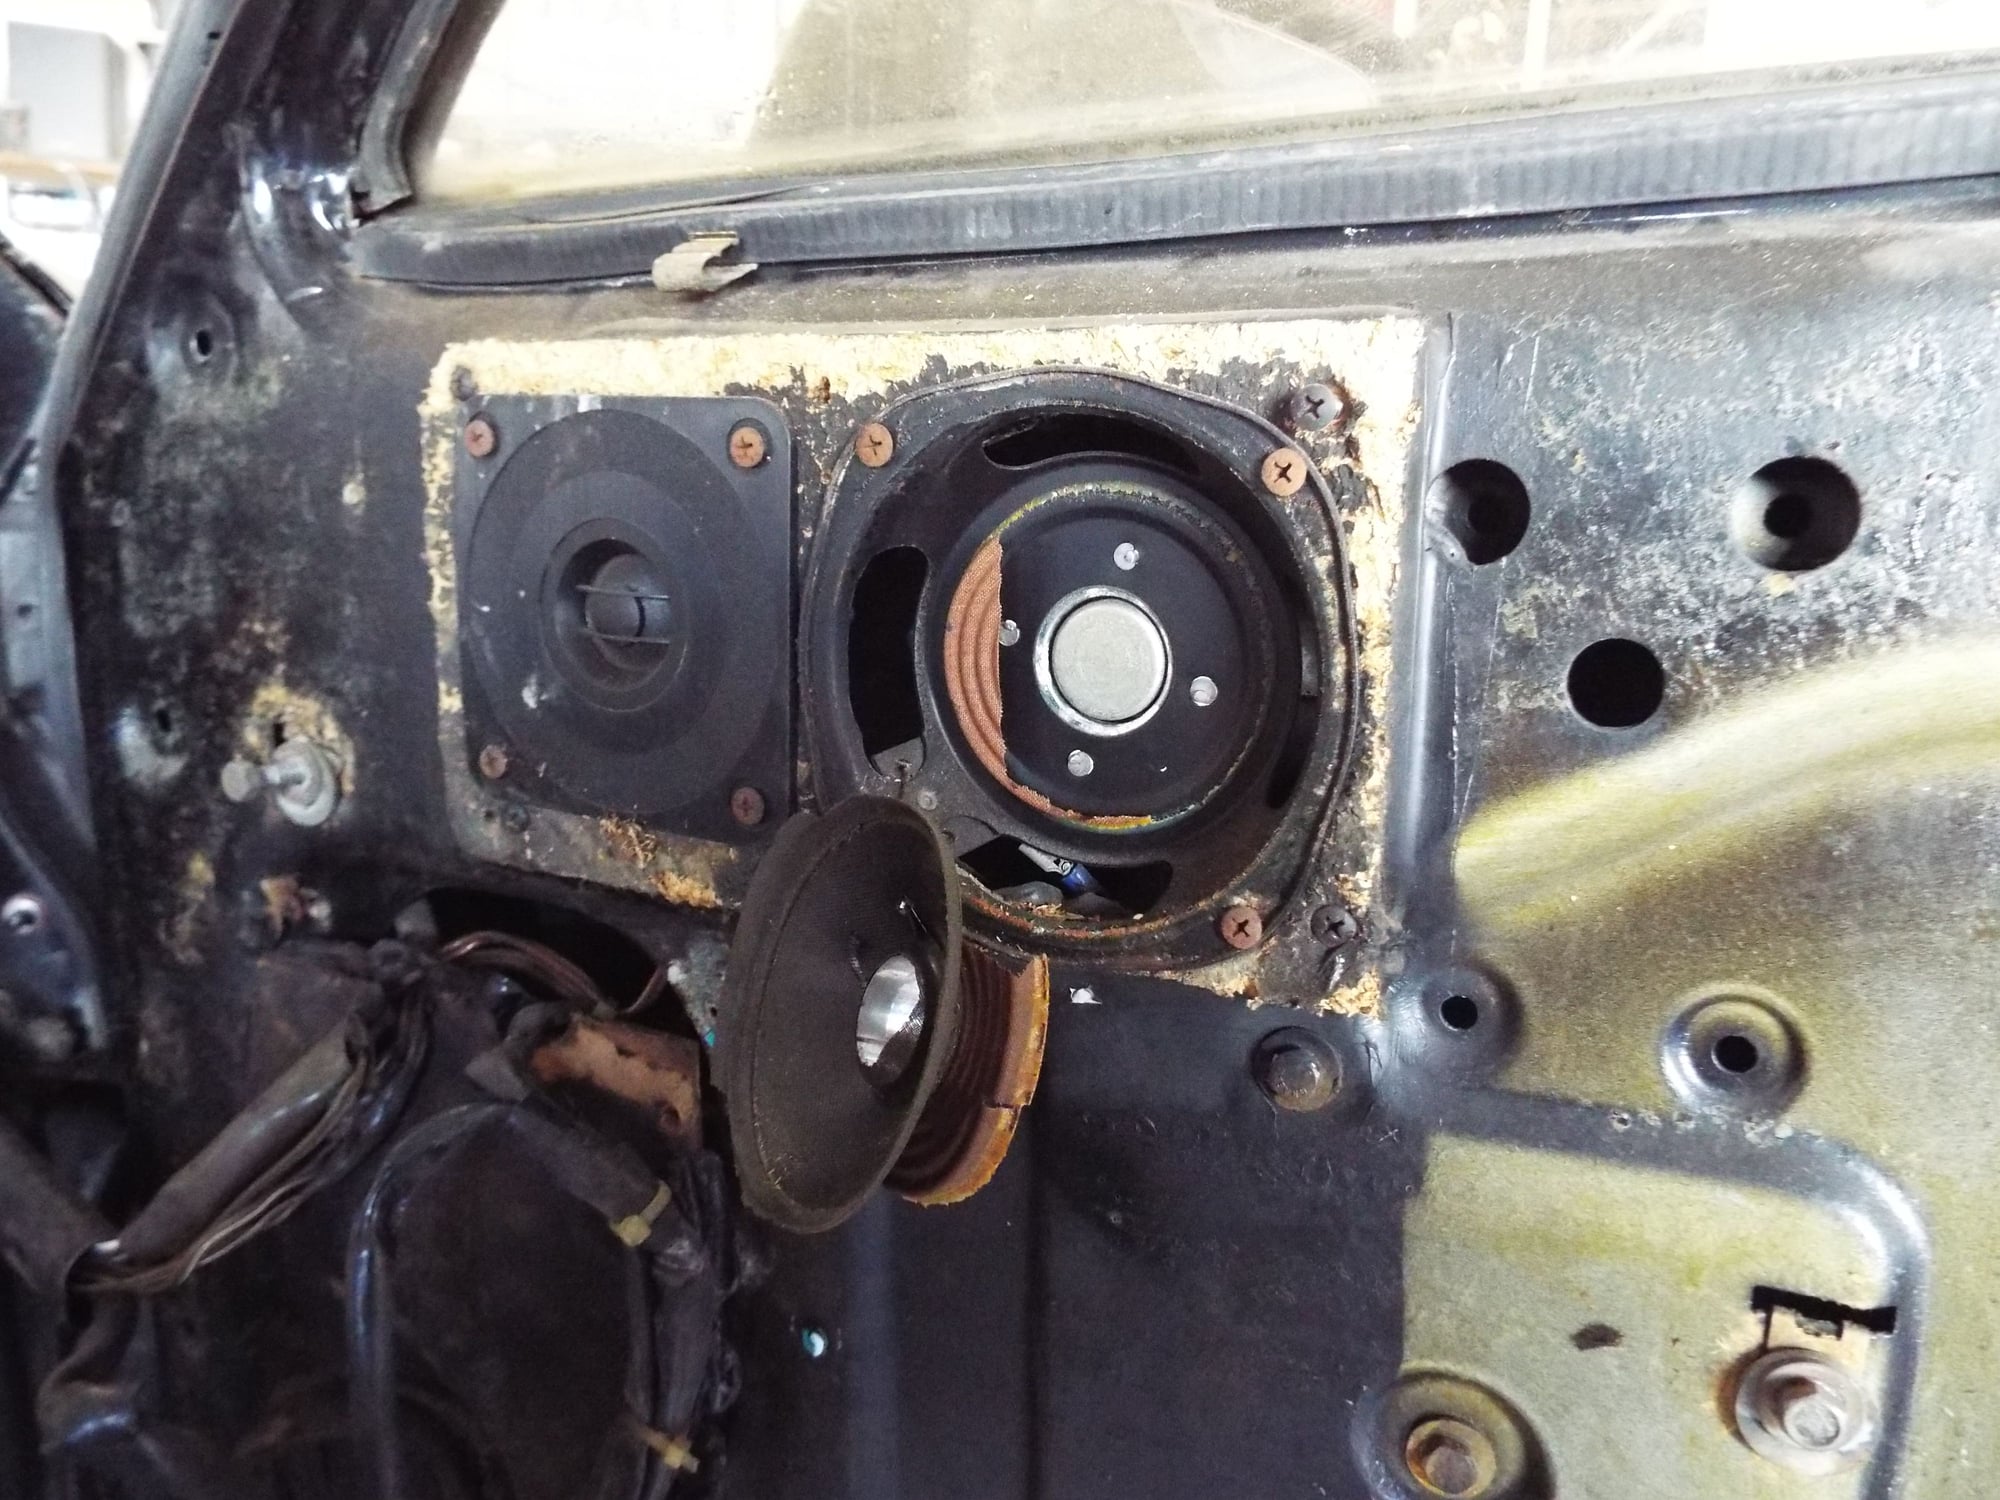
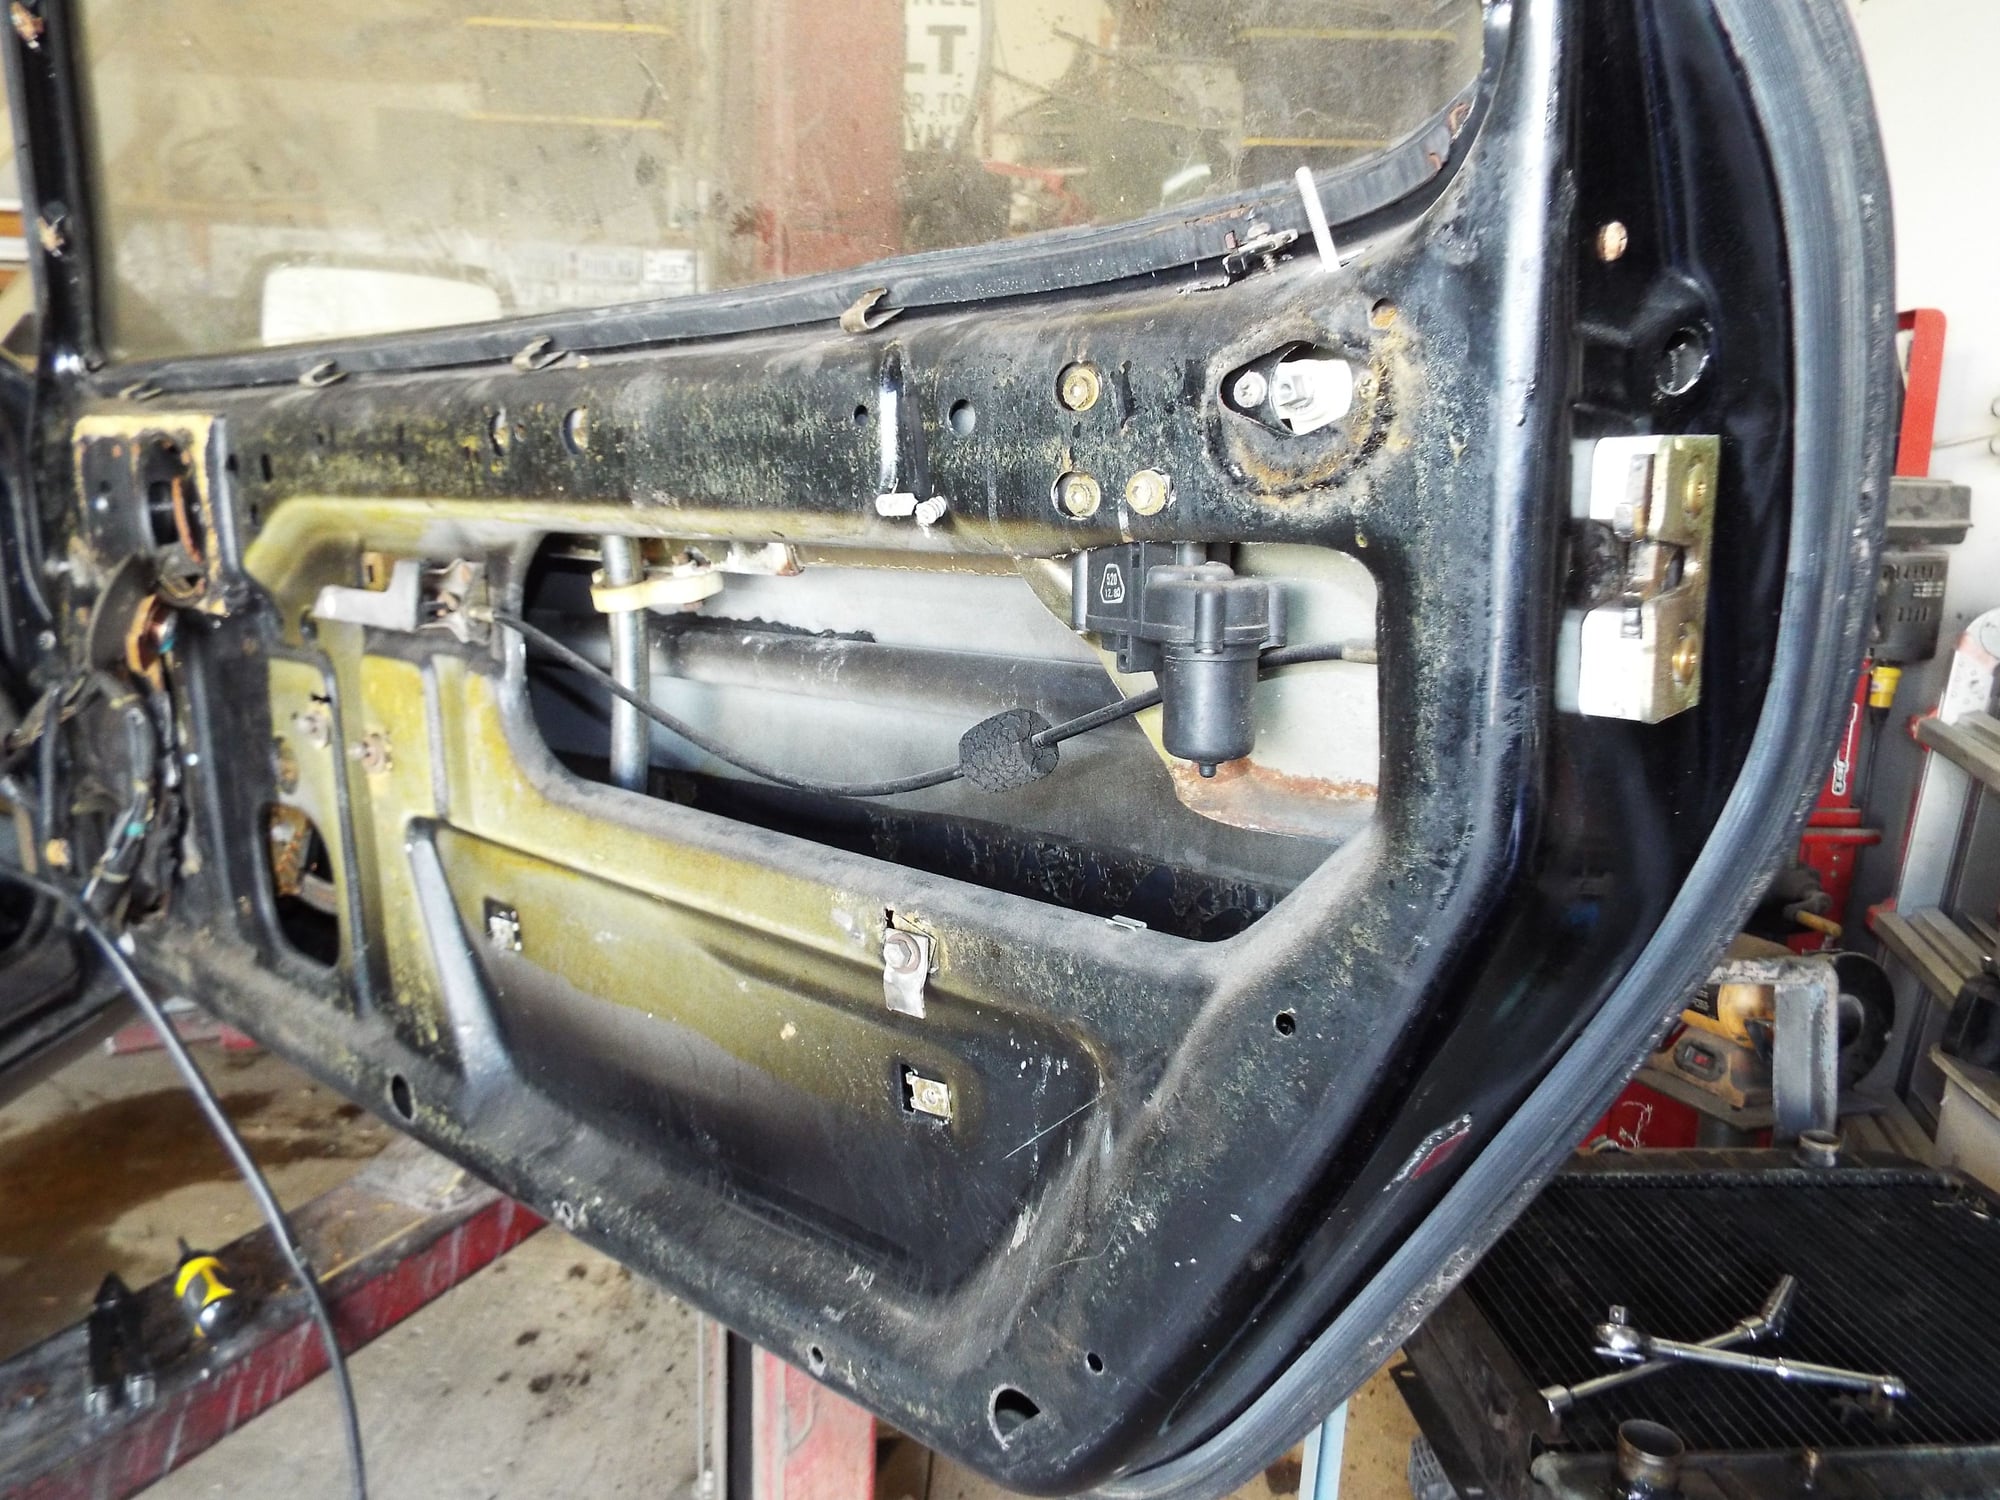
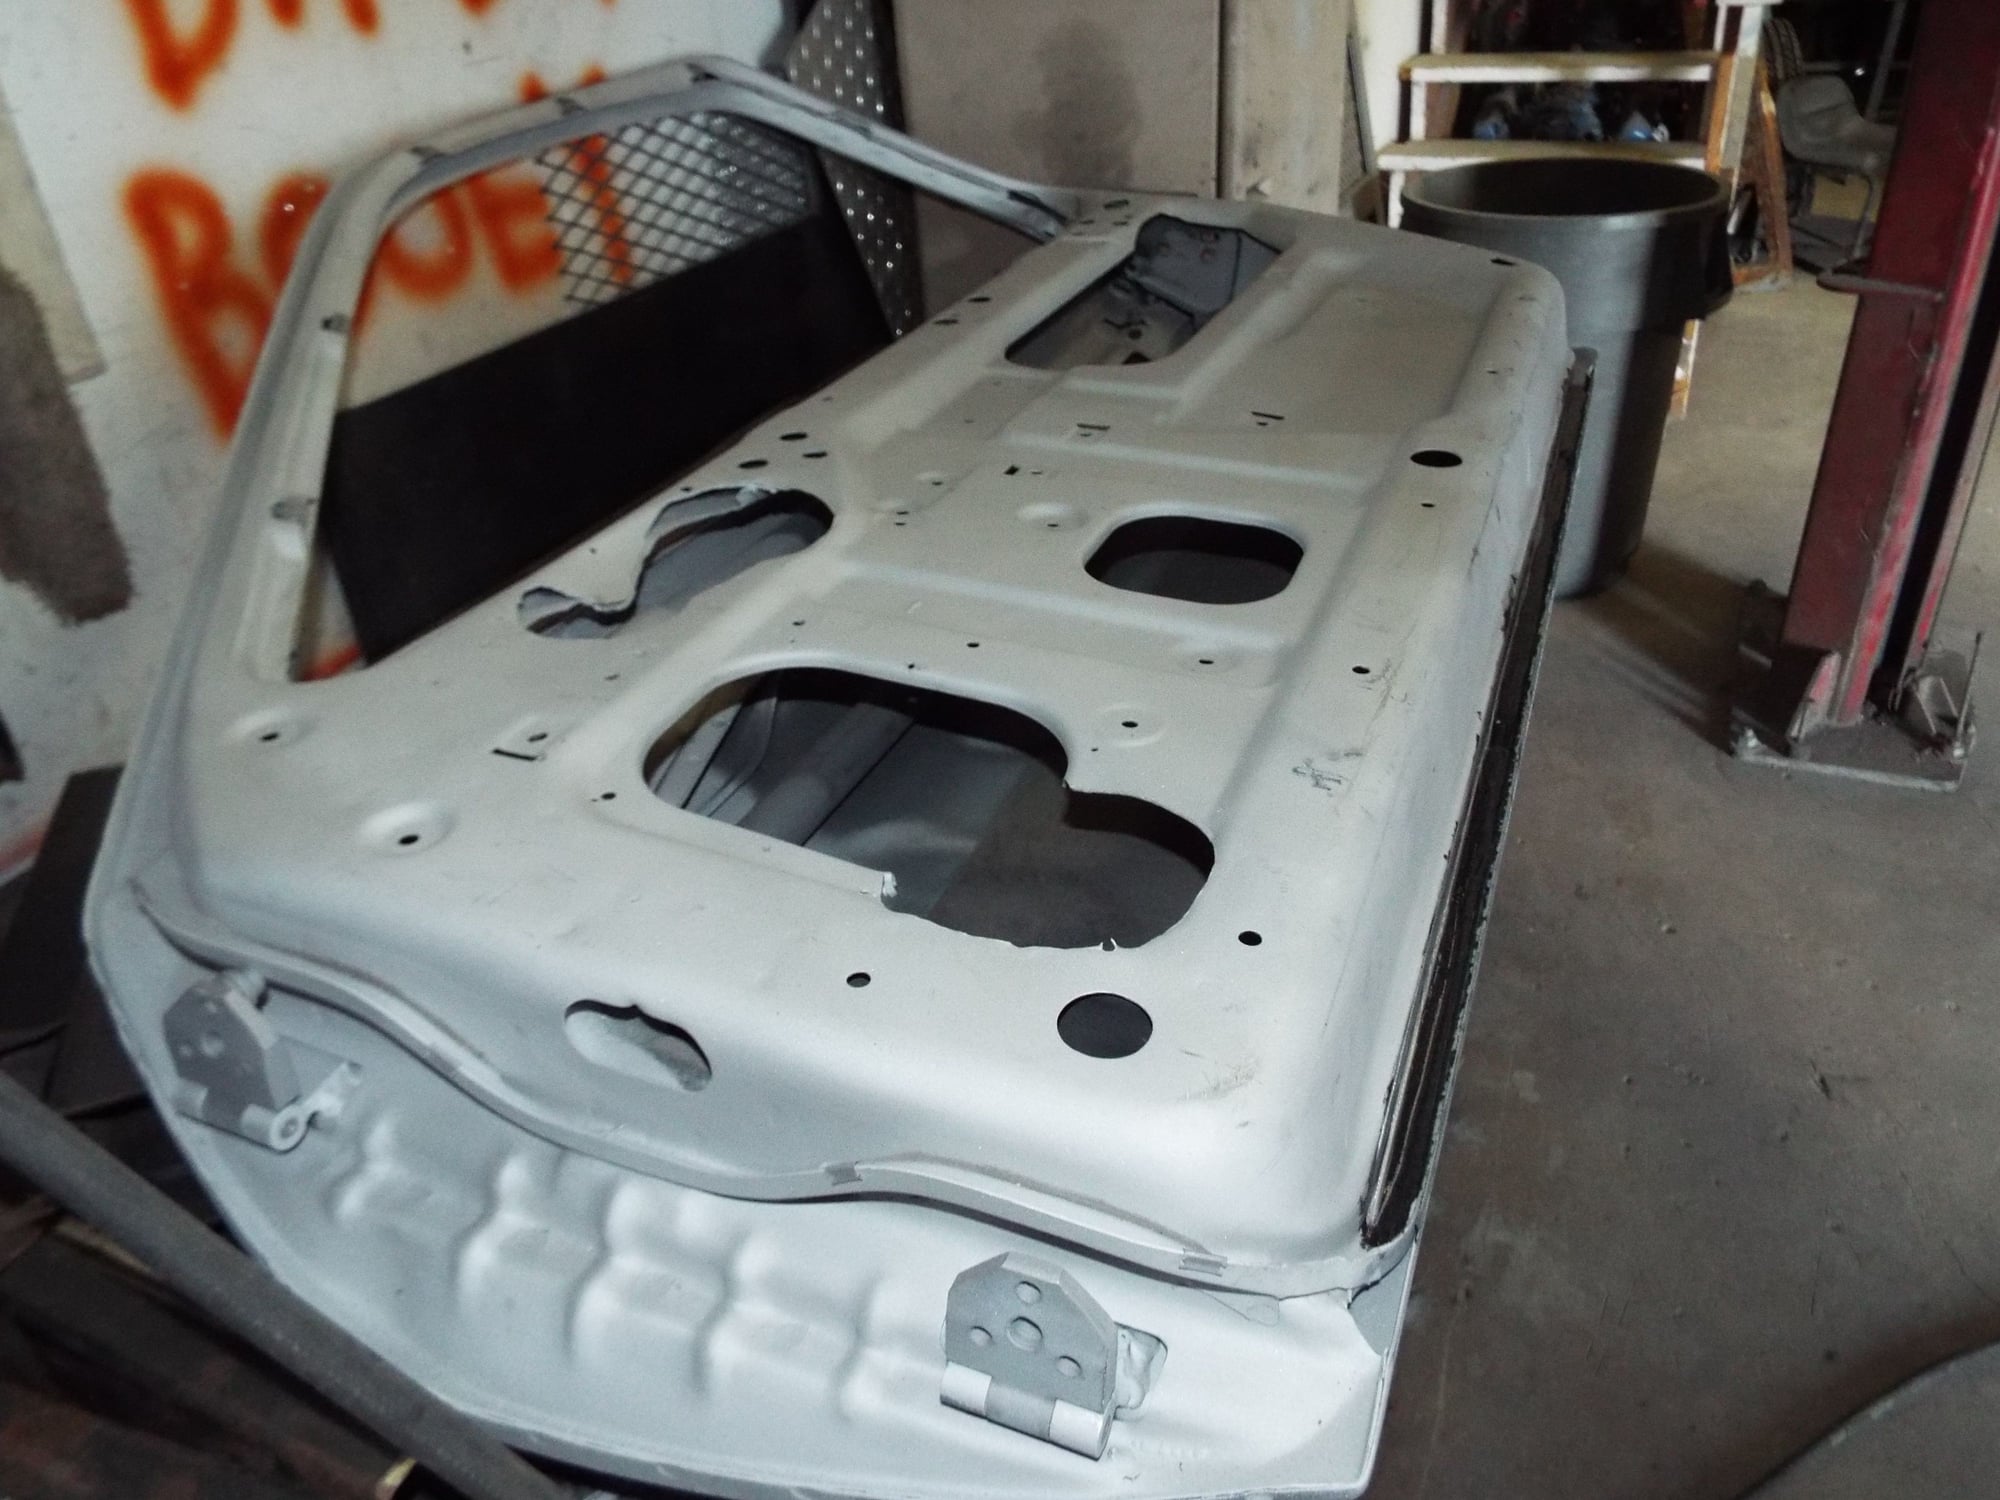
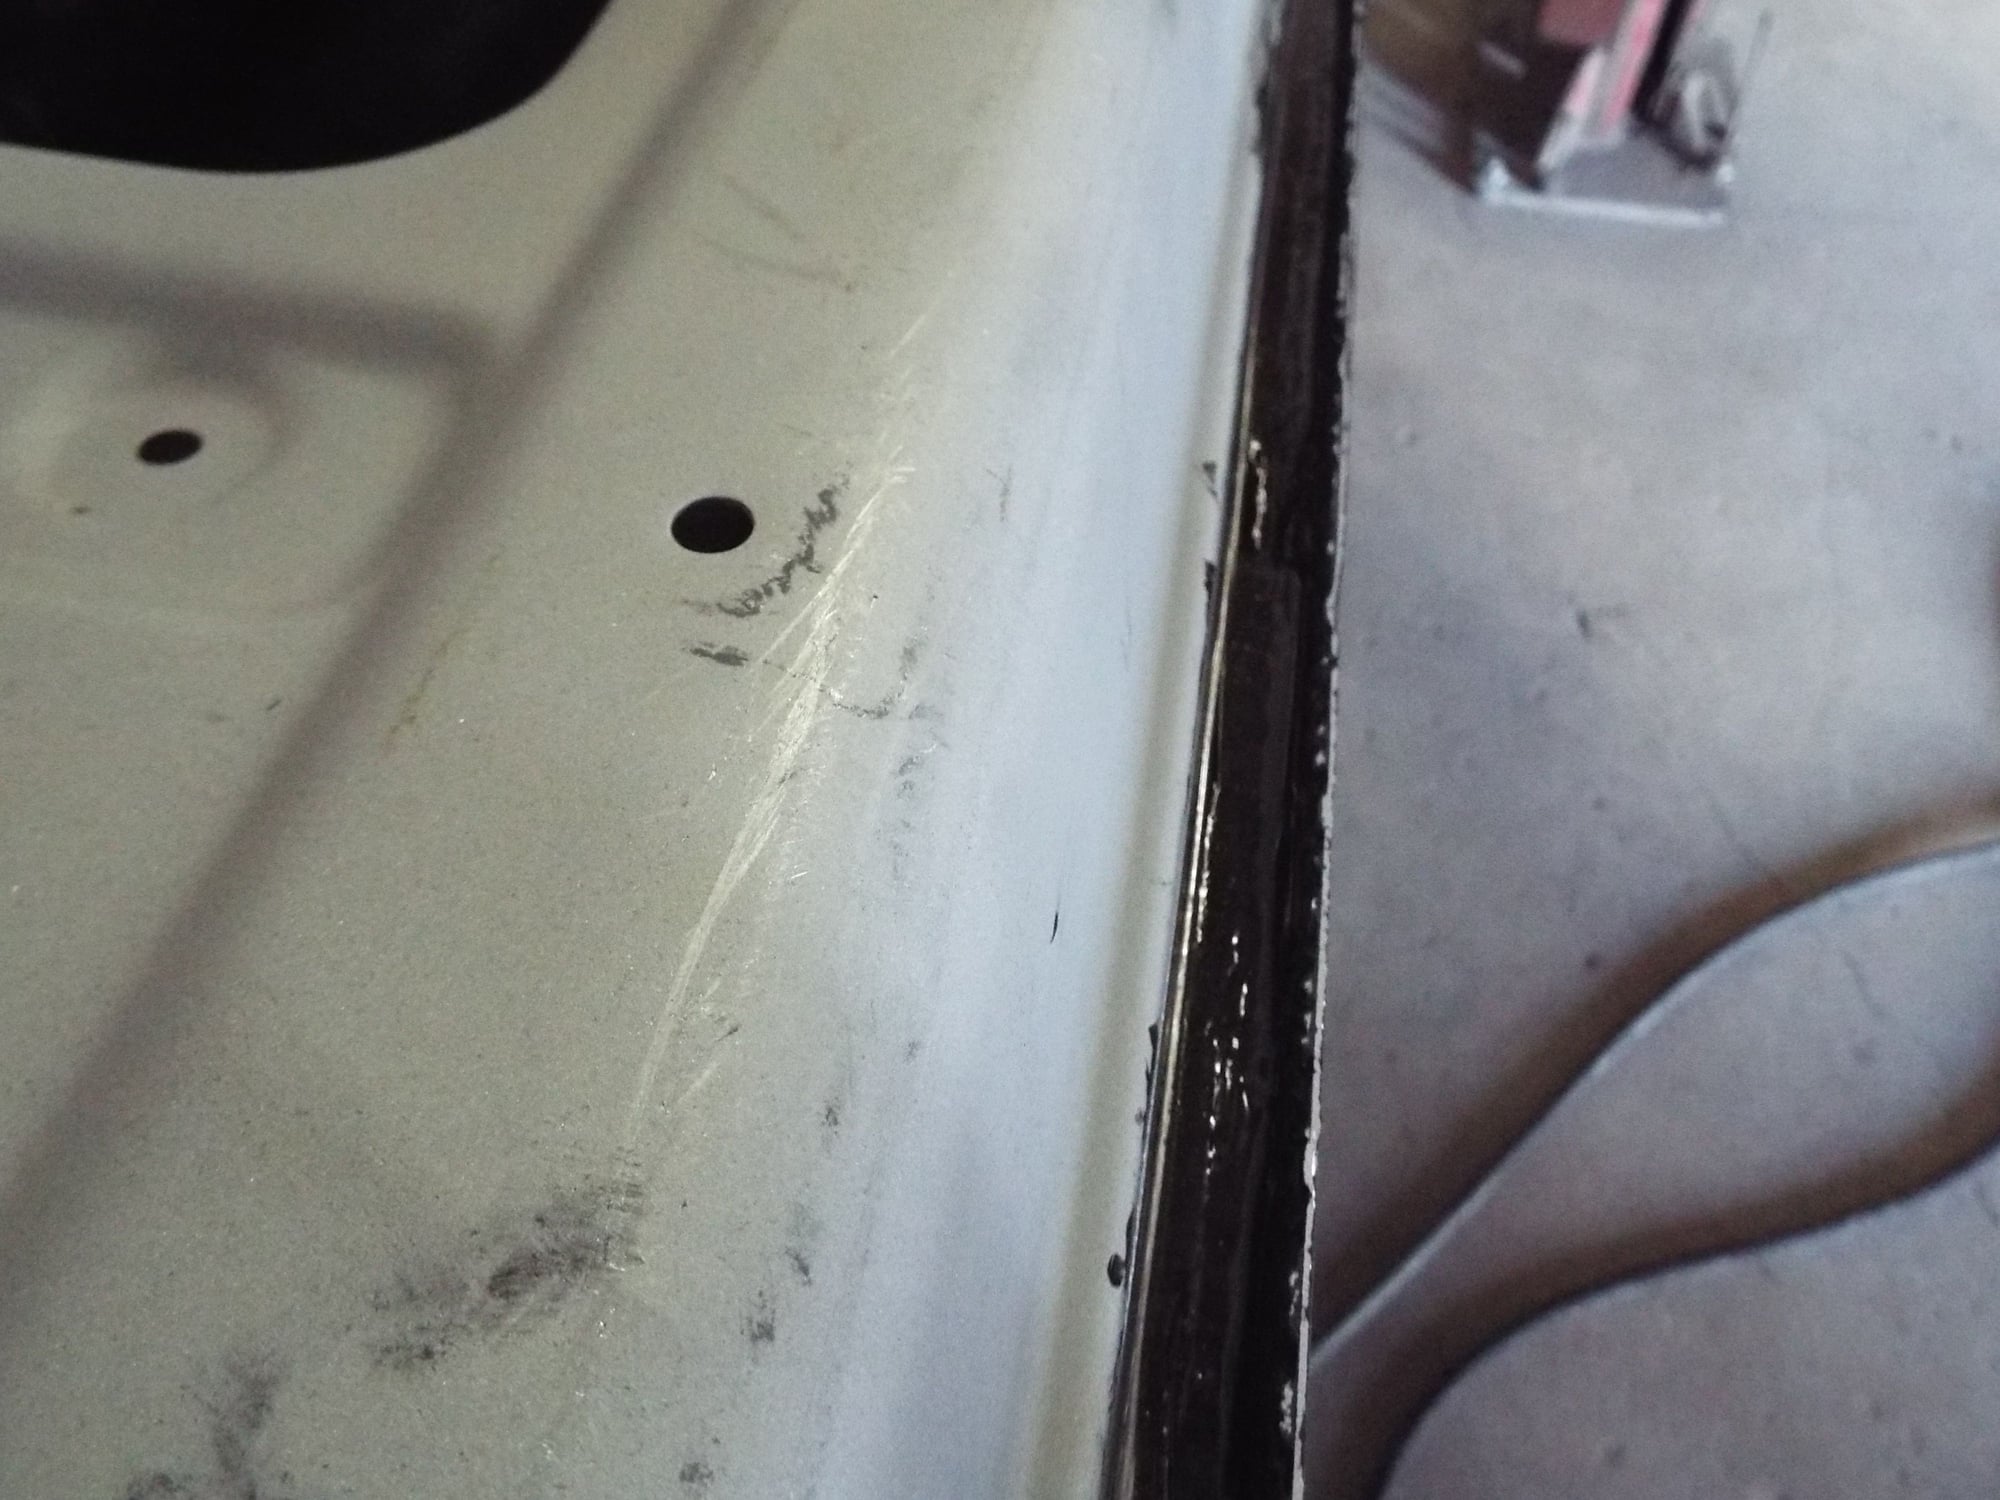
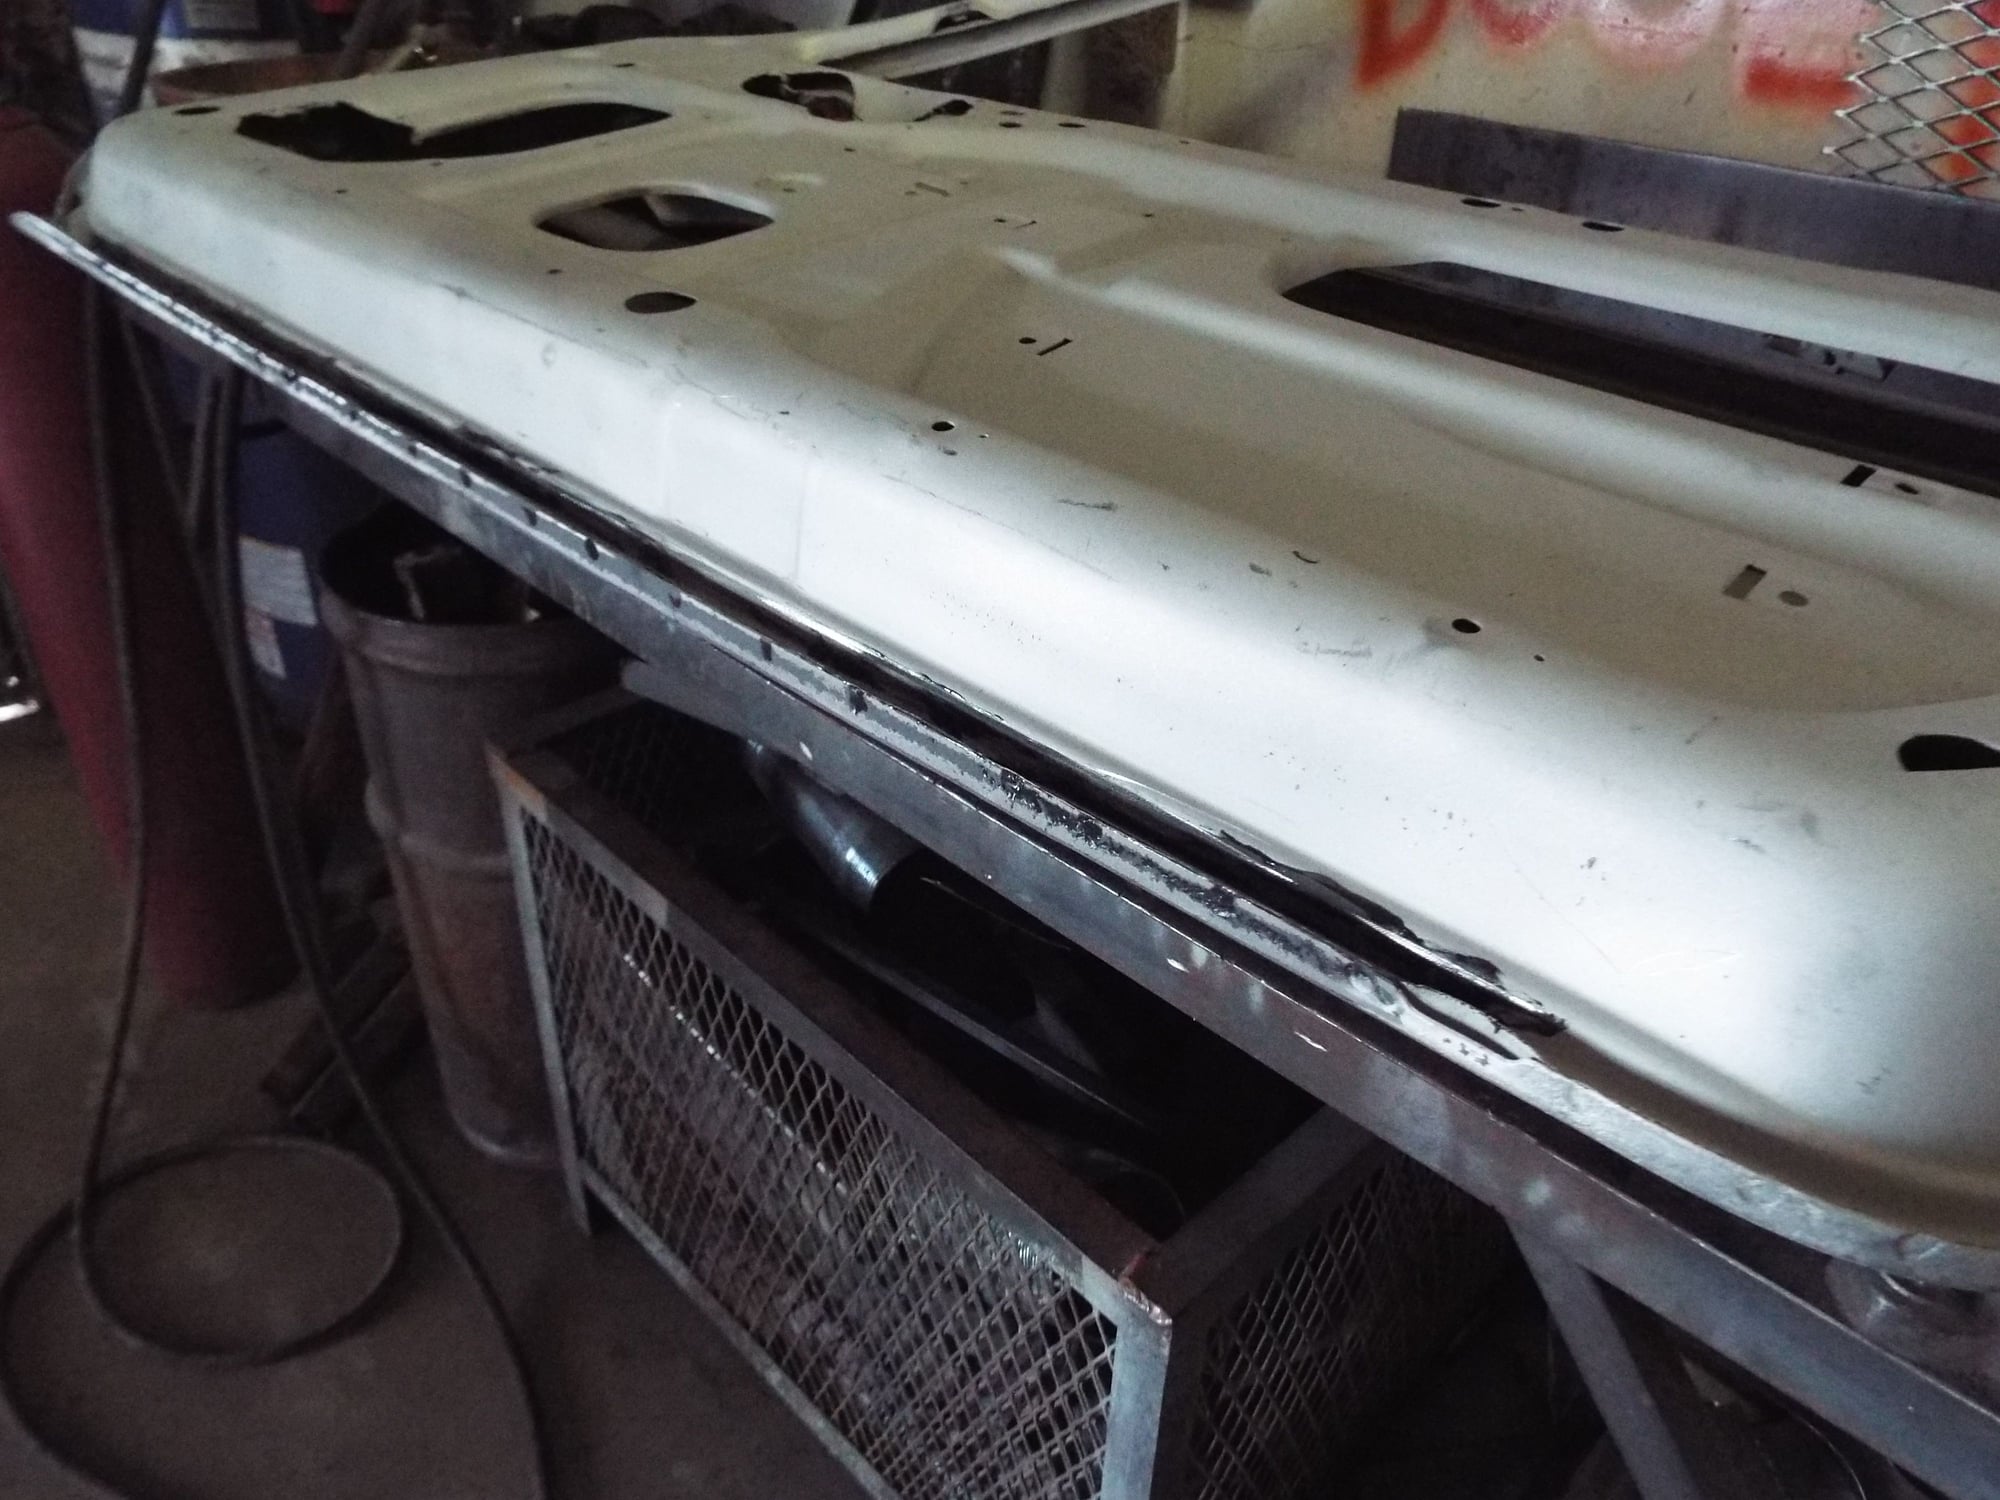
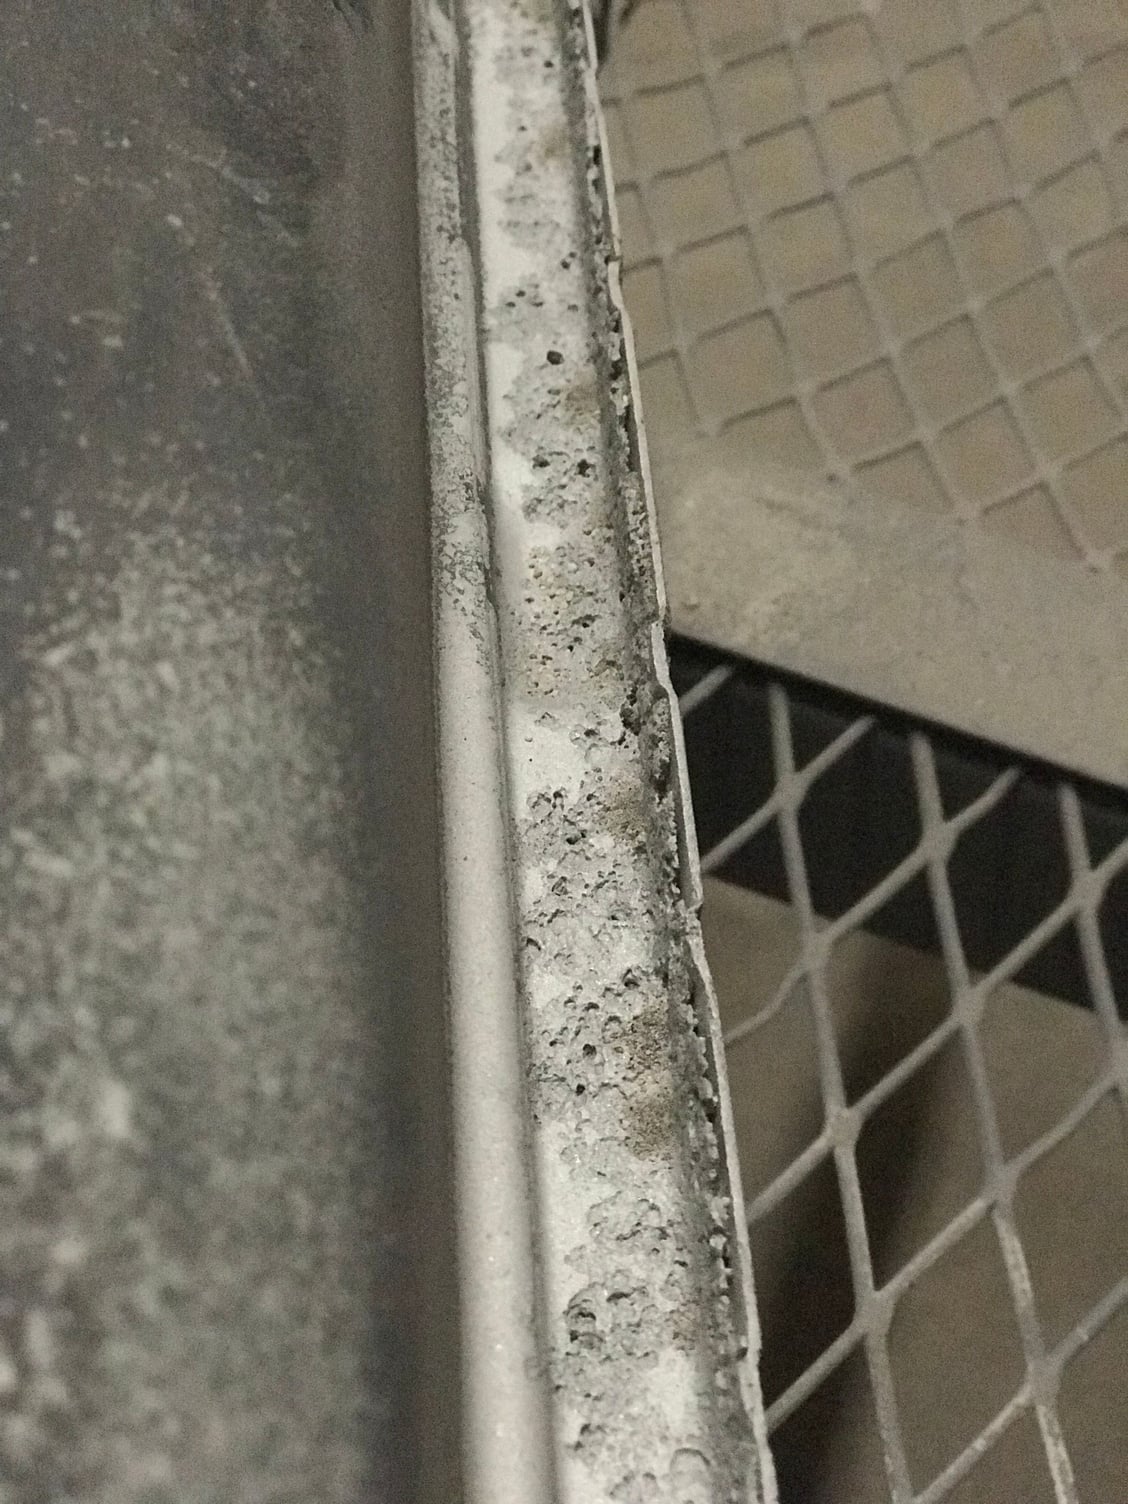
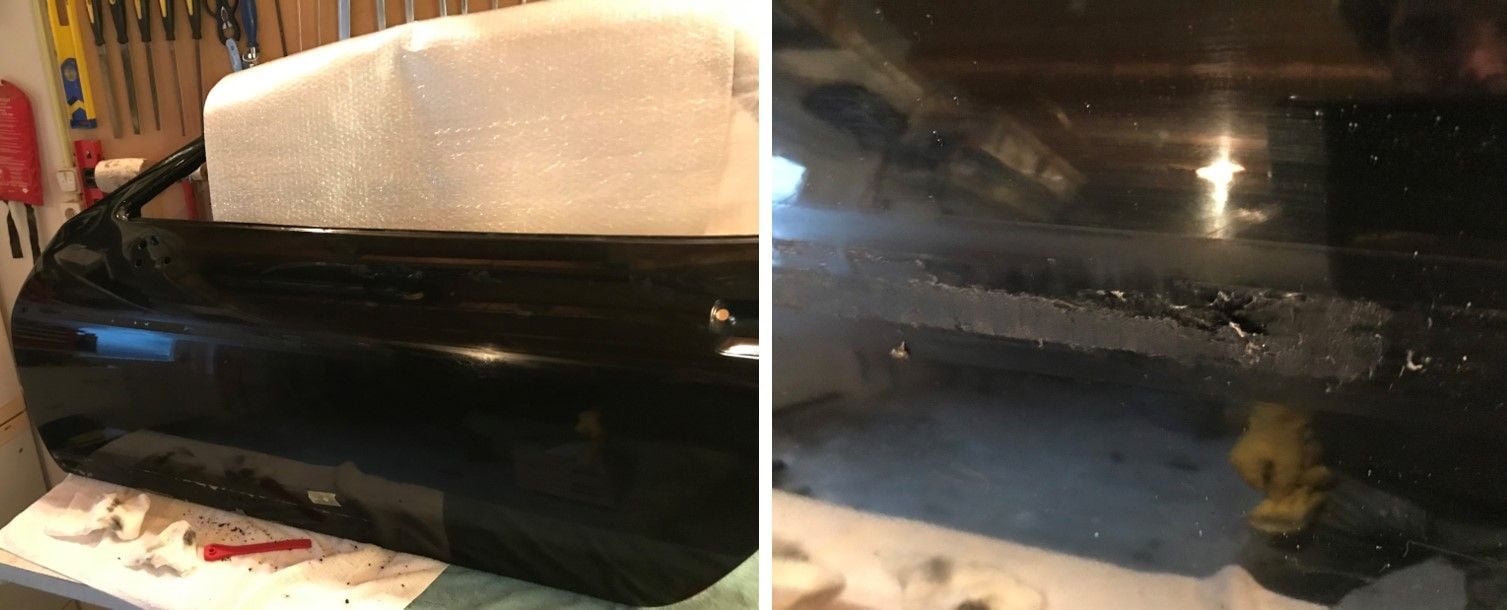
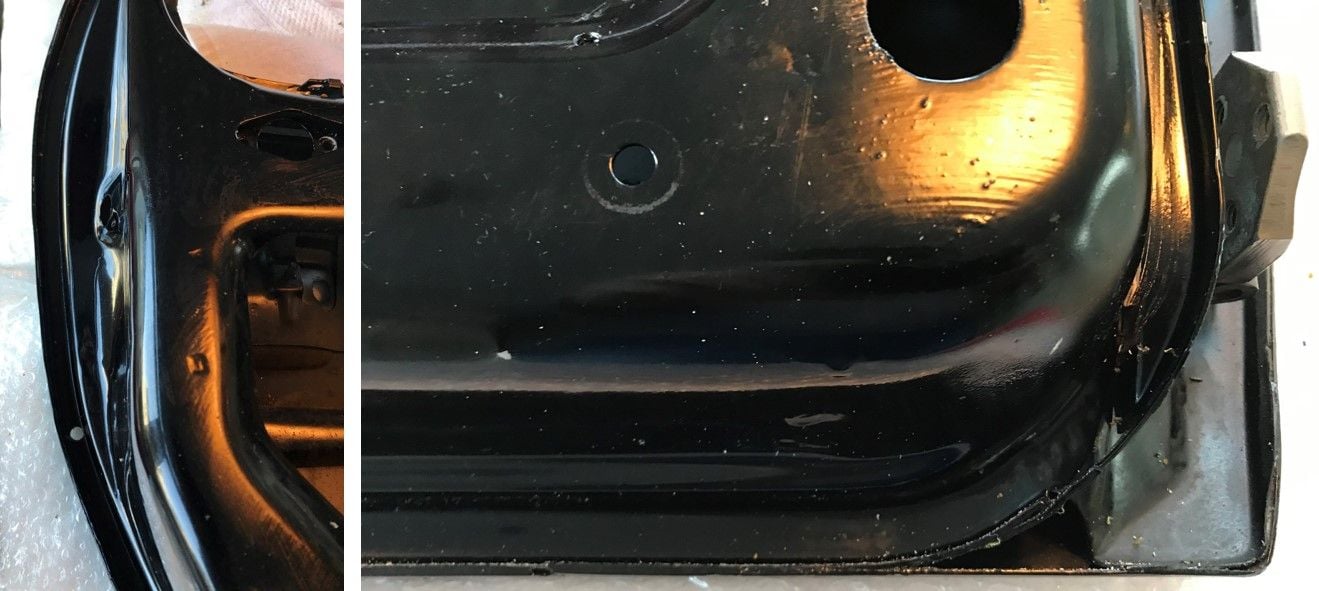
Wonderful pics and the added enhancements of the detail and arrows pointing to this or that item, accompanied by the factory charts - brilliant! Here's a couple pics of my '81 Doors which I completely gutted, media blasted, epoxy primed, welded the Rub Strips holes up, and, the main reason I am adding to this fine thread (only because I feel the information I have will add to the users experience). Media blasting these doors will usually find the corrosion. Especially northern cars used in the snow and salty roads. Aluminum will corrode. My door bottoms where the outer to inner shell was resistance welded together (spot welded) were compromised and the ONLY way to eradicate this corrosion was blasting, with a soft delicate media like plastic to punch out the rot exposing the areas to be repaired.
I did this internally, and used 3M Panel Bond #8115 to repair these door bottom areas. I'll try to find some photos to illustrate just what one must do to fully recondition these doors. Anyone who suggests any other method is being dishonest. Pics coming - switching computers, brb.
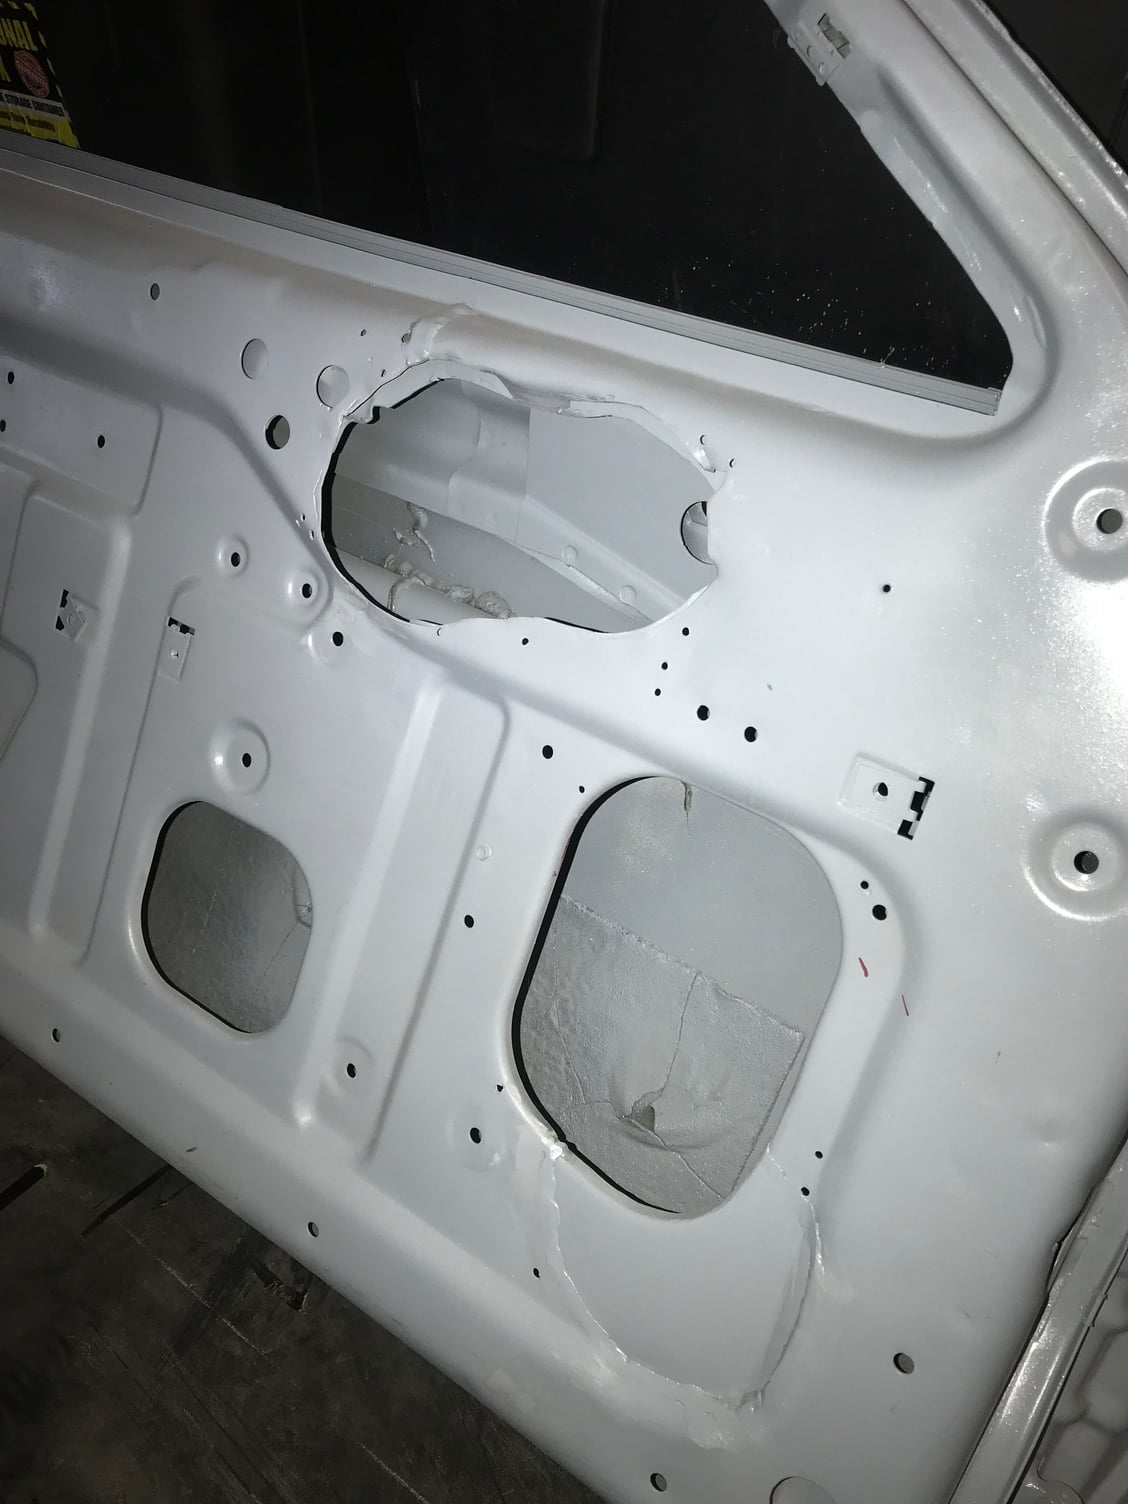
And on my '81 Doors I found massive hack jobs a P.O. undertook to install speakers. I also welded these gaping holes up back to a near-original condition. I don't care much for a sound system at this point of time, certainly BOSE or someone makes very small and big-sounding speakers to install vs. the crap back in the 80s/90s. Of course, crap is always a subjective term - I assign that work when the Doors are hacked up to benefit a speaker!
.
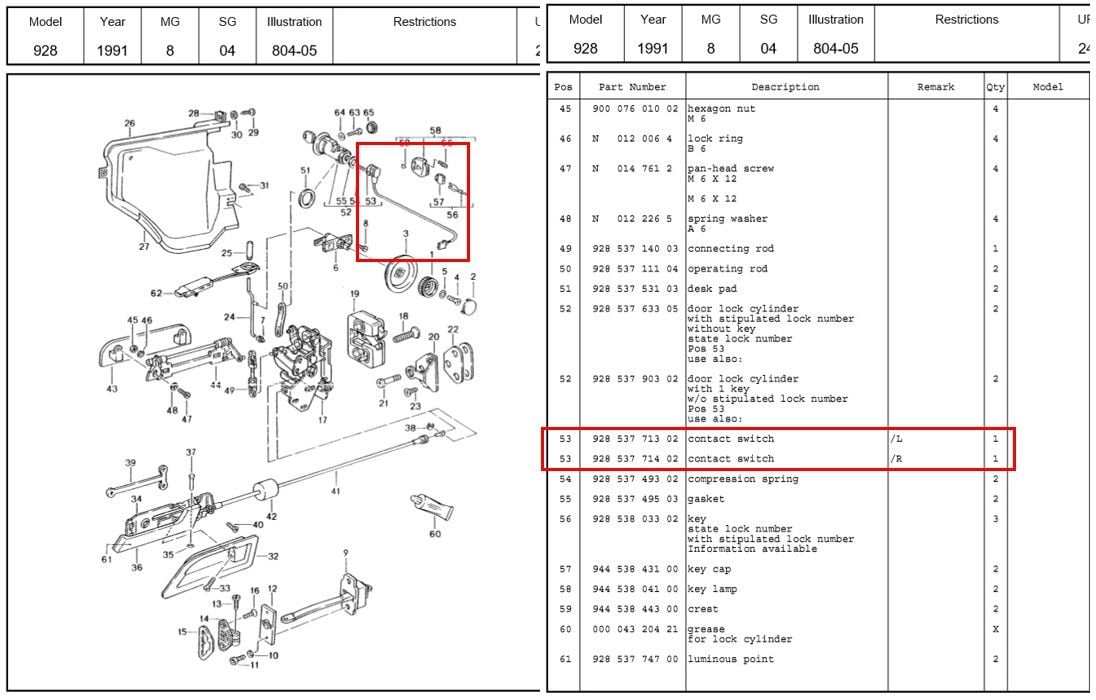
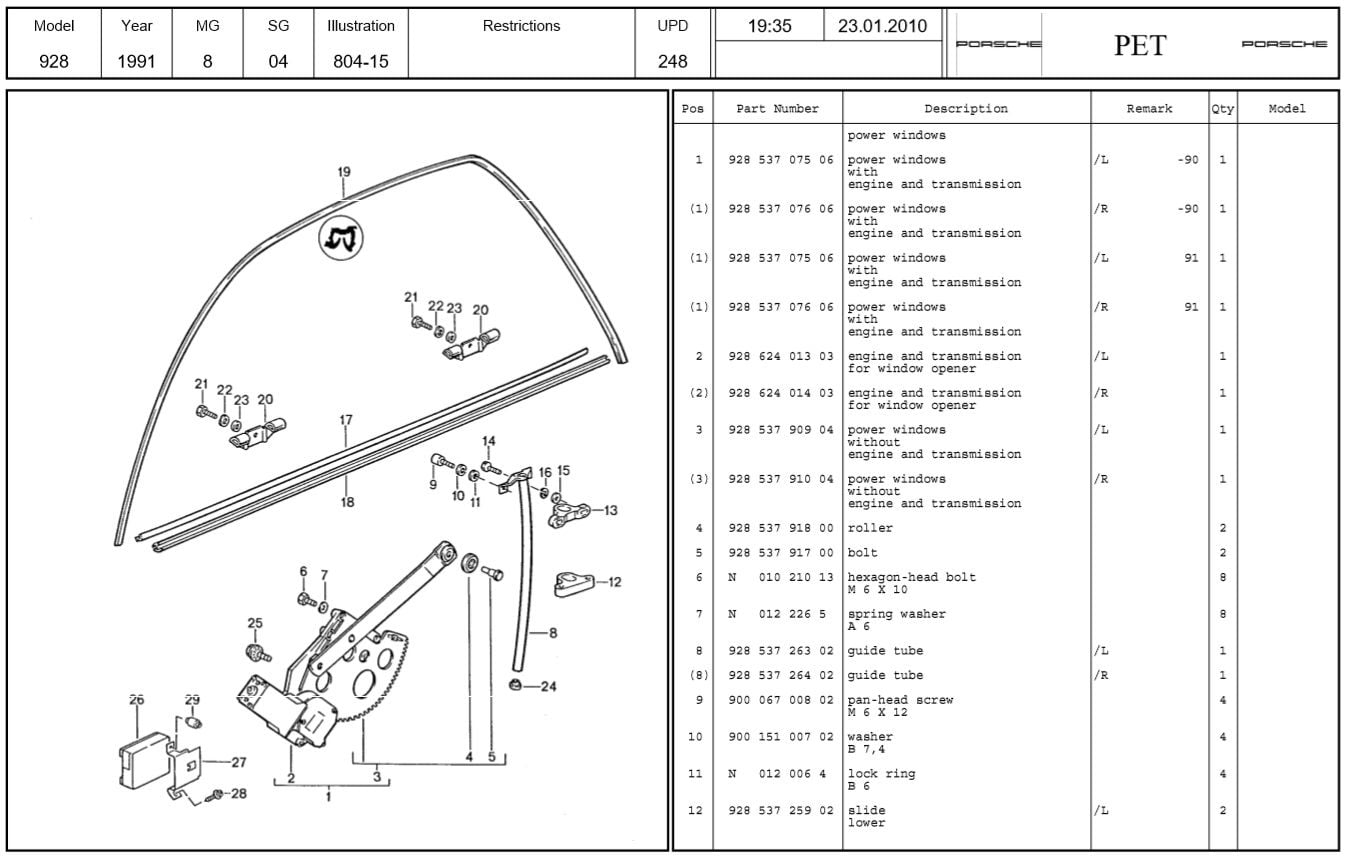
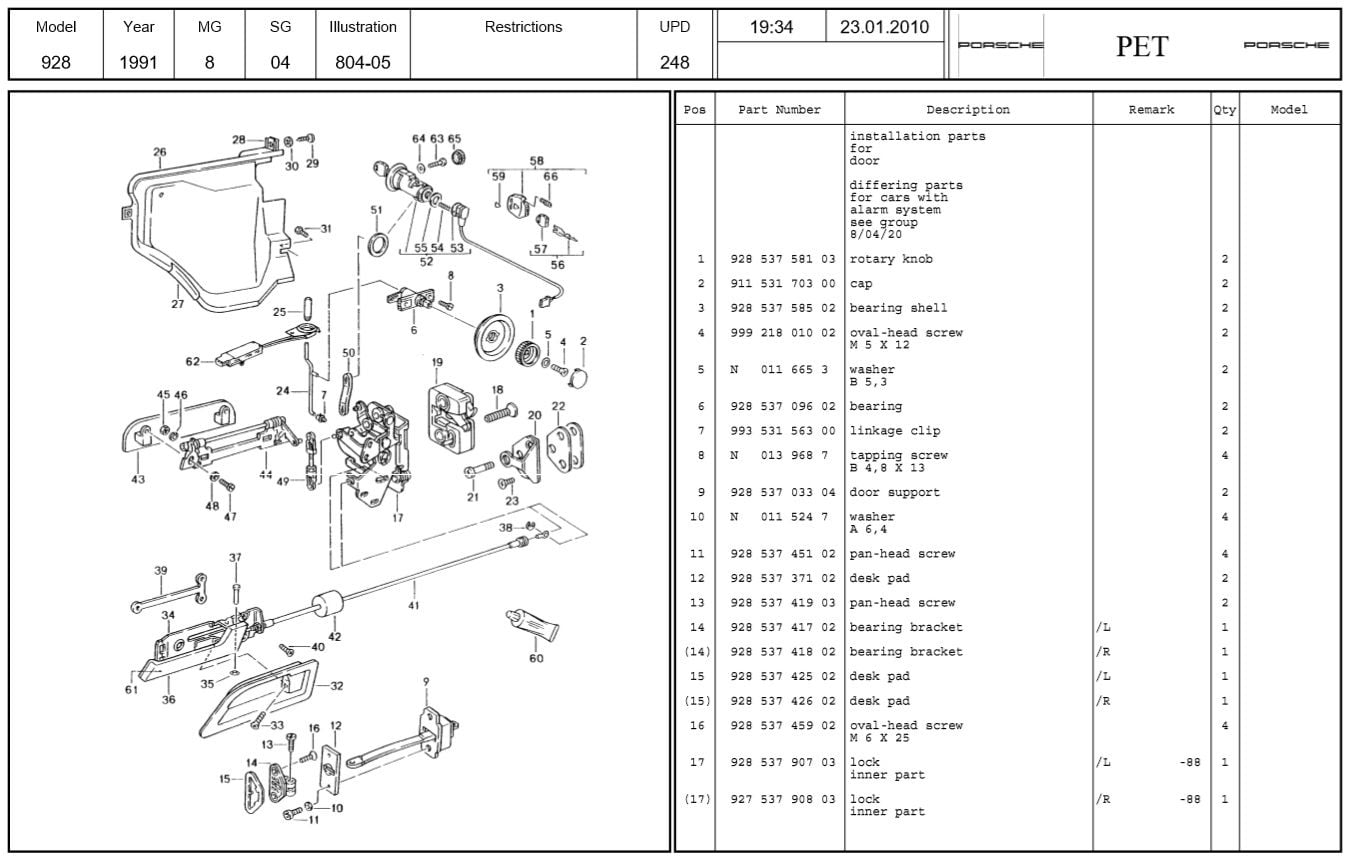
Ready for the next step. Below the relevant PET pages:
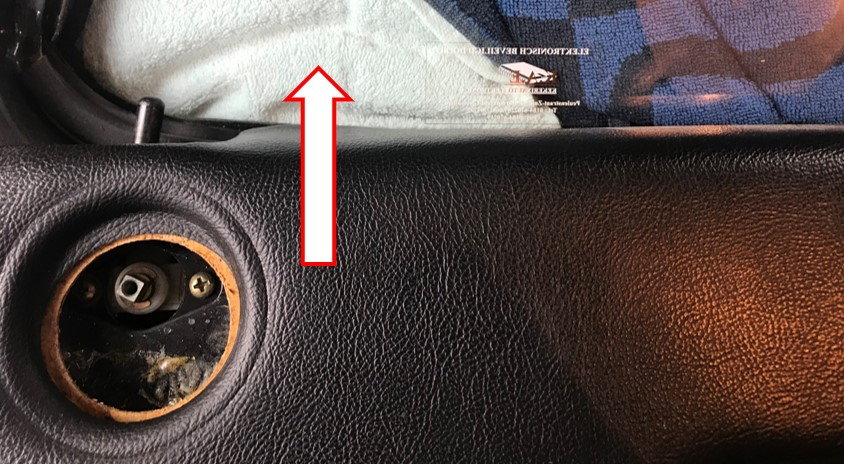
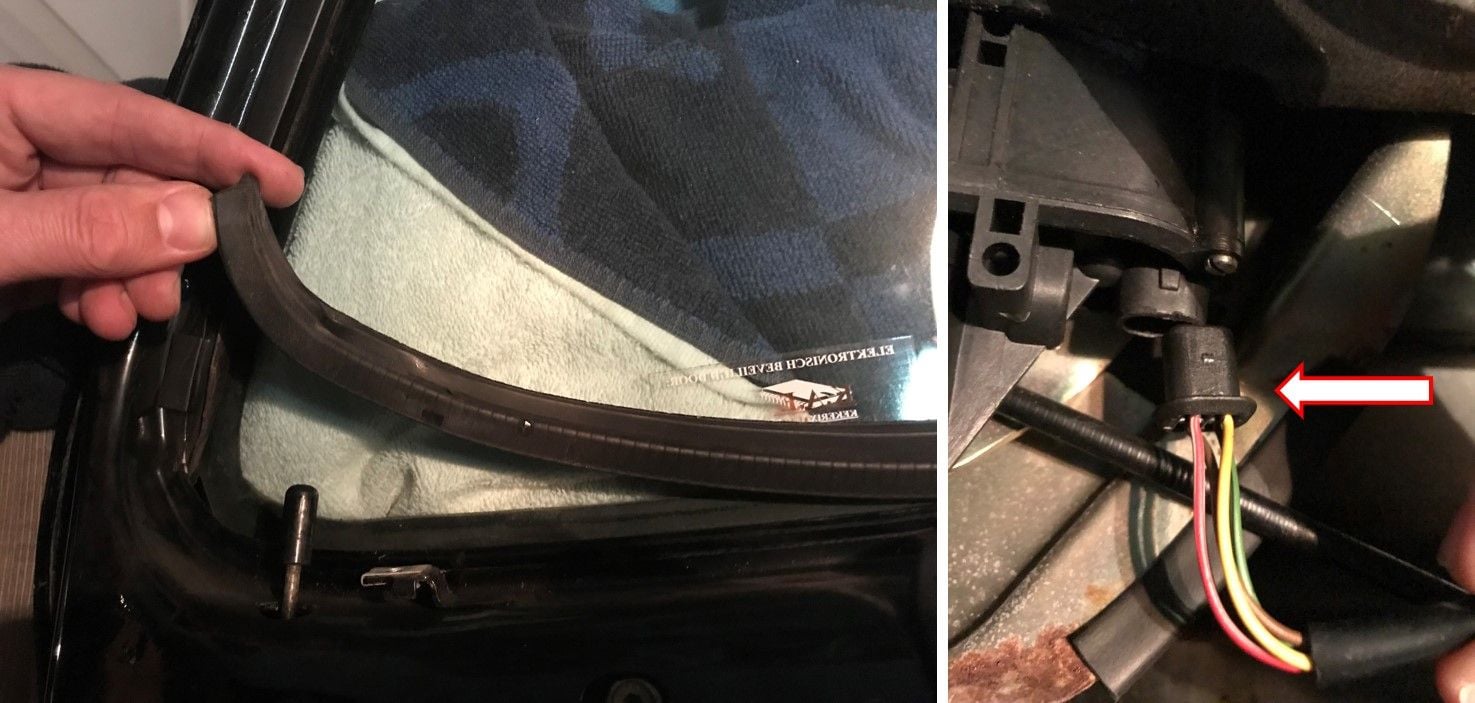
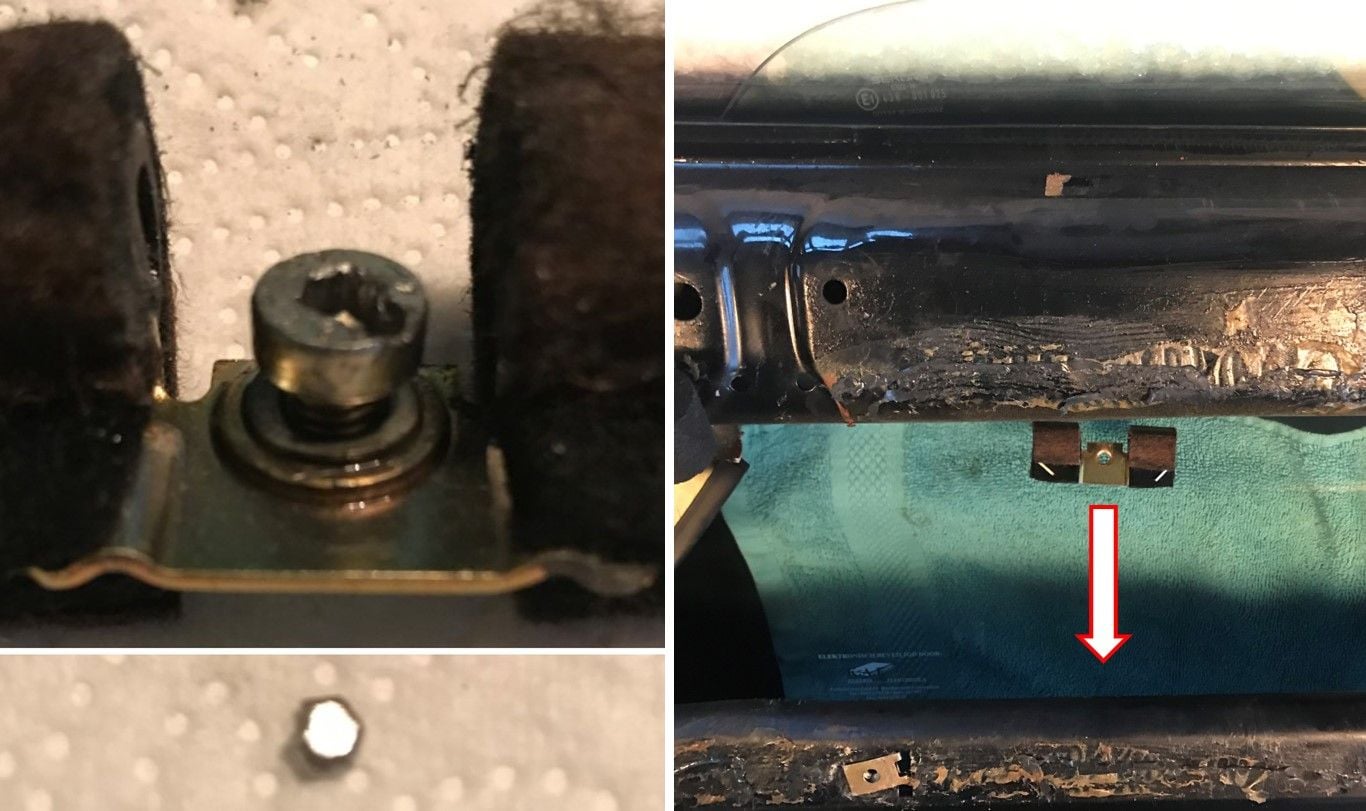
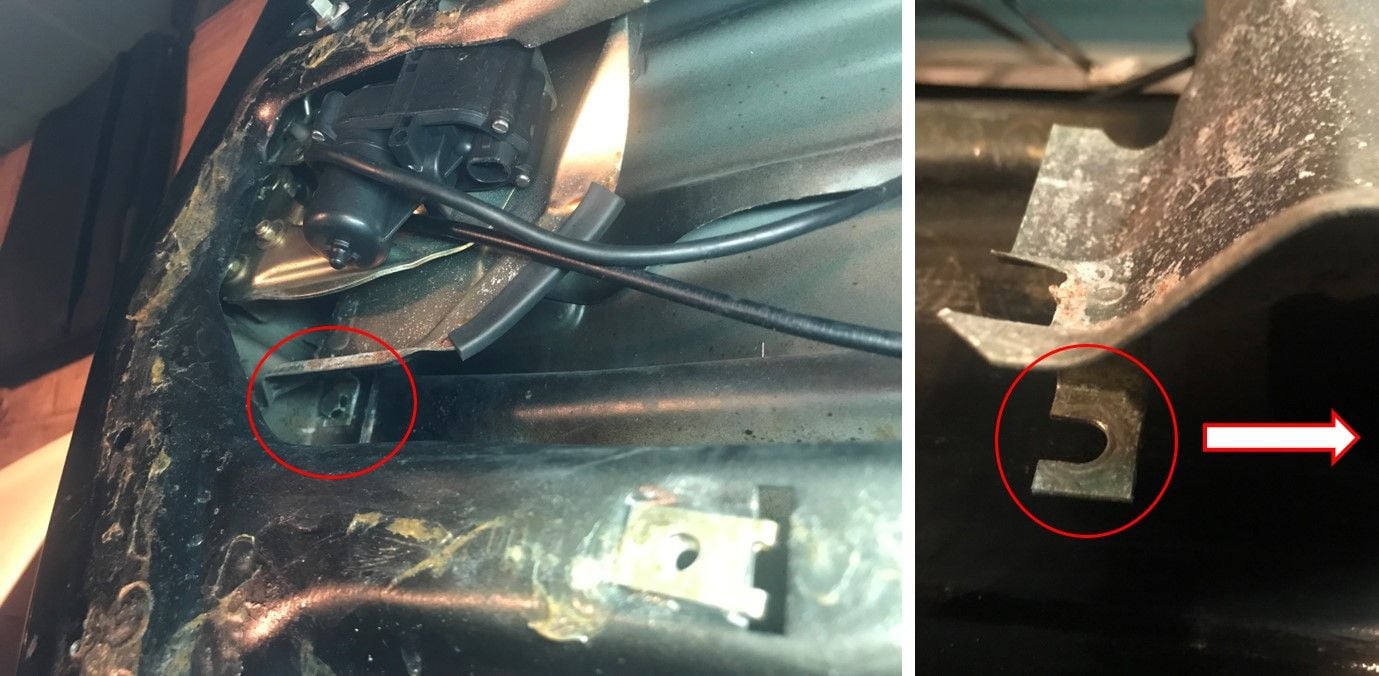
For better access to the wiring harness and later on the door lock mechanism remove the inner rubber window seal. Starting on the wiring harness, first remove the connector from the door lock motor. I put a flat screwdriver between the plastic edge near the arrow and the bottom of the housing on the motor. It took a while to come loose:
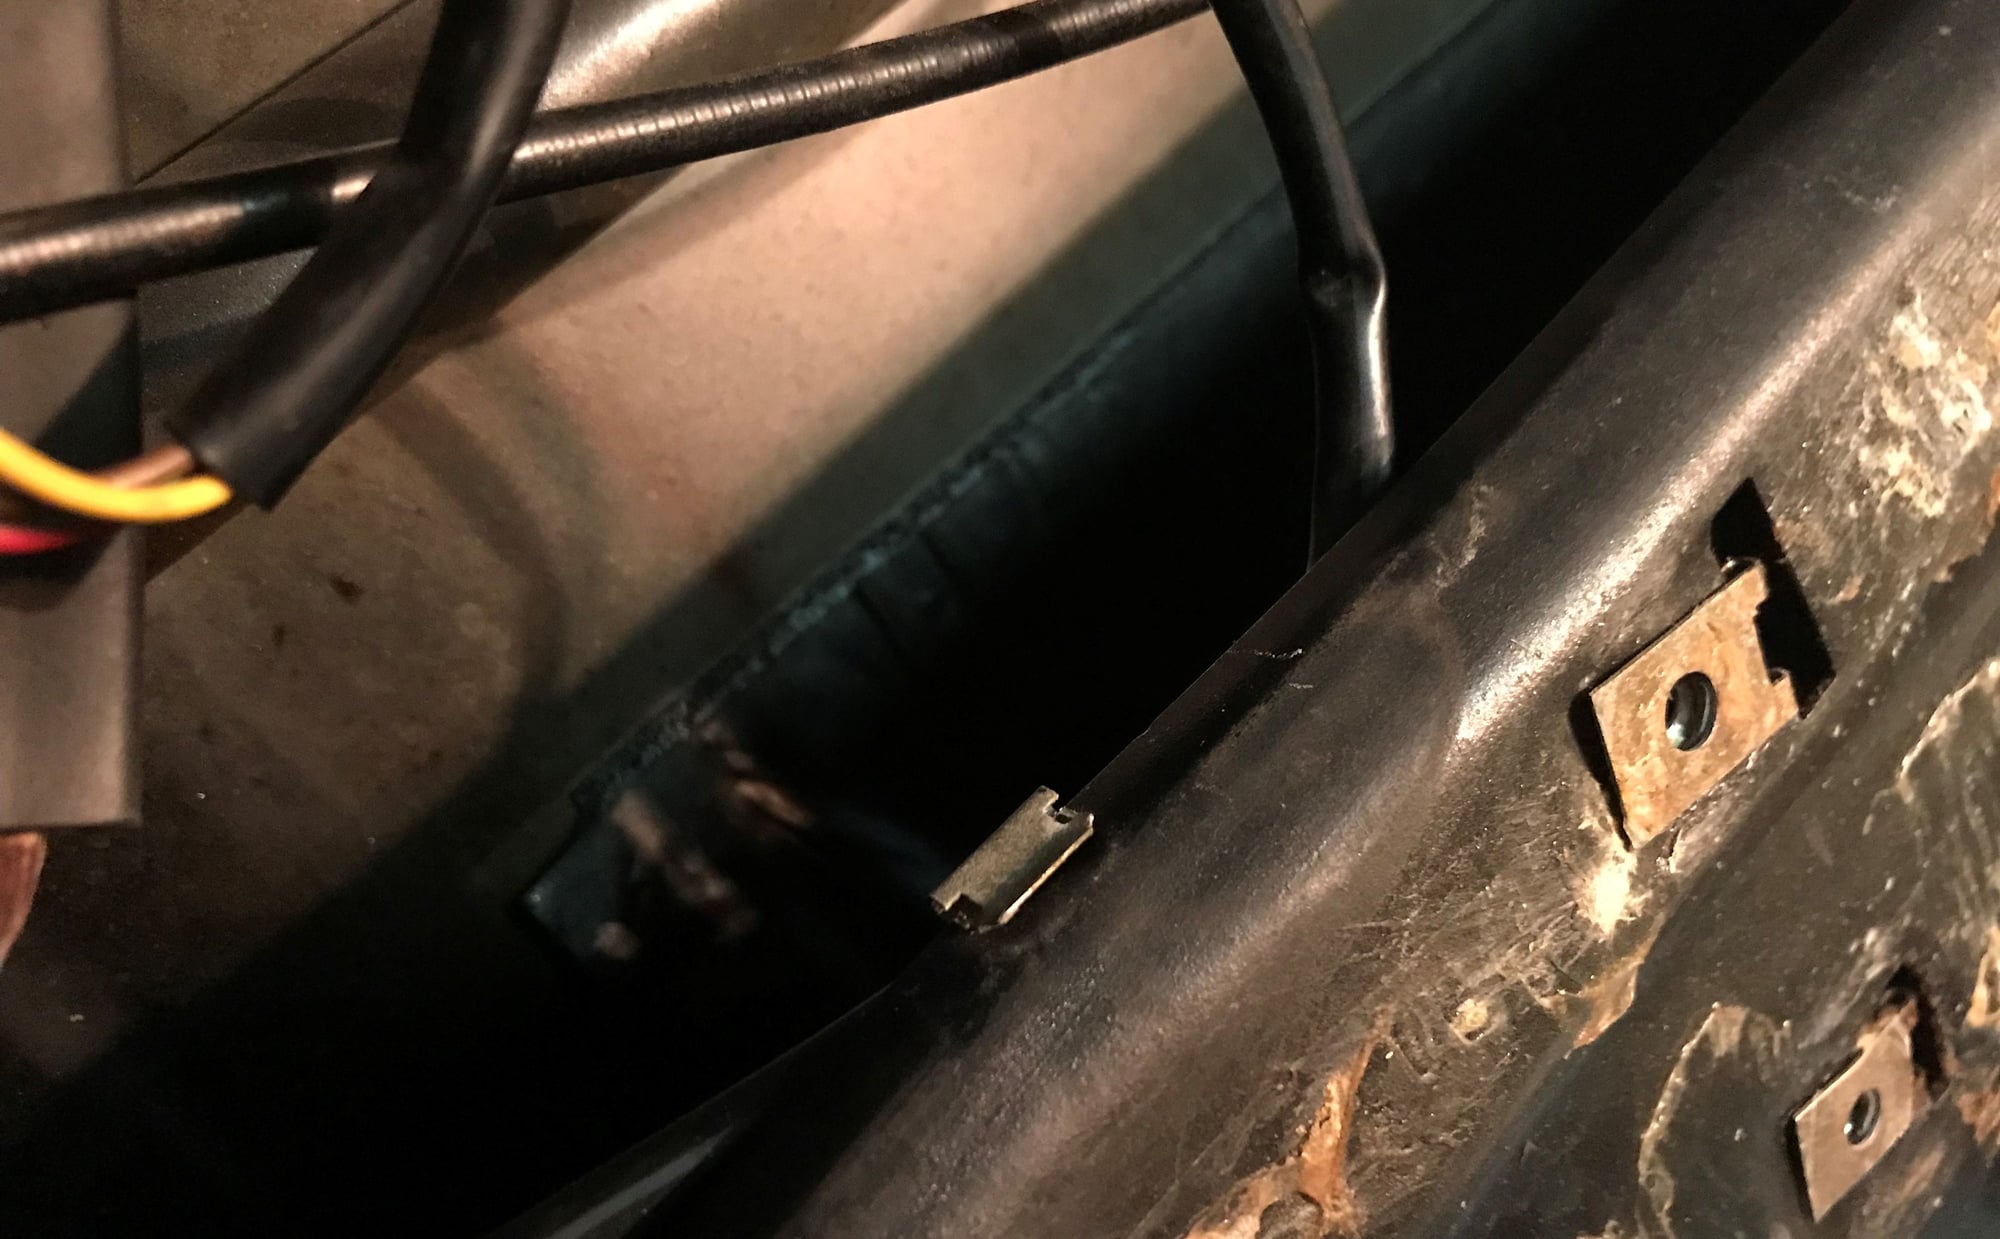
The next part of the harness are the wires to the door guard light. The harness is attached to the body with a small metal clip, shown in the picture below:
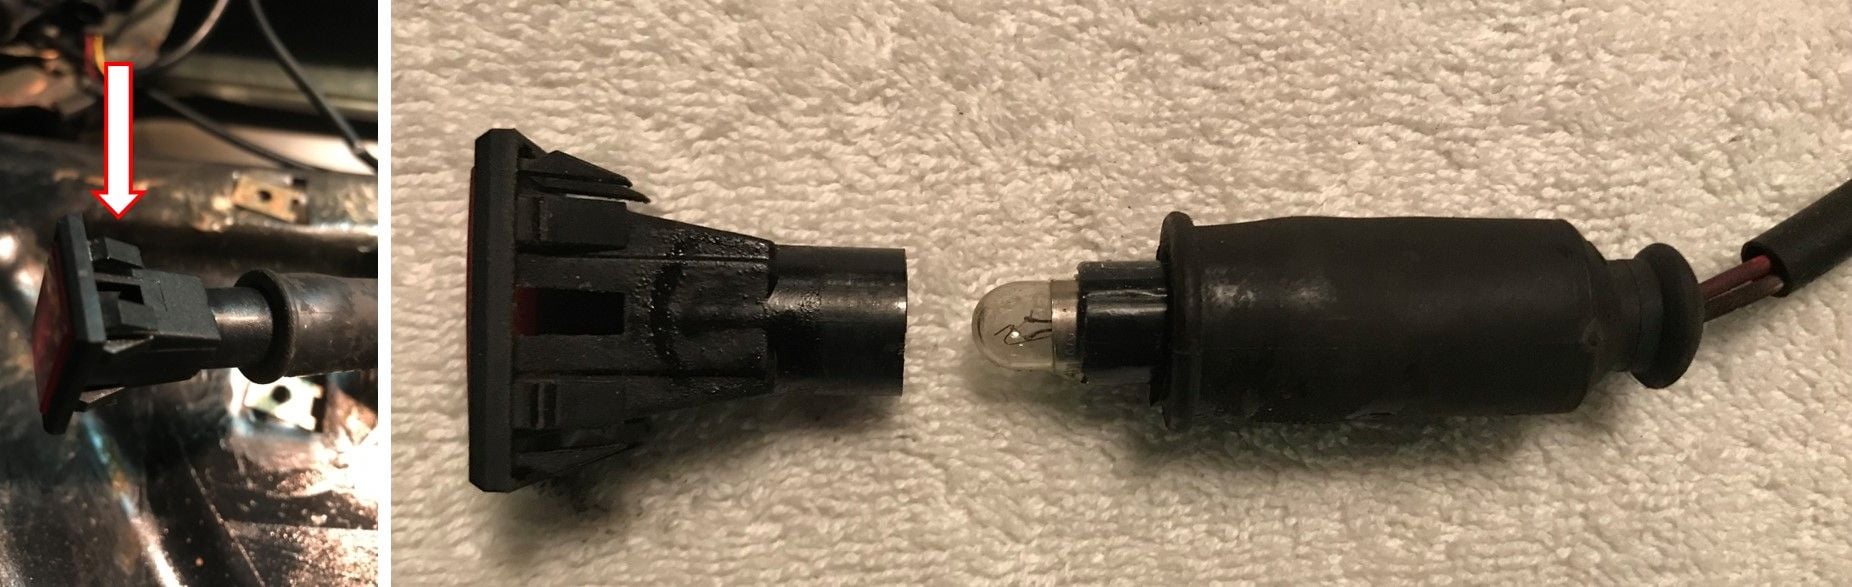
To take the door guard light out you have to reach inside the door and push the small plastic clips on the light housing. You can then just gently pull the housing of the bulb itself:
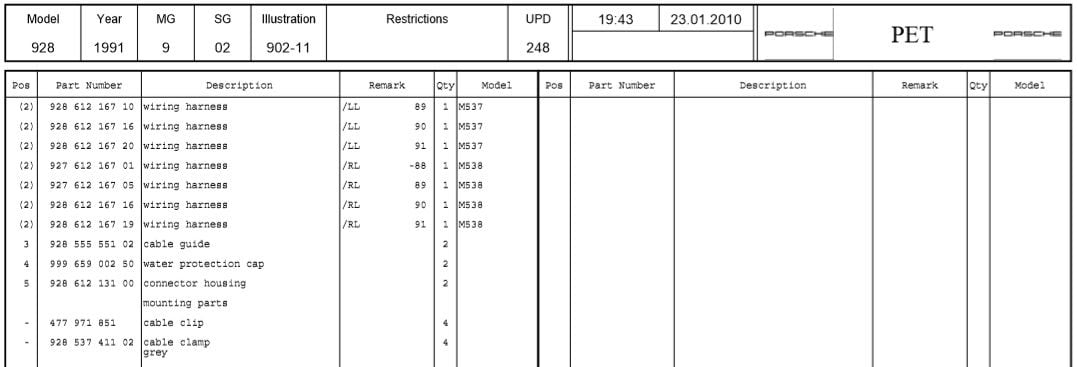
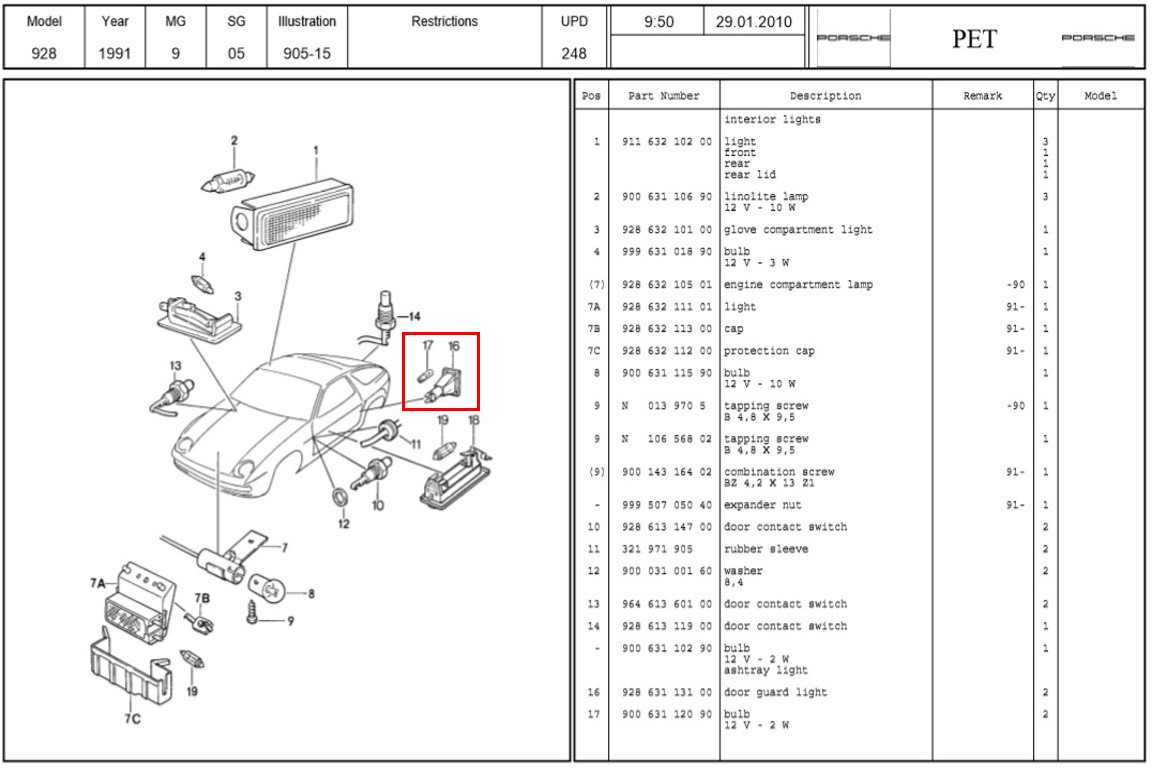
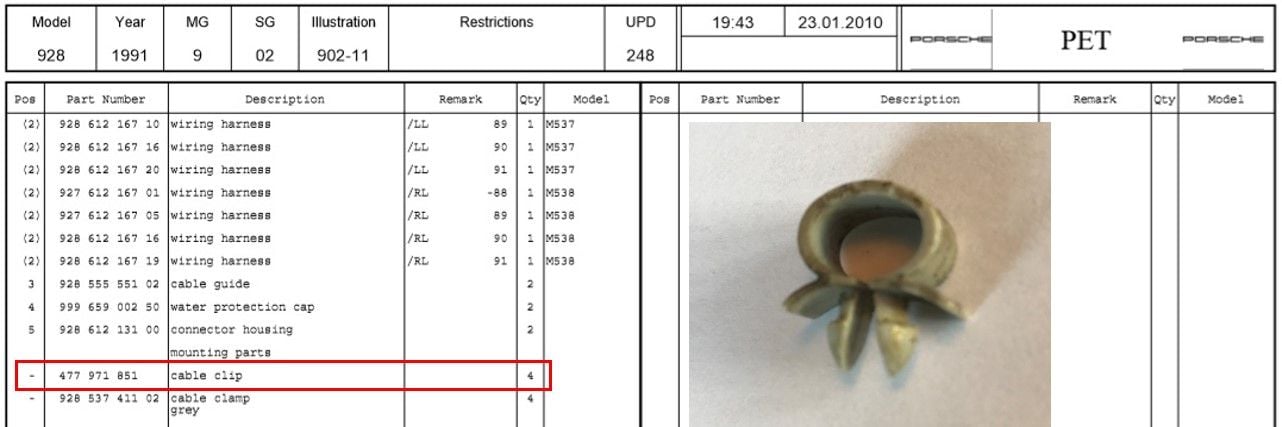
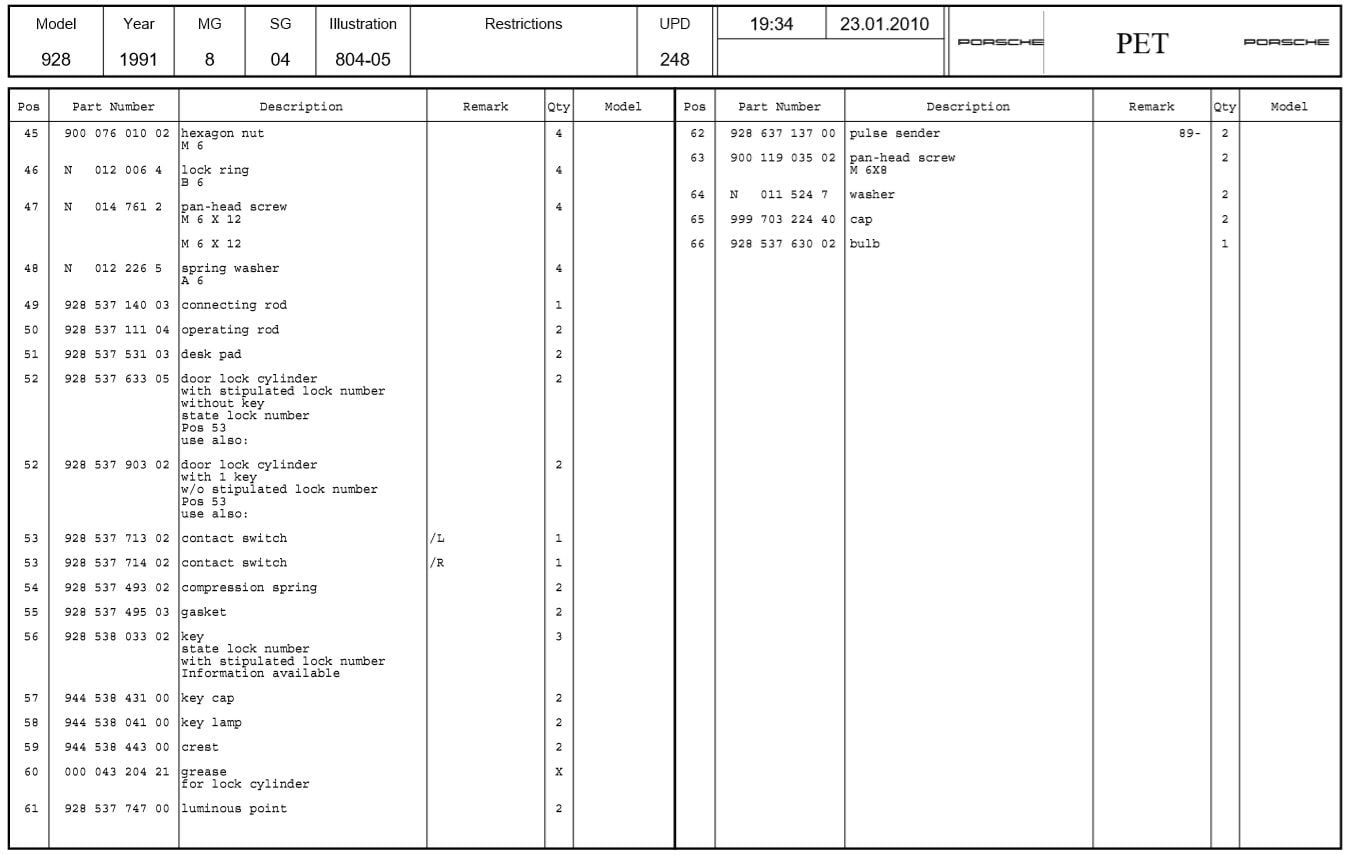
The bulb and housing can be found on the Pet page below, whereas the rubber water protection cap is shown on the PET page at the beginning of this chapter:
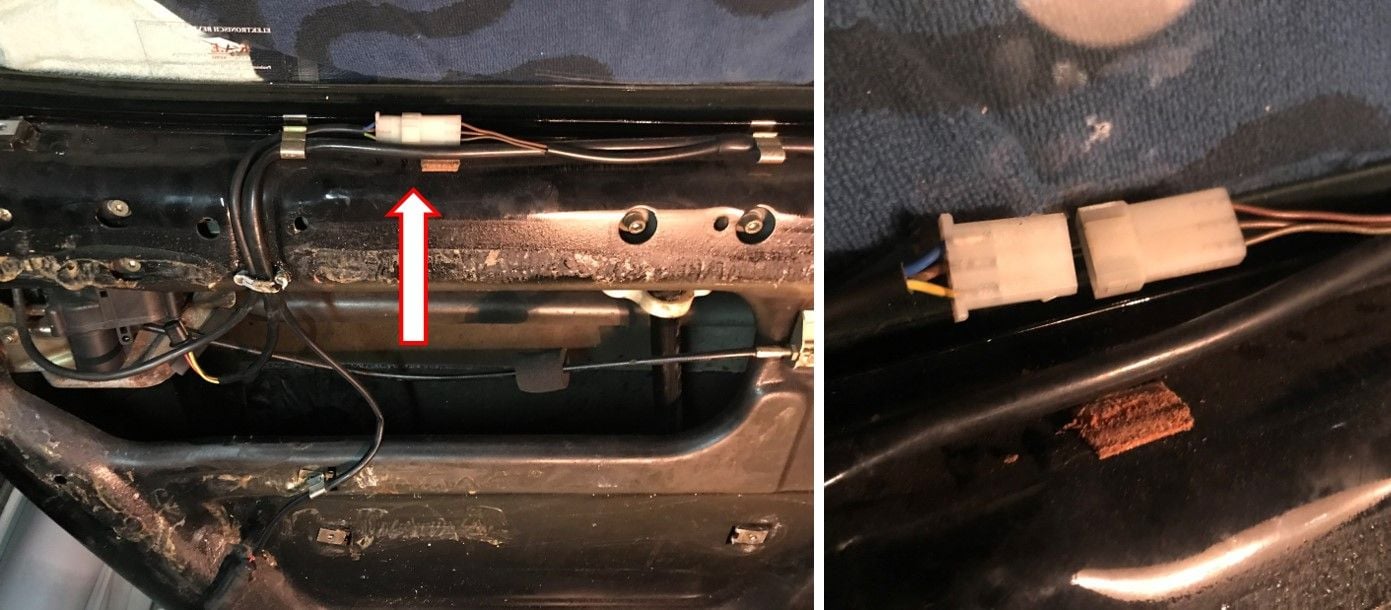
Next disconnect the wires for the contact switch, located just below the window:
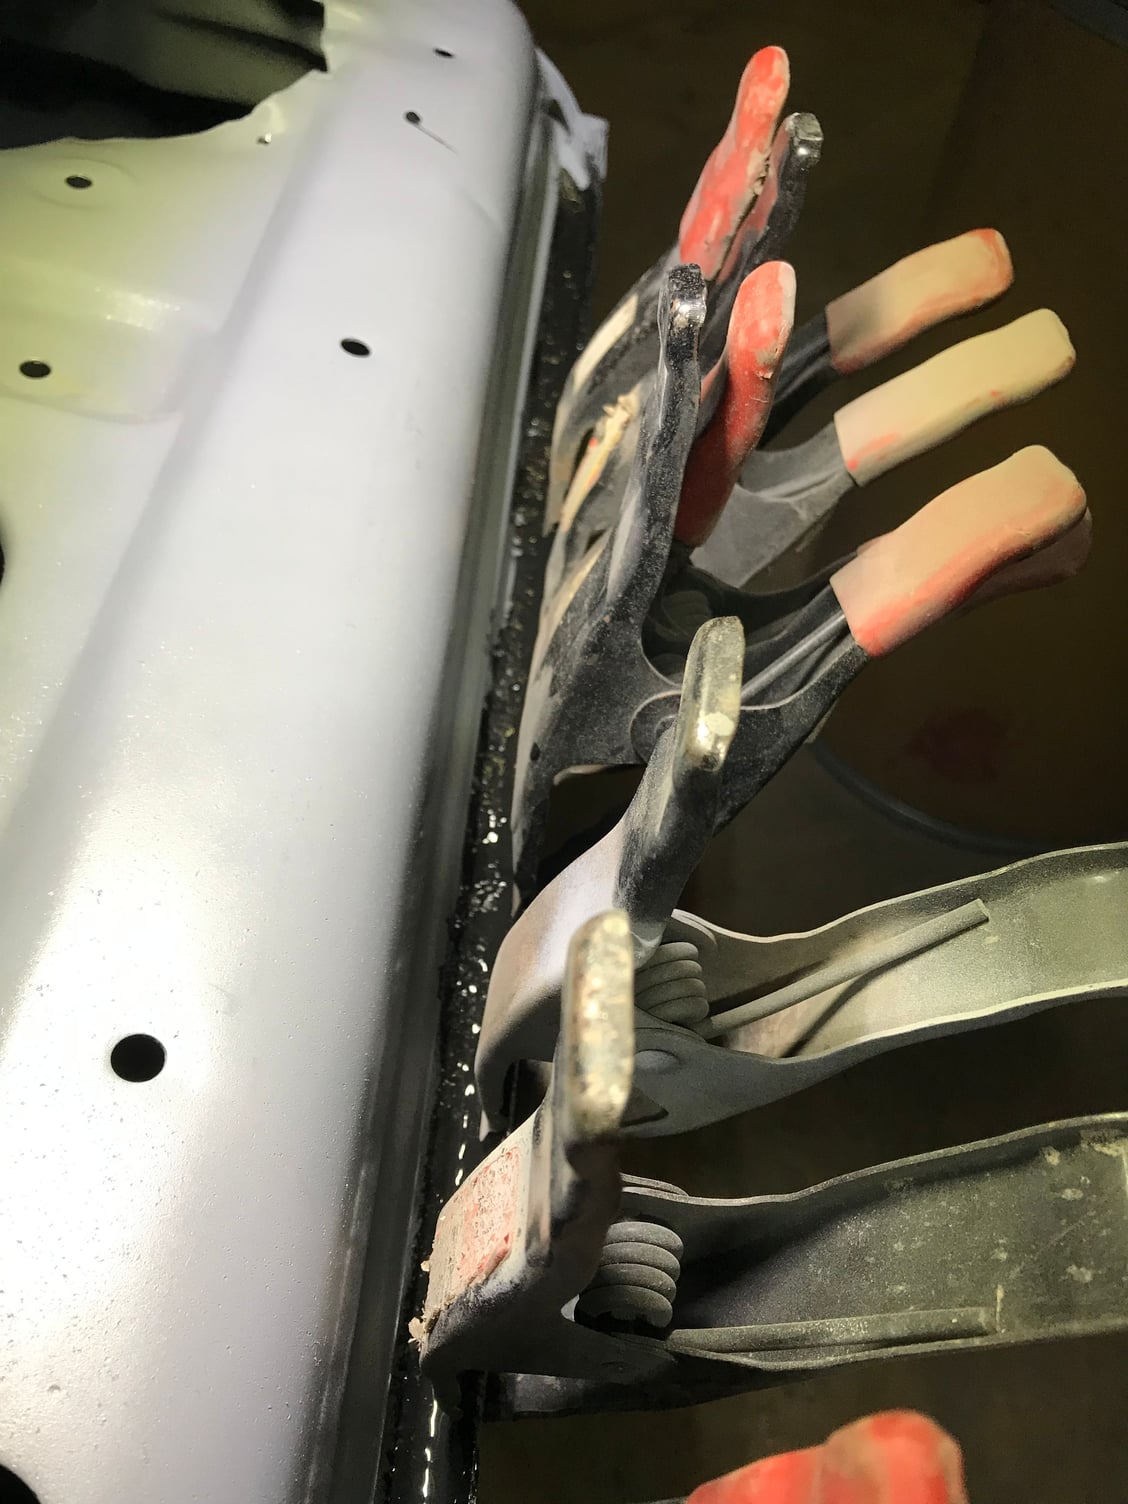
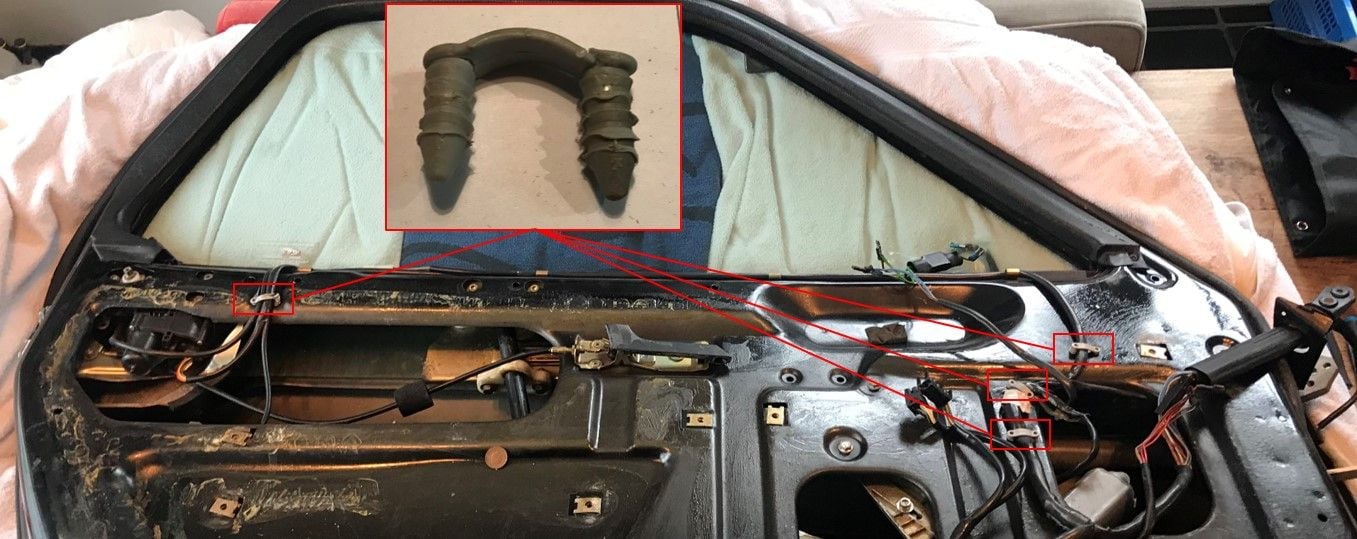
You can now start to remove the grey plastic clips that hold the harness to the vertical part of the door frame. There are 4 in total as shown on the picture below, and I have only been able to safe 1 sort of ‘intact’:
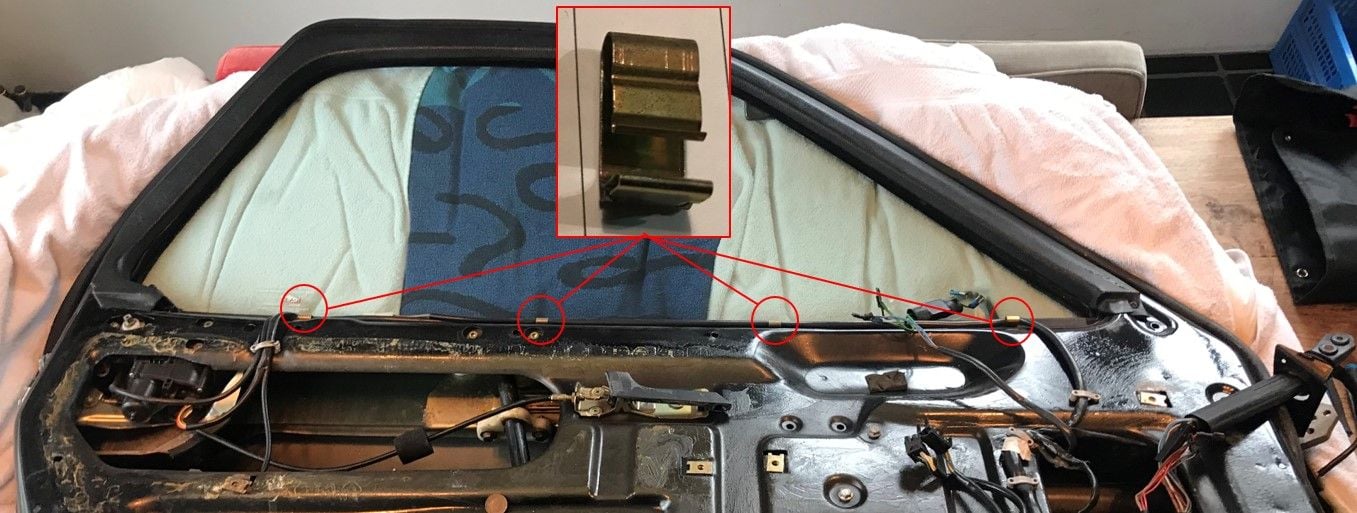
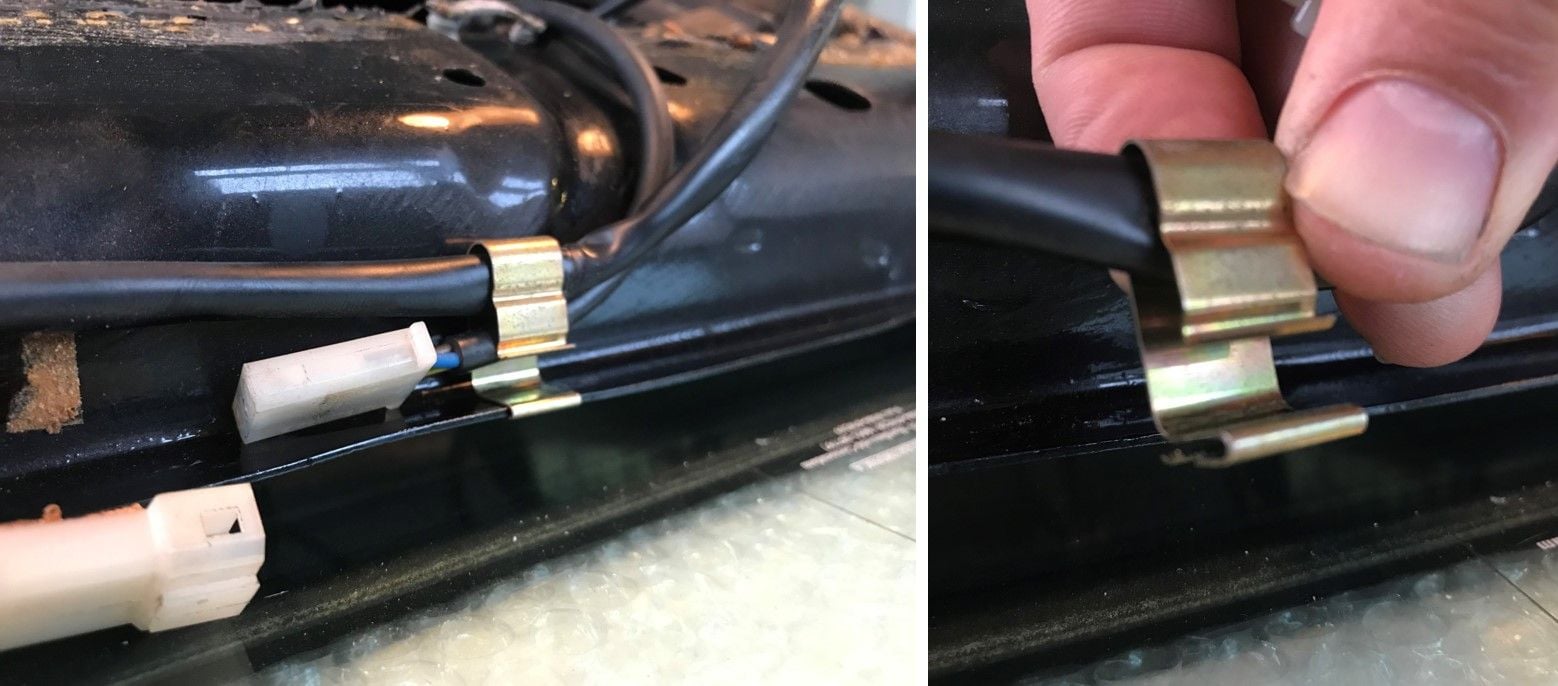
Remove the 4 clamps that hold the harness to the top of the door frame, as shown in the picture below:
I found the easiest way is to just slide the clamp of the door frame first, and then pull it off the harness:
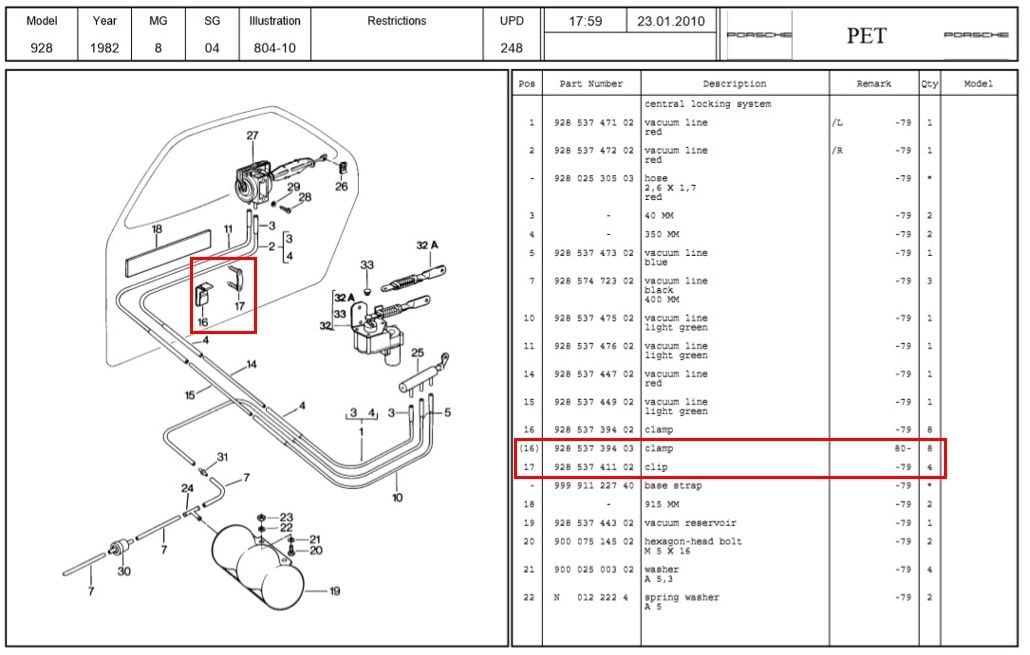
Both clamp and clip are not shown on PET ’91 (only the grey clipp’s part no. is mentioned), but they are on PET ’82:
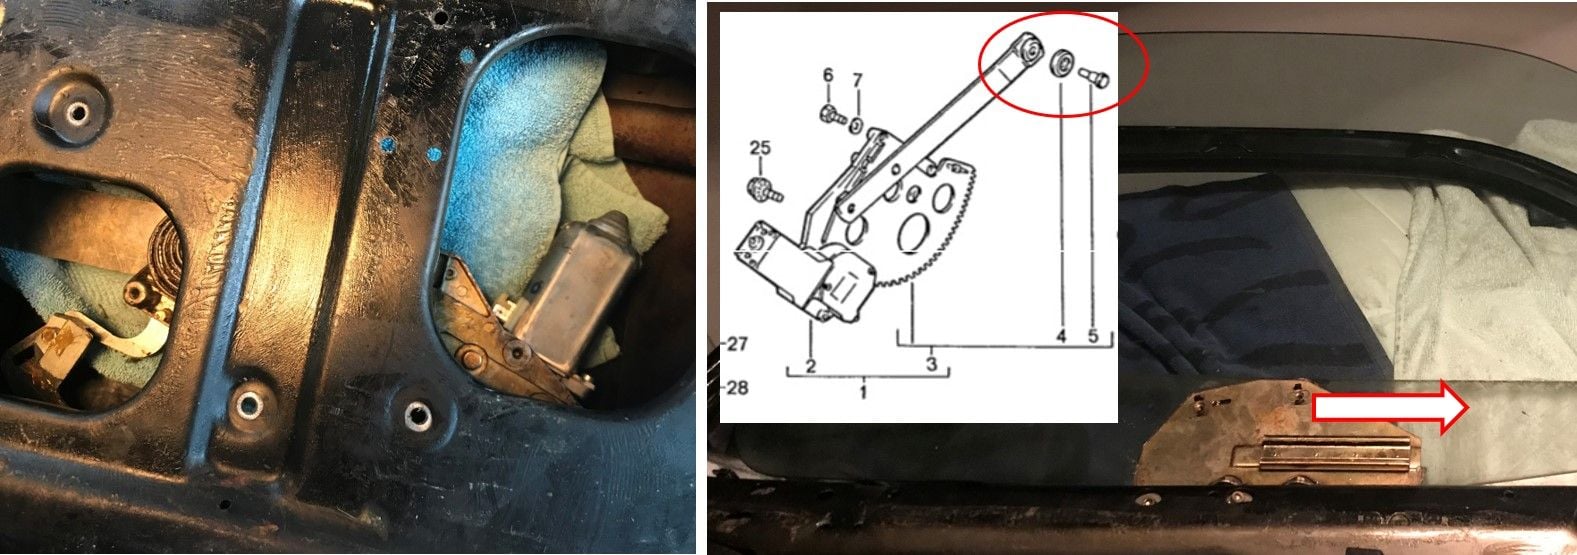
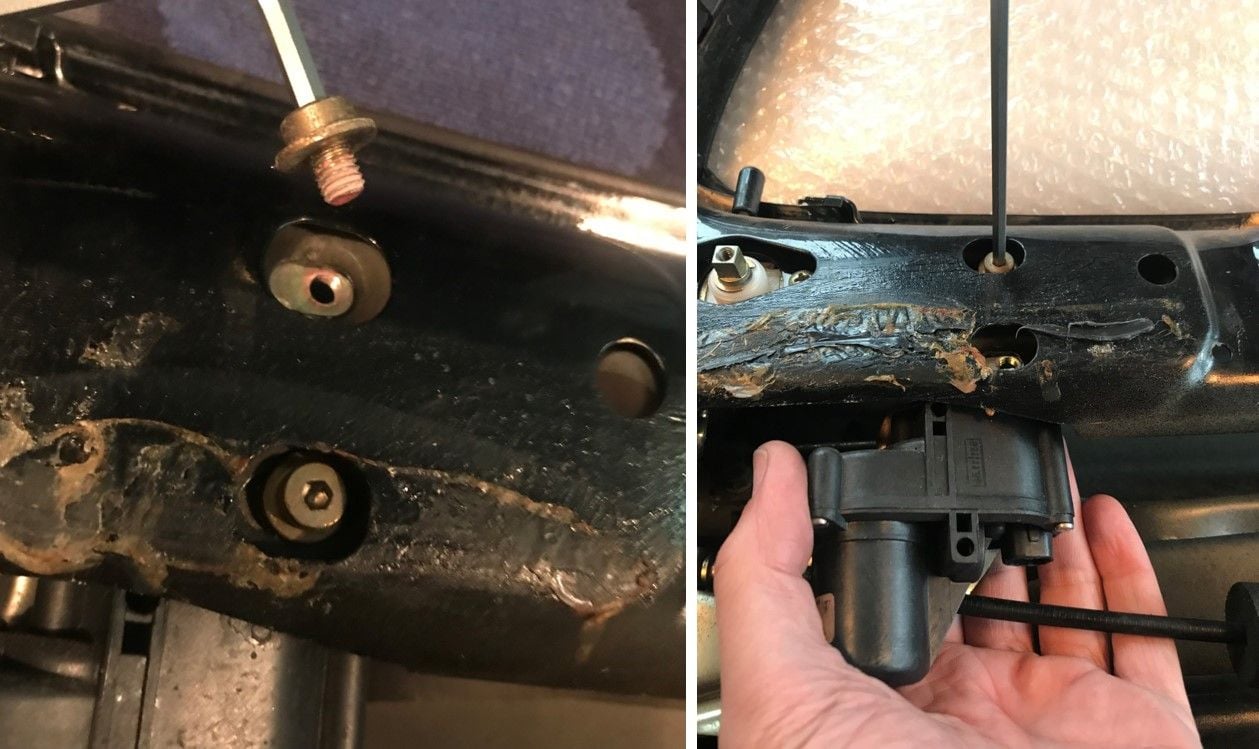
Next part of the harness is the connector for the window motor. It comes off the main harness just above the opening for the motor, and the connector is on top of the motor just inside of the opening. I used a flat screwdriver to carefully loosen the connector:
Last part of the harness to get out is the mirror harness. It disappears into the opening of the window motor and is held there by a small plastic clip:
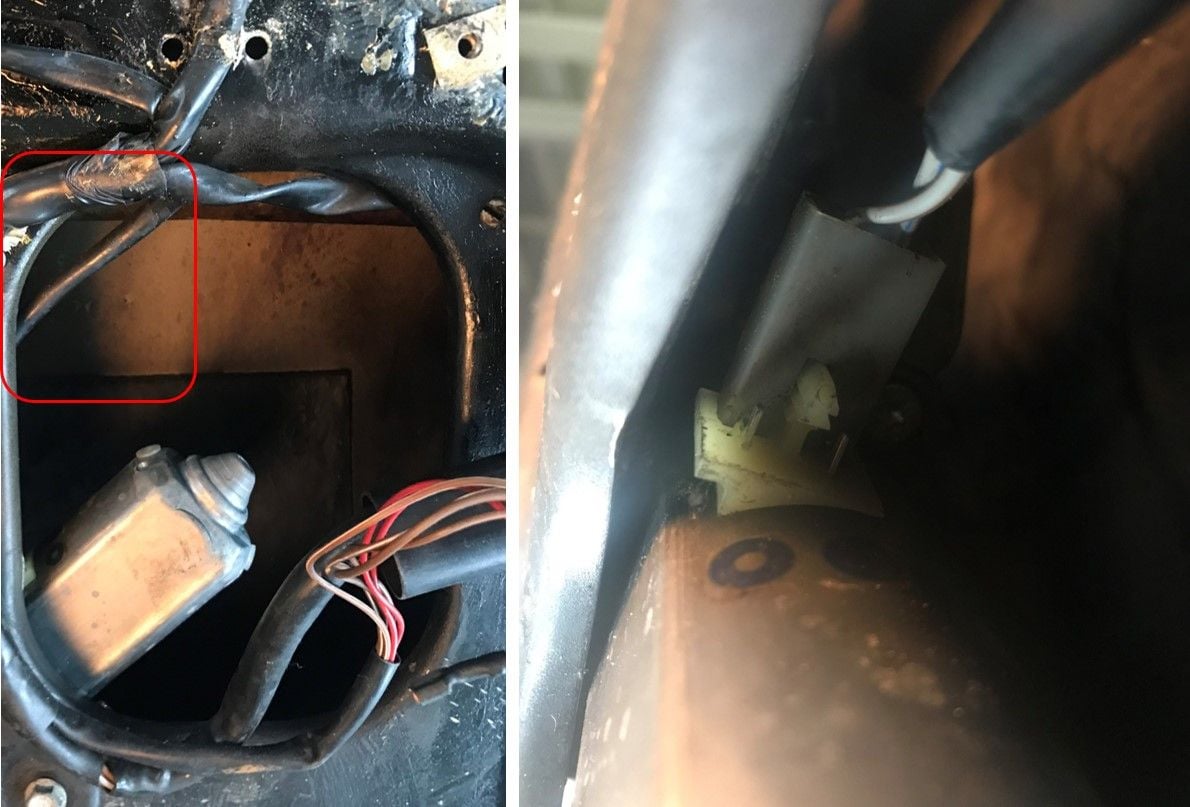
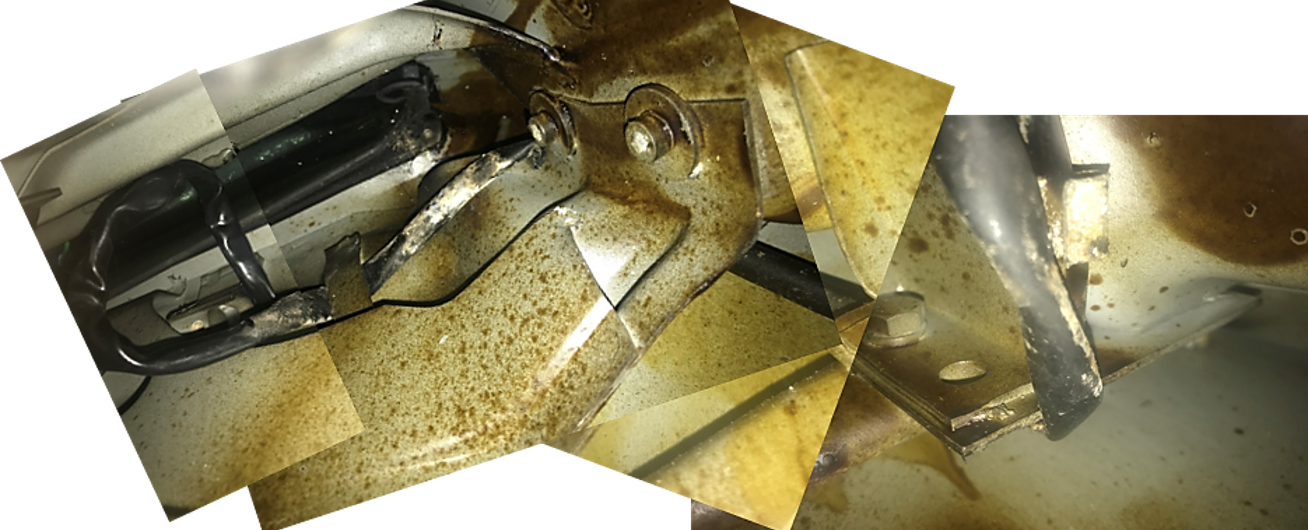
Below is a picture combined of several photo’s I took to show the exact routing of the mirror harness:
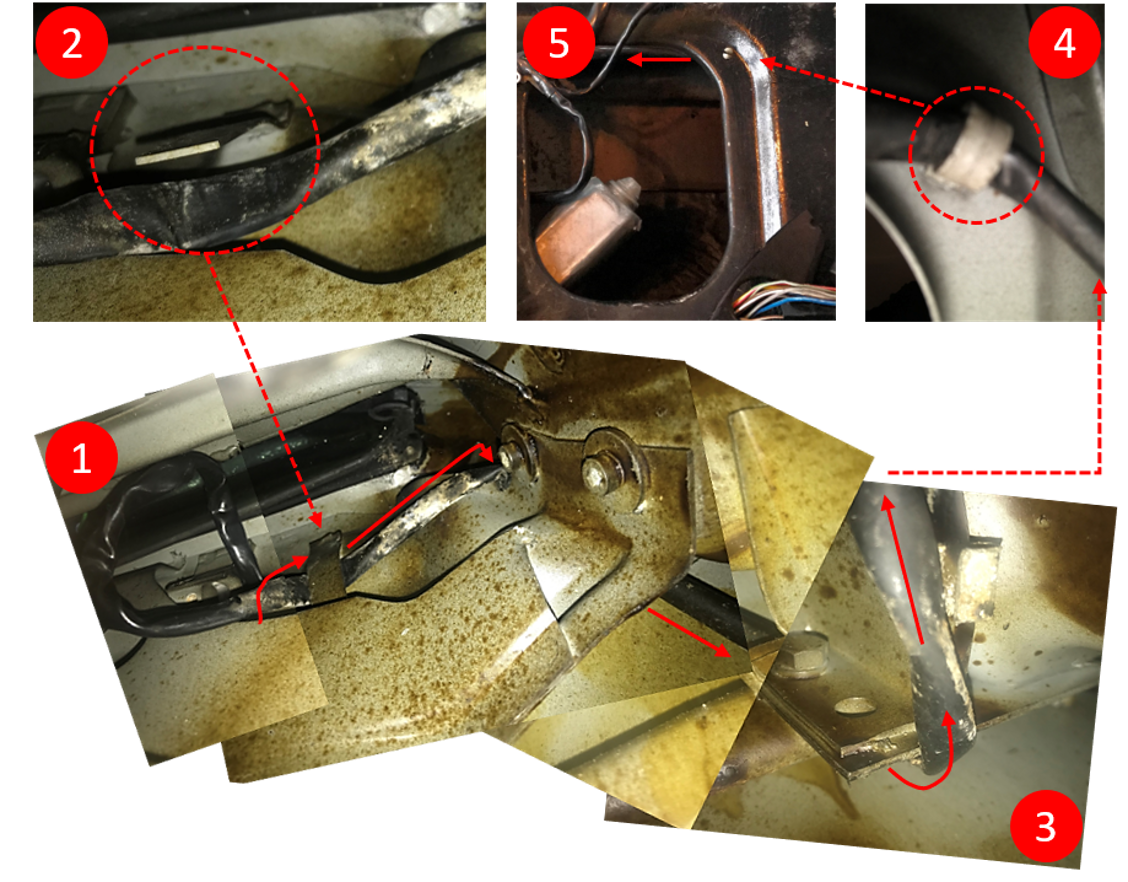
Below is the same picture but with a few additions and explanation. It may take you a minute to understand what the hell I tried to do but just follow the arrows and you’ll be fine…:-)……:
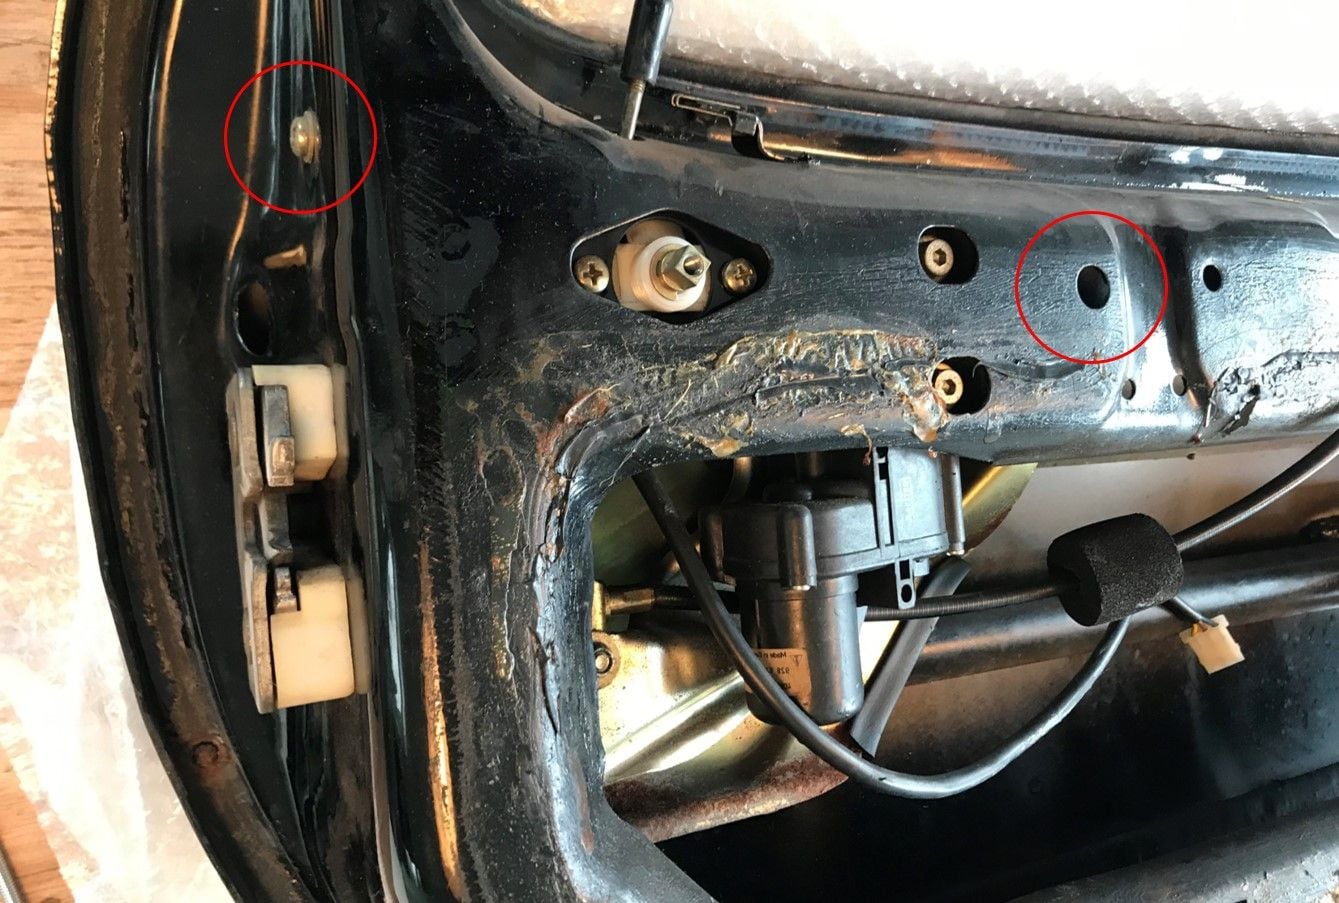
1. The “loop” of wiring harness shown above and to the right of nr. 1 is normally not there: I pulled the mirror harness back into the door a good 10 centimeters to be able to move it around inside.
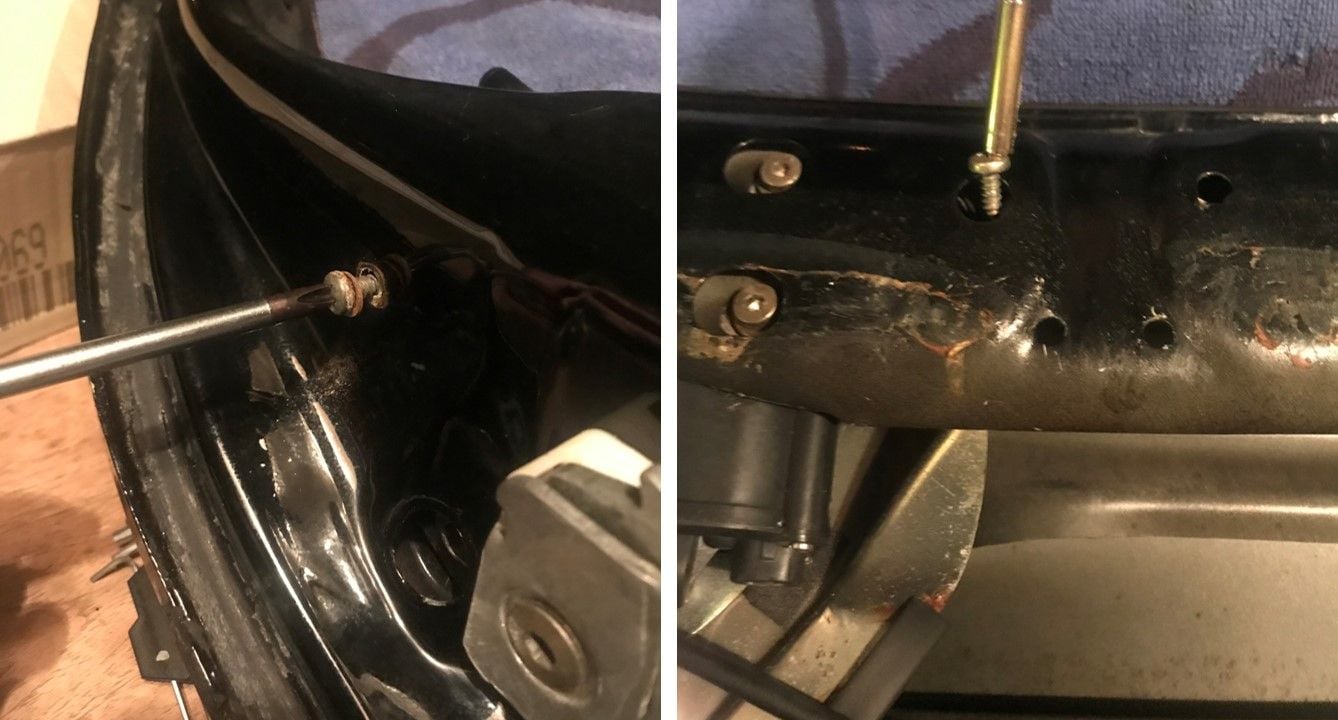
2. Nr. 2 shows a metal lid that holds the harness down just forward of the entry point. You can easily bend it upwards to free the harness. After this the harness runs underneath the bracket and also underneath the reinforcement bar (that on the other side holds the lock cover, see chapter 9).
3. Nr. 3 shows where the harness bends around the reinforcement bar and comes forward towards the opening for the window motor.
4. Nr. 4 shows the cable clip mentioned above in place.
5. Nr. 5 shows the harness exiting the window motor opening.
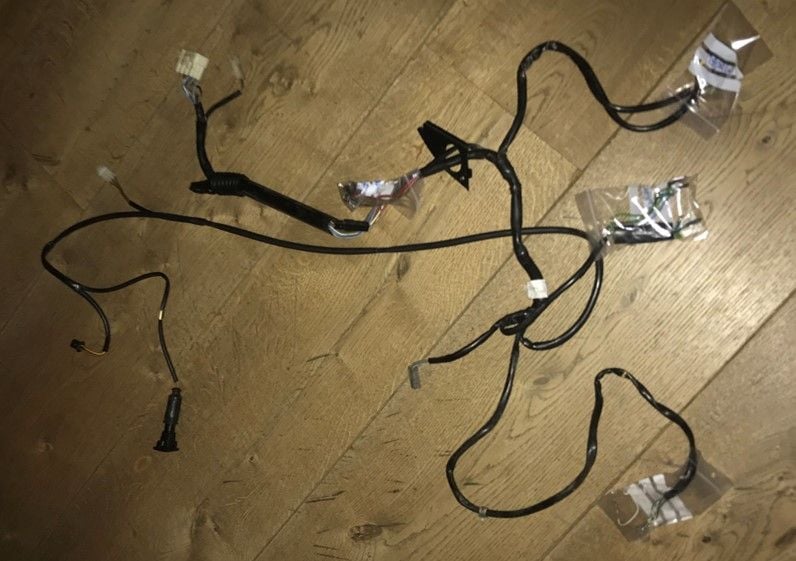
After that the harness will be out:
Next the window motor and lift mechanism……
.
Last edited by Smitje 928; 02-25-2019 at 11:10 AM.
Wonderful pics and the added enhancements of the detail and arrows pointing to this or that item, accompanied by the factory charts - brilliant!
Thanks Donald!
Originally Posted by DonaldBuswell
And on my '81 Doors I found massive hack jobs a P.O. undertook to install speakers. I also welded these gaping holes up back to a near-original condition. I don't care much for a sound system at this point of time, certainly BOSE or someone makes very small and big-sounding speakers to install vs. the crap back in the 80s/90s. Of course, crap is always a subjective term - I assign that work when the Doors are hacked up to benefit a speaker!
That must have been quite a butcher…….
Looks though that you did an amazing job on restoring the doors…!
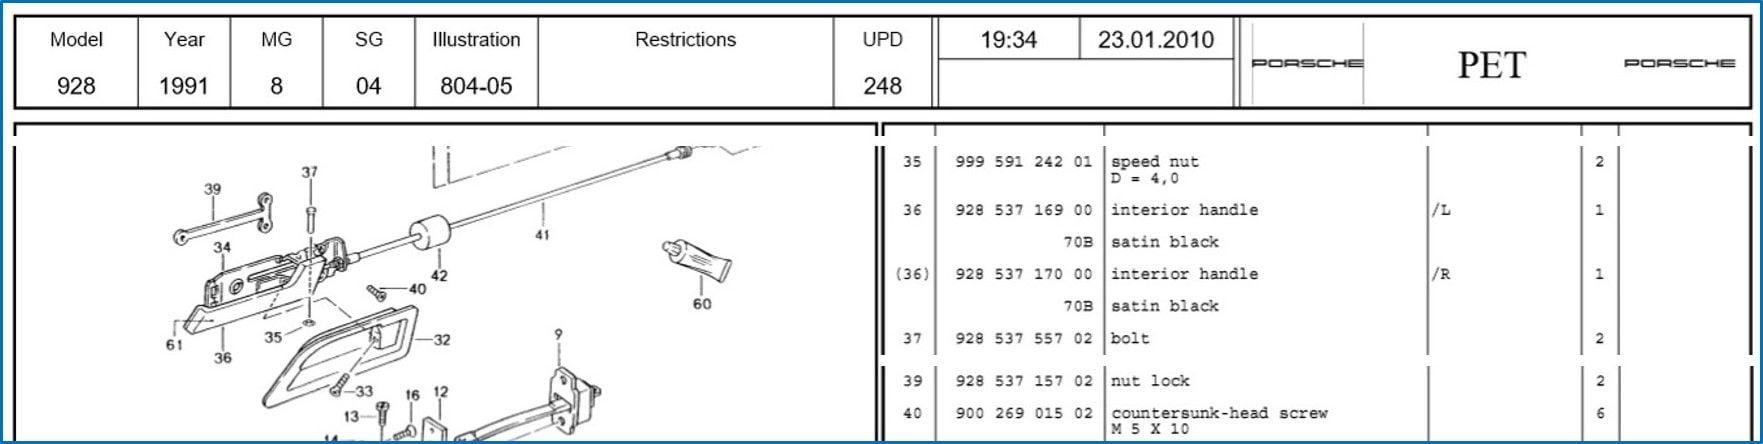
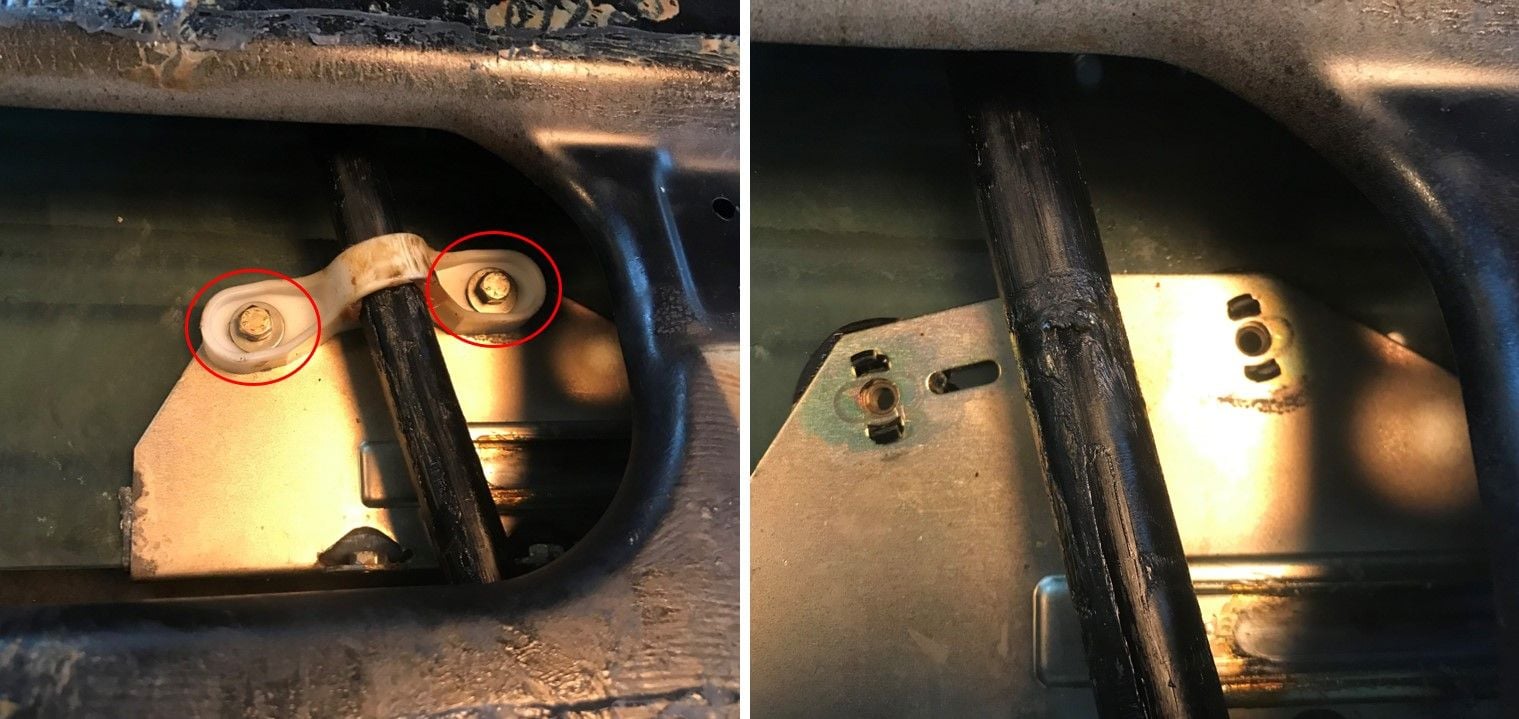
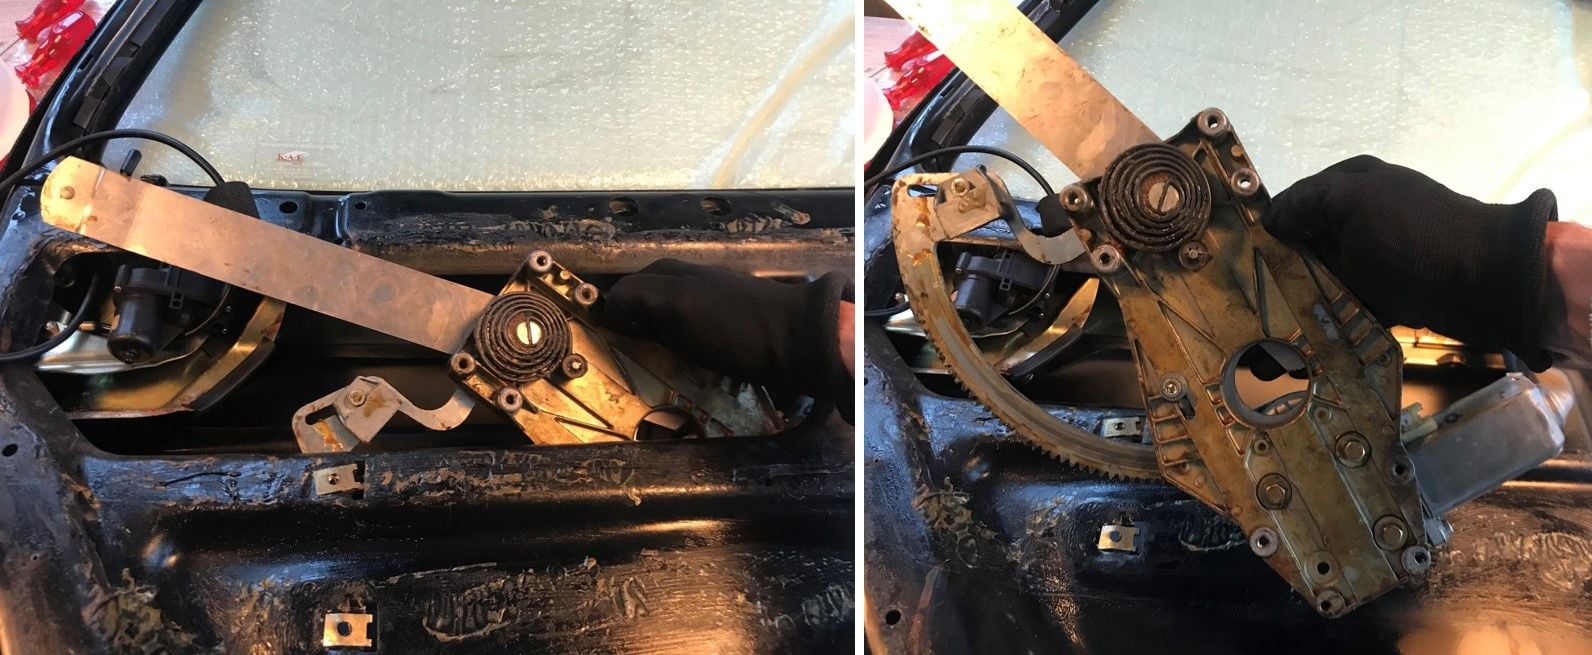
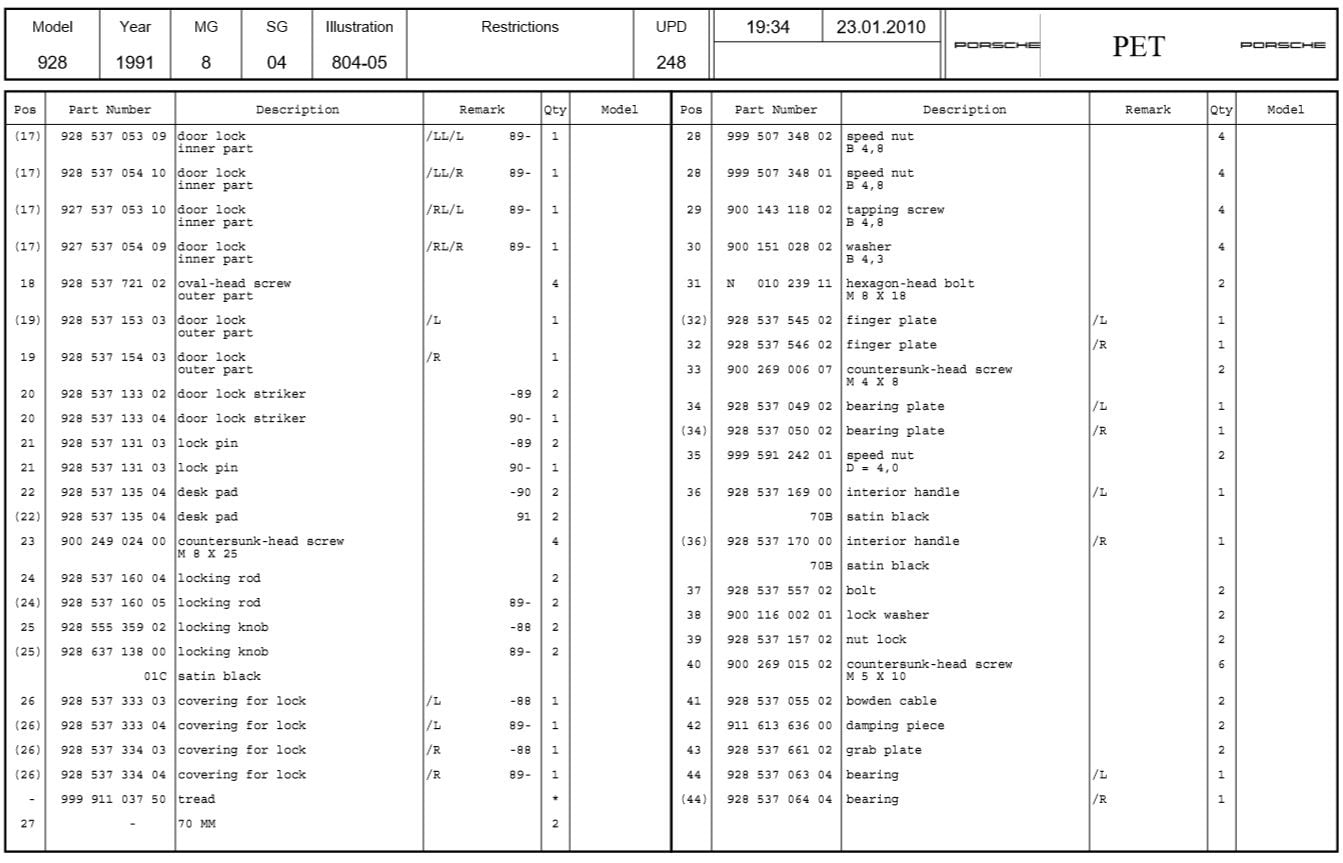
To be able to remove the window motor and lift mechanism I needed to get the interior door handle out of the way first. Take the 3 screws out (nr. 40 in the PET picture below) and make sure to also take out the nut lock that’s on the inside and is held by the same 3 screws (nr. 39). You can then move the door handle to the side allowing you to eventually take the window motor and lift mechanism out through the opening:
Unscrew the motor and lift mechanism by removing the 4 bolts shown below in the picture on the left. As I wanted to get the window guide tube out of the way as well before removing the motor and lift mechanism I put a towel below the motor to prevent any damage to the aluminum:
Move the motor and lift mechanism forward to free the roller from the guide rail. Lower them onto the towel and leave them there until the window guide tube is out:
Next job is window guide tube, slides and felt guides....
.
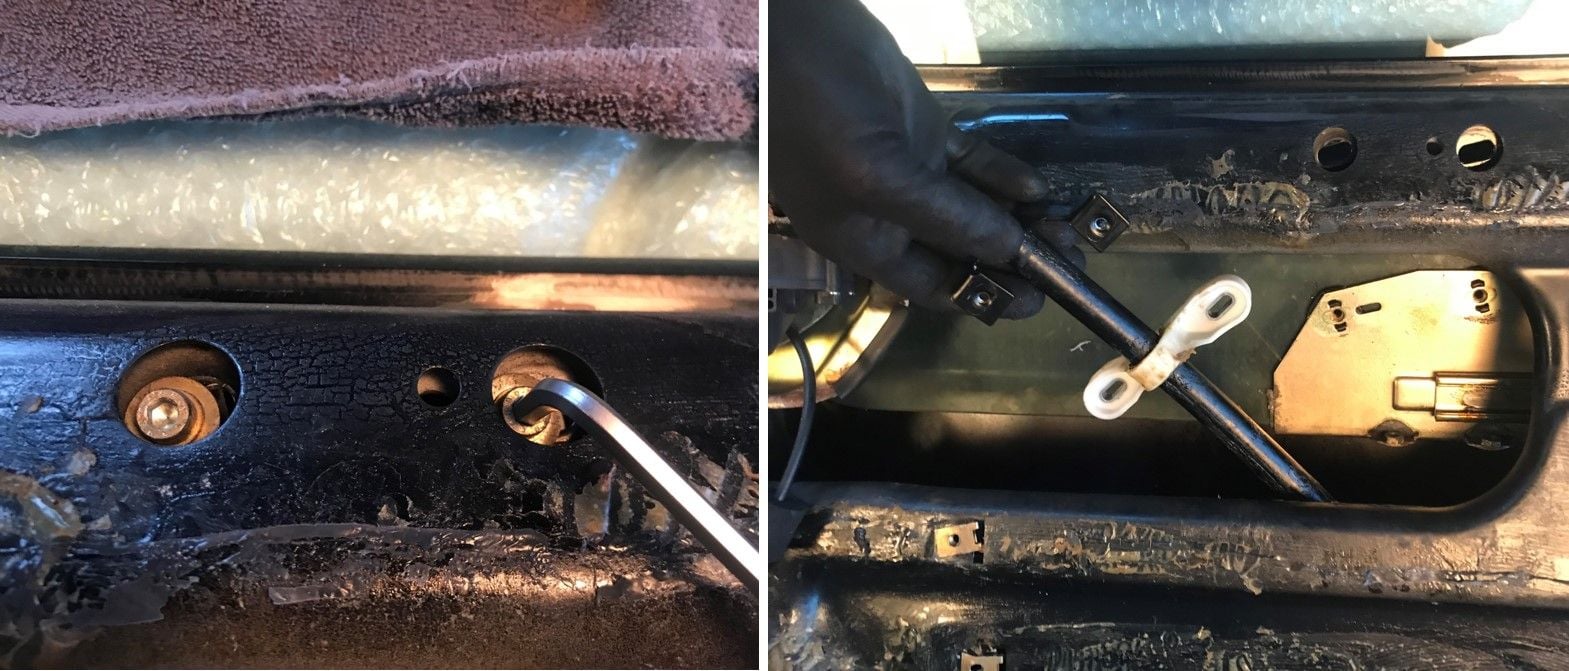
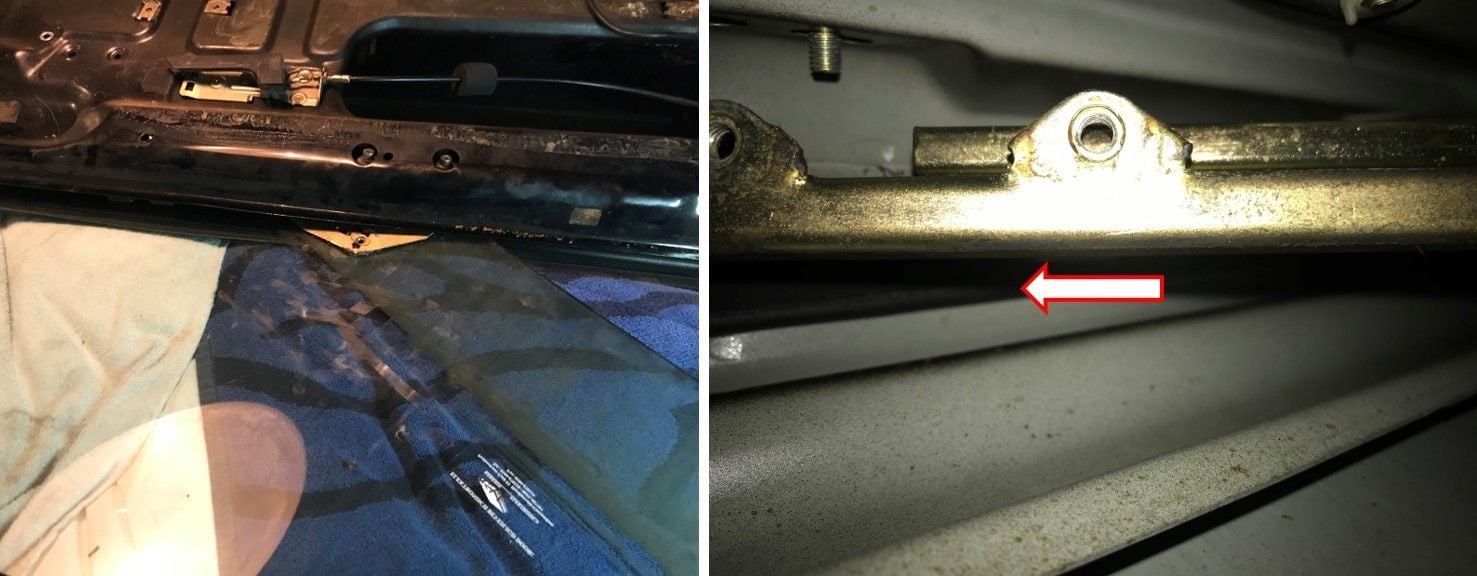
As there is nothing to hold the window in place you can slide it down a bit until the bolts keeping the lower slide in place are accessable. Remove the two bolts:
Slide the window down even further until you can see the two bolts that attach the upper slide to the window. Remove these bolts as well:
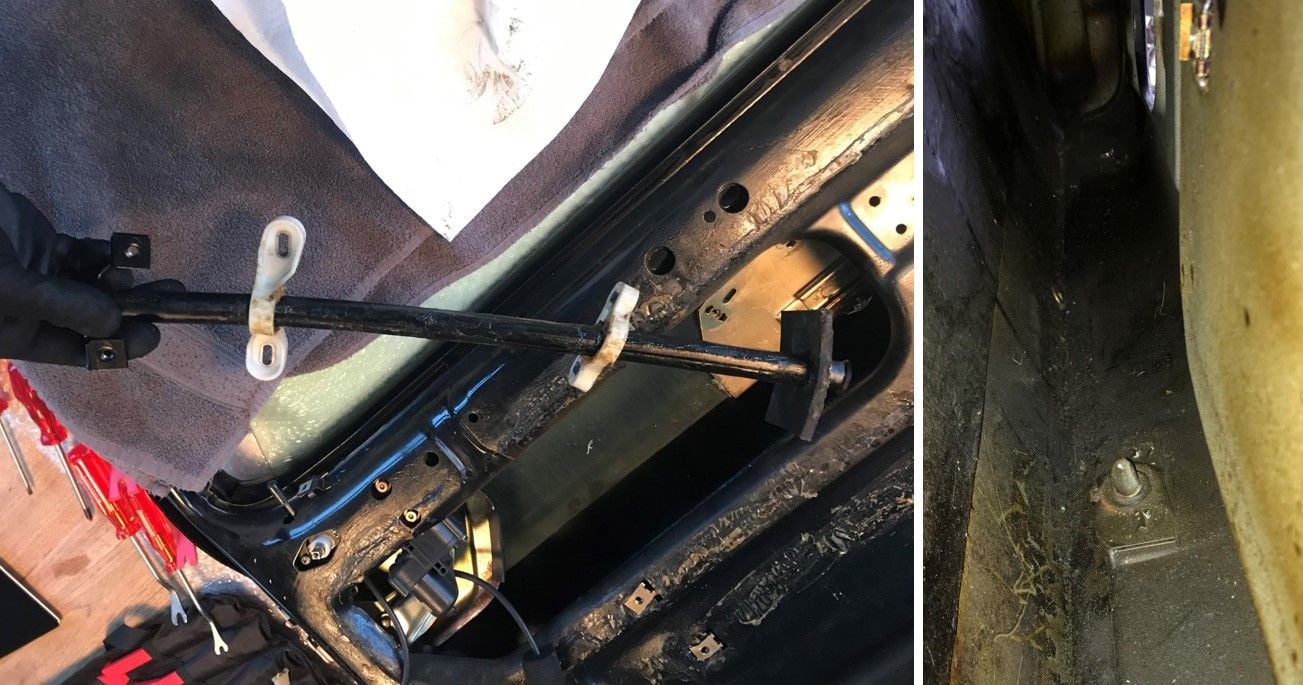
Unscrew the two allen bolts that attach the guide tube to the door frame. Then pull the guide tube free from the pin on the inside-bottom of the door:
You should now have enough room to take the window motor and lift mechanism out through the opening:
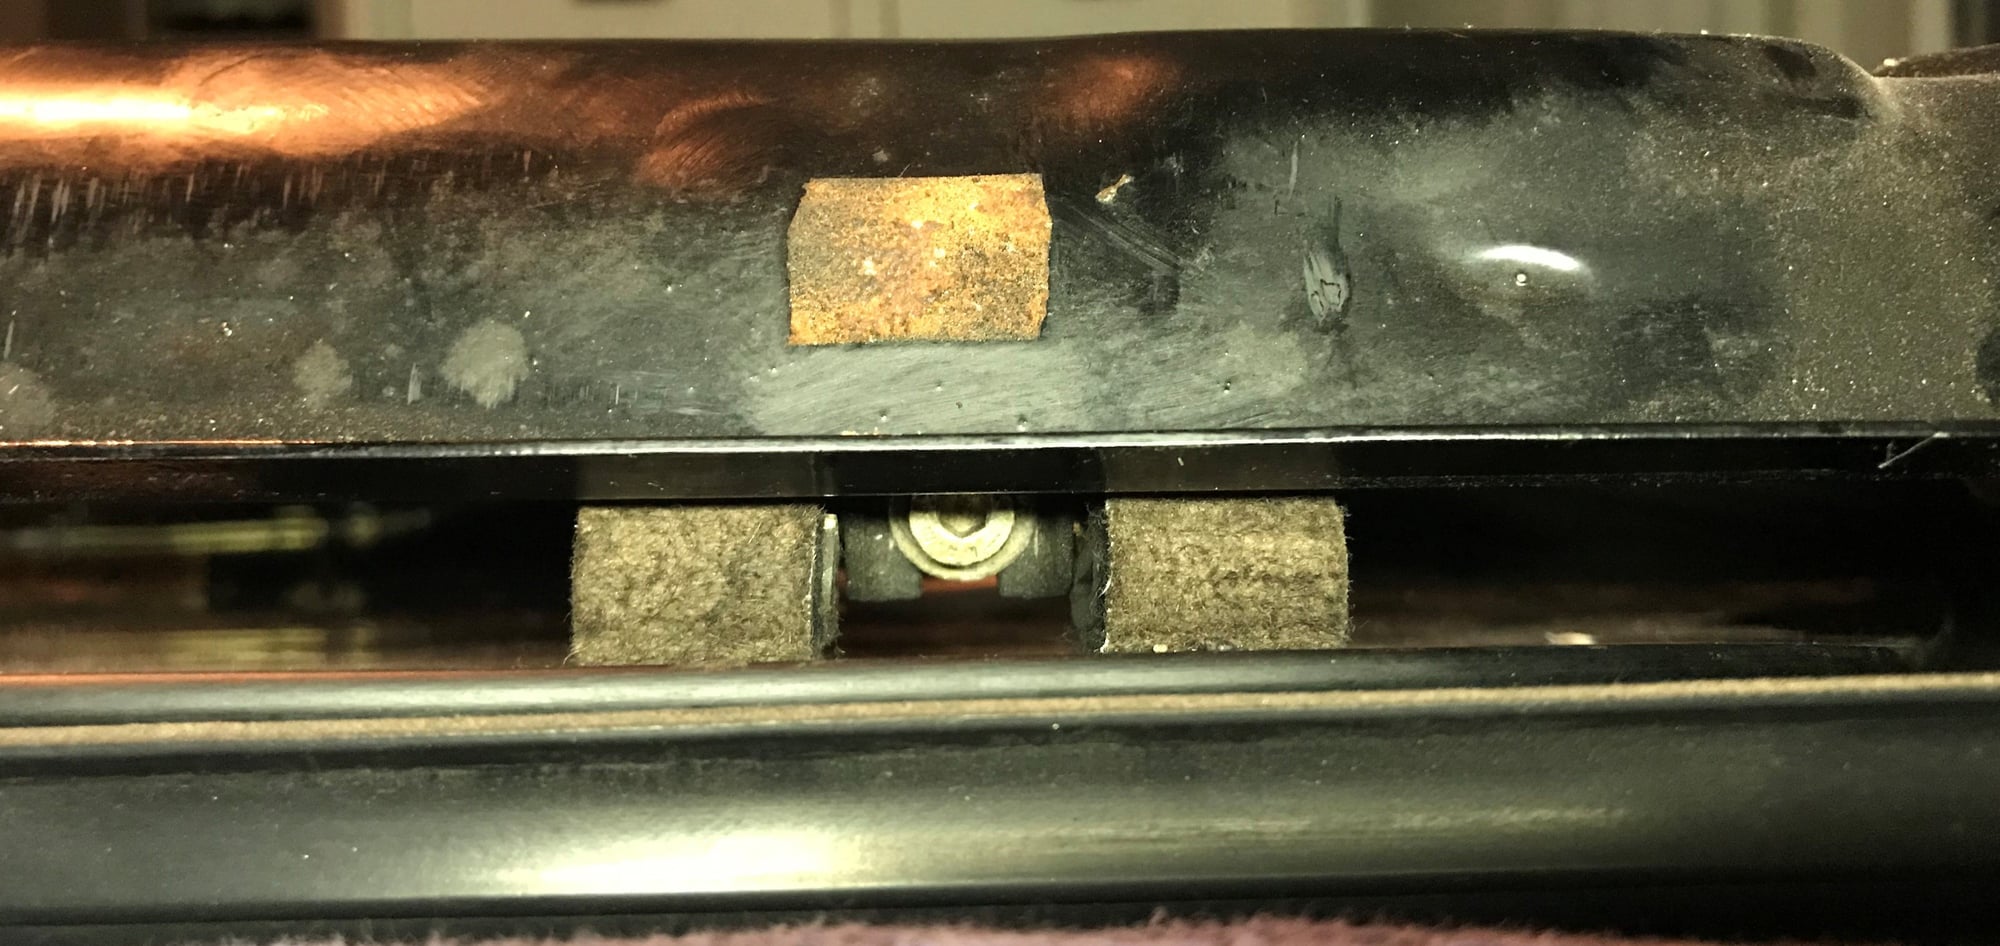
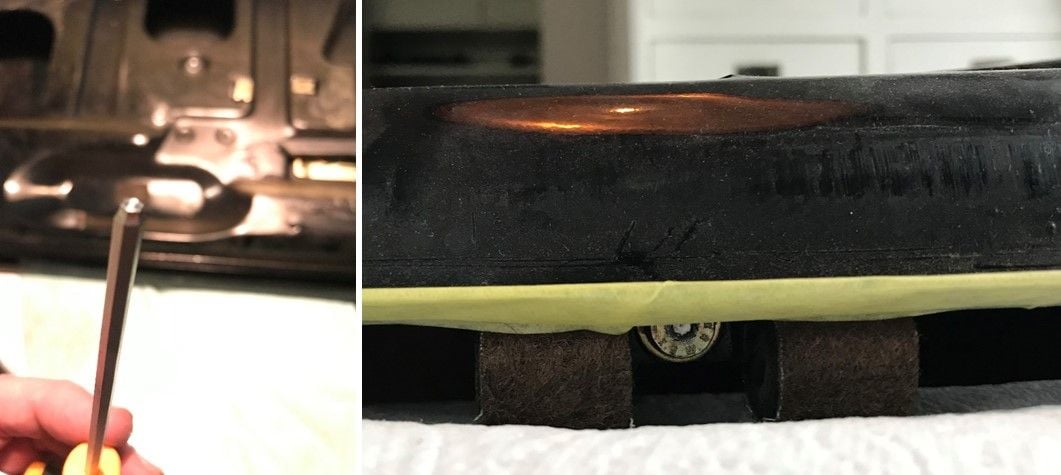
Removing the felt guides is a tricky job and requires a bit of patience. My big tip: NEVER use an allen-head screwdriver with a round tip to loosen the bolt! Mine snapped leaving the tip inside the bolt……
It took 3 days of drilling and numerous drills to finally drill a small hole in the bolt, enabling me to get a small metal hook behind the tip and force it out. Luckily the inside of the bolt was still in good enough shape to then use a regular allen-head screwdriver and remove the bolt. When the bolts are out the felt guides will slide down on the inside of the door, allowing you to take the glass out:
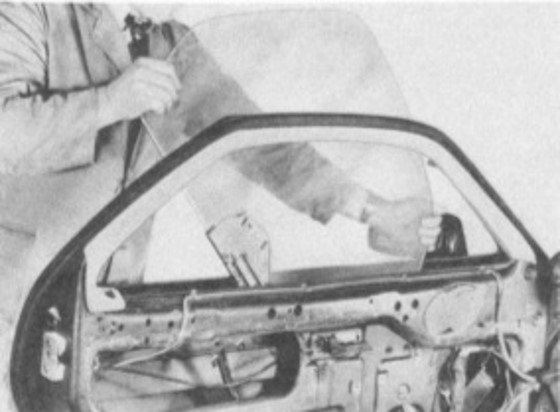
The WSM shows at what angle the glass should be lifted out of the door:
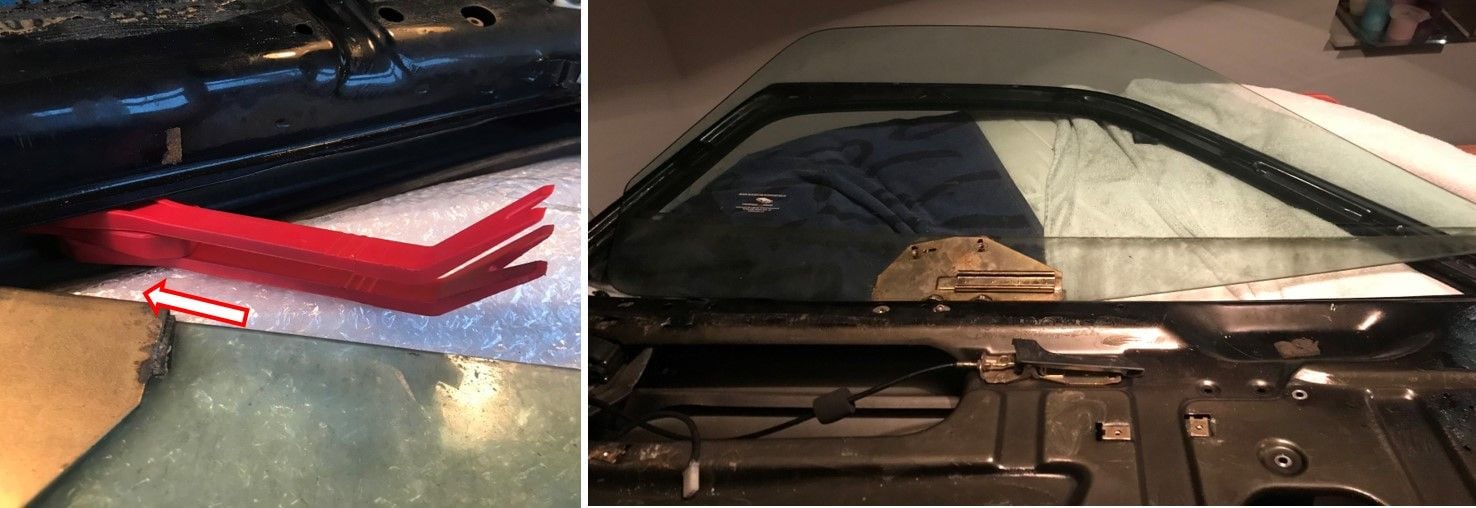
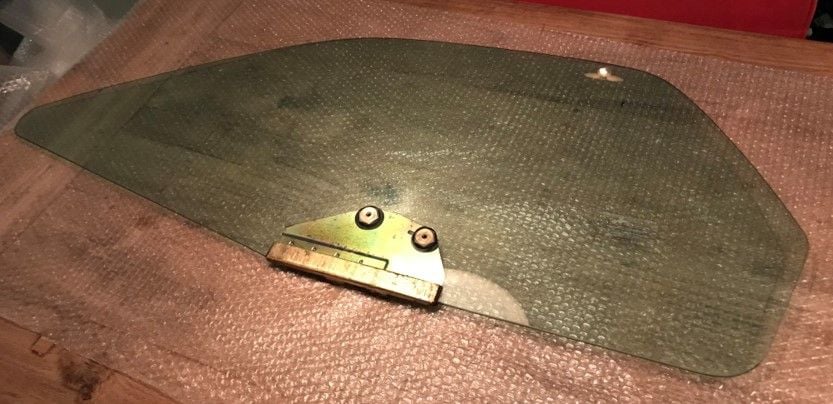
When I tried to do that I just couldn’t get the glass through the opening, it simply wasn’t wide enough. The picture below shows the bracket attached to the window: the guide rail and mounts for the lower slide are slightly to high. I used three plastic tools and pushed the middle one in between the others, creating enough space to get the window out:
After a good clean-up I wrapped it in bubble-plastic and stored it away in a very safe place…!!!!
Next are the door lock mechanism, door handle and door support....
9. Door lock mechanism, door handle and door support
.
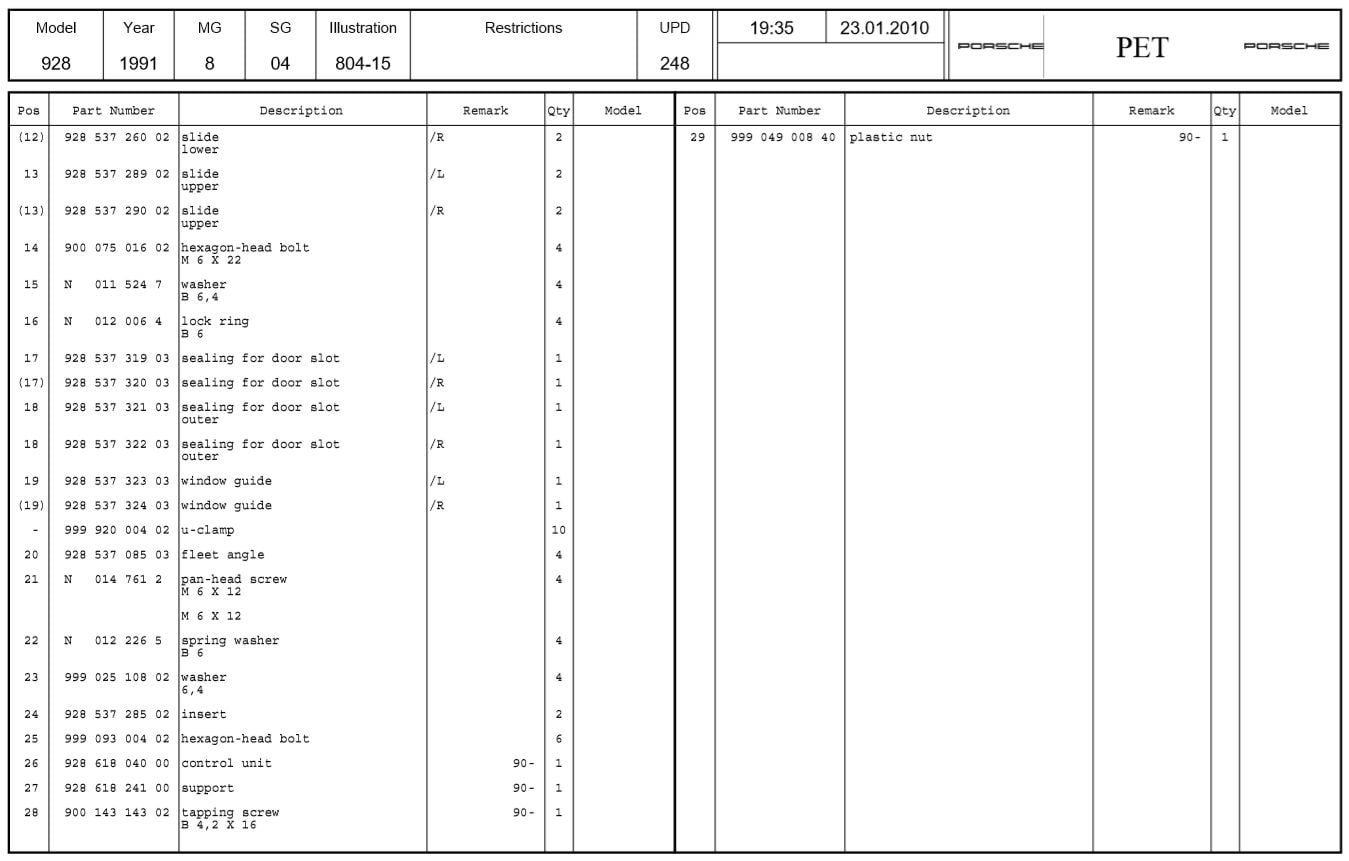
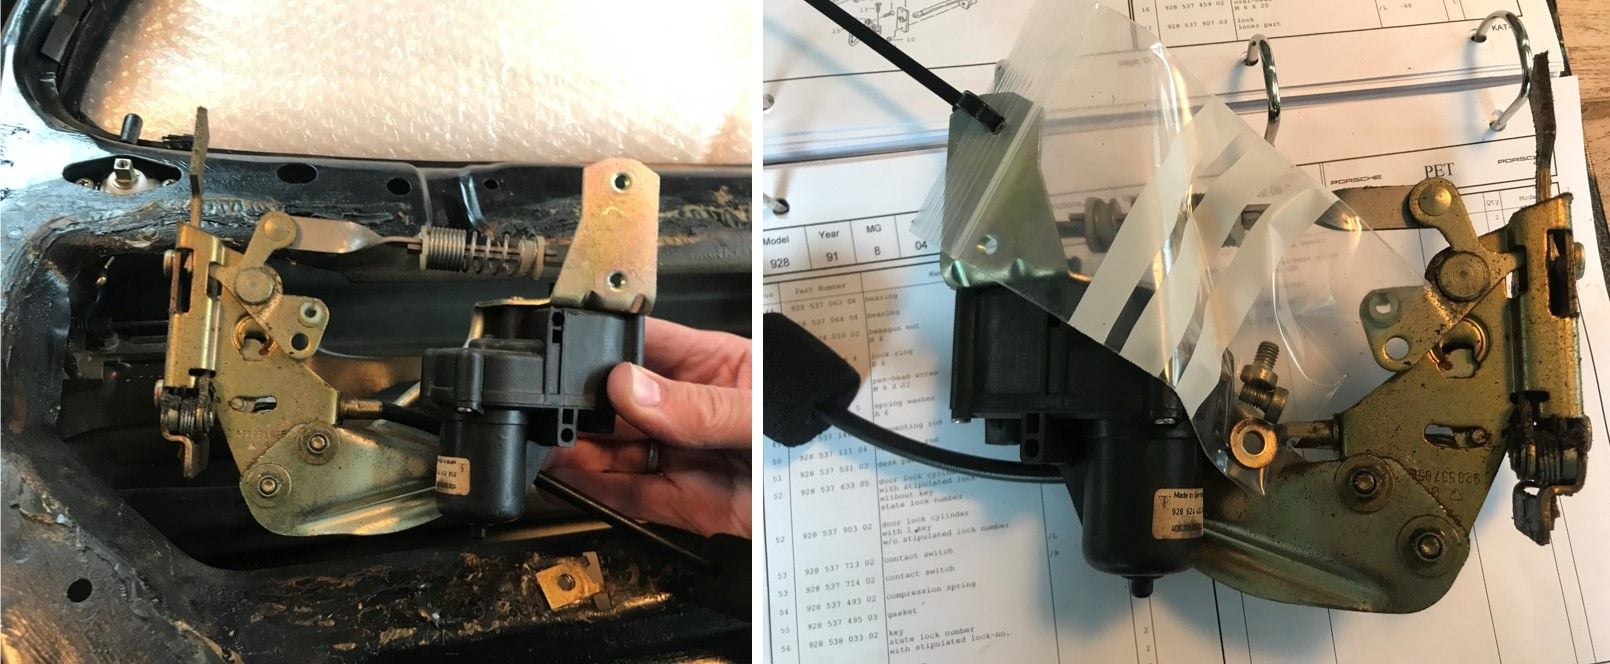
Below the relevant PET pages for reference:
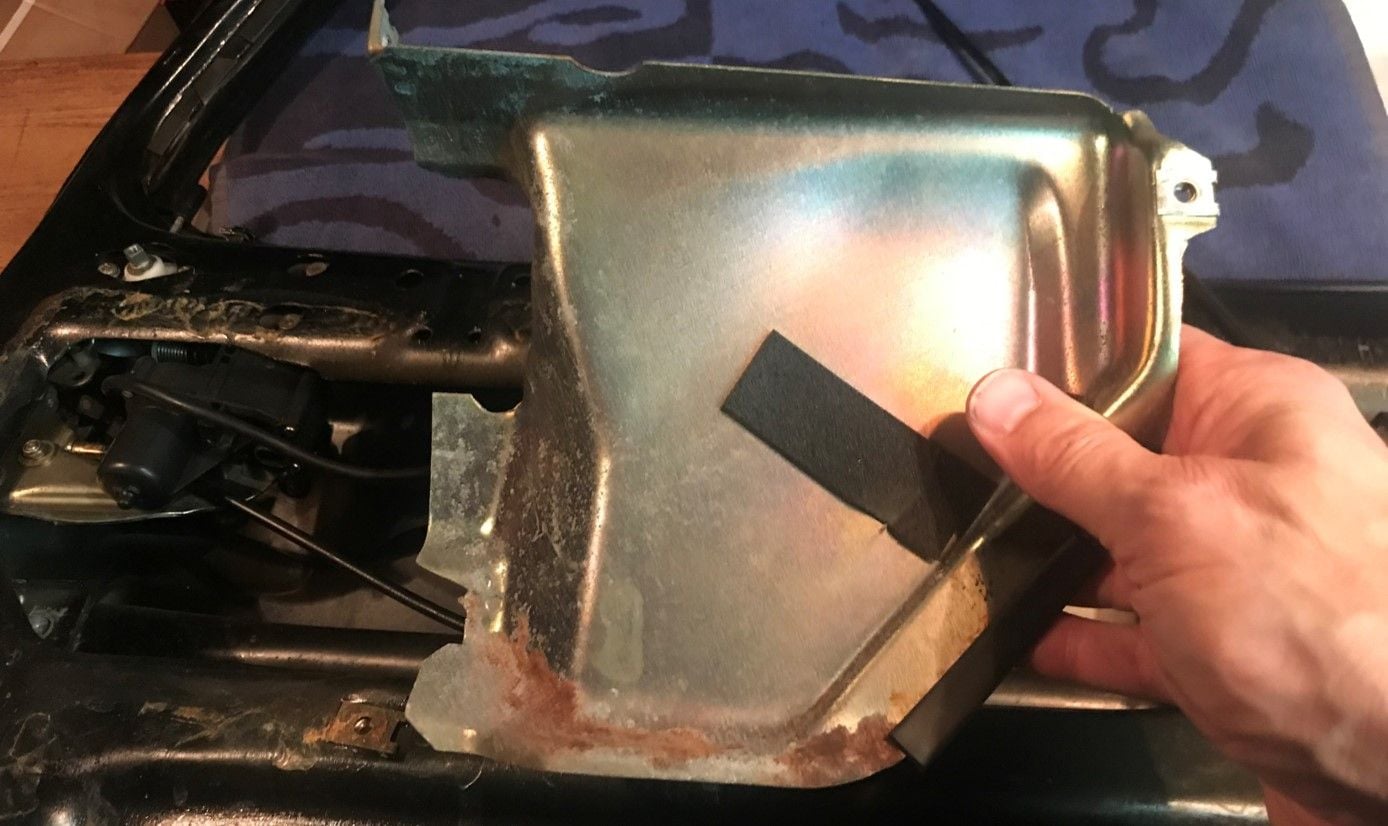
First job is to remove the lock security plate. To do so, first emove the two screws indicated in the pictures below:
The security plate is held at the bottom by the bolt that attaches the reinforcement bar to the door frame.
Loosen the bolt but DO NOT take it out: there is quite some tension on that bar, and it will be very difficult to get the bolt back in afterwards. When the bolt is loose, just slide the security plate out:
There is some rust on my plate, indicating there was some moisture in the door. Having no vapor barriers probably didn’t help….
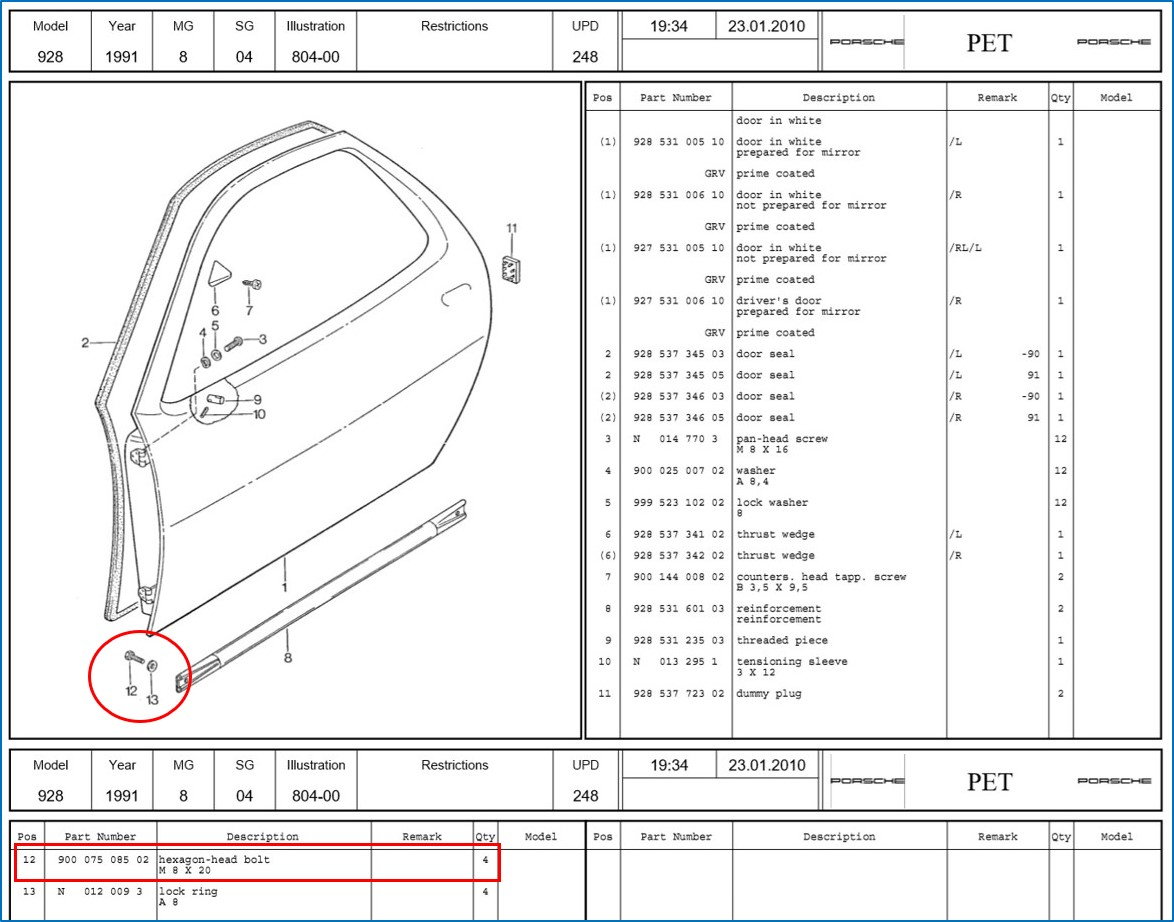
The PET page below might give the impression that the security plate is bolted down with a 20 mm bolt (as the reinforcement bar is bolted with one bolt on each side, and 4 are needed in total).
But if you check PET 804-05 nr. 31 at the beginning of this chapter it shows an M8 x 18 bolt, and that is also what I found in the car.
Next remove the two oval-head screws that hold the outer door lock in place. There is some white residue on the lower bolt, indicating that moisture got into that area:
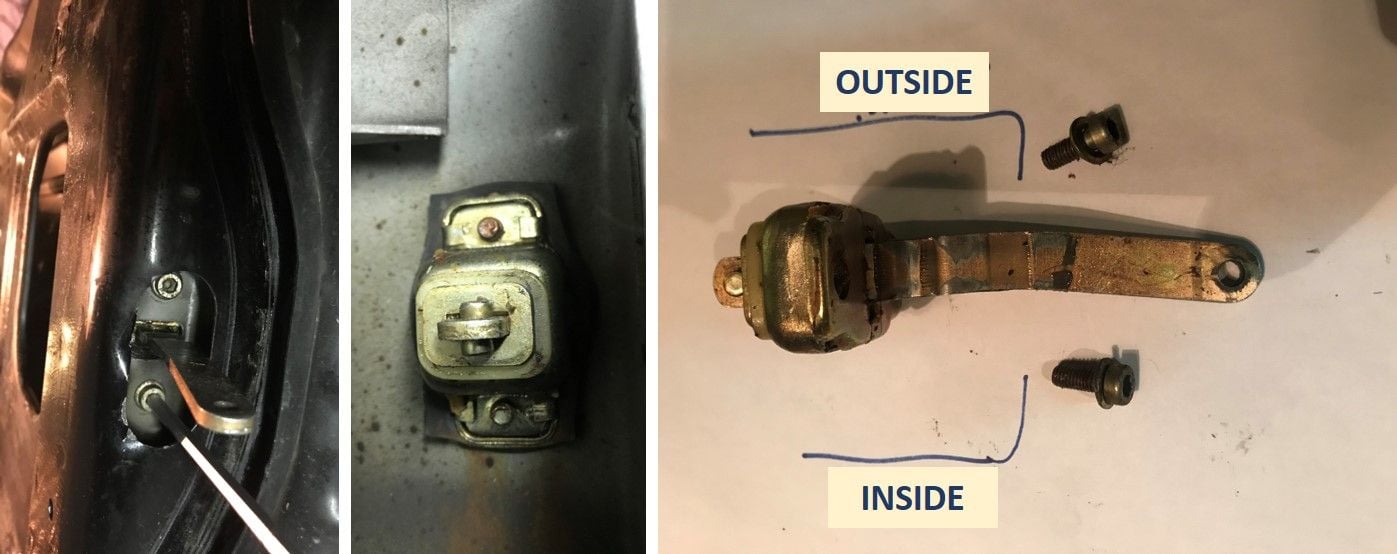
With the outer door lock out removed you can release the inner door lock mechanism from the door handle and the door lock cylinder.
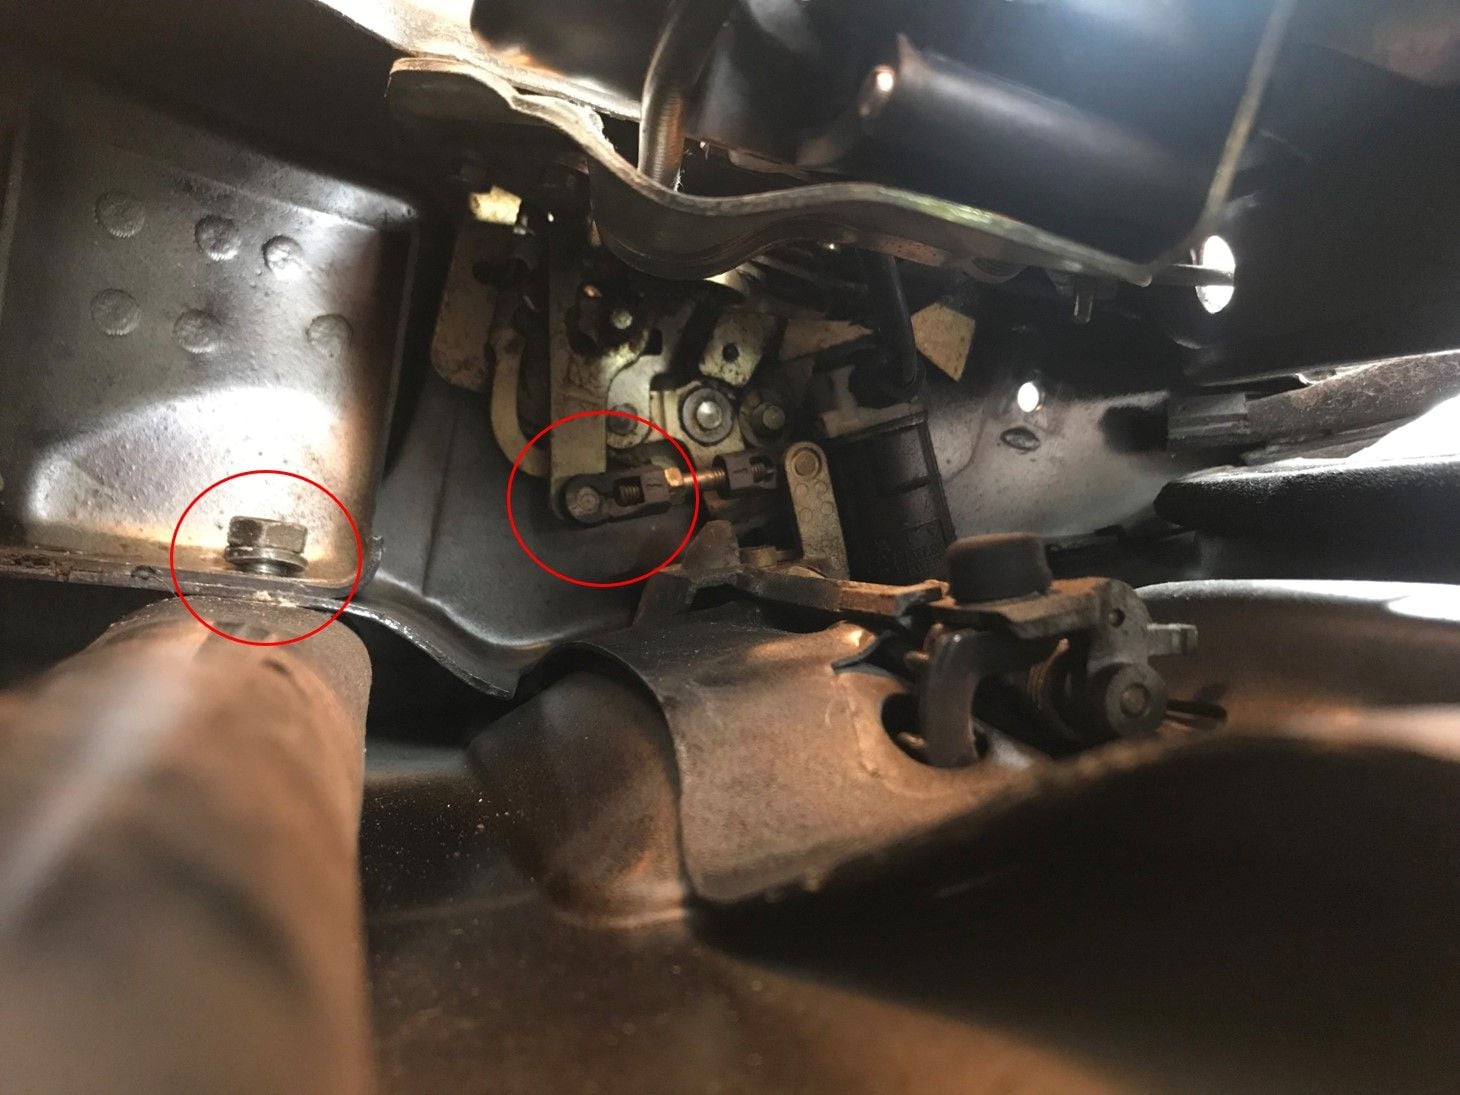
The picture below shows the door lock mechanism; on the left the bolt that held the security plate (that washer apparently becomes a
challenge when re-installing the plate) and the on the right the connecting rod between the door handle and the door lock mechanism:
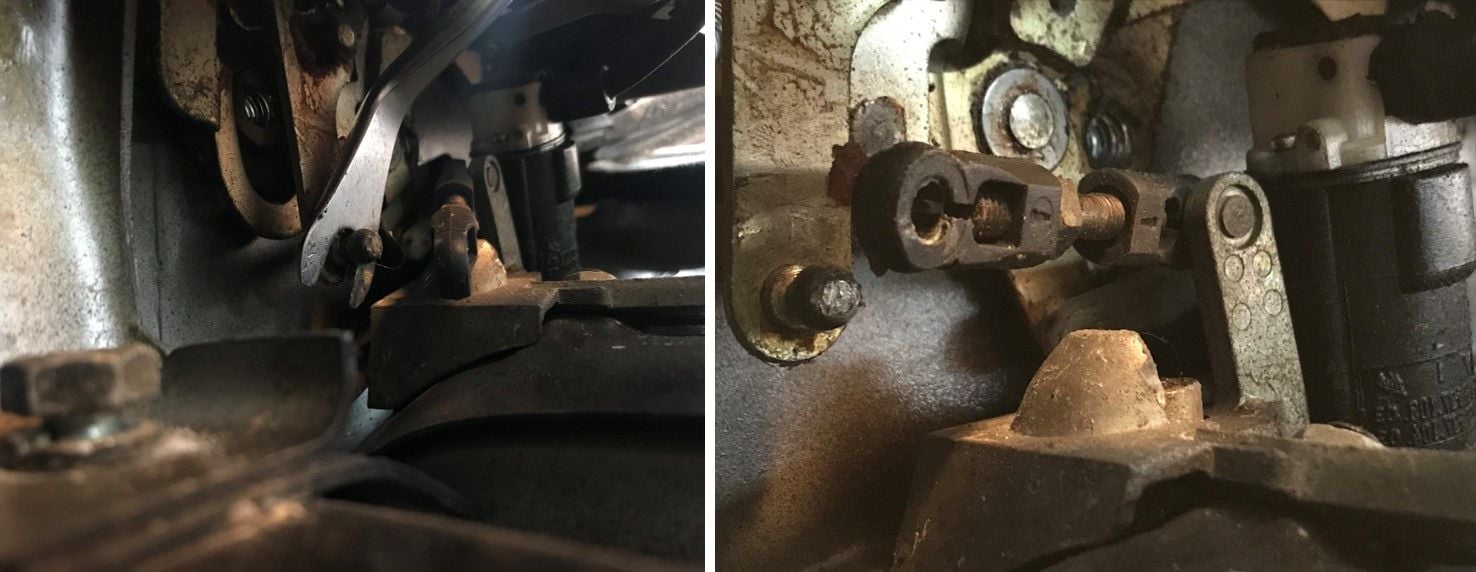
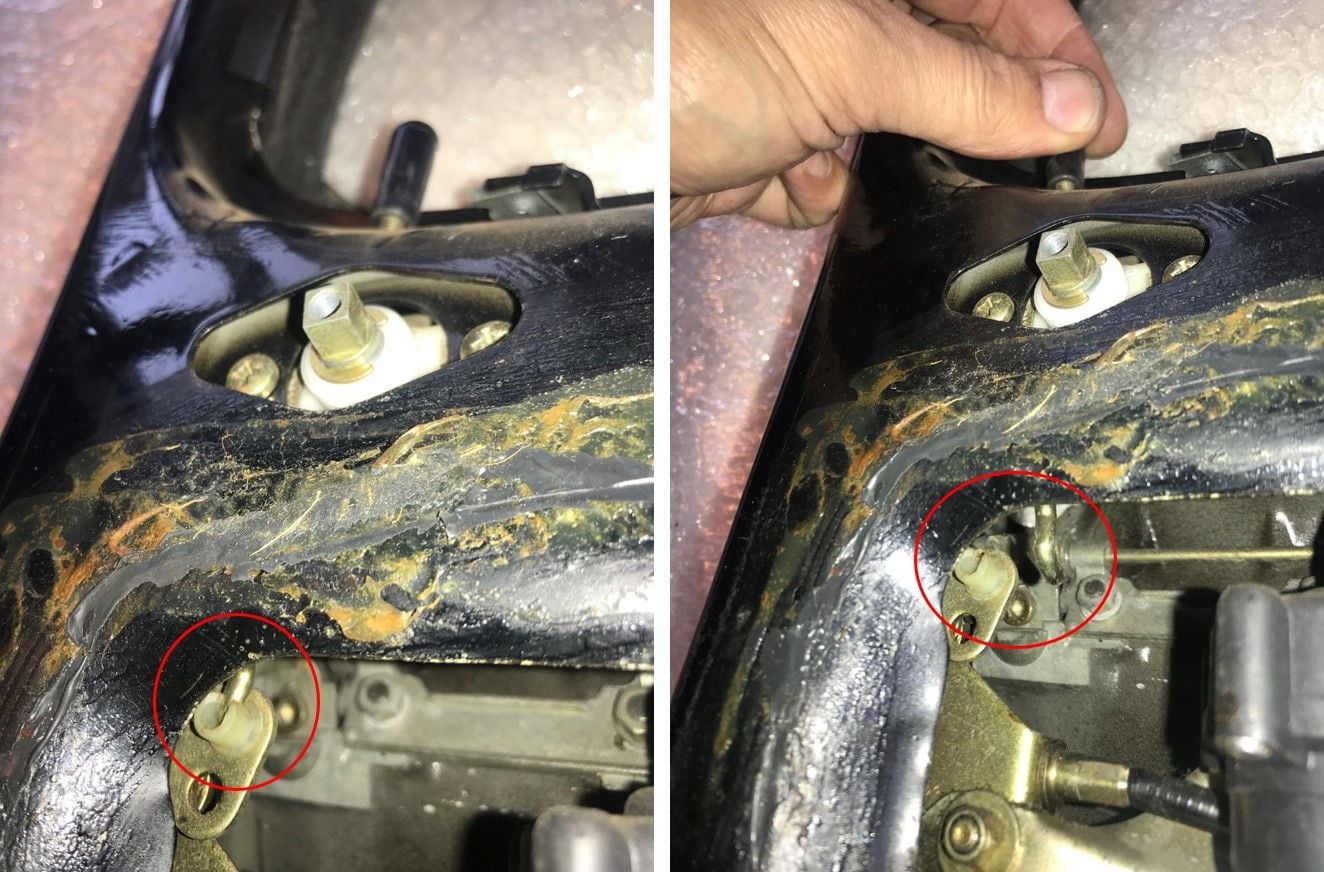
I inserted this tool from the lock mechanism opening in the door and popped the rod of the metal ball. It took me a while to do so as I didn’t want to crack the plastic part of the rod:
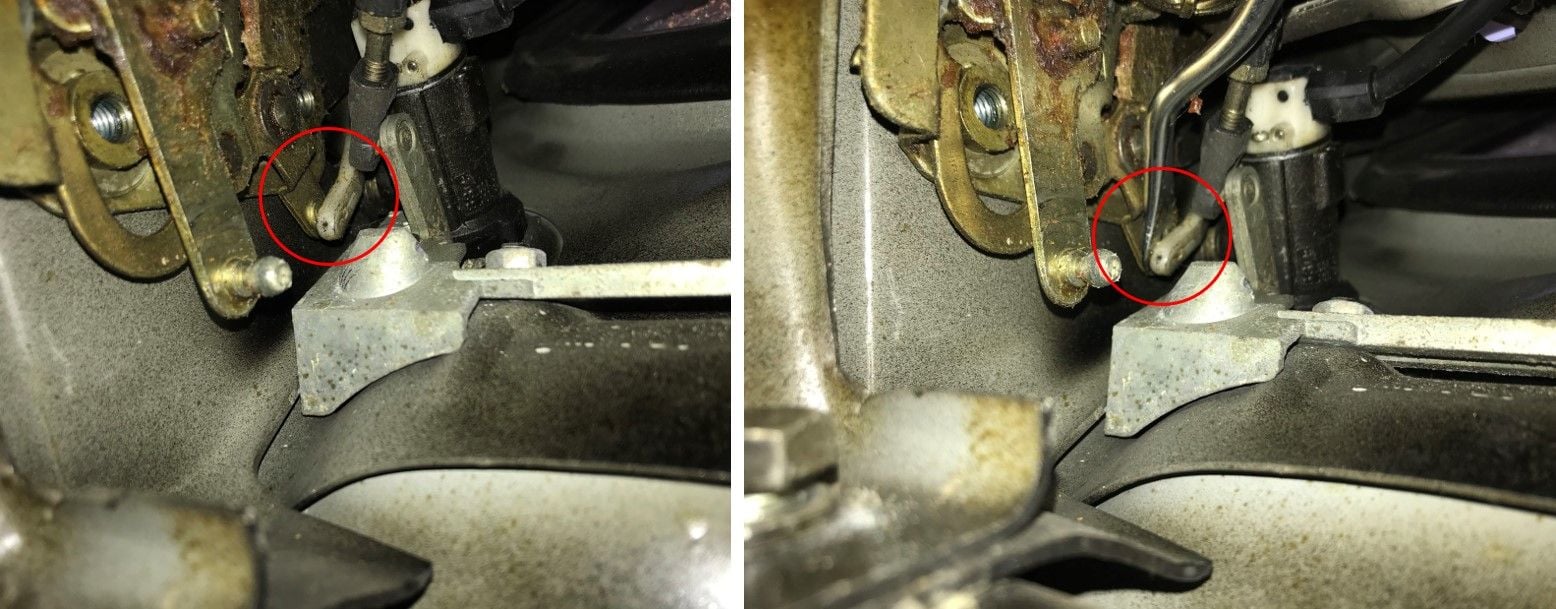
Push the black rod outwards (upwards in this picture, but remember my door is lying on its back). This will give you access to the white plastic operating rod that
connects the lock mechanism to the door lock cylinder. Using the same tool is popped the rod of the metal ball:
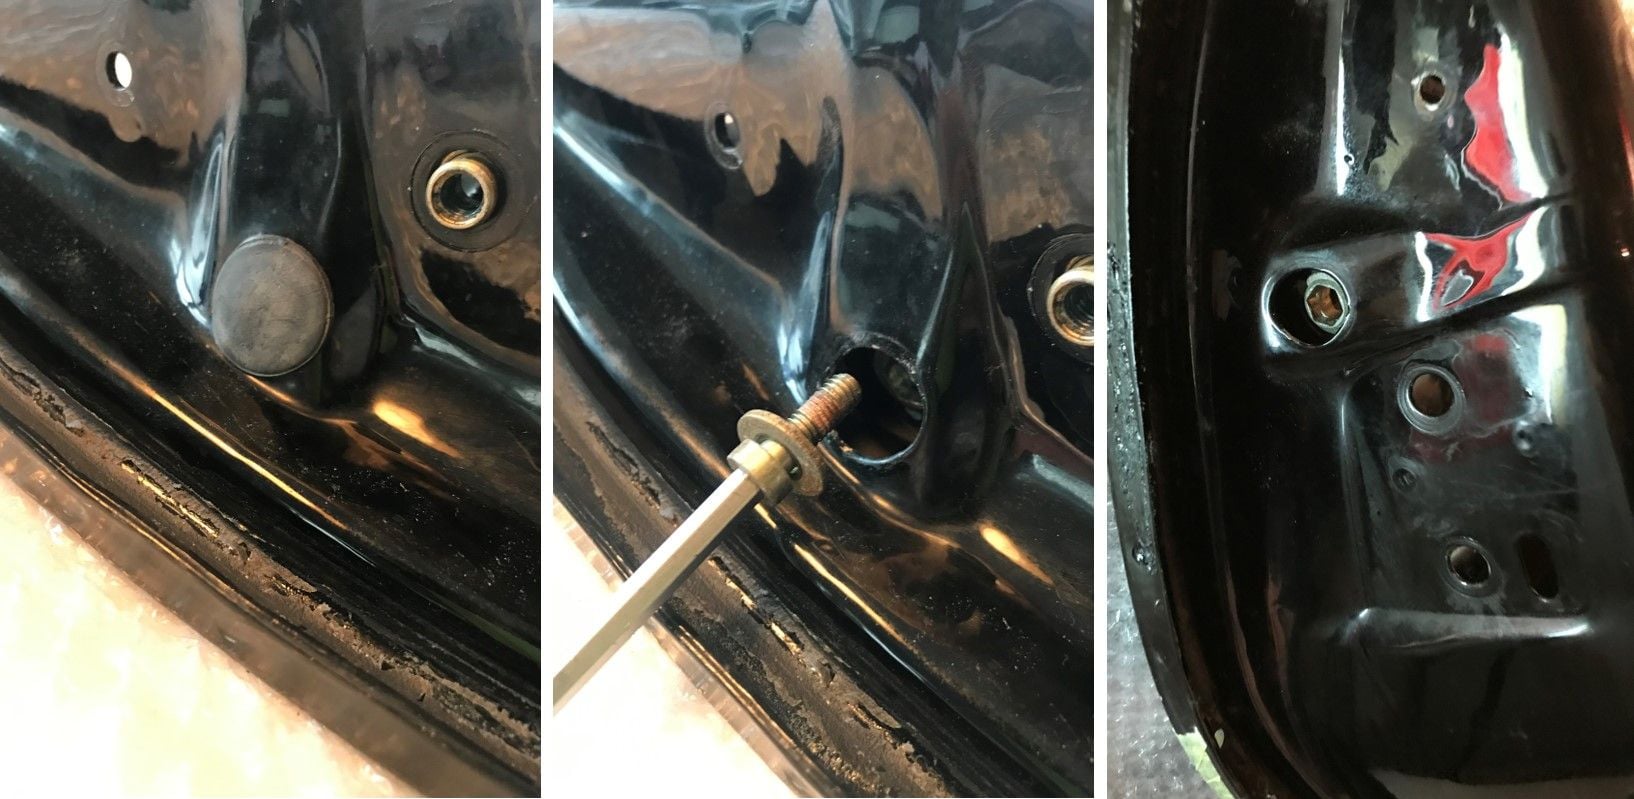
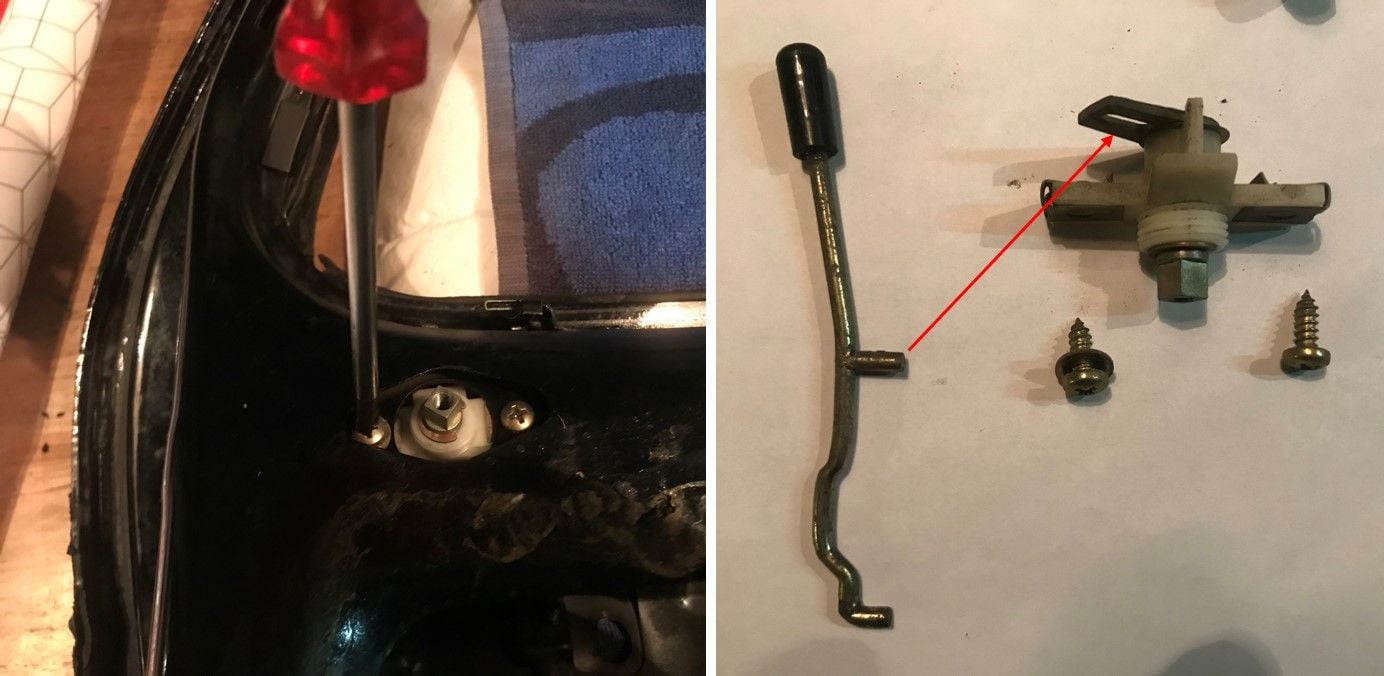
The door lock cylinder is still bolted to the door itself. To unbolt is first remove the small plastic cap and then unscrew the allen-head bolt. The picture on the right shows the spacer that sits in the door:
Remove the spacer using a large allen-head screwdriver. I haven’t been able to locate this part in PET, but it is shown in the WSM as you can see below on the right:
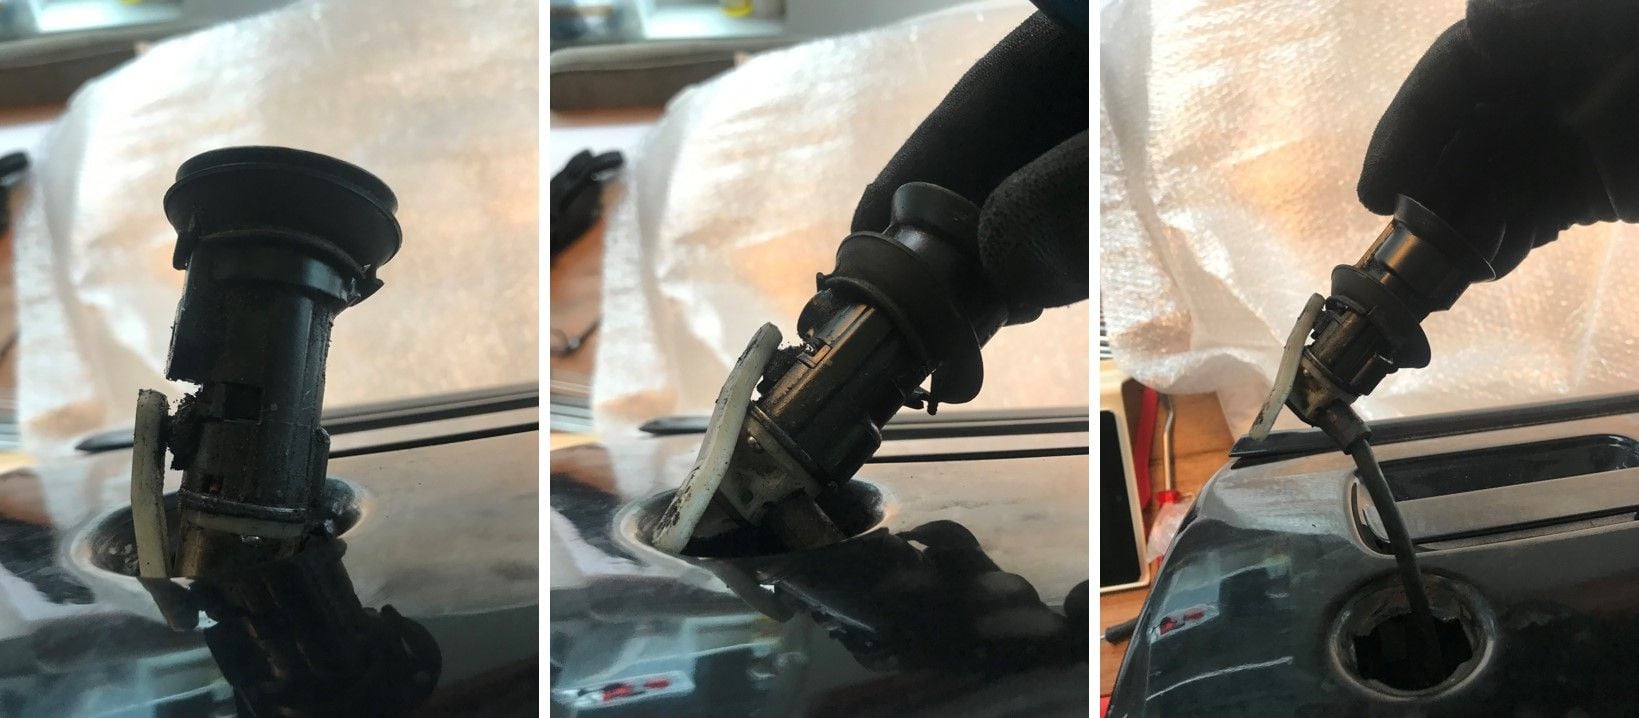
Remove the lock cylinder by first gently pushing it outwards from inside of the door. I pushed the white plastic rod in line with the lock cylinder to get it through the hole in the door.
It requires a bit of fiddling but in the end it comes out fairly easy:
Release the locking rod from the door lock mechanism by pushing it out of the plastic cap:
Remove the two pan-head allen-bolts that secure the door lock mechanism to the door. Keep them in a secure place: I haven’t been able to find these in PET:
The door lock mechanism is now free so you can take it out. I stored it with the pan-head screws in a plastic bag tie-rapped to it… :-)
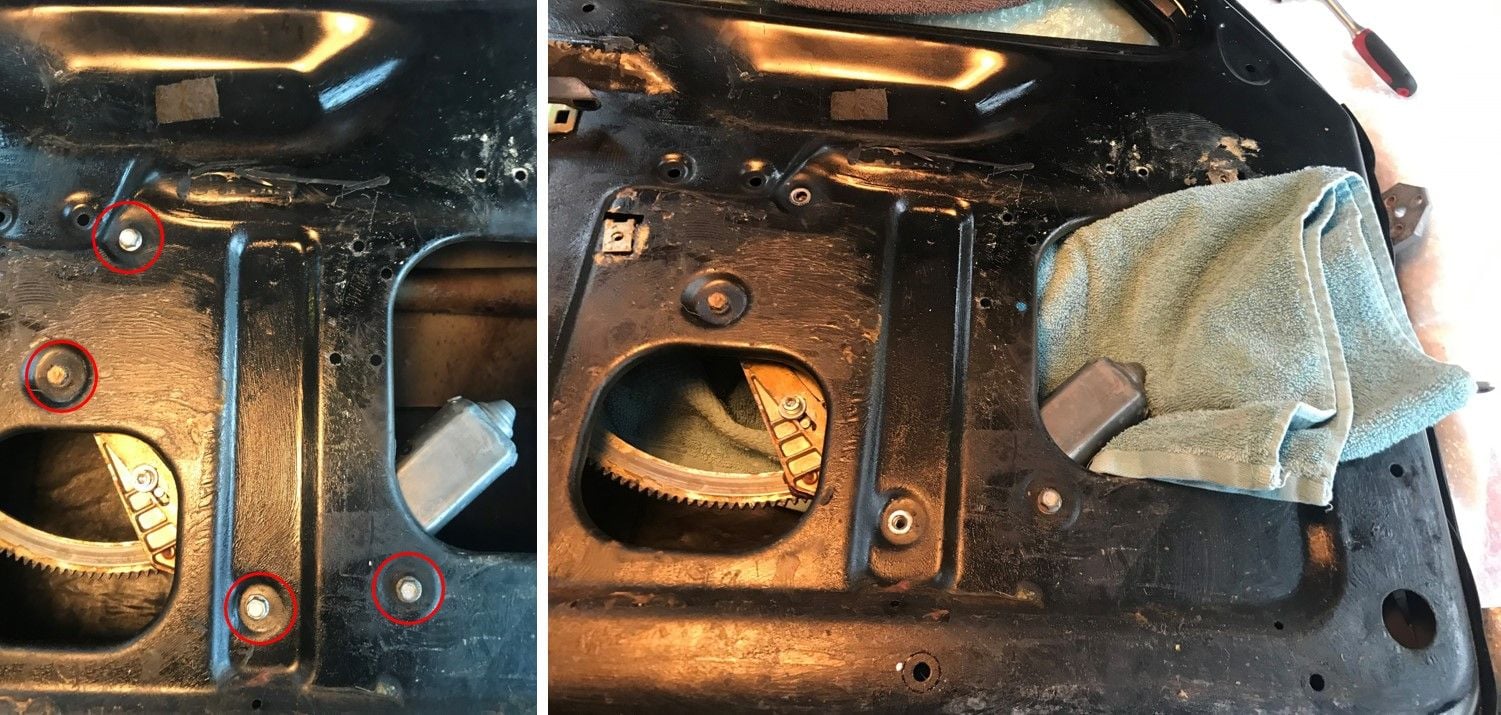
To remove the door handle and inner plate first remove the rubber cap of the front bolt. Next take out the two allen-head bolts that hold the door handle:
Remove the two hexagon nuts that hold the inner plate to the door (I know the allen-head bolts are not removed yet in the left picture…..let’s call it artistic freedom… :-)…)
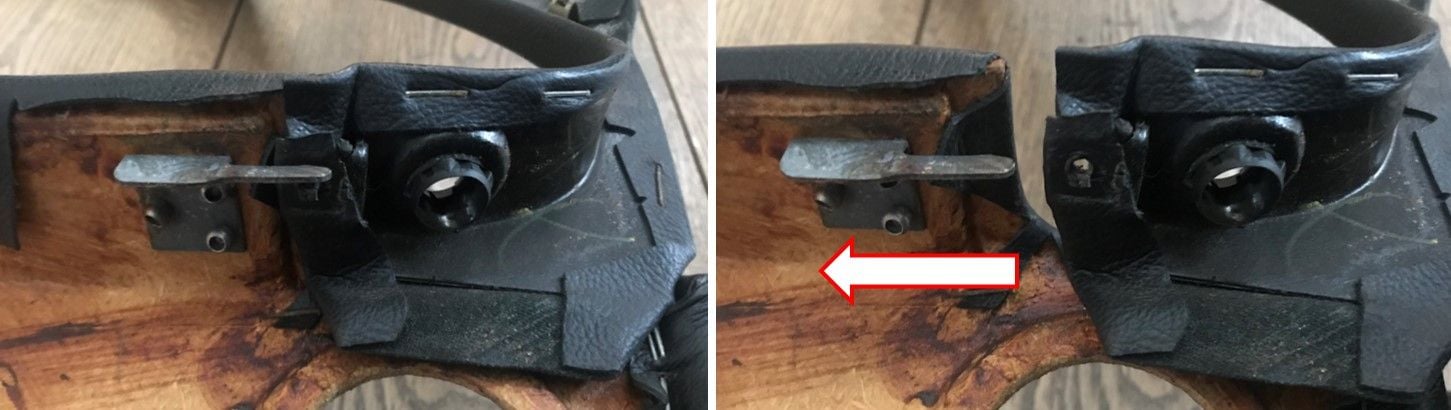
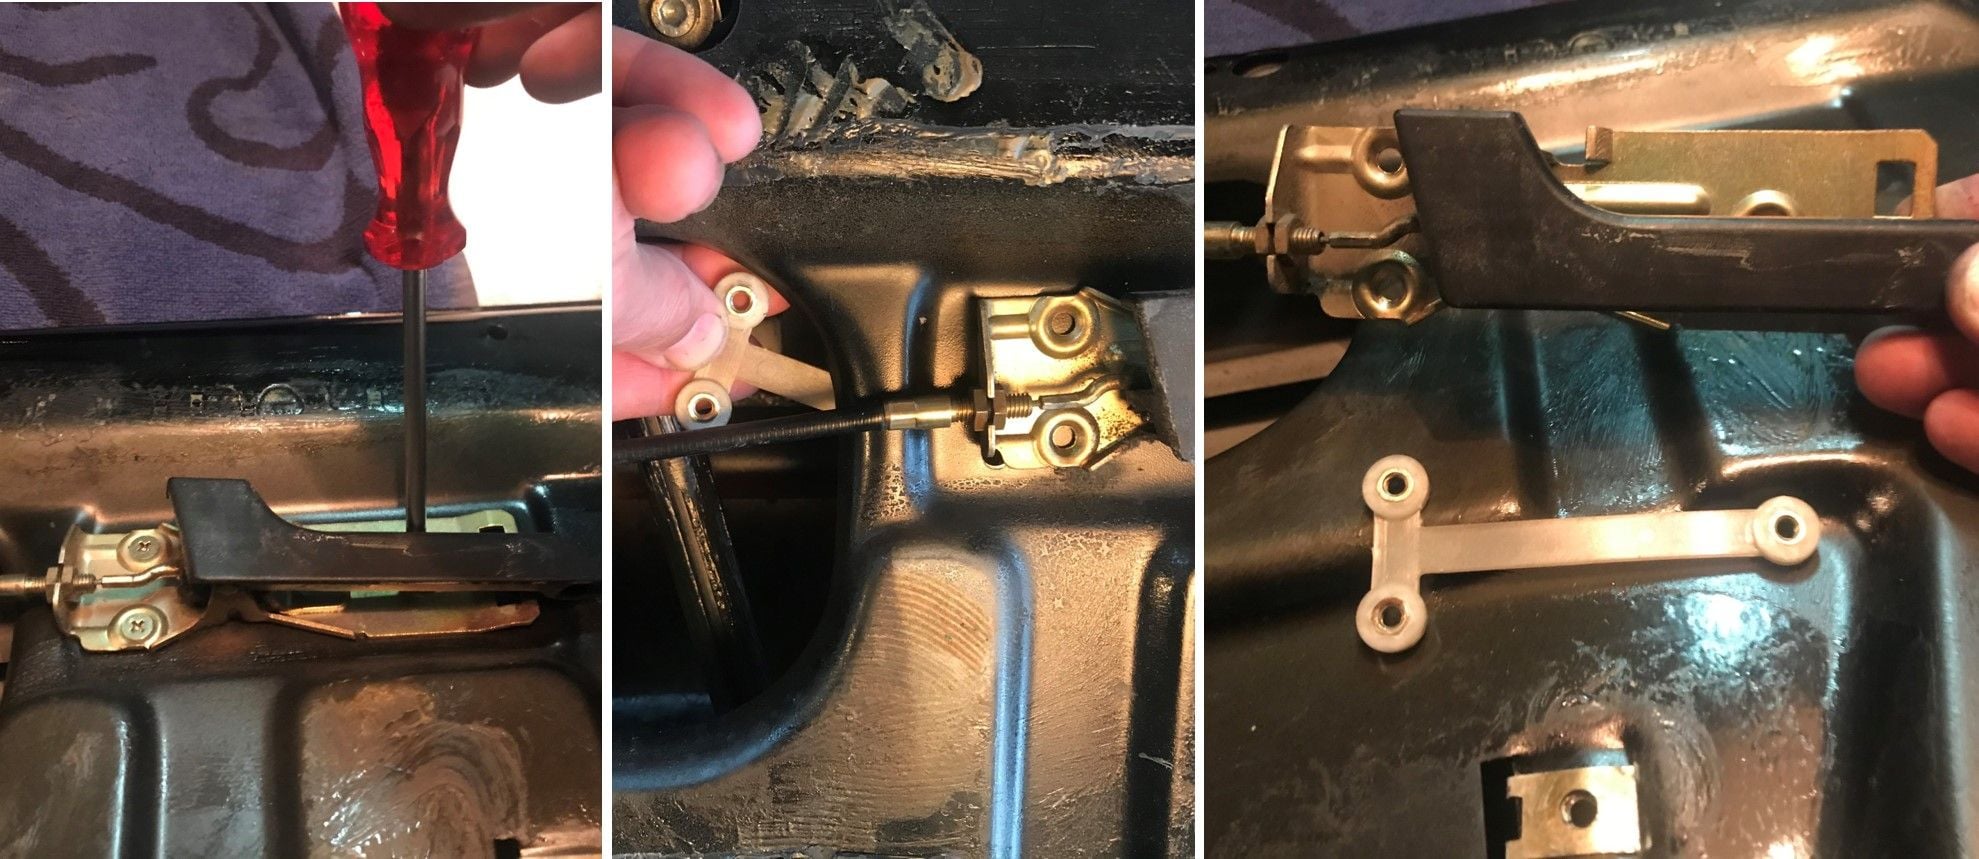
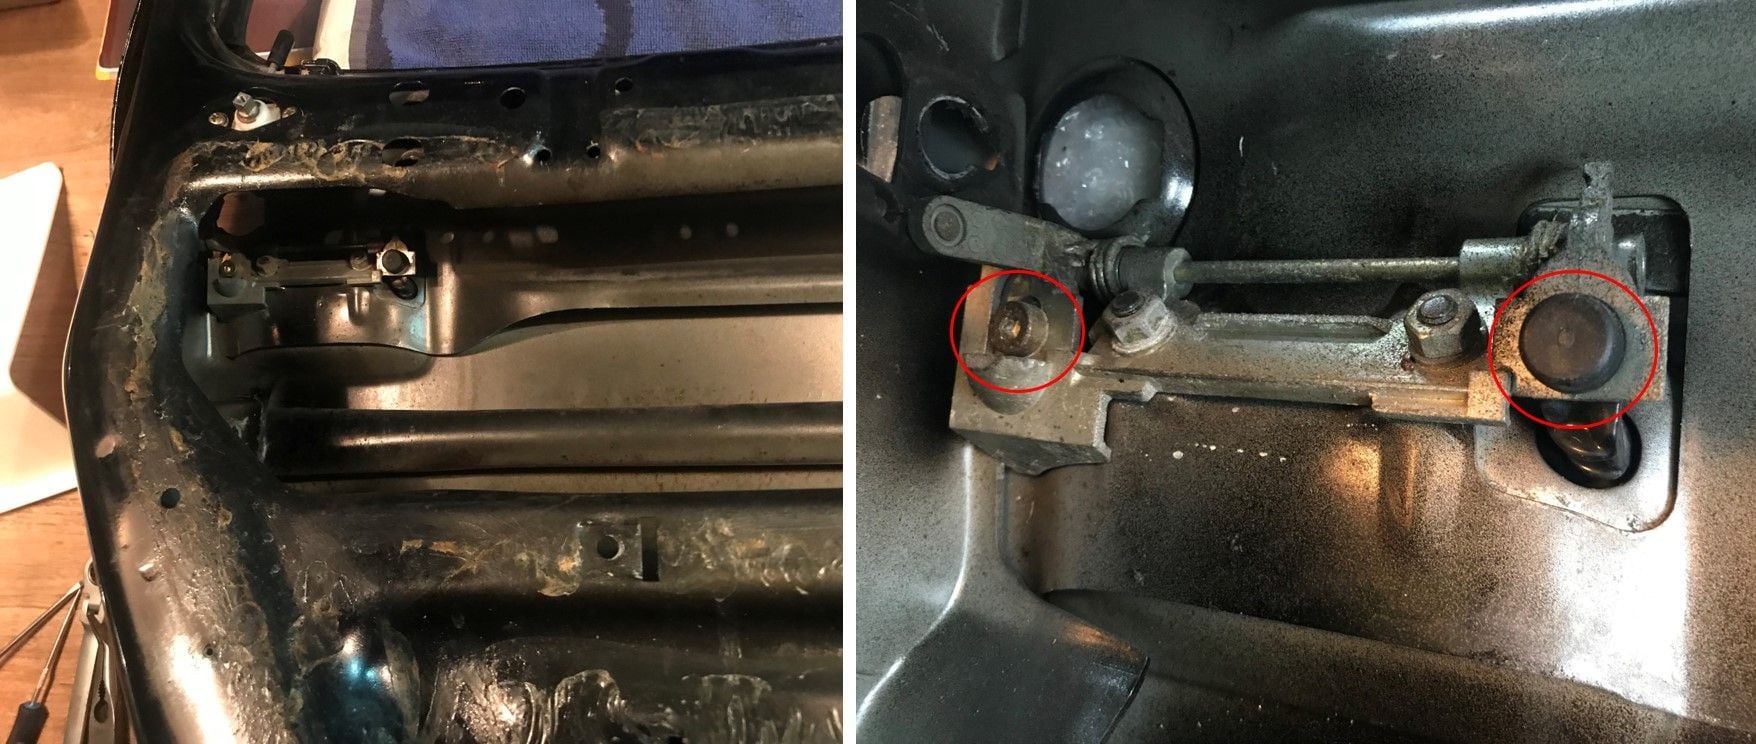
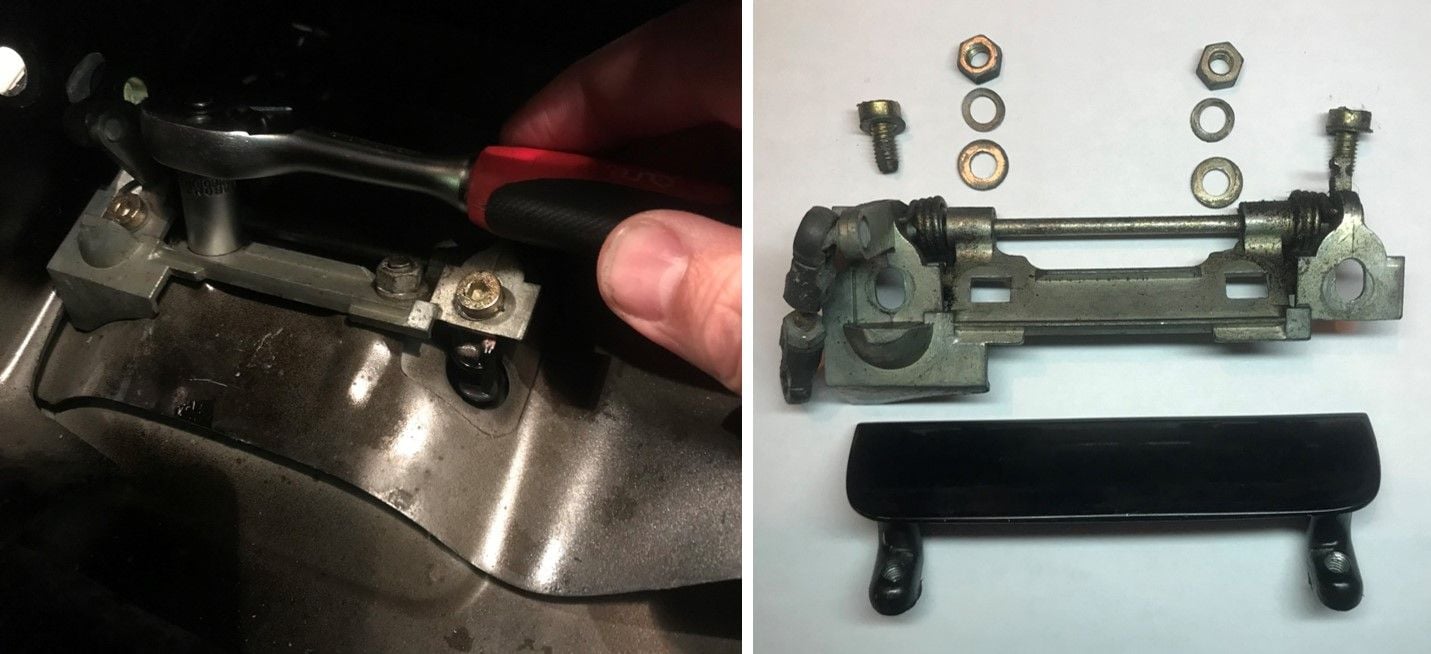
Remove the locking rod and bearing from the door. You’ll first need to slide the end that’s shown in the picture below out of the slot on the bearing. Then remove the two screws on the side of the bearing:
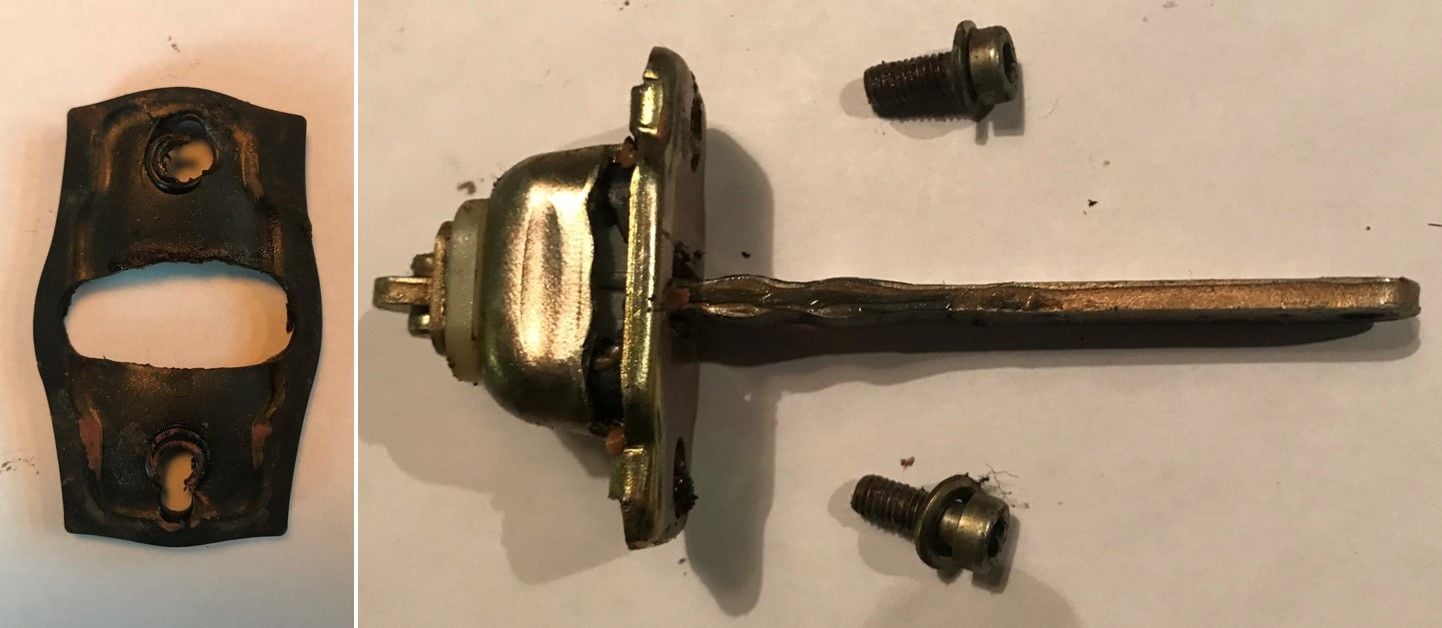
Last thing to do is to remove the door support from the door. Undo the screws and pull it out from the inside.
Don’t forget to also remove the rubber desk pad that sits between the door support and the door: it tends to stick to the door.
Keep an eye on the curve in the door support, to prevent installing it the wrong way around:
.
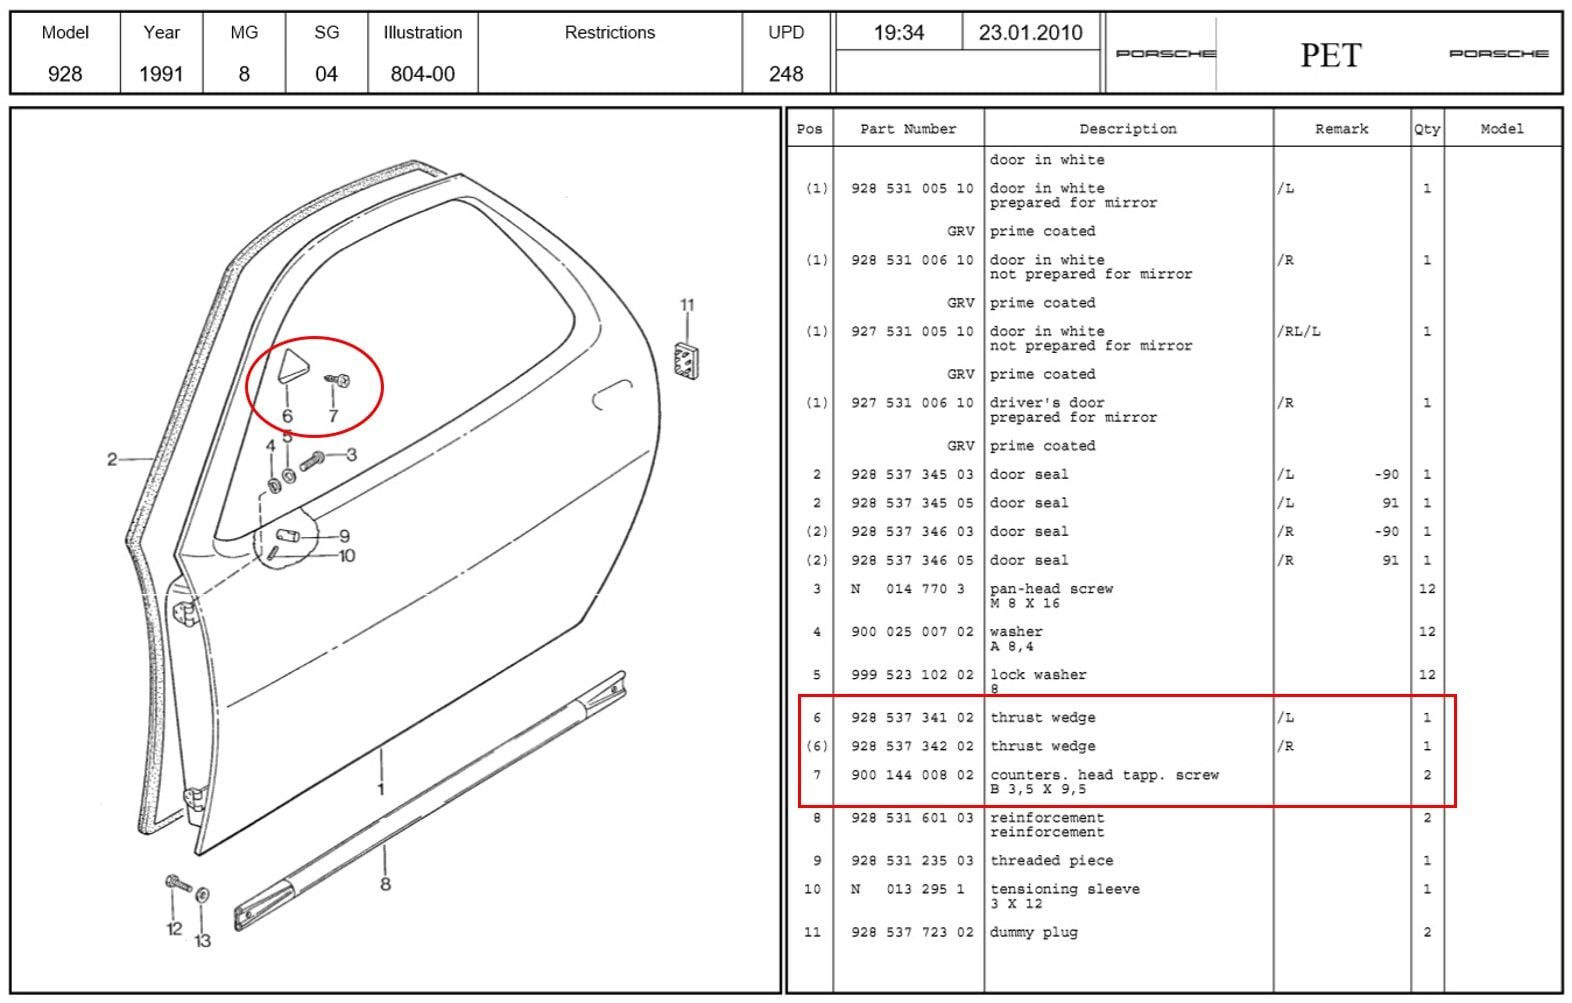
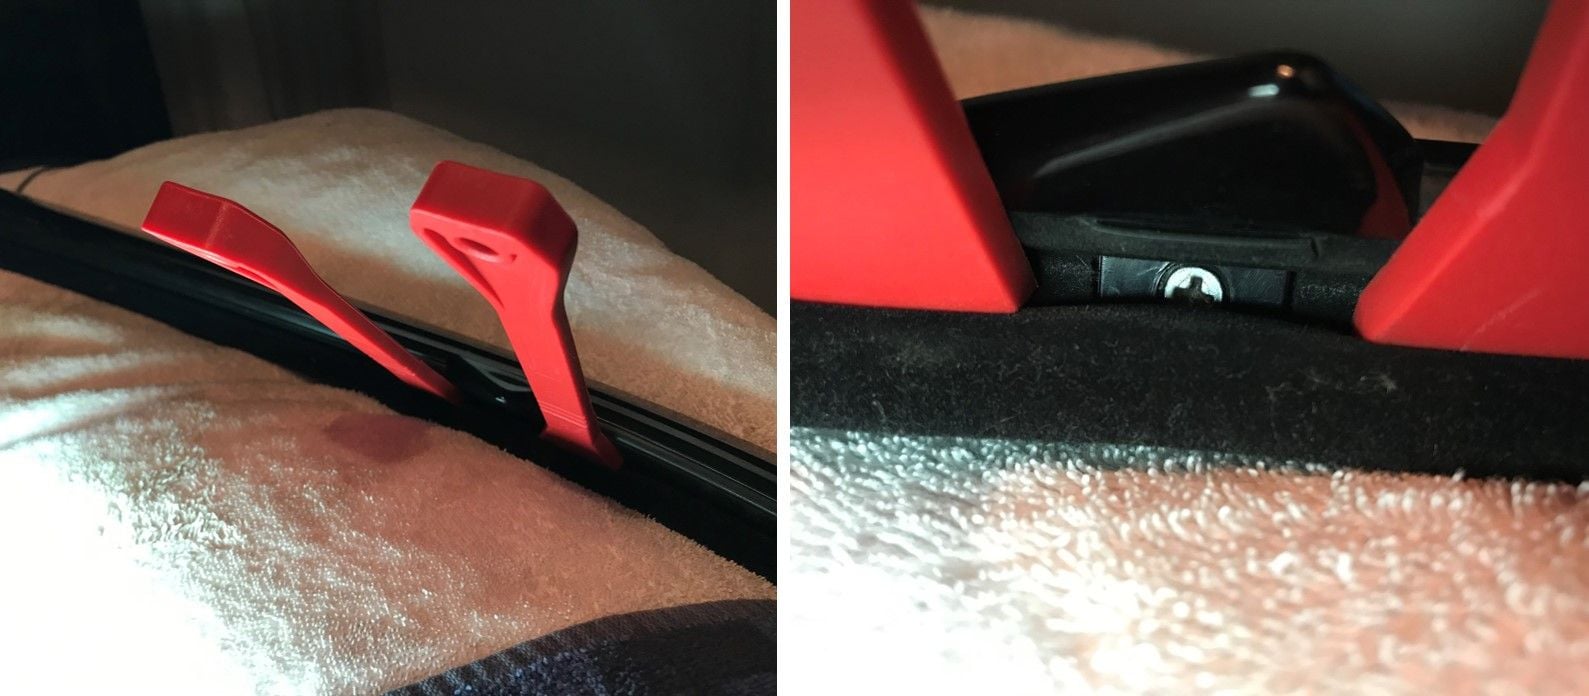
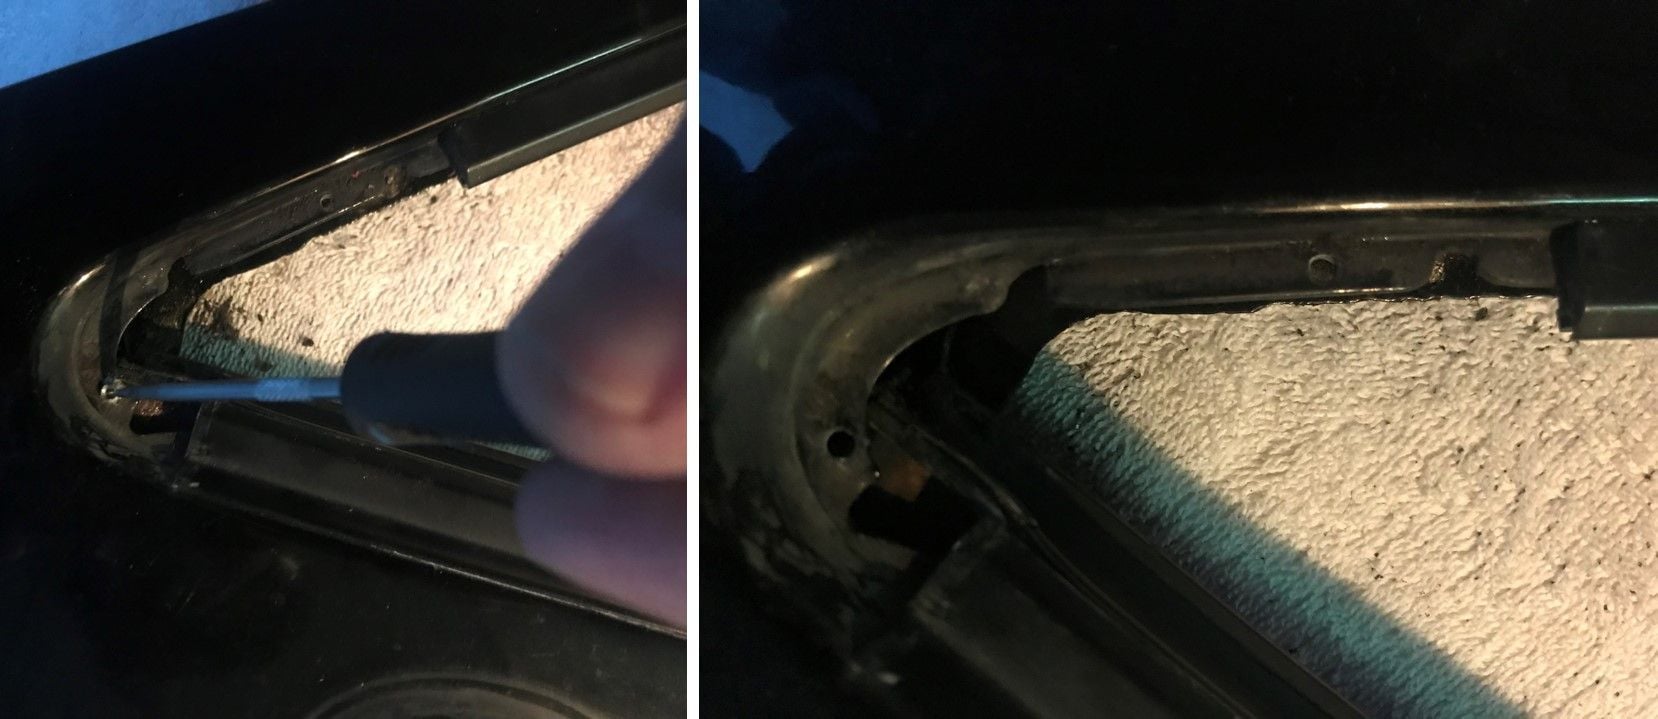
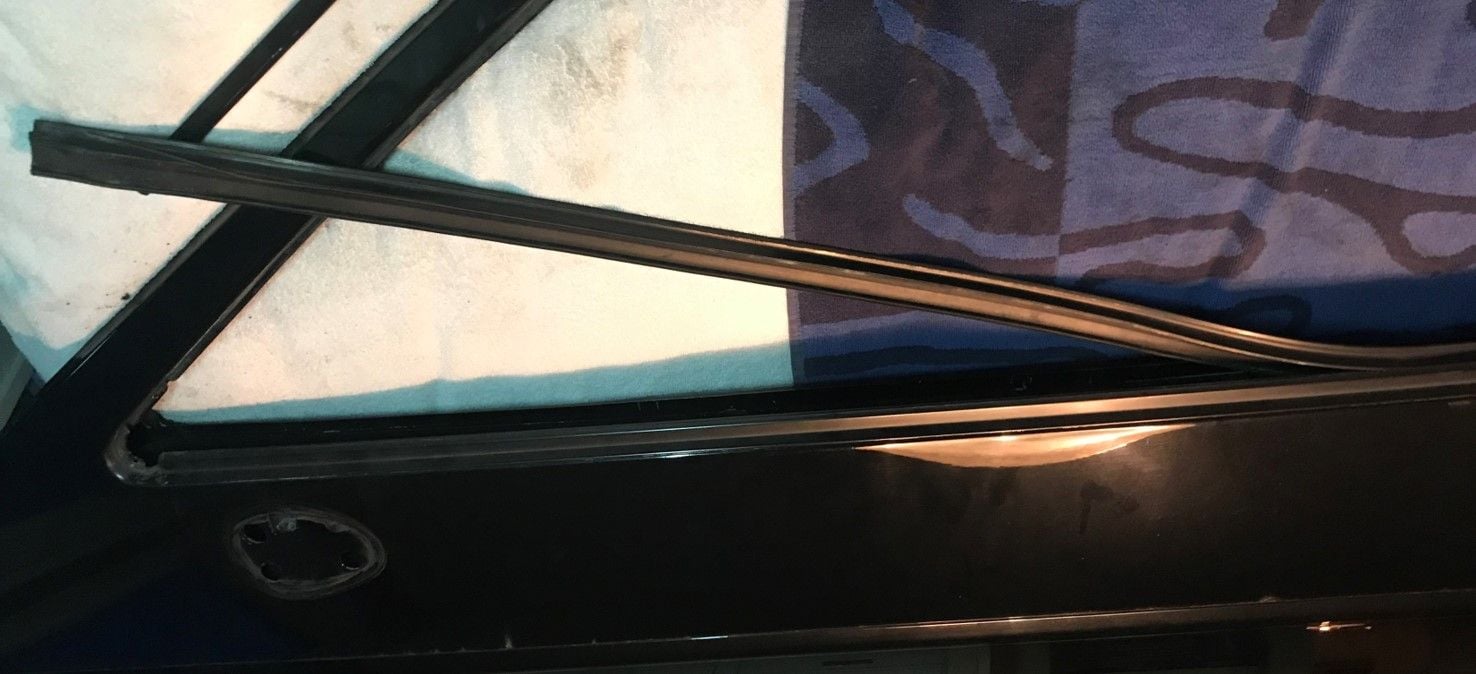
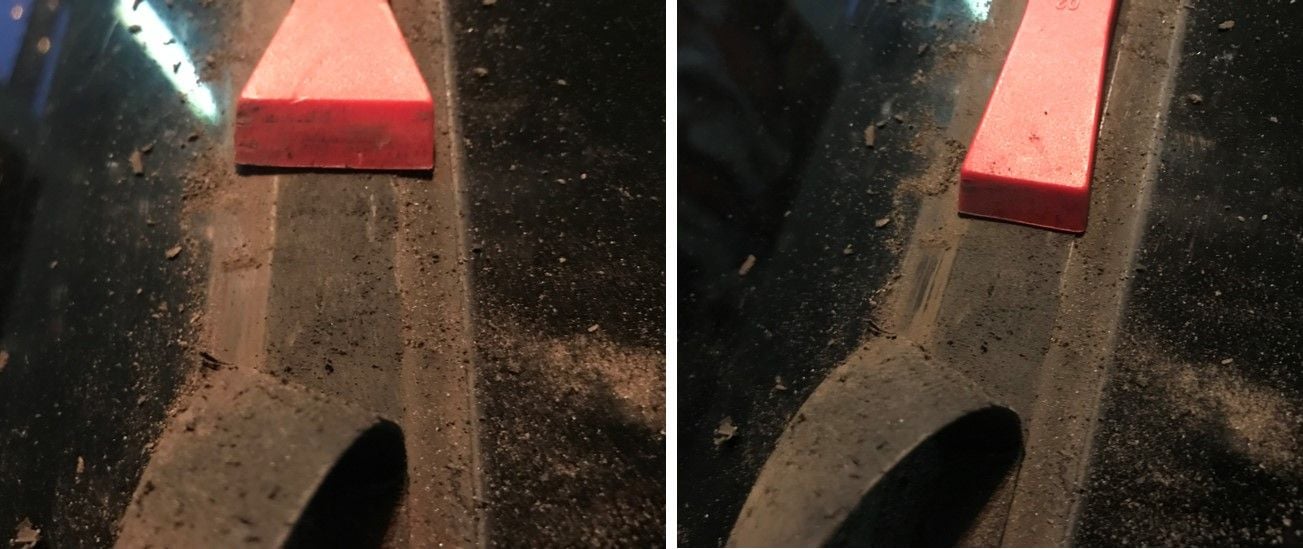
First remove the triangle-shaped thrust wedge from the window frame by taking out the screw inside the rubber window guide:
Remove the window guide by pulling from the rear corner. Mine came out without a problem:
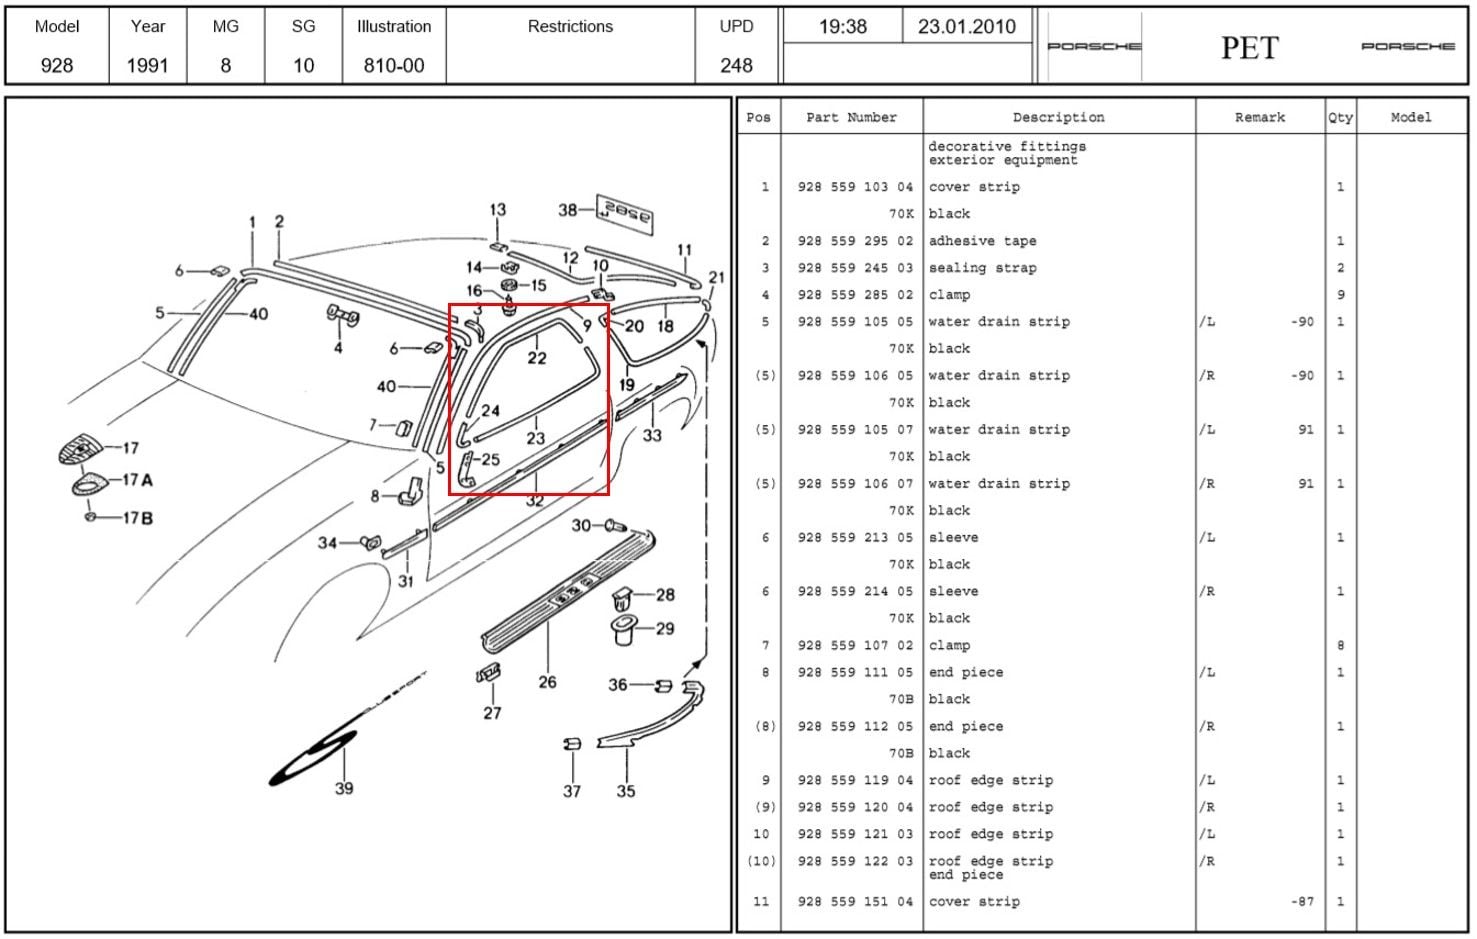
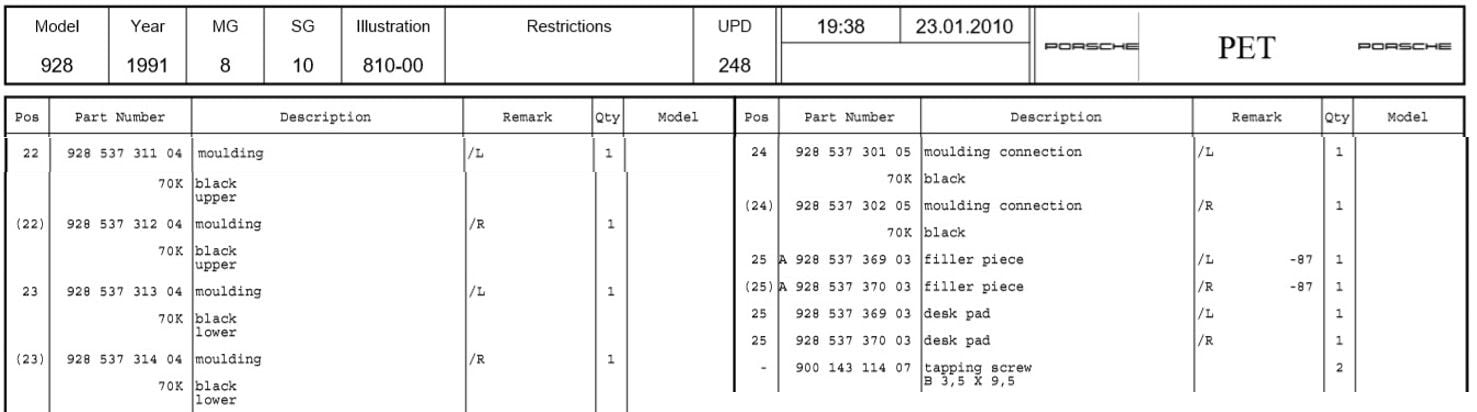
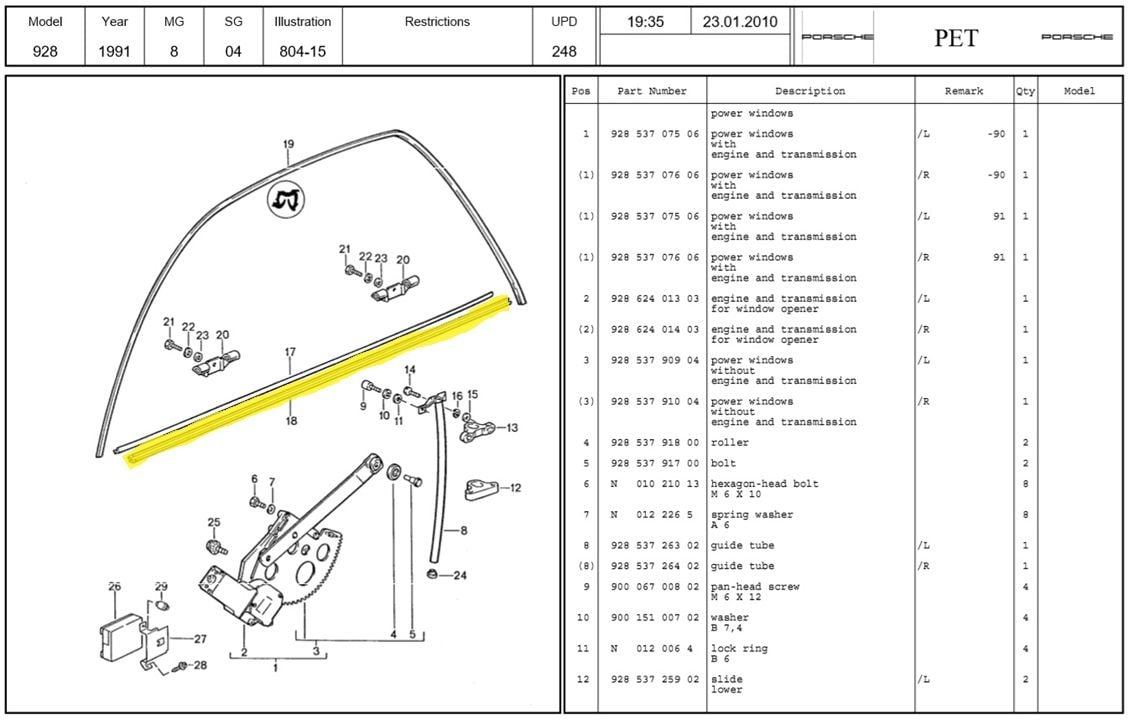
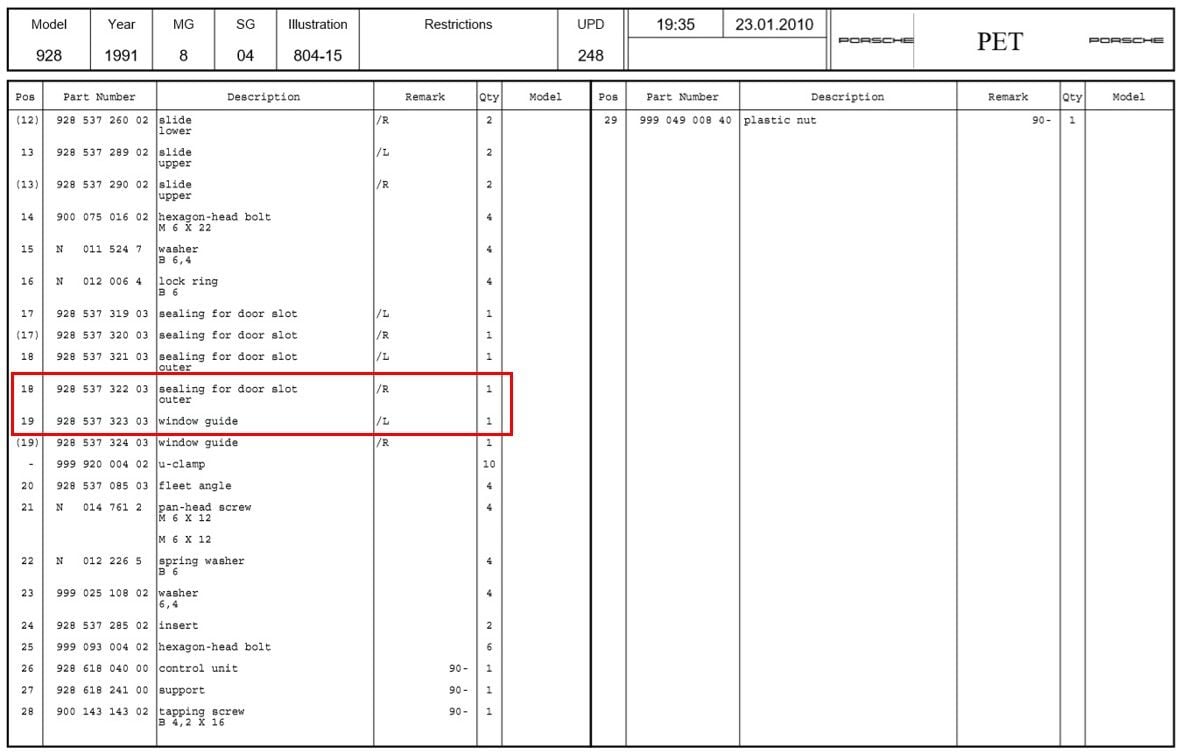
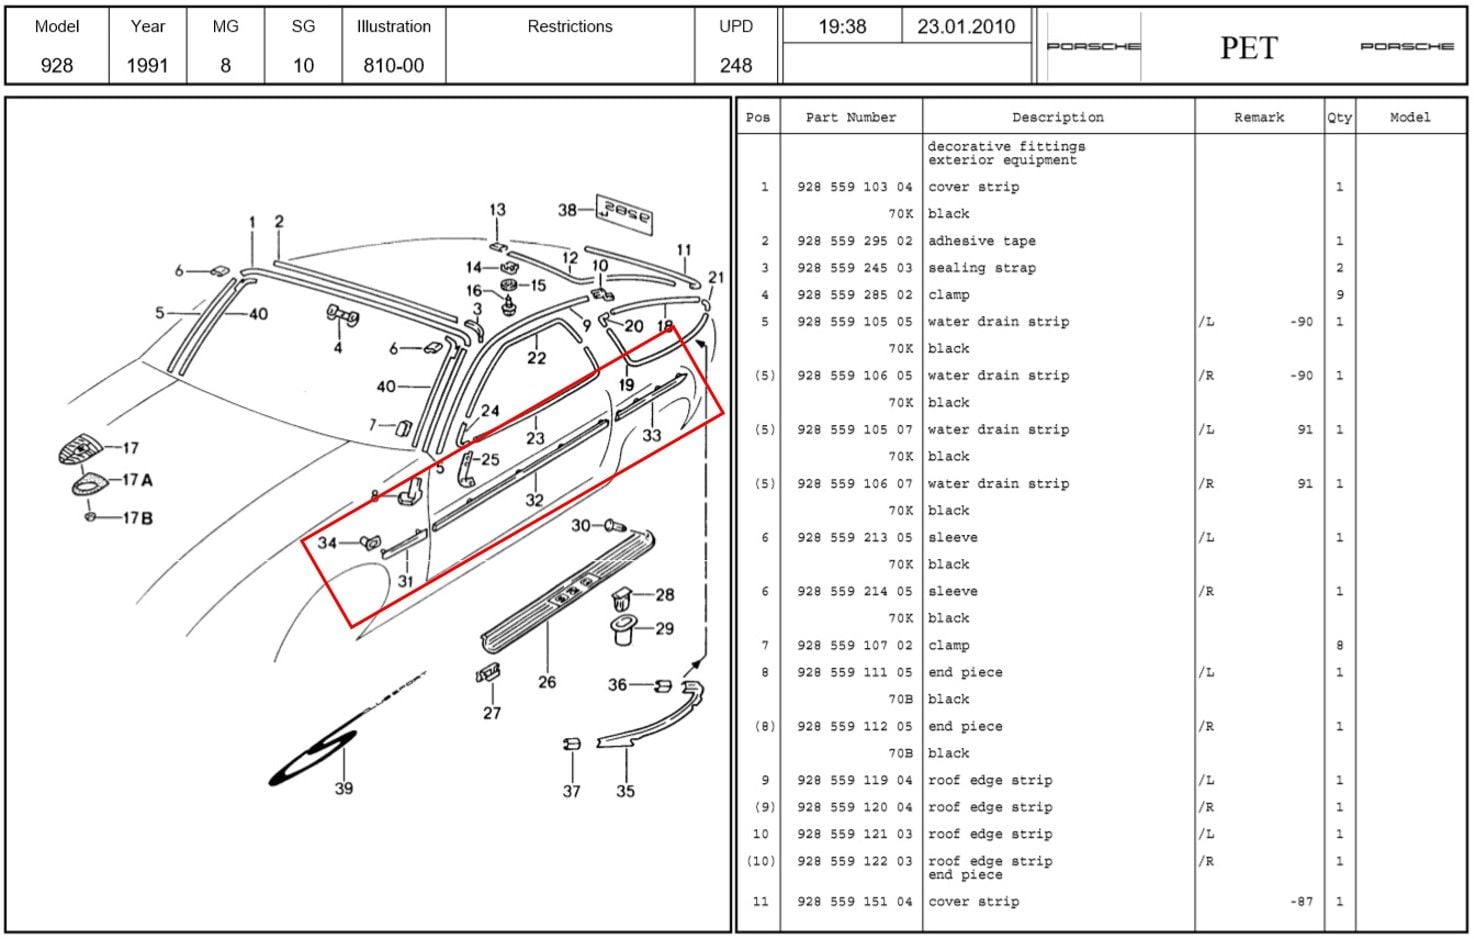
Below the relevant Pet pages for reference on window trim:
Remove the moulding connection (nr. 24) in the front lower corner. It is attached by two pins that click into the holes shown on the picture below on the right.
Mine were pretty stuck so they didn’t survive (they warped and one of the pins broke off).
The filler piece (nr. 25) below the moulding connection is held one by two flat rivets that I drilled out using a 3 mm drill:
Once you drilled the top off the rivets the filler piece comes loose. As the rivets lower part and the holes in the door are slightly wider than 3 mm a small piece of the rivets needs to be pushed out:
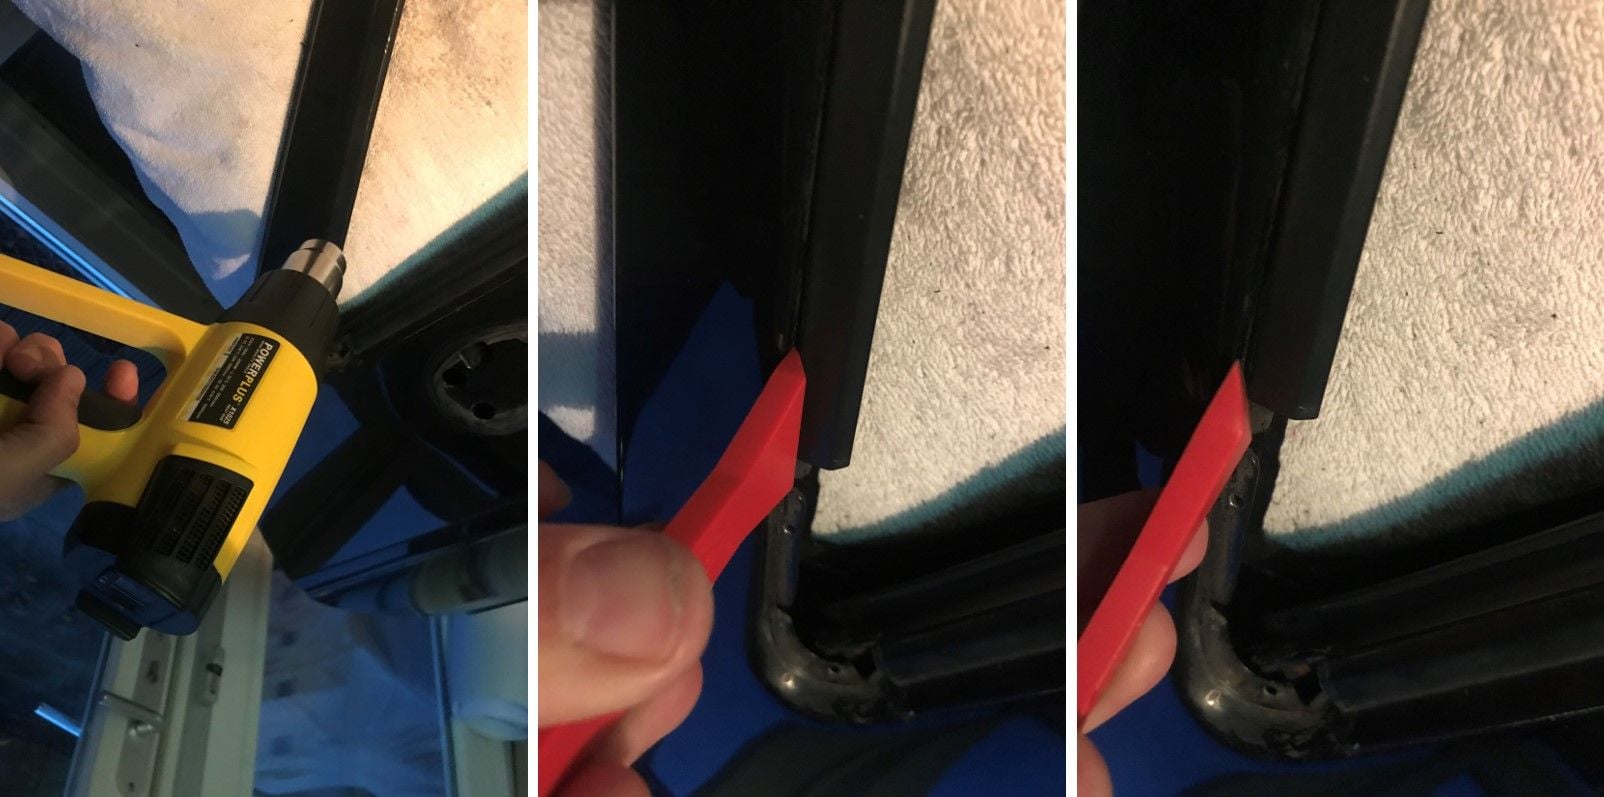
Next remove the upper trim piece (nr. 22). I first used a heat gun to heat up the trim piece.
I then started above from where the filler piece was and used a plastic tool, tapping on it to get the piece off in that corner:
Work your way towards the top and rear of the door until the piece comes off entirely:
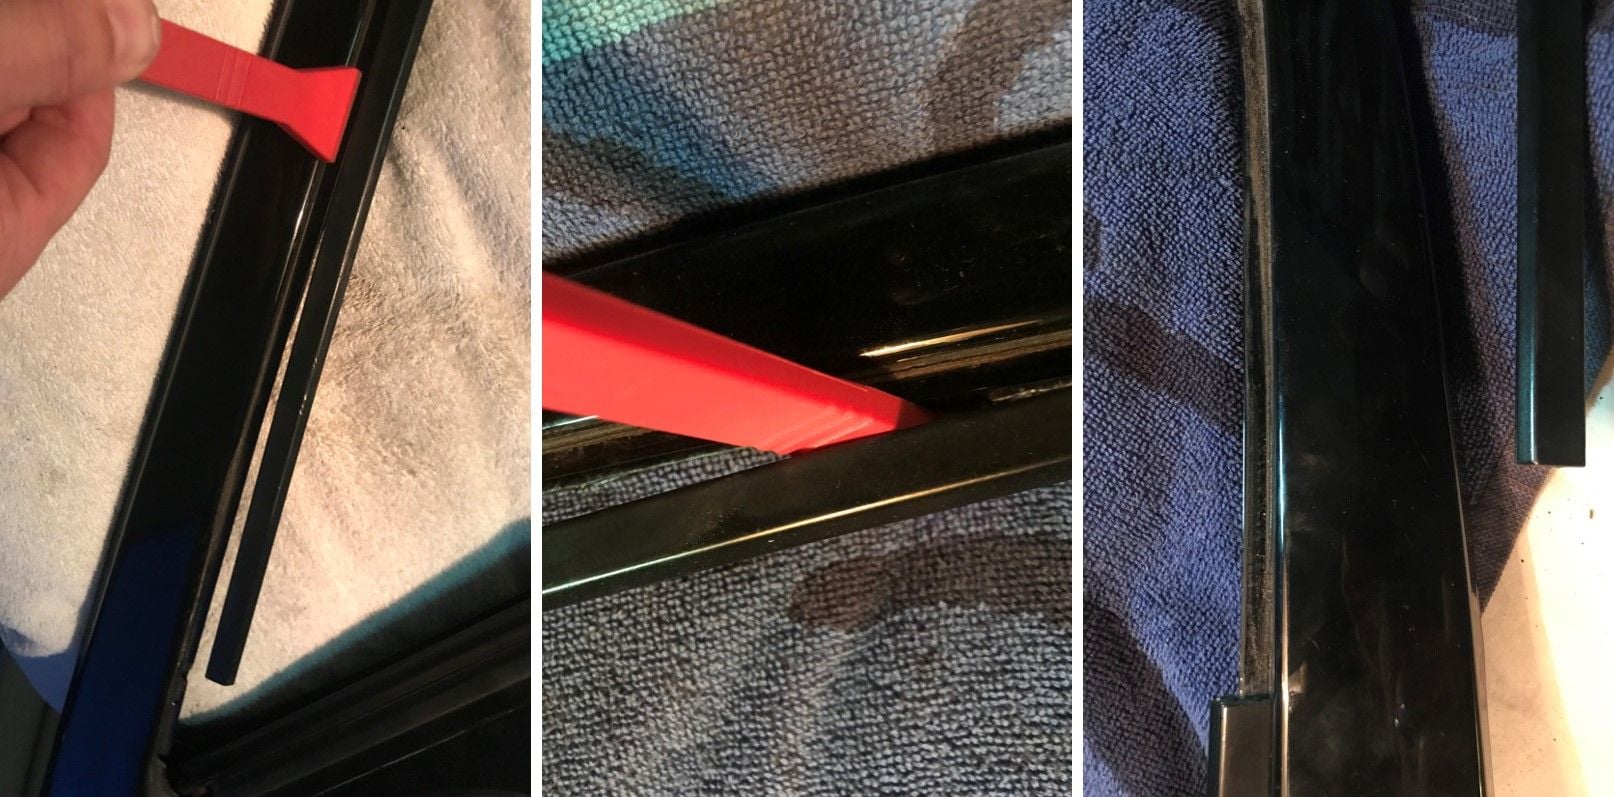
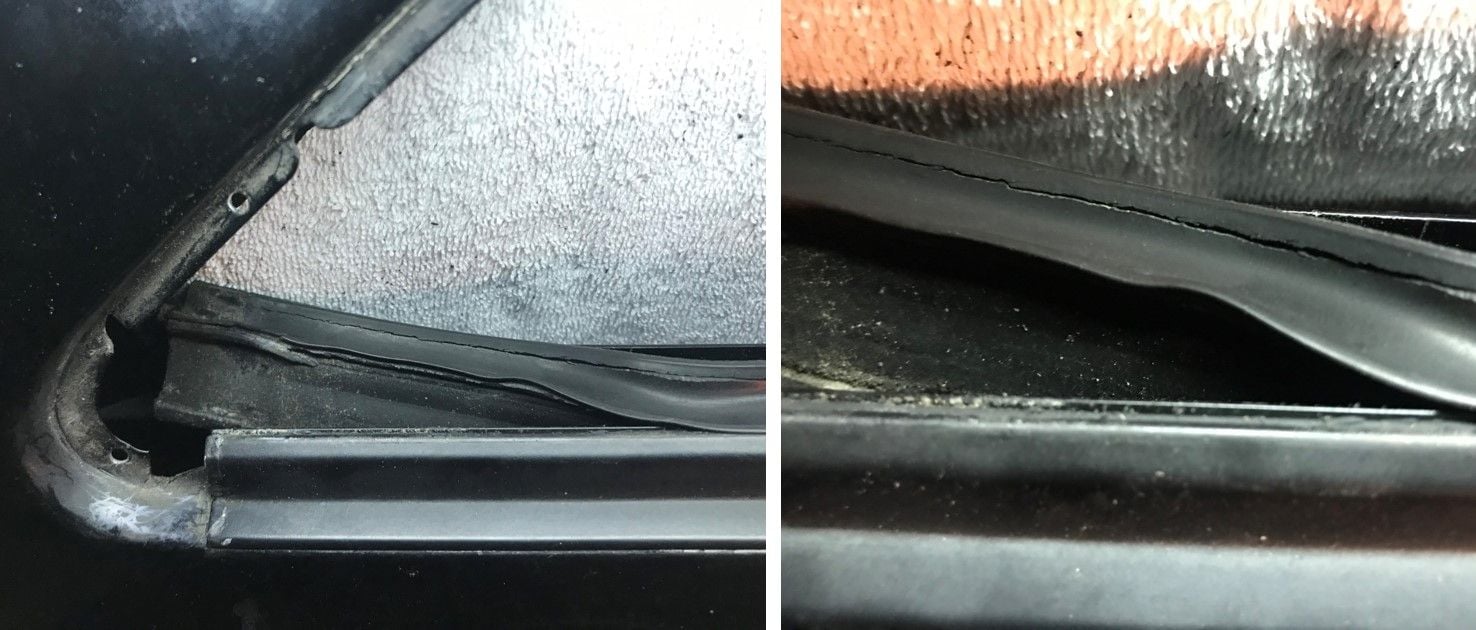
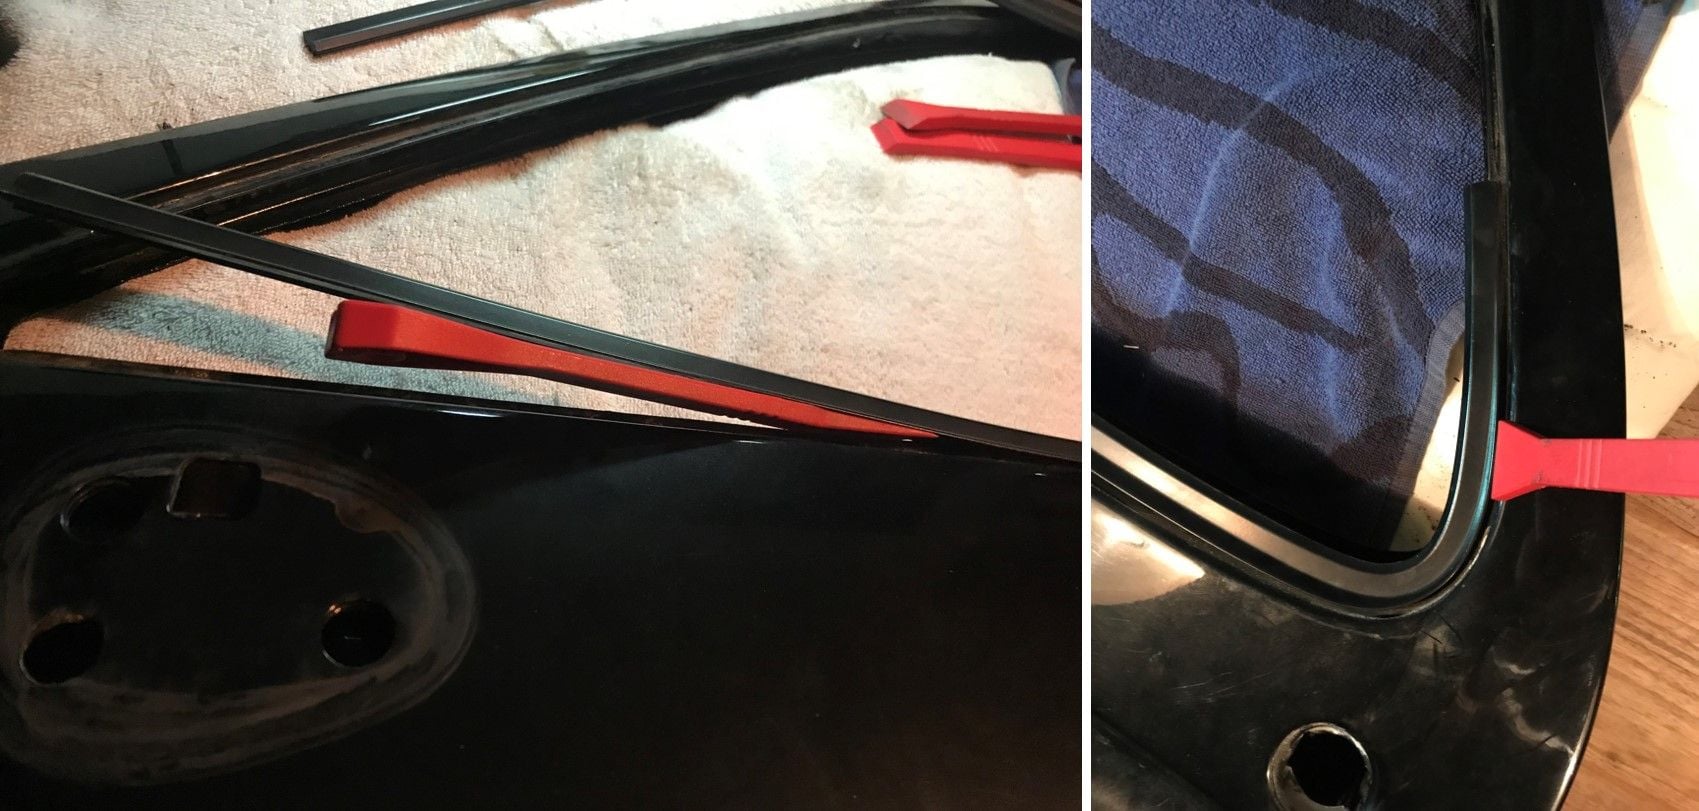
Before removing the hardest part of the window trim (nr. 23) I first separated the rubber outer sealing from the trim:
Pull it out from inside the door frame. Mine were in pretty bad shape (cracked all over) and came off by pulling hard:
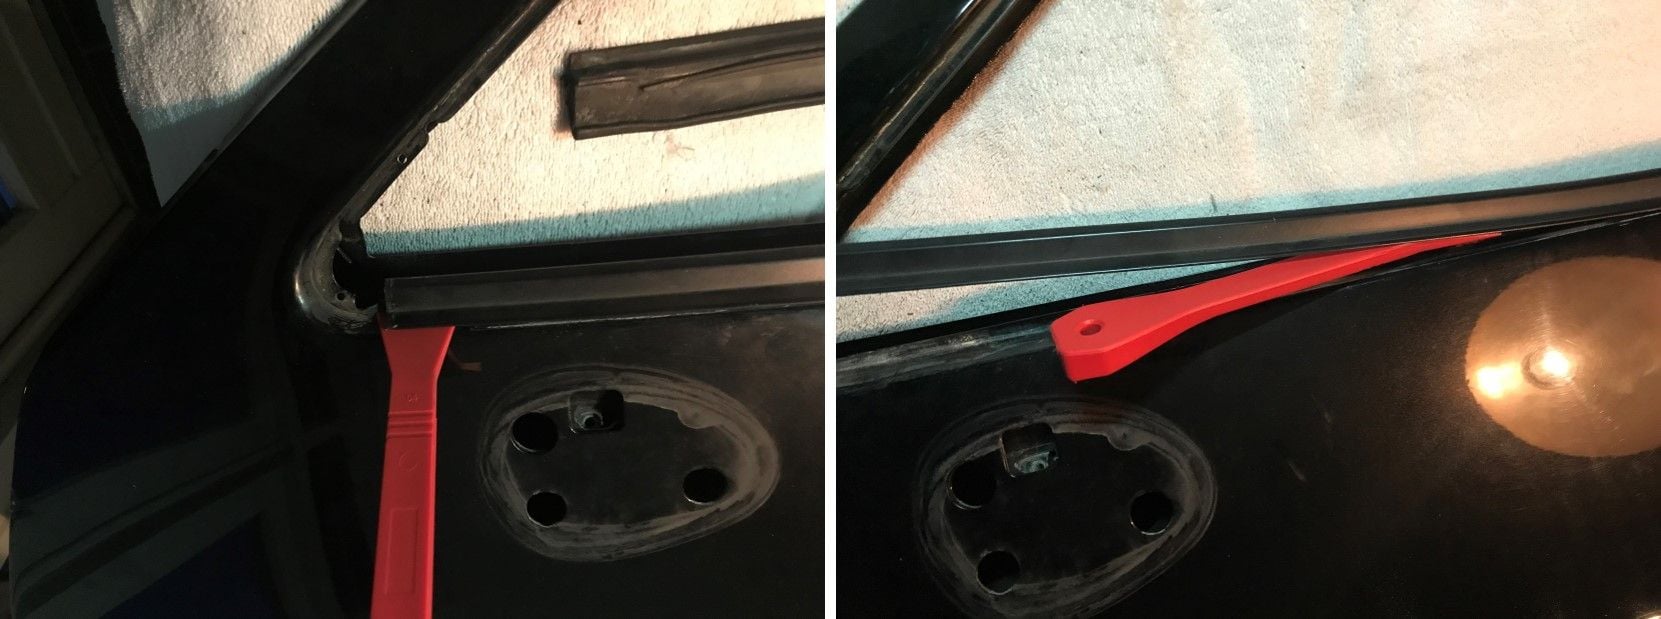
I then used the thinnest plastic tool I had to carefully tap the trim piece out, starting at the front and working my way towards the rear corner (and the bend in the trim piece):
When I had the trim off almost until the corner I moved over to the other side of the bend and tapped the trim piece out:
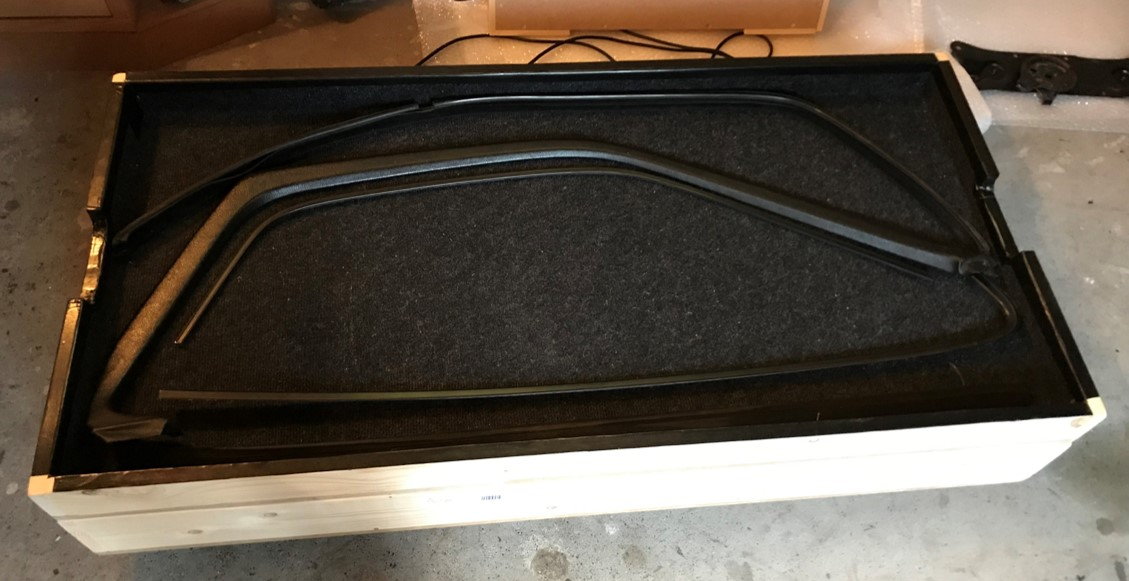
The trim pieces and window frame linings got their own crate:
.
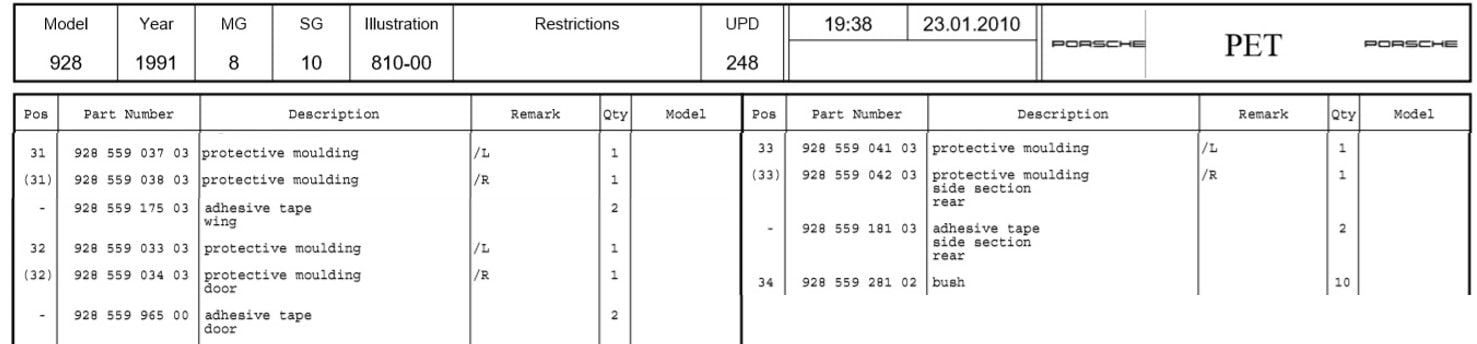
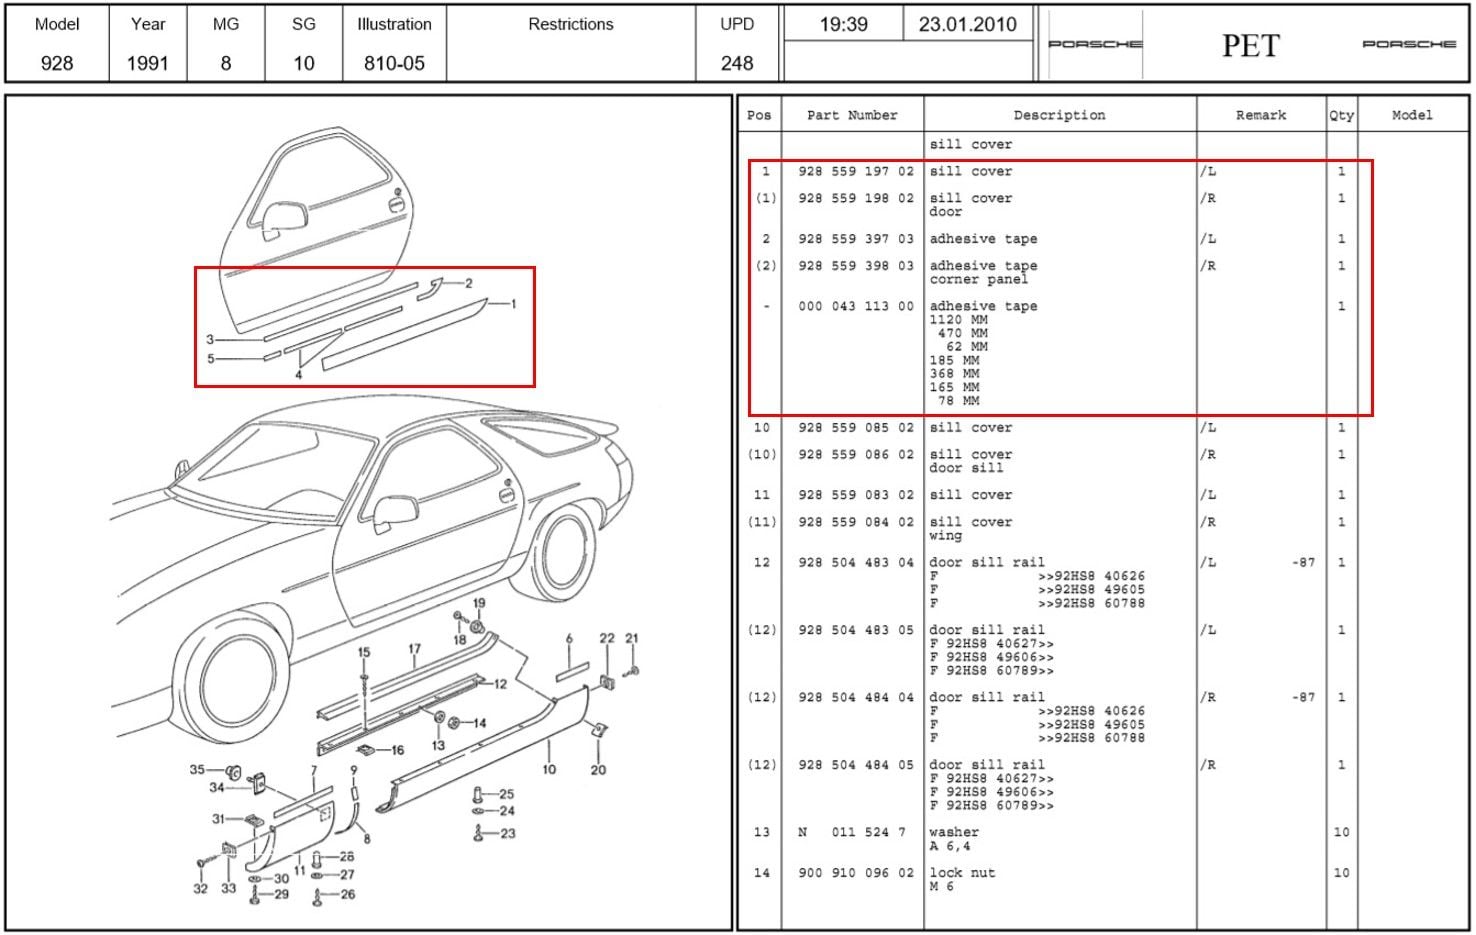
Below the relevant Pet pages for reference on rub strips / protective moulding:
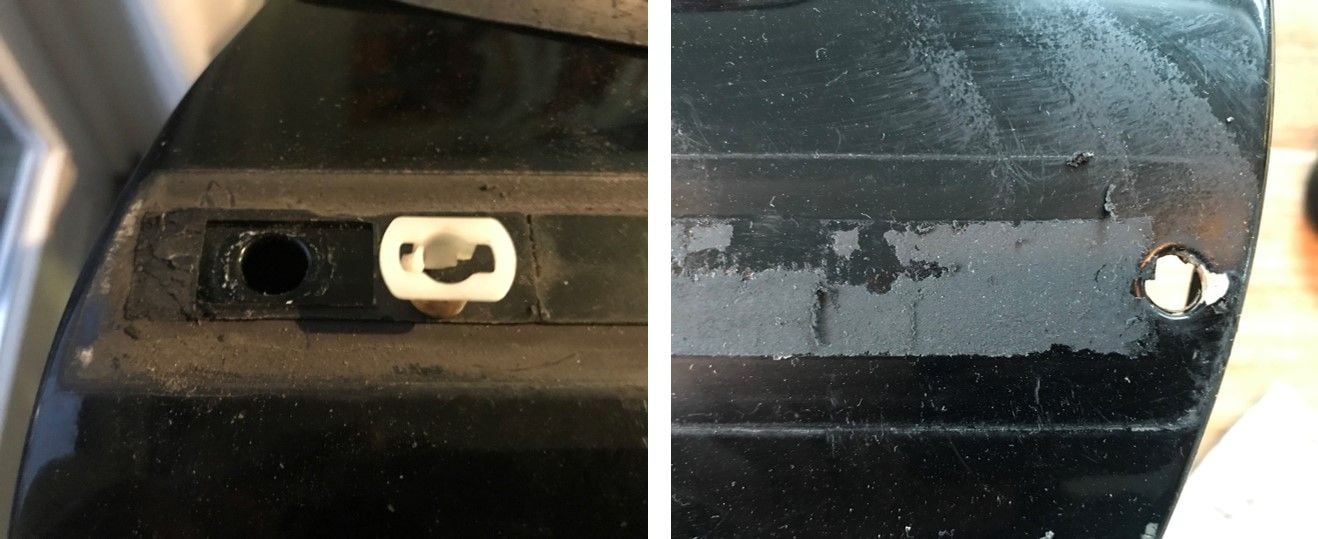
To remove the rub strip from the door you first need to remove the lock nut on the rear side of the door behind the door seal. The bolt it locks on to is integrated in the rub strip.
Make sure to heat up the adhesive tape using a heat gun; next you can use some dental floss or fishing line to cut through the adhesive tape. Don’t pull the strip away from the door more than a few centimeters.
The plastic of the strip is very flexible (the paint not so much), which does makes it easier to handle and for me reduced the fear of breaking it:
On the forward side of the door the rub strip ‘clicks' into a plastic bush:
The bush is easily removed from the door; the picture on the right below shows the hole in the door for the integrated bolt on the rear side of the rub strip:
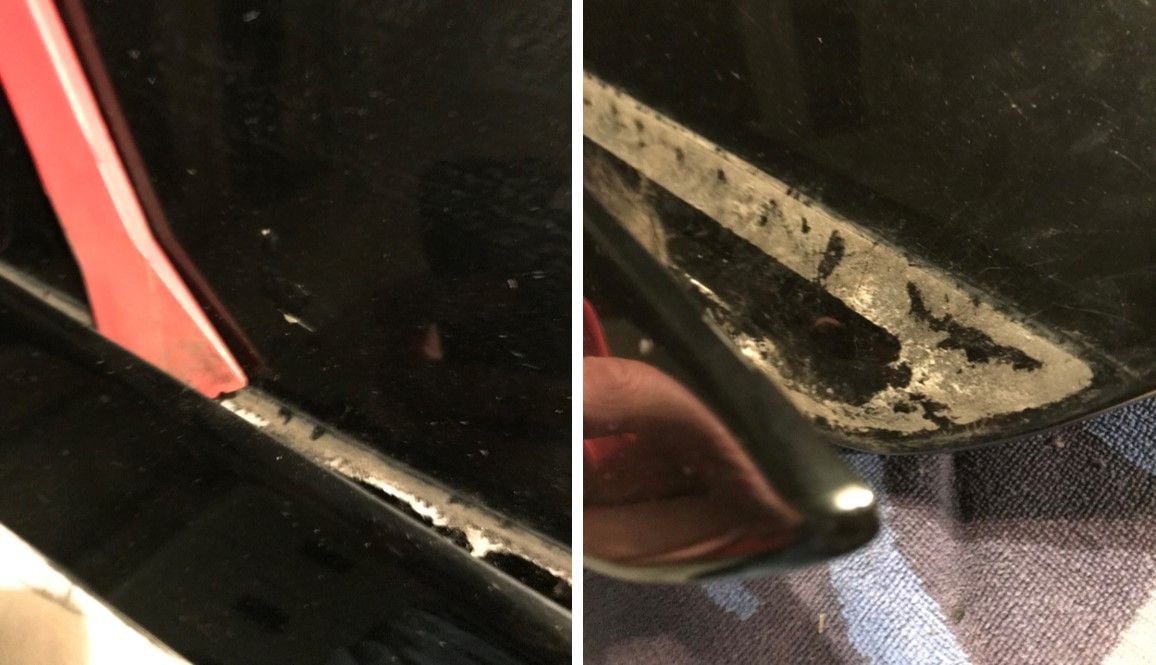
Next is the sill cover:
It took a while before I could get a thin plastic tool between the cover and the door skin, but once it became loose it was pretty straightforward.
The adhesive tape is still quite strong after 30 years, so it took a while to get the cover off:
The disadvantage of the plastic tool instead of dental floss or a fishing line is that you do scratch the paint a bit; as my car will be painted I didn’t mind:
The next and last job is removing the glue and adhesive tape...
.
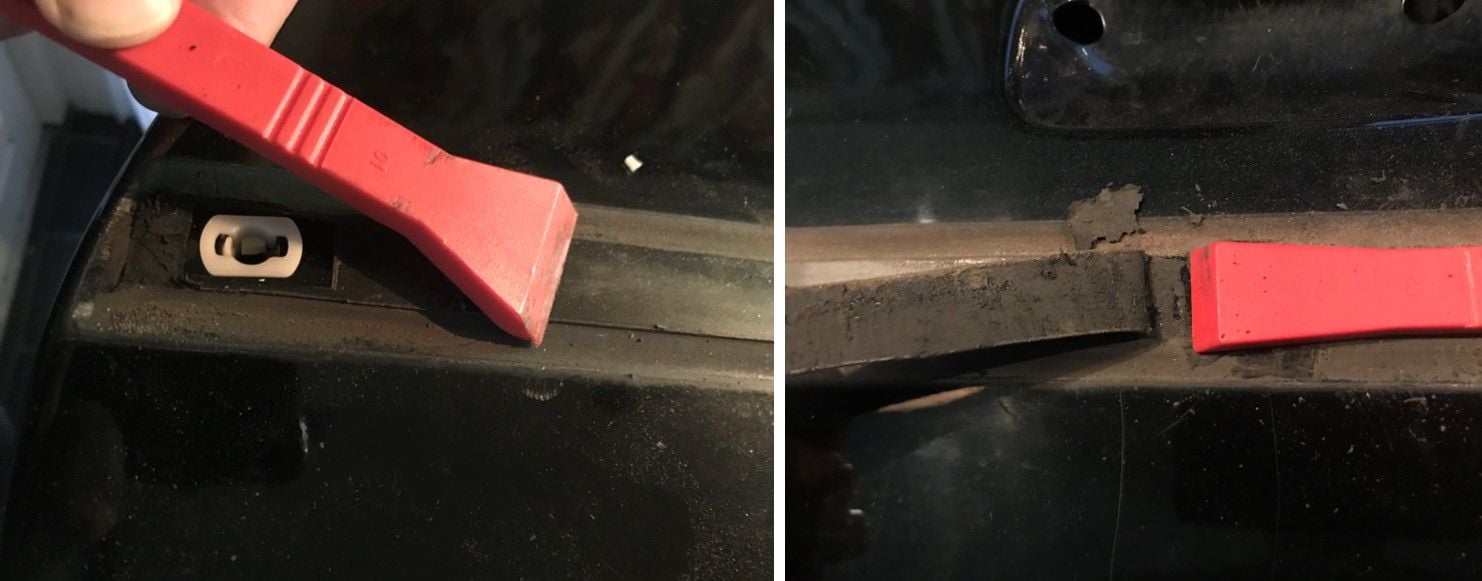
I first used a flat plastic tool to remove the thickest layer of the adhesive tape:
Don’t use a ‘wide’ tool, as it will be difficult to keep flat on the surface. Still allow yourself enough time to get it off:
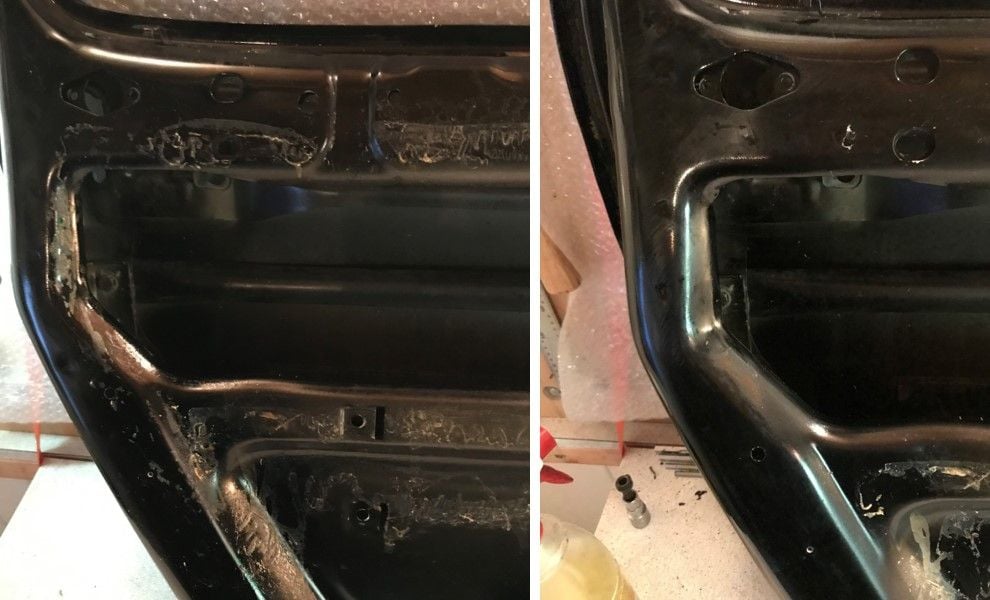
To remove the glue residue I used cloths, acetone and a lot of elbow grease……
On the inside of the door was a lot of hardened glue, that could only be taken off by again using a lot of cloths and acetone. I spend hours on softening the glue en then very slowly removing it by rubbing with the cloth:
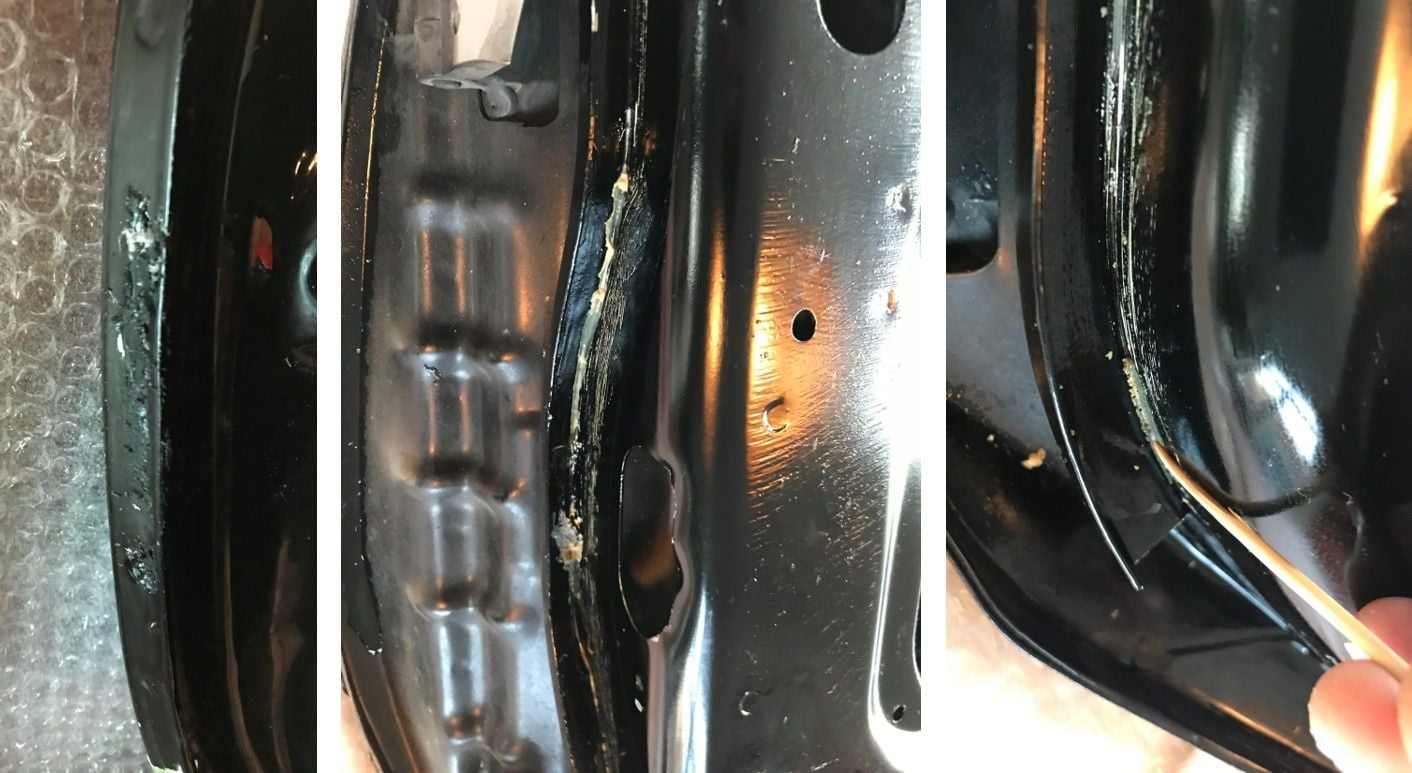
The picture on the left below shows some kind of bathroom sealant being used to keep the door seal in place:
The other two pictures show the slot that holds the door seal. That really was a challenge to clean out; I ended up using wooden skewers to take out the last bits out of the edges:
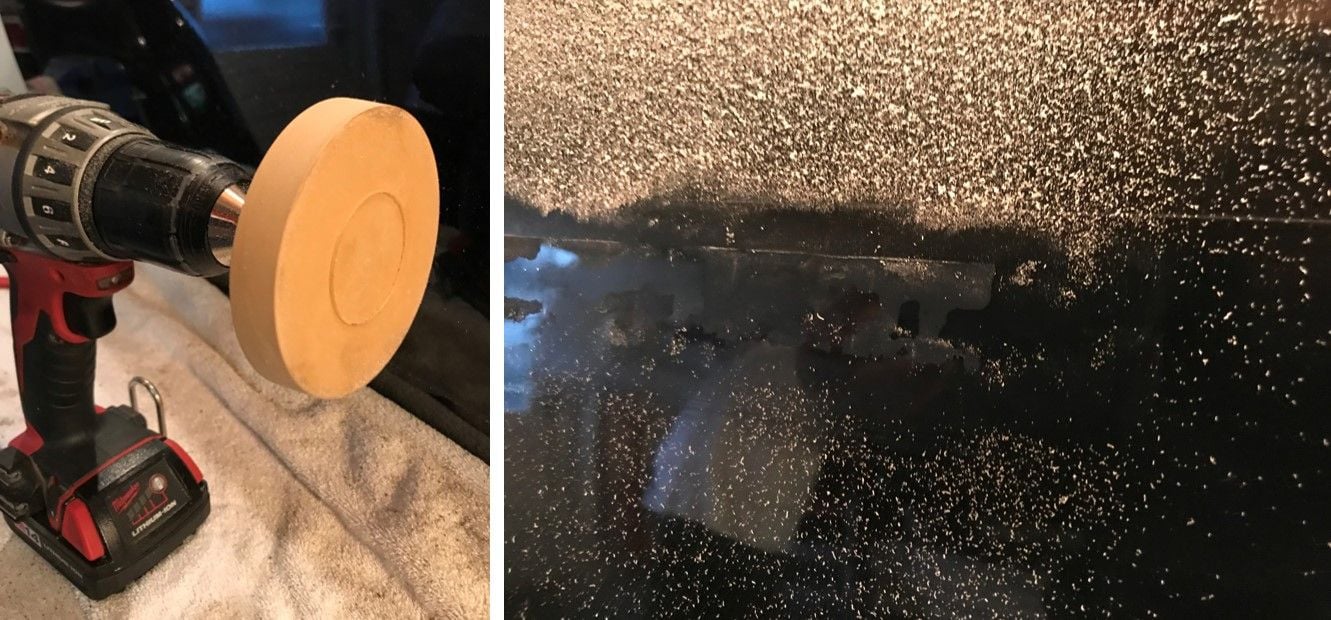
Another way to remove larger pieces of adhesive tape is a ‘caramel disc’. I tried it and it was very effective, not scratching the paint at all!
The only downside is the huge amount of tiny rubber parts that come off the disc while using it:
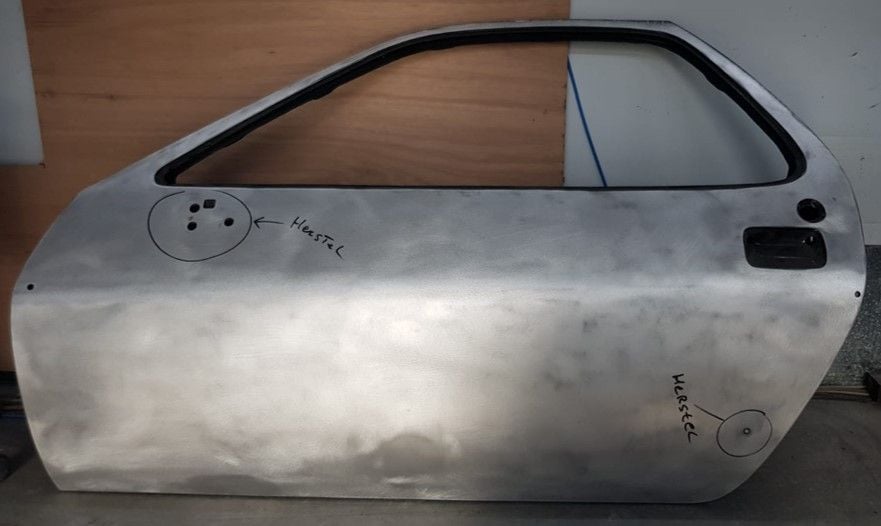
After all glue and adhesive tape was removed I gave the surface a final clean with some degreaser and then some citrus cleaner. The end result was a very clean and shiny door, ready to be send off to the aluminum specialist:
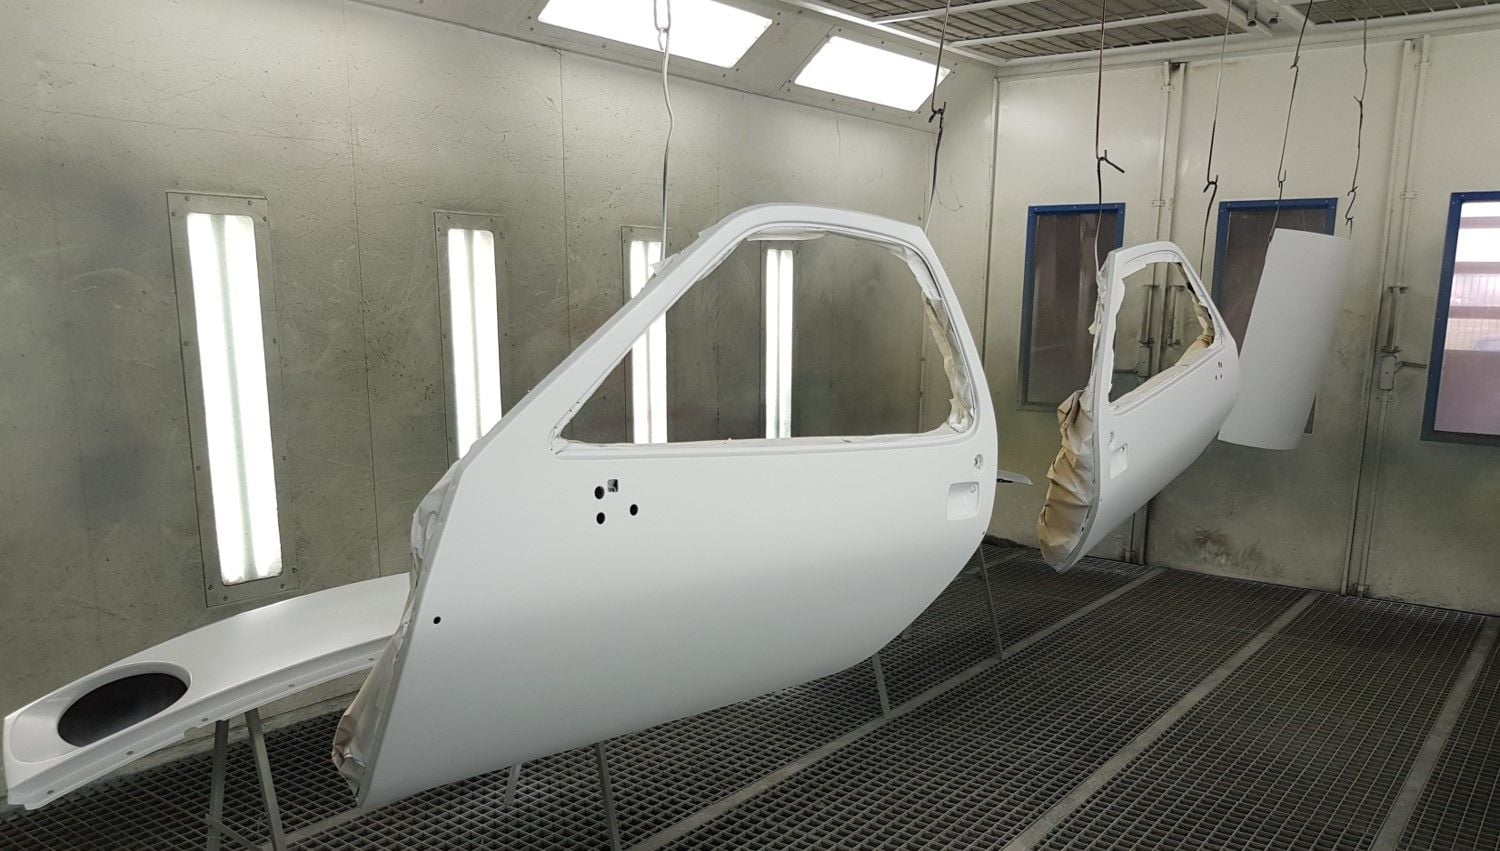
Below a sneak preview of the specialist’s excellent job:
All aluminum parts in epoxy primer:
Thanks for reading! Feel free to comment so I can hopefully improve the write-up....!

 02-24-2019, 11:01 AM