

Torque tube removal S3 5 speed
 01-27-2018, 03:32 PM
#1
Rennlist Member
Thread Starter
Is it possible to remove the torque tube without having to remove the clutch on an 85? The top two bolts on torque tube look impossible to remove with taking out the clutch.
 01-27-2018, 06:08 PM
#2
Addict
Rennlist Member
Rennlist Member
Join Date: Oct 2003
Location: Gone. On the Open Road
Posts: 16,561
Received 1,682 Likes
on
1,092 Posts
Possible? Probably. If you were to make a custom tool or have a 720-tooth ratchet.
Practical? Nope.
Practical? Nope.
01-27-2018, 08:44 PM
#3
Chronic Tool Dropper
Lifetime Rennlist
Member
Lifetime Rennlist
Member

Considering how [relatively] easily the clutch comes out of the 928, why would you try to wrestle the TT out with the clutch still in there? Inquiring minds and all that...
01-29-2018, 04:25 PM
#4
Rennlist Member
Short story is we didn't have a drift pin/punch with us to knock out/move the three pins, and yes we found out it is possible to get the top two bolts out, just took a bit of ratchet wrench, small increments.

And luckily they were not stubborn to break loose

The clutch will still be coming out for ease of reassembly and inspection as a while your in there
Thanks guys,
Dave and Eric
 01-29-2018, 07:35 PM
#6
Team Owner
FWIW if you slide the front bell housing back on the 4 bolts about 3/4 of an inch,
then the clutch will drop out without any pin driving .
NOTE driving the pins has the hammer force taken up via the thrust bearing,
is that really what you want to do to your thrust bearing?
then the clutch will drop out without any pin driving .
NOTE driving the pins has the hammer force taken up via the thrust bearing,
is that really what you want to do to your thrust bearing?
01-30-2018, 01:15 PM
#7
Rennlist Member
Stan I was under the impression that moving the 2 small pins back and removing the stepped pin forward was correct per the manual (must admit I've not read the procedure in over two years).
I usually use a small ball-peen hammer and tap them, had the hammer but not the correct drift pin/ punch with us, but I hear you.
I'll try your suggestion, those 4 bolts should be easier than dealing w/ the pins under the car and having to rotate the engine
Thank you!
Dave
I usually use a small ball-peen hammer and tap them, had the hammer but not the correct drift pin/ punch with us, but I hear you.
I'll try your suggestion, those 4 bolts should be easier than dealing w/ the pins under the car and having to rotate the engine
Thank you!
Dave
Trending Topics
 01-30-2018, 01:53 PM
#10
Team Owner
if you cant fix it with a hammer and a sawzall then its electrical
NOTE also goes with this^^^^ info, remove the two trans mount to cross member bolts so the TT will slide back.
NOTE You dont need to remove the starter either
NOTE also goes with this^^^^ info, remove the two trans mount to cross member bolts so the TT will slide back.
NOTE You dont need to remove the starter either
01-30-2018, 04:20 PM
#11
Rennlist Member
Stan do you put the 3 "U" clips in the Intermediate plate before unbolting the assembly from the Flywheel, and does it matter where the 2 timing pins are (top or bottom)?
OK for those following along here are the steps
1, Remove exhaust (don't forger the O2 sensor wiring
2. Remove Clutch Slave
3. Remove lower Bell housing
4. Pop off clutch Fork from Upper Bell housing Ball socket
5. Unbolt and Slide back drive shaft to intermediate shaft connection (leave intermediate shaft in the pilot bearing to hold clutch assembly from falling into face).
6. Loosen E-Brake and unbolt cable from Trans Cross member.
7. Remove the two cross-member to trans mount bolts (to allow trans and TT and engine upper bell housing to move back).
8. loosen the four Bell Housing bolts (about 3/4) to allow the clutch assembly room to drop out with the 3 pins in-place.
9. Remove clutch assembly bolts (only turning engine clockwise, same direction as to tighten the crank pulley bolt).
10. Firmly grasp the clutch assembly and pull intermediate shaft out of flywheel, and yes it's as heavy as it looks!
Did I miss anything?
Thanks again Stan, looking forward to trying this,
Dave
01-30-2018, 05:52 PM
#12
Team Owner

I spray paint a line on both sides of the clutch pack to keep things oriented,
the large pin will only fit in one spot so find it and mark the assembly with paint.
Now between line 3 and 4 you would insert the pin spacers by prying the release arm to the rear ,
use some weldowood cement to hold the spacers so they dont come free.
remove the release arm from the bushing here.
Then loosen the PP bolts.
NOTE the following procedure will take the guesswork out of fitment issues with the clutch assembly being installed and centering the stub shaft.
its important to realize the pilot bearing can be damaged if the stub shaft is bottomed out into the bearing this will transfer forces to the thrust bearing as well.
NOTE after replacing the pilot bearing,
Verify fit and position of the driveshaft and rear pinch bolt slot,
and retorque the rear pinch bolt.
mock up the stub shaft and guide tube,
slide the bell housing back to the block ,
then measure the stub into the pilot bearing,
mark the stub on the rear side of the guide tube.
Also fit the clamp tube to verify that slots line up
This so when you refit the assembly you will know where to put the stub shaft so its centered into the pilot bearing.
The stub should be bottomed out into the pilot bearing then pulled back about 3 to 4 MM this should place the bearing surface into the center of the pilot bearing.
 02-03-2018, 05:40 PM
#14
Team Owner
Hi Dave your welcome
02-11-2018, 02:45 PM
#15
Rennlist Member
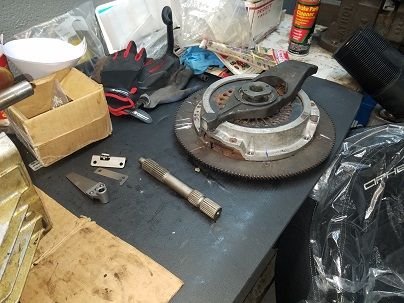
A few of us braved the 8+ inches of falling snow yesterday and headed over to "The Tank" as in Shark Tank
We first fortified ourselves with some Philly style Cheese stakes from a local Penn Station and then proceeded separating the TT from Trans and then cleaning the outside of the trans using some Purple De-greaser and hot water rinse from a cheep garden sprayer.
Once clean enough for the bench, opened it up to remove the Broken reverse lockout spring and the centering spring, the two lower parts pictured here and one of the new centering spring (actually it pushes the selector lever to the 4th-5th position).
With both of these broken and the linkage clamp loose at the rear on the splines the car was not driveable.
When we drained the Trans fluid we noticed it was like new clean, so I'm thinking "someone" or the PO, already removed the broken bits as non were found inside the trans
While I was playing Trans explorer, Eric and John pulled the Clutch using Stan's method as written here above, worked great 30mins I think and w/o having to deal with the 3 pins
Thanks again Stan, and BIG Thanks to Eric and John for the helping hands, was a good day at The Tank!
Dave