When you click on links to various merchants on this site and make a purchase, this can result in this site earning a commission. Affiliate programs and affiliations include, but are not limited to, the eBay Partner Network.
Thank you I have been following this video as a guide where he removes the one bracket for the lower control arm, to be able to lower the arm enough to be able to wiggle it out, but no luck yet. I will try my luck next Sunday. https://www.youtube.com/watch?v=67AX2pCxwUM
You can say that again, a PIA for sure ! lol
The downside to removing the lower ball joint is that it then becomes mandatory to get an alignment. However, now that it is taken off just drop the lower swing arm by removing the 4x 19mm bolts plus two 17mm nuts/bolts in the front. IMO it is easier to remove the strut if the hub is not attached to the upper a-arm and the lower swing arm is removed from below the strut. 10 ways to skin a cat so just sharing what worked best for me. Let us know how it turns out.
The downside to removing the lower ball joint is that it then becomes mandatory to get an alignment. However, now that it is taken off just drop the lower swing arm by removing the 4x 19mm bolts plus two 17mm nuts/bolts in the front. IMO it is easier to remove the strut if the hub is not attached to the upper a-arm and the lower swing arm is removed from below the strut. 10 ways to skin a cat so just sharing what worked best for me. Let us know how it turns out.
Thank you. Yes, I do appreciate your help. I only saw the two 19 mm bolts in which the picture shows as I removed, I will check pet to where the other 2 are. I did find the 2 17 mm bolts in front I had started removing them instead of the ones which I correctly removed instead.
I don't think I removed the lower ball joint ? I just removed the 2 bolts which connects the hub to the swing arm, the ball joint is still attached to the hub. I might be wrong !
All these terms are sort of known to me but never actually saw what they looked like until I started doing some mechanical work on the 928 !
Here is what I have removed: ( Now that I see it, I now realize I have removed the ball joint connection, I thought if the ball joint was still in place there would be no issue, OOPS)
As far as alignment goes I was prepared to get an alignment anyway, since by changing the shocks and then adjusting the ride height to something more normal than what the previous owner had chosen for the front, which caused me to bottom out too many times for me.
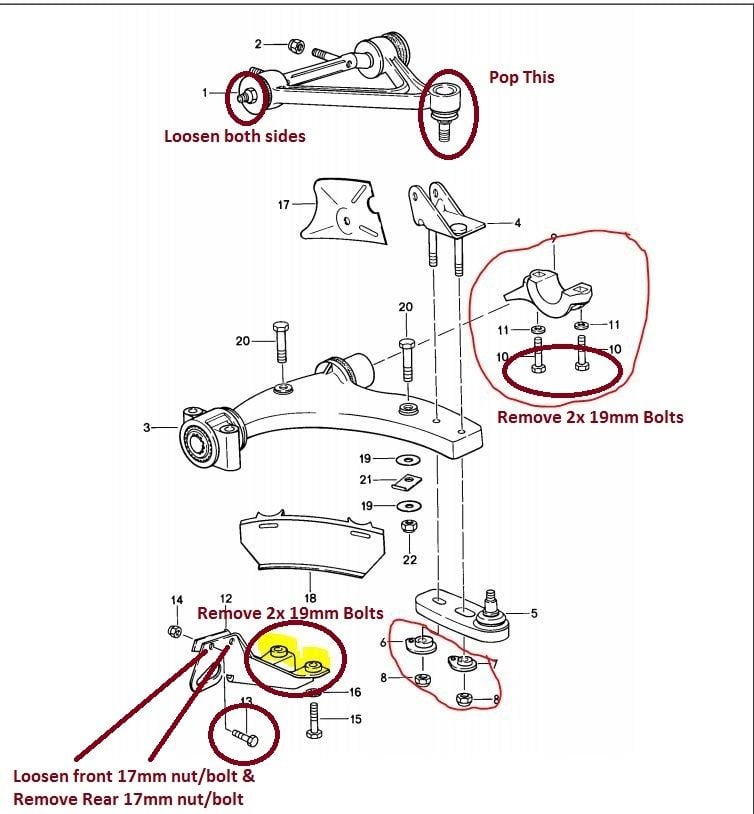
I have removed what is circled in red. The highlighted yellow where the 2 bolts I started removing by mistake.
I added some remarks to your diagram. The other 2x 19mm bolts are what you highlighted in yellow. Part #13, #14 is one of the 17mm nuts/bolts you need to remove. Remove the 17mm nut/bolt in the back and just loosen #13 & #14. This allows that bracket to just swing down once you remove the 2x 19mm bolts. You should then be able to remove the whole lower swing arm and it literally takes 5 minutes to remove.
I added some remarks to your diagram. The other 2x 19mm bolts are what you highlighted in yellow. Part #13, #14 is one of the 17mm nuts/bolts you need to remove. Remove the 17mm nut/bolt in the back and just loosen #13 & #14. This allows that bracket to just swing down once you remove the 2x 19mm bolts. You should then be able to remove the whole lower swing arm and it literally takes 5 minutes to remove.
I finally succeeded in removing the front shocks yesterday, mainly by positioning the A-Arm in a high enough position so that I could wiggle them out. I did not have to remove or loosen any more screws !
Now time for compression of the springs to disassemble them.
I know I'm late to the party but according to this video, you don't have to remove much of anything...
I was looking for a DIY video for the rear shocks.
Re the front shocks, I was able to screw mine out (complete with springs) down through the top arm, once I had lowered the bottom arm inner mounts so I could swing the stub assembly upwards. The different top arm on 86.5+ makes this easier.
For the rear shocks, I had little trouble there, but many have had severe issues getting the long pin out that connects everything at the bottom. I dont recall removing the disc rotor at all. Just remember the top bolts are asymmetric. The bottom shock eye is also at an angle.
jp 83 Euro S AT 57k
I know I'm late to the party but according to this video, you don't have to remove much of anything...
I was looking for a DIY video for the rear shocks. https://www.youtube.com/watch?v=jzOtBDzJ_do
So, the expectation, now, is that you can remove rear coil-overs, disassemble them, press-off, clean, re-lube and press-on the adjusters, reassemble the coil-overs, re-install them, torque everything to spec, set the ride height and re-align the car in 30 minutes...
So, the expectation, now, is that you can remove rear coil-overs, disassemble them, press-off, clean, re-lube and press-on the adjusters, reassemble the coil-overs, re-install them, torque everything to spec, set the ride height and re-align the car in 30 minutes...
Great.
It took..5(?)of us 6hrs to do shocks and freeing and adjusting the collars via my spreadsheet hints, driving in to driving out.
Thank you everyone for that advice and video, but maybe 2 experts without issues can replace the rear shocks in 30 minutes or so, certainly not me.
I started in Feb, only working on it on weekends and I had to stop because of an unfortunate accident, I crushed my index in a scissor jack and got some stitches, which came from my escape while preparing to change the winter tires for summers on April 22nd. Since then I have not been able to do any progress.
It's only been 2 weekends since I have been able to do some work around the house, much less the car ! We had purchased a new hard top gazebo in which my wife wanted installed, there must have been around 2 to 300 screws !
I finally got it done this weekend ! I was then able to do some yard work like cutting the grass and thatching and by then the long weekend was over, so hopefully I will be able to finish putting the rear shocks back in.
I have one on the driver side installed, but somehow I think I did not install one of the concave washers correctly, so I will have to remove the pin again to adjust correctly ! I know have all the printouts I need with pics so i can install them correctly !
I have received my new lower ball joints to be installed afterwards. The top ones have been rebuilt already.
If I am done in time I will be going to Camp 928 ! Right now the outlook looks pretty grim for that since I also have to adjust the ride height and then get it aligned.

 01-22-2018, 12:08 PM