When you click on links to various merchants on this site and make a purchase, this can result in this site earning a commission. Affiliate programs and affiliations include, but are not limited to, the eBay Partner Network.
Hello All,
Here is a project I have been working on for a while, coming up with an alternative to highly priced transmission mounts. This started a few months ago when I decided I really needed to figure out what that banging noise was every time I hit a big bump in the road. I've got an '86 928S. After searching on this site a little while I found out my transmission mounts were shot and the tranny was actually hitting the cross member when I hit a pot hole or speed bump. It was also probably to blame for the harsh gear shifting I had.
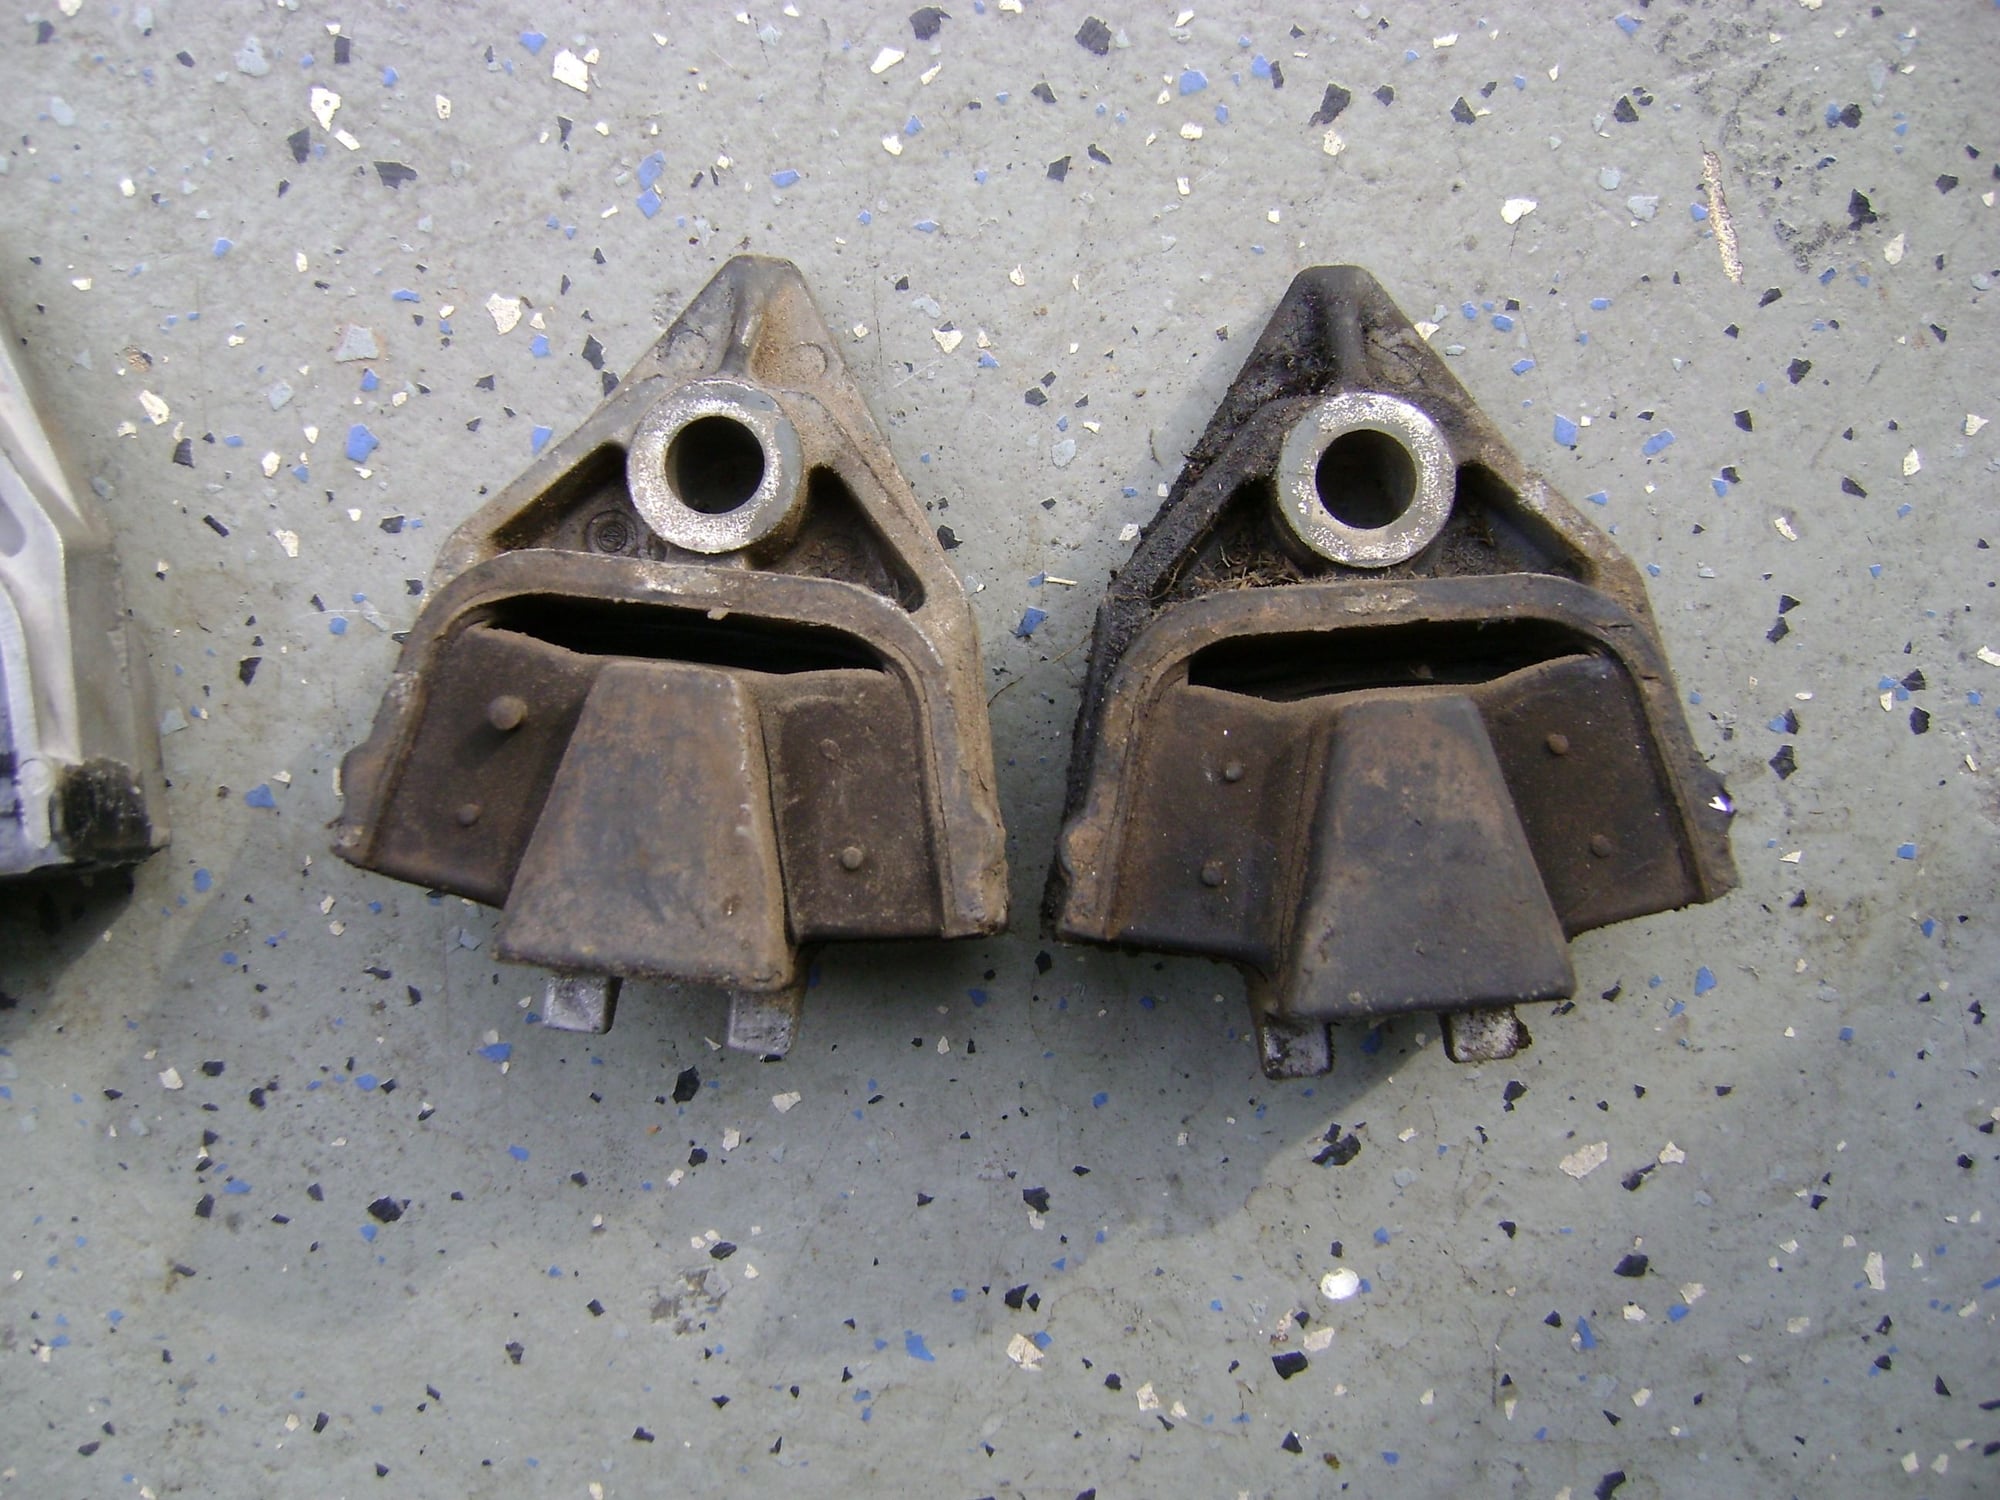
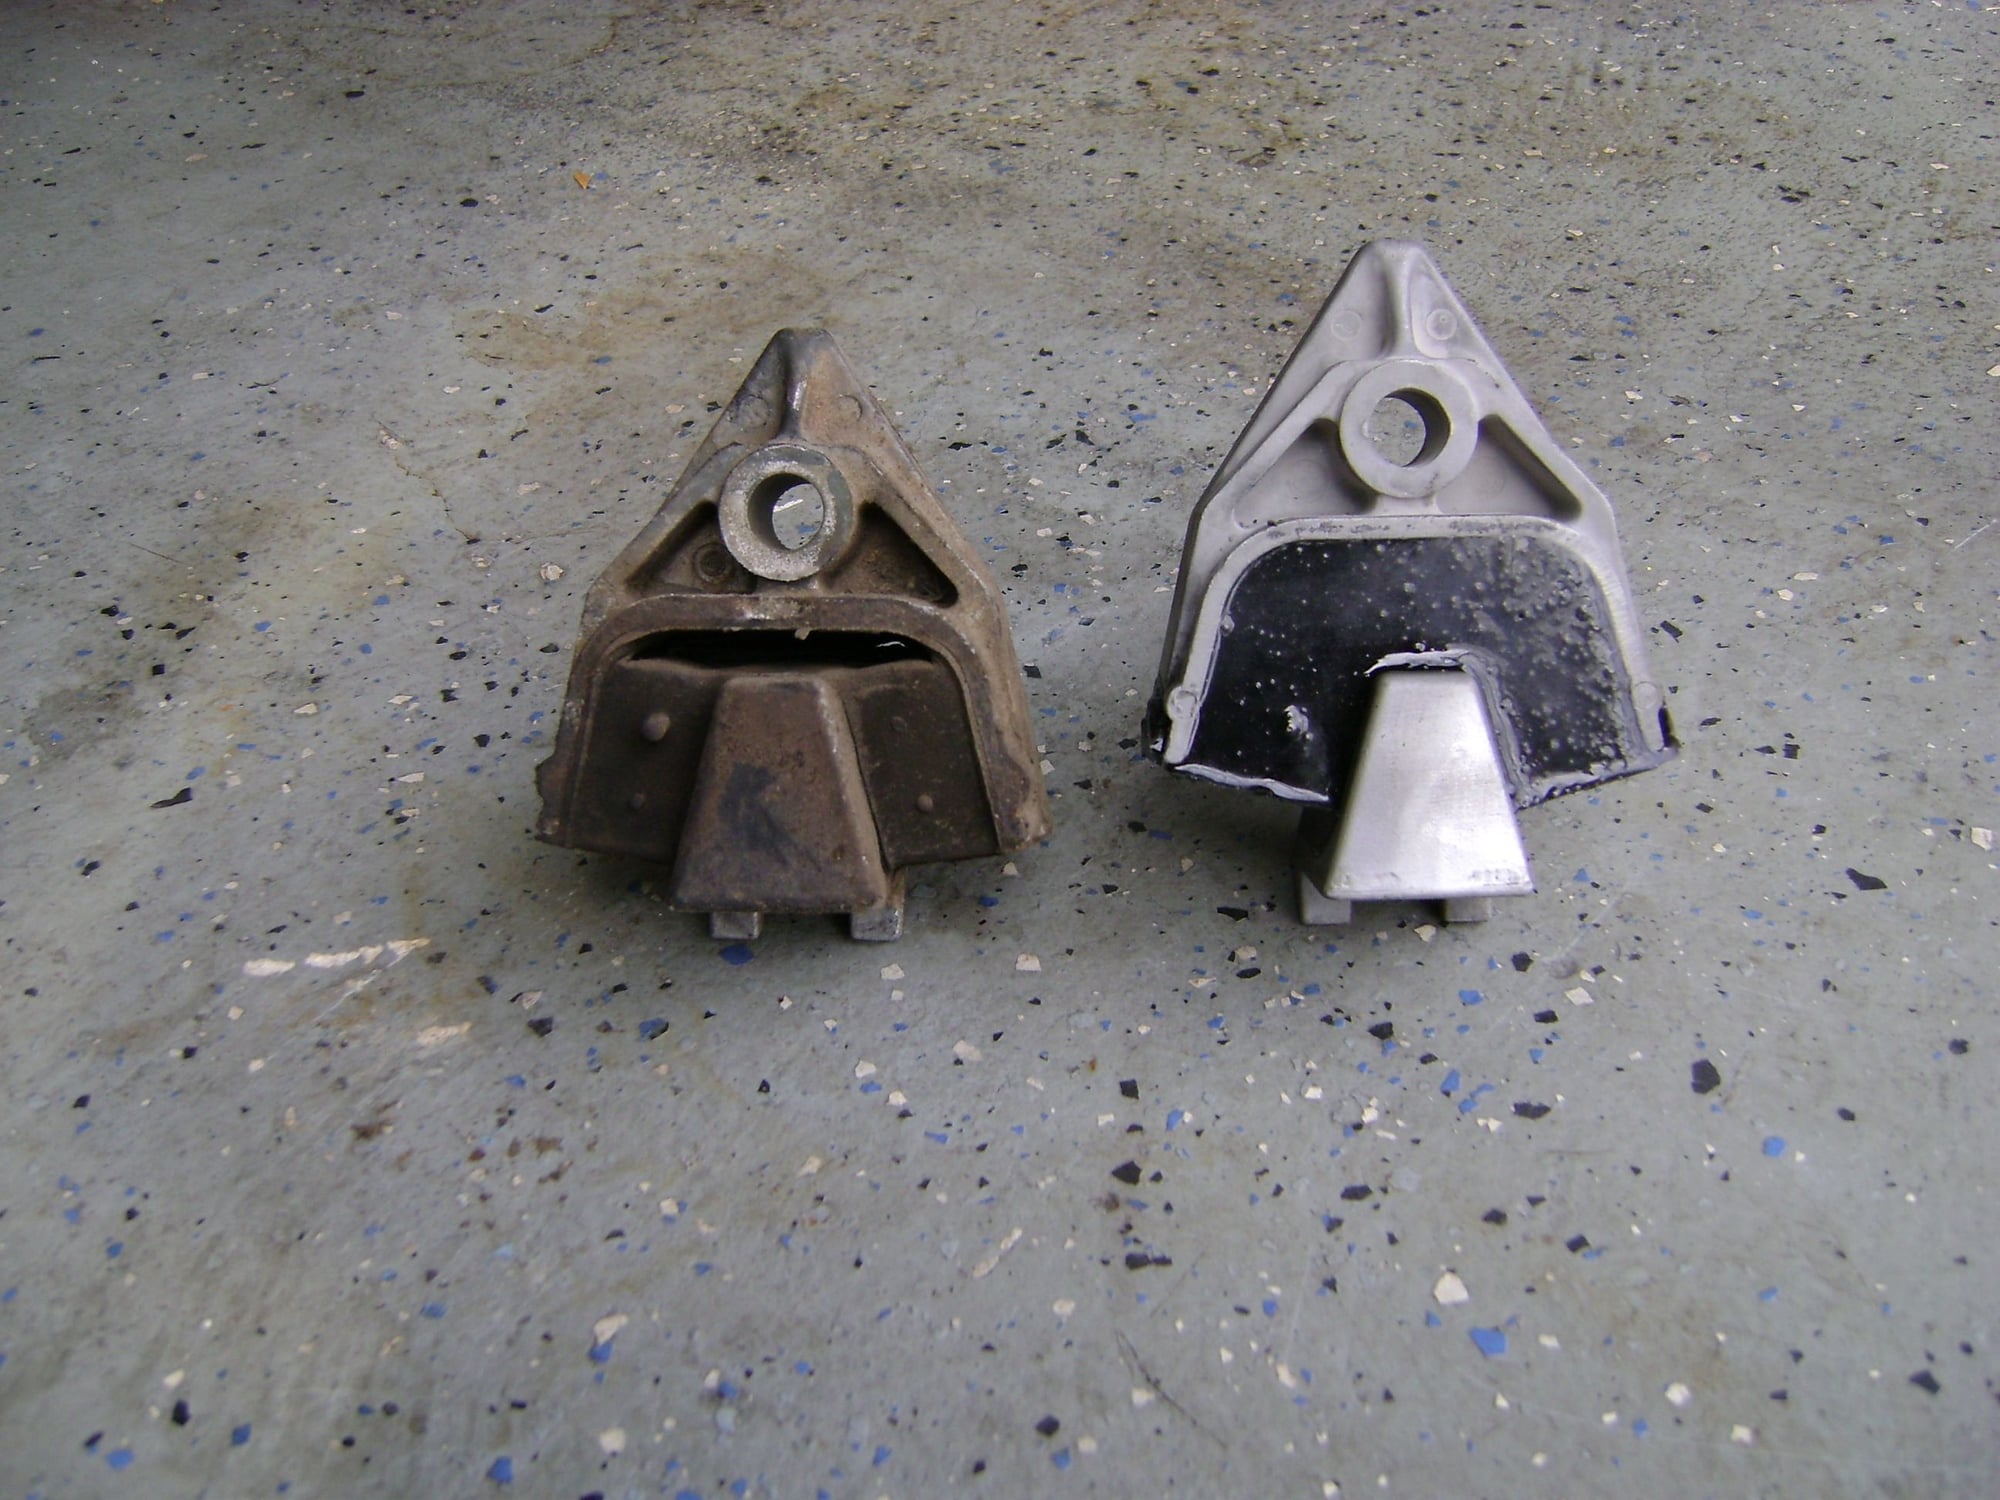
Anyway, at $200 a pop I was eager to find an alternative. Not to mention a friend of mine has two '87 928S4's that need mounts, so for $1200 I was willing to do a little experimenting. I've read several threads here about people trying to make custom mounts, but none of them seemed to have gone anywhere that I can tell. I started by pulling the old mounts to see how much they've compressed. Here is a picture of the old mounts. They were compressed about half an inch compared to new ones. Notice one side is compressed more than the other. There were no shims to be found when I removed them.
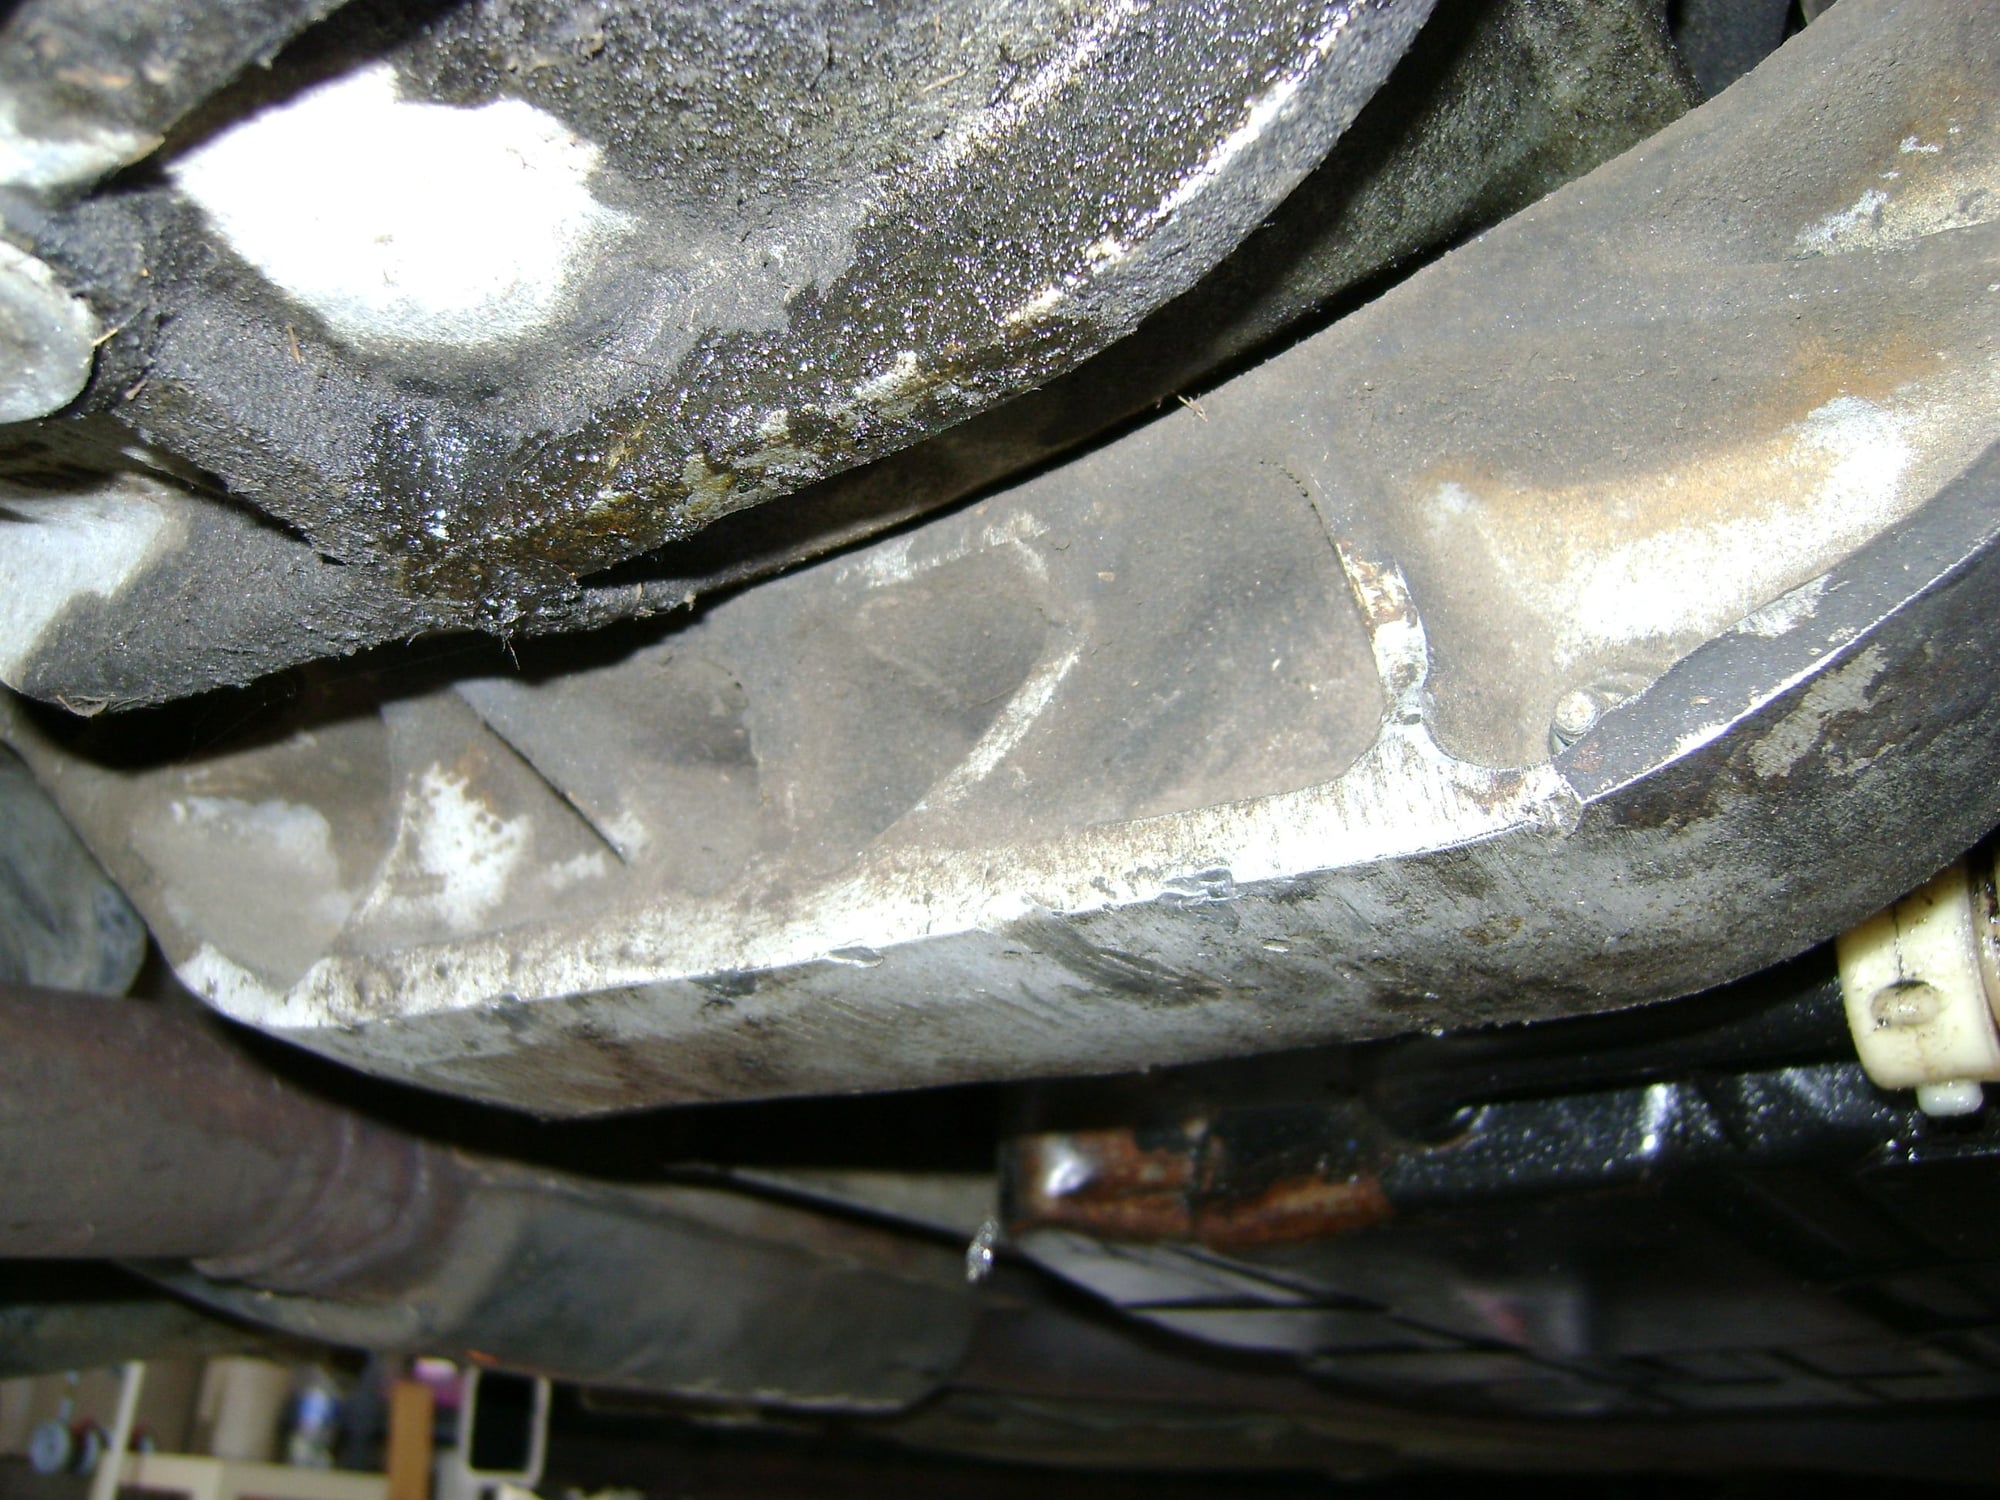
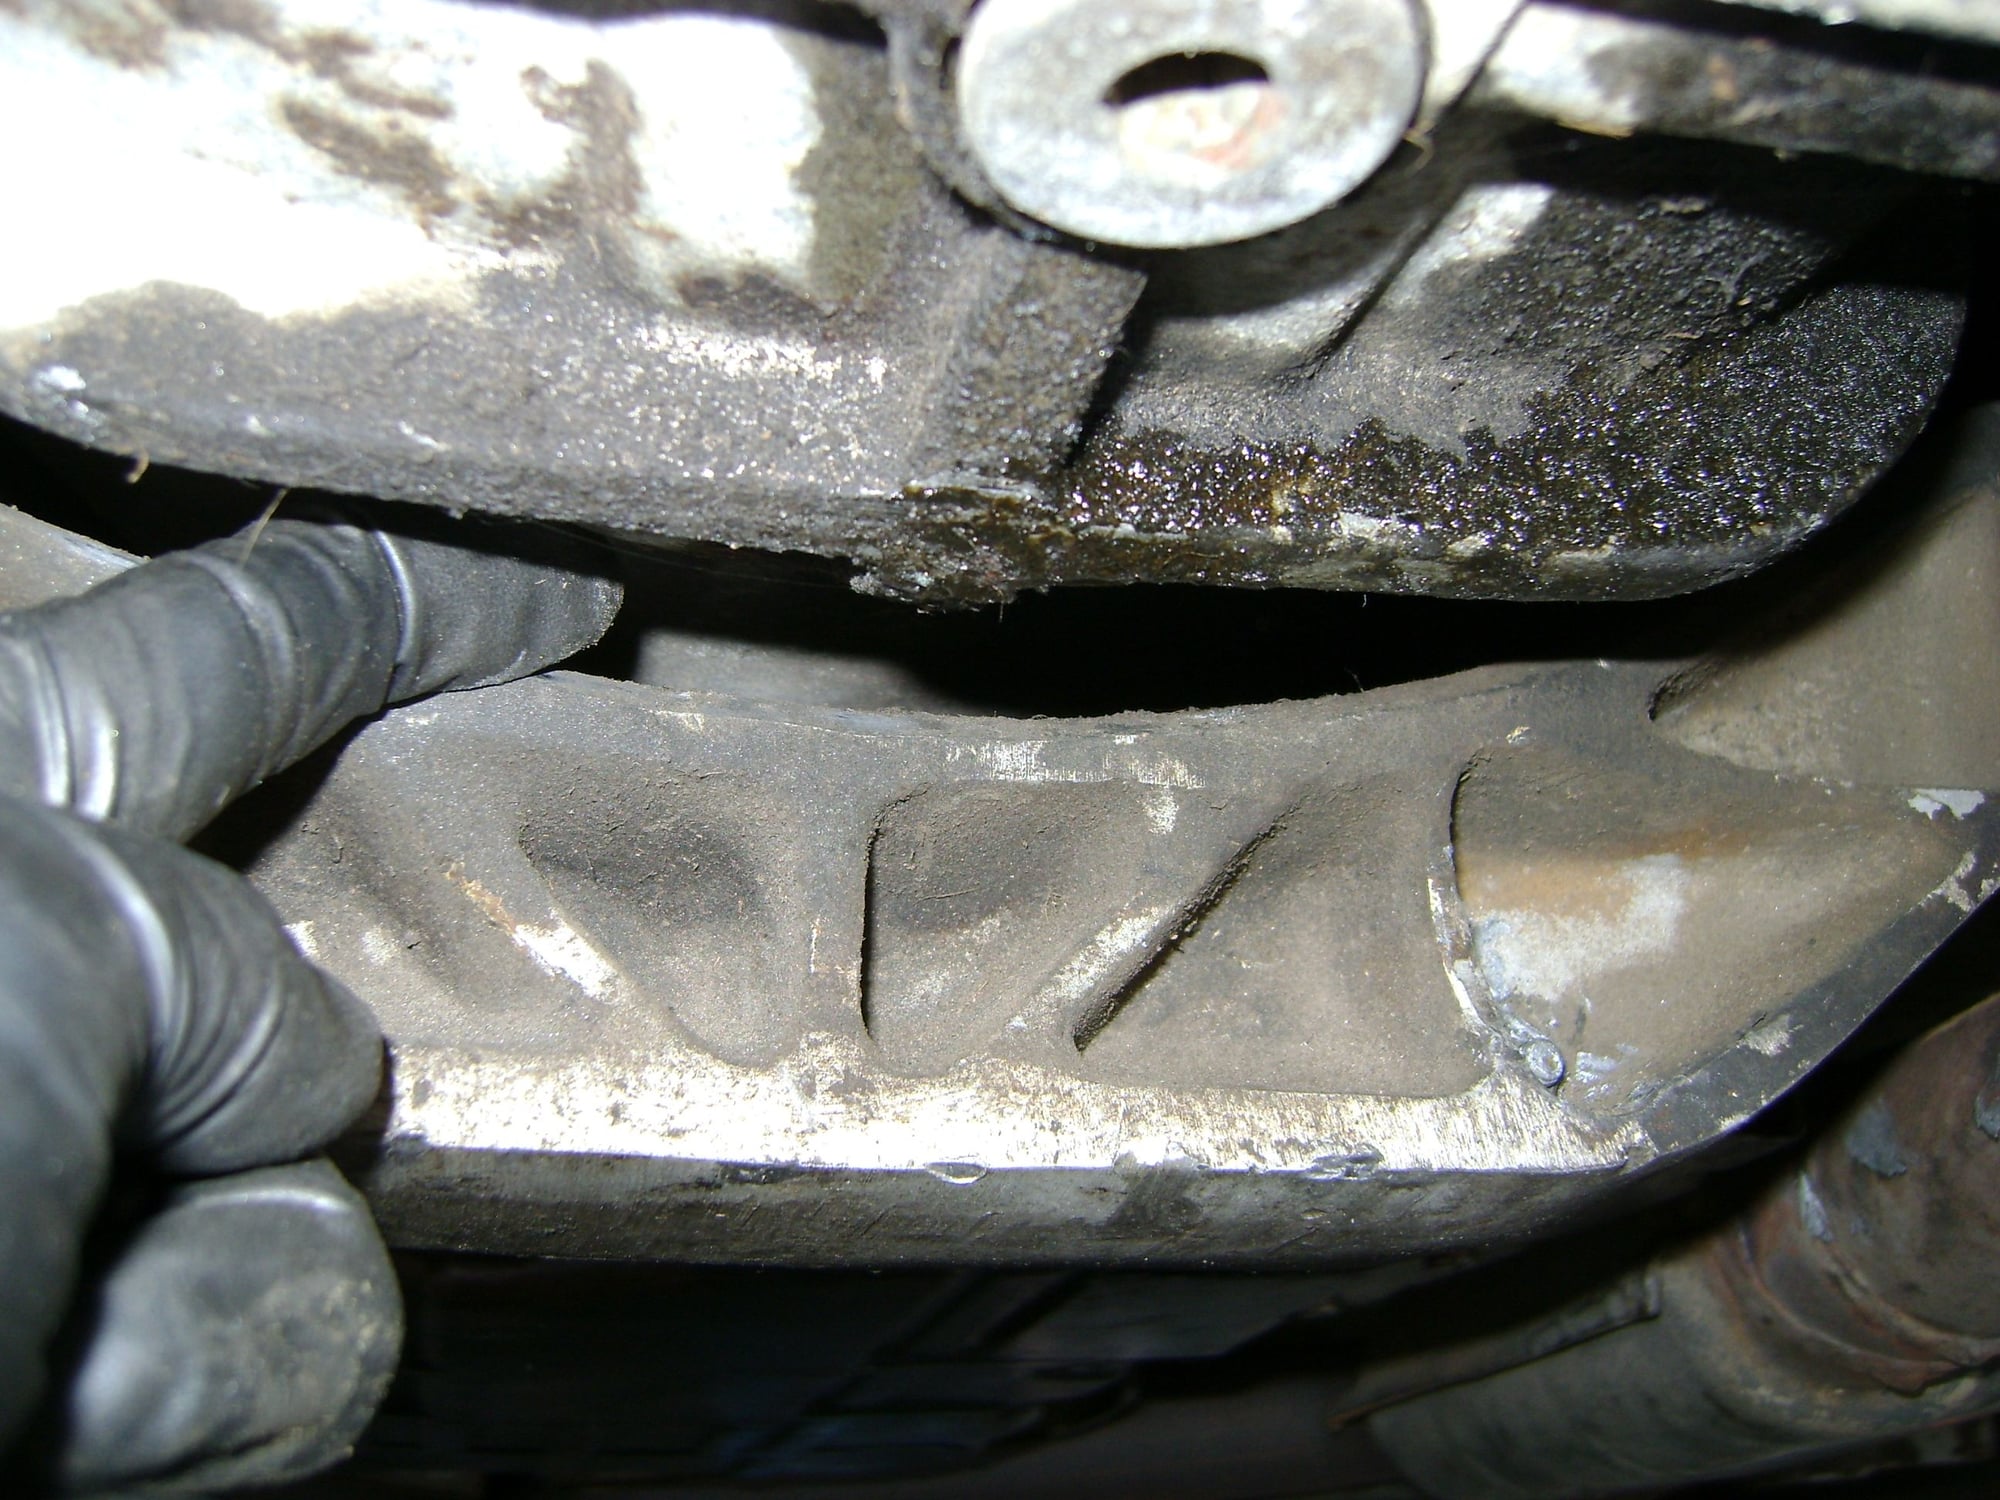
Here is the clearance my transmission had from the cross member.
I had another set of old mounts that were also shot, so I used them to make my new mounts. I cut off all the old rubber and cleaned up the two aluminum pieces that make up the mount. Then I sandblasted them till they were ready to reuse. I figure this was the best way to go rather than trying to machine all new metal hardware.
Then I made a mold that would hold the metal pieces in the correct position while I mixed and poured polyurethane in the space. I tested a few different polys to get the right stiffness. The stock rubber was very similar to 60A Shore hardness. I didn't want to go harder since I didn't want the extra vibration and who knows what that would do to the engine mounts. I've read a lot of the autocross guys use 80A or 90A.
I got the poly from McMaster-Carr. They carry Forsch polyurethane, so after calling Forsch to get advice on how to get the poly to adhere to the aluminum, I was able to order the appropriate primers.
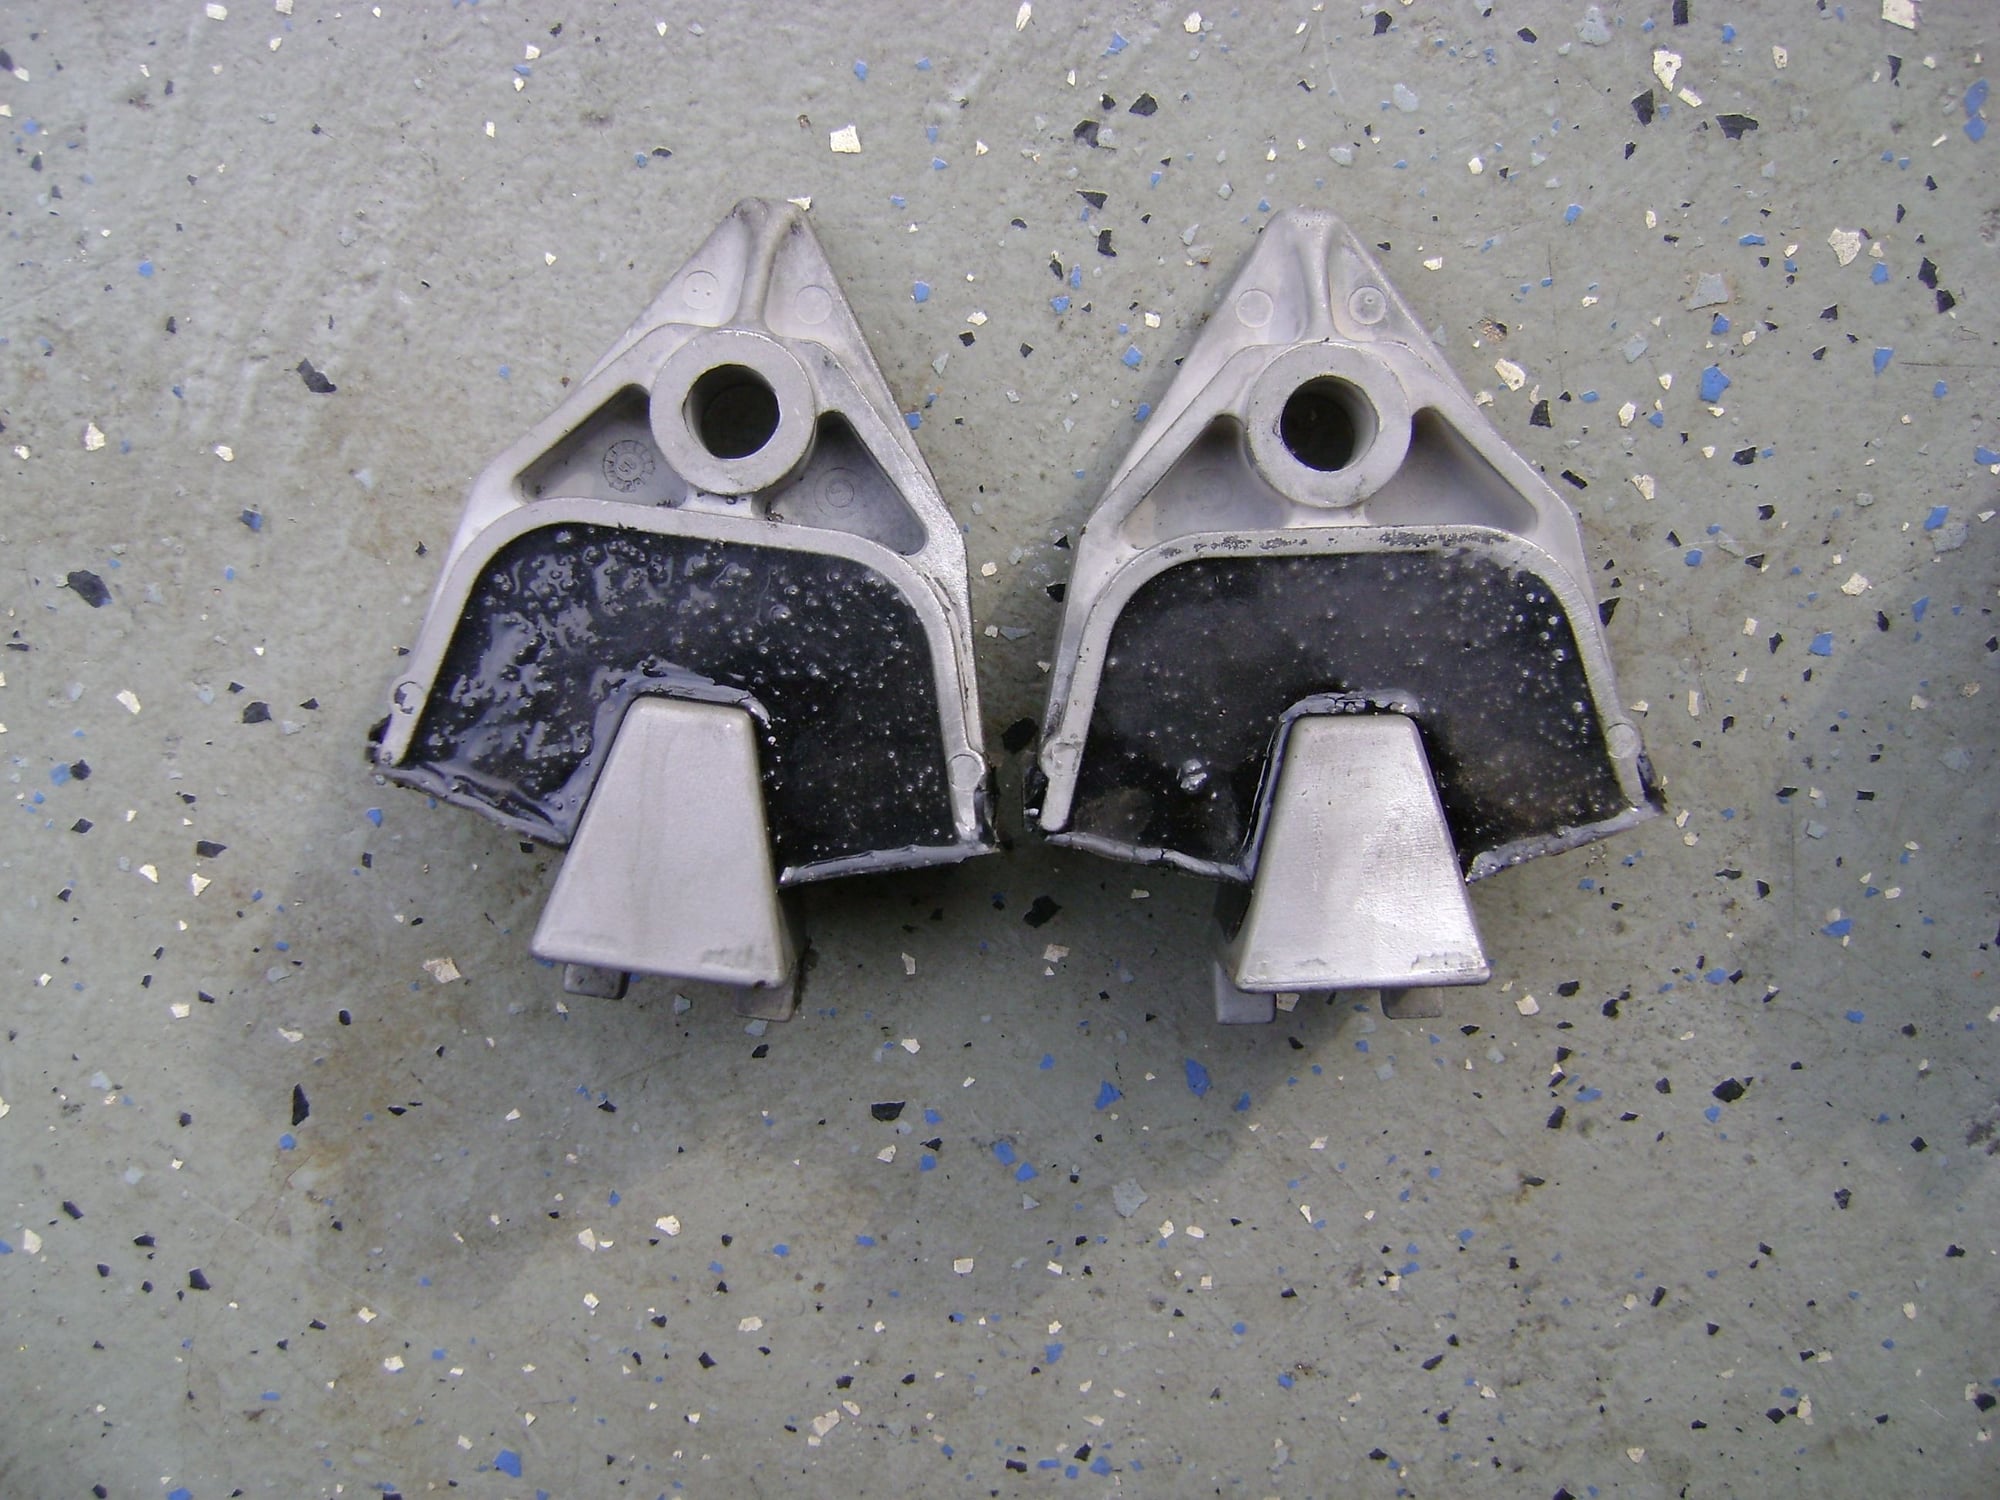
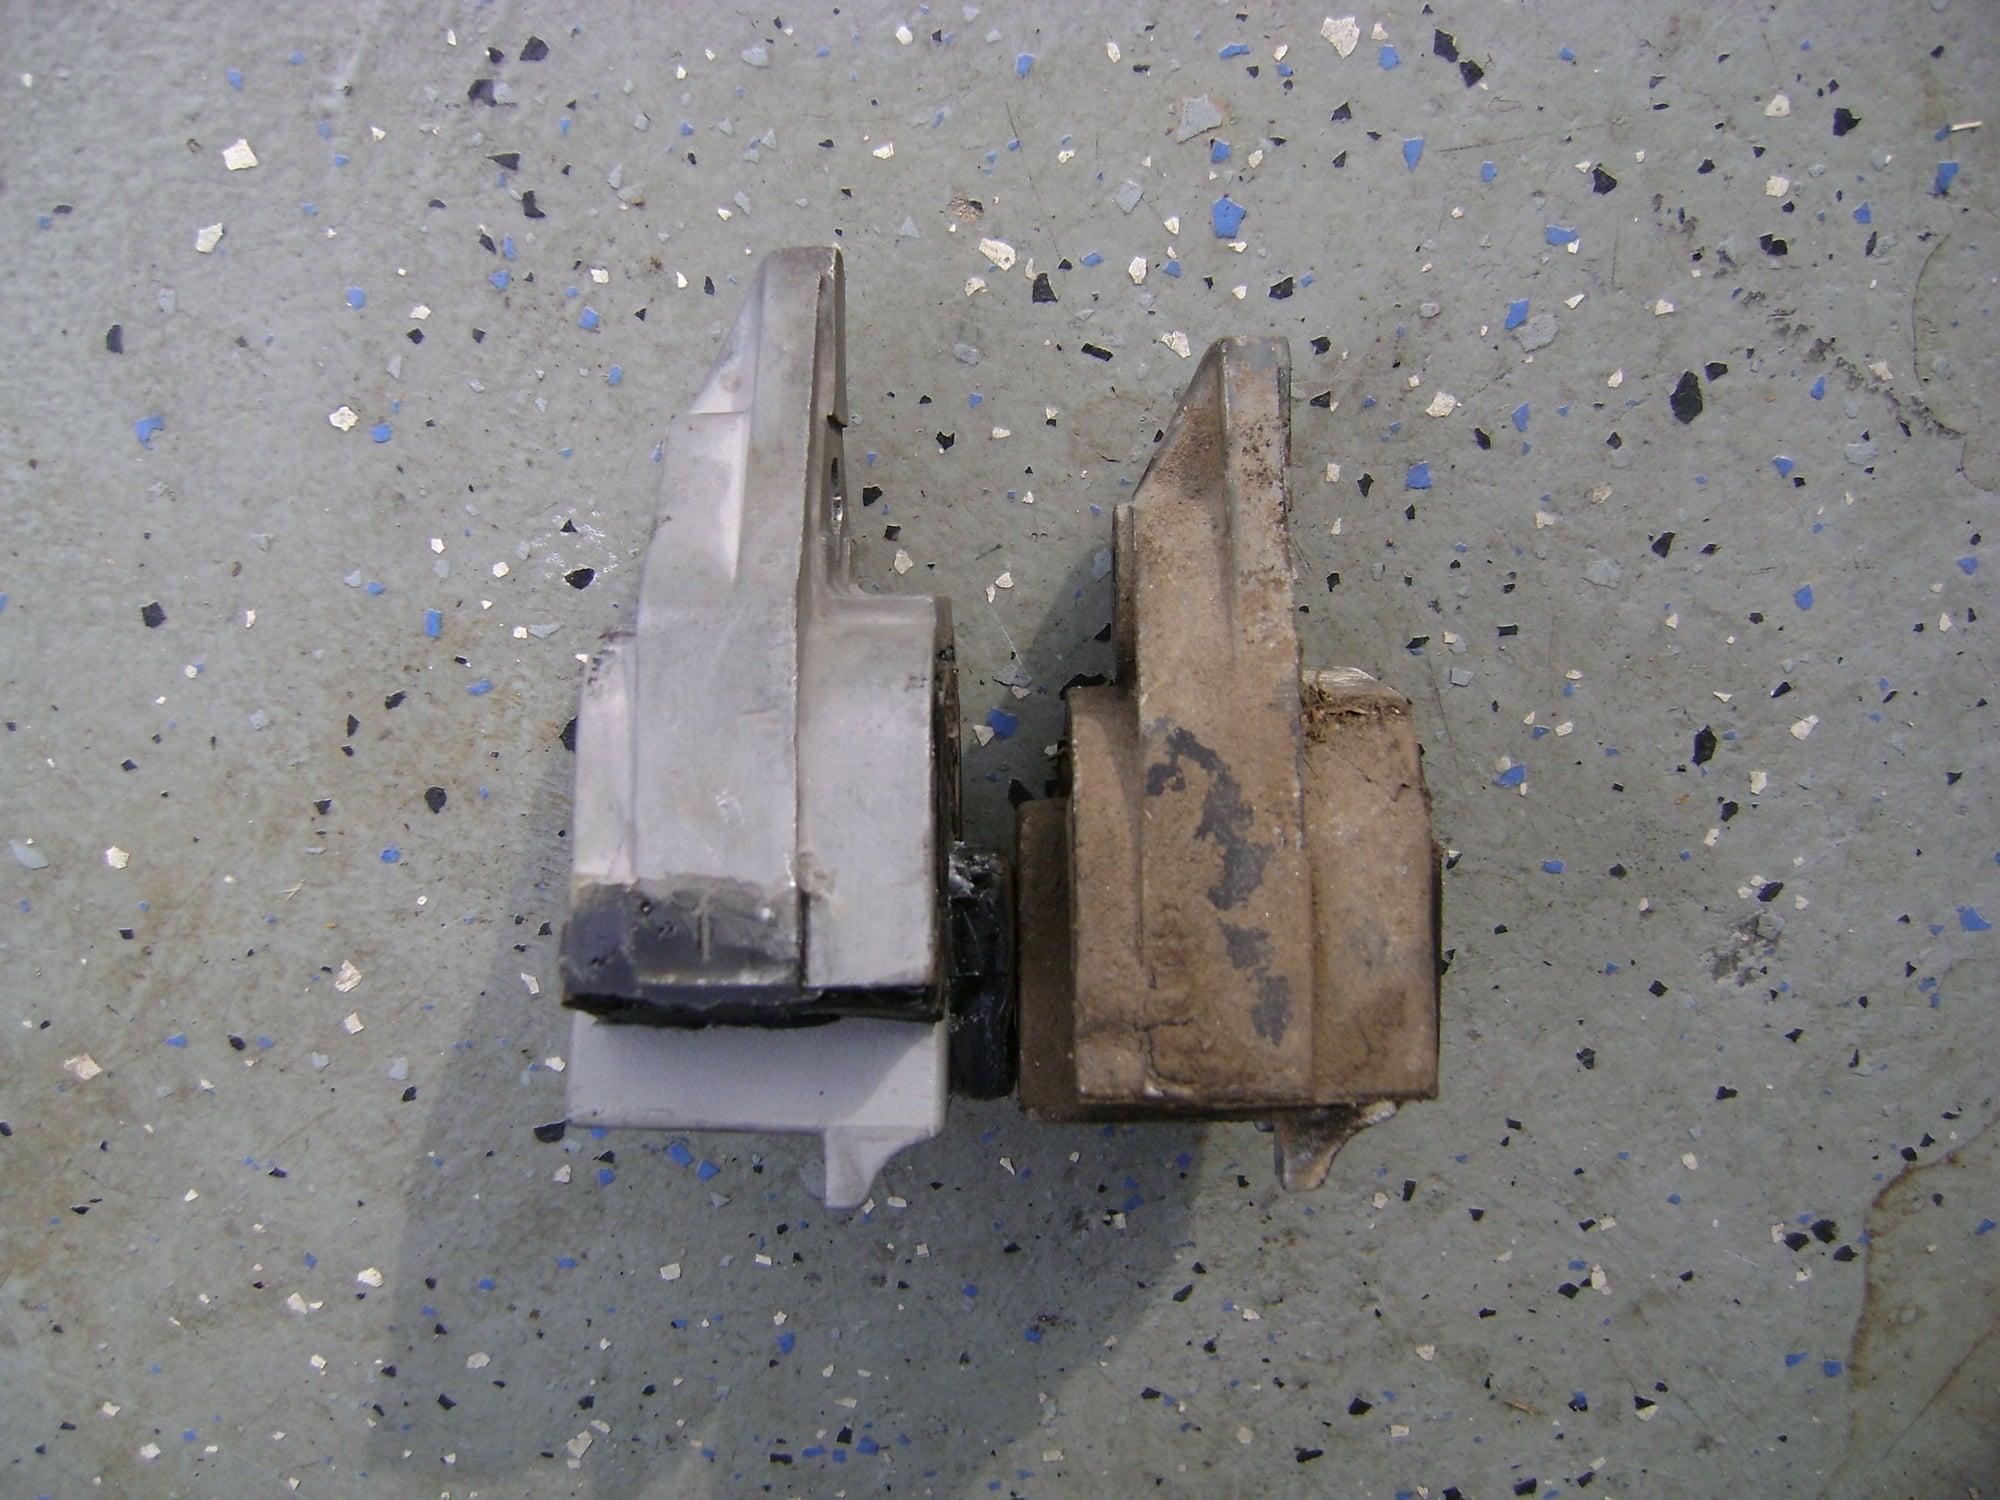
After mixing, pouring, and waiting the requisite 7 days to cure, it was time to take the mounts out and test them. Here are the completed mounts.
An a couple of pictures comparing them to the old ones. I made the new ones as close to the height of new mounts as I could.
I didn't leave a space in the poly like the originals had for two reason: I did't want my mounts to compress as much over time as the originals, and it would have made the casting process a little harder. I guess I could have cut out the extra poly after casting, but I'll see if it makes a difference.
I installed the new mounts and ended up having to shim one side 4mm. I know it was't a problem with the mounts since they were cast in the same mold. The PO had pulled the engine and replace the enging mounts, but not the transmission, so I guess over time the transmission had shifted those 4mm. Here is a picture of the clearance my tranny now has from the cross member, about an index finger.
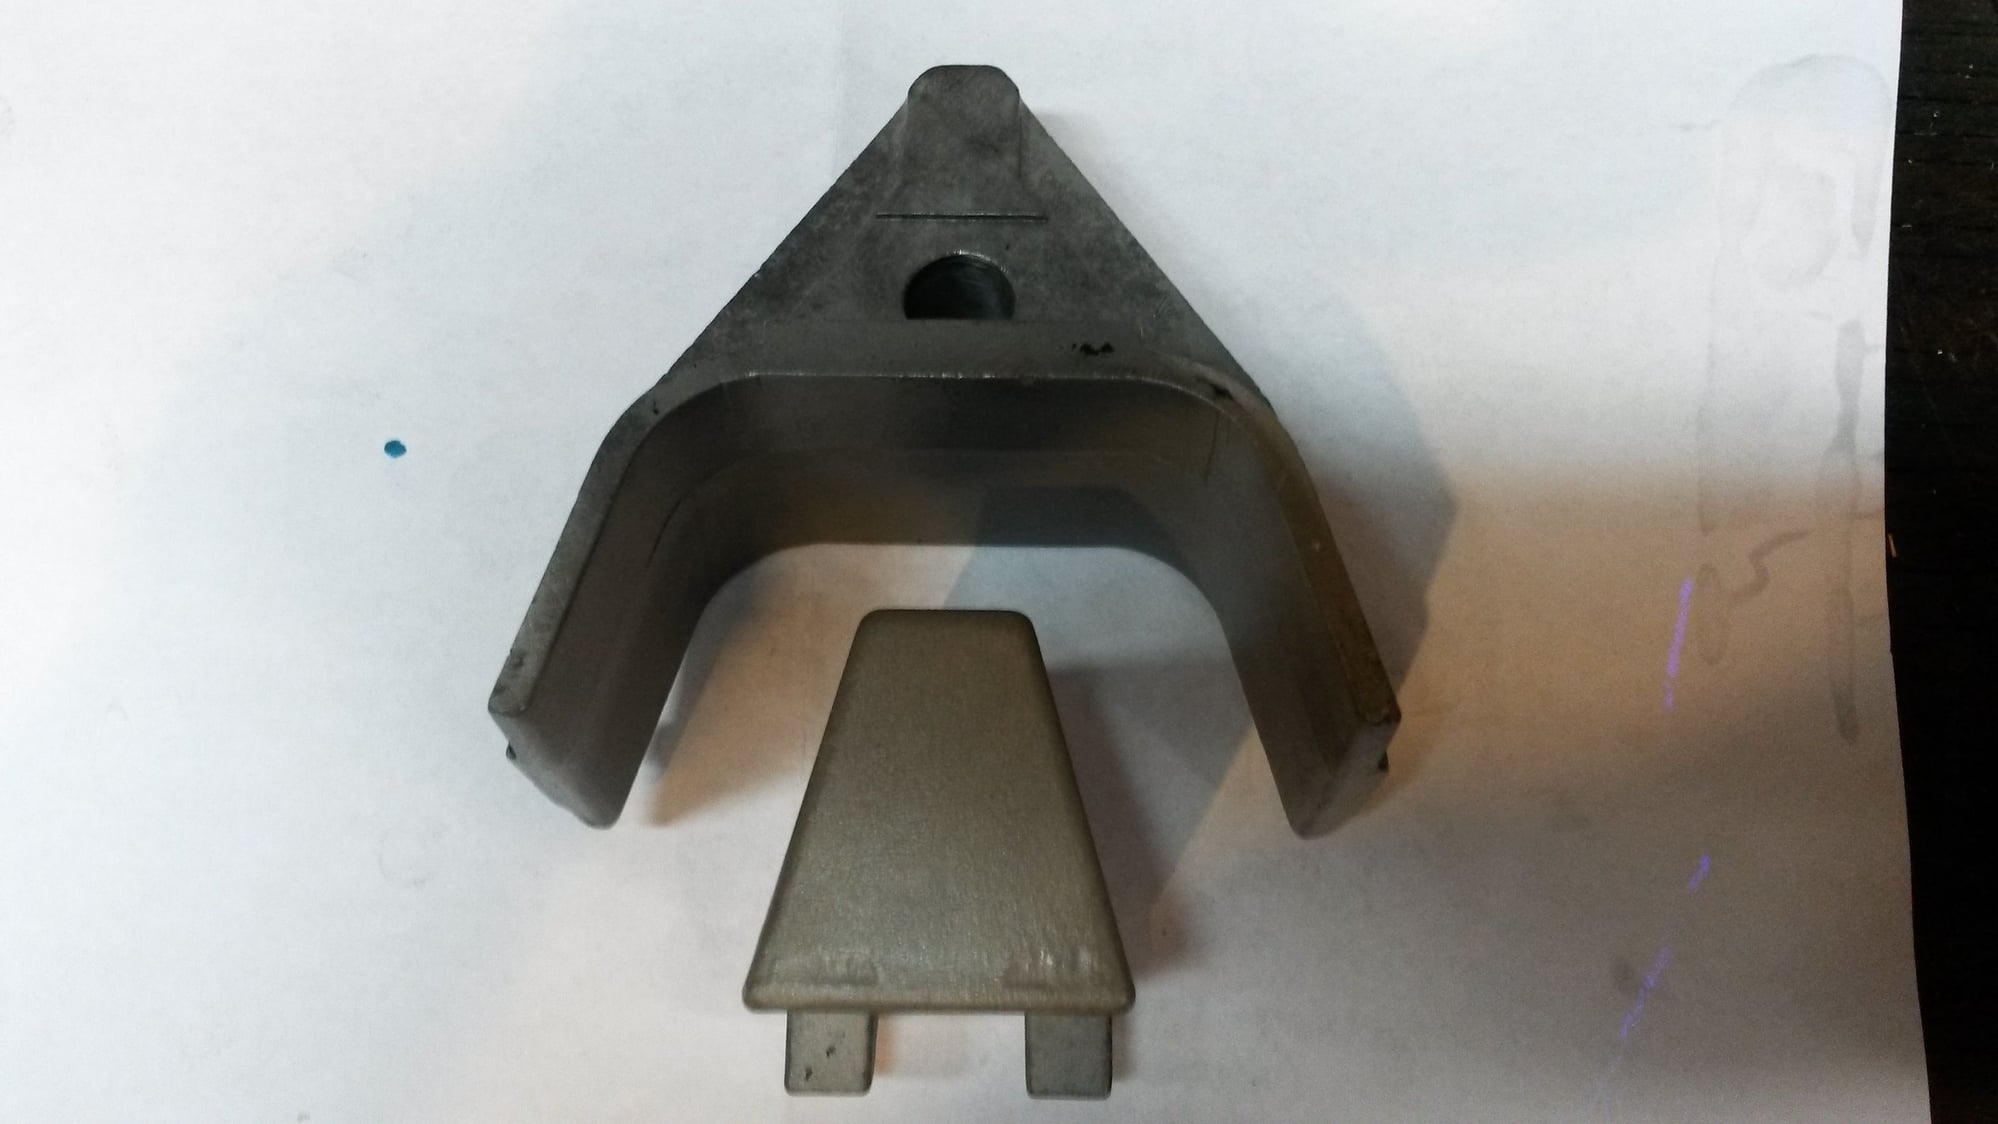
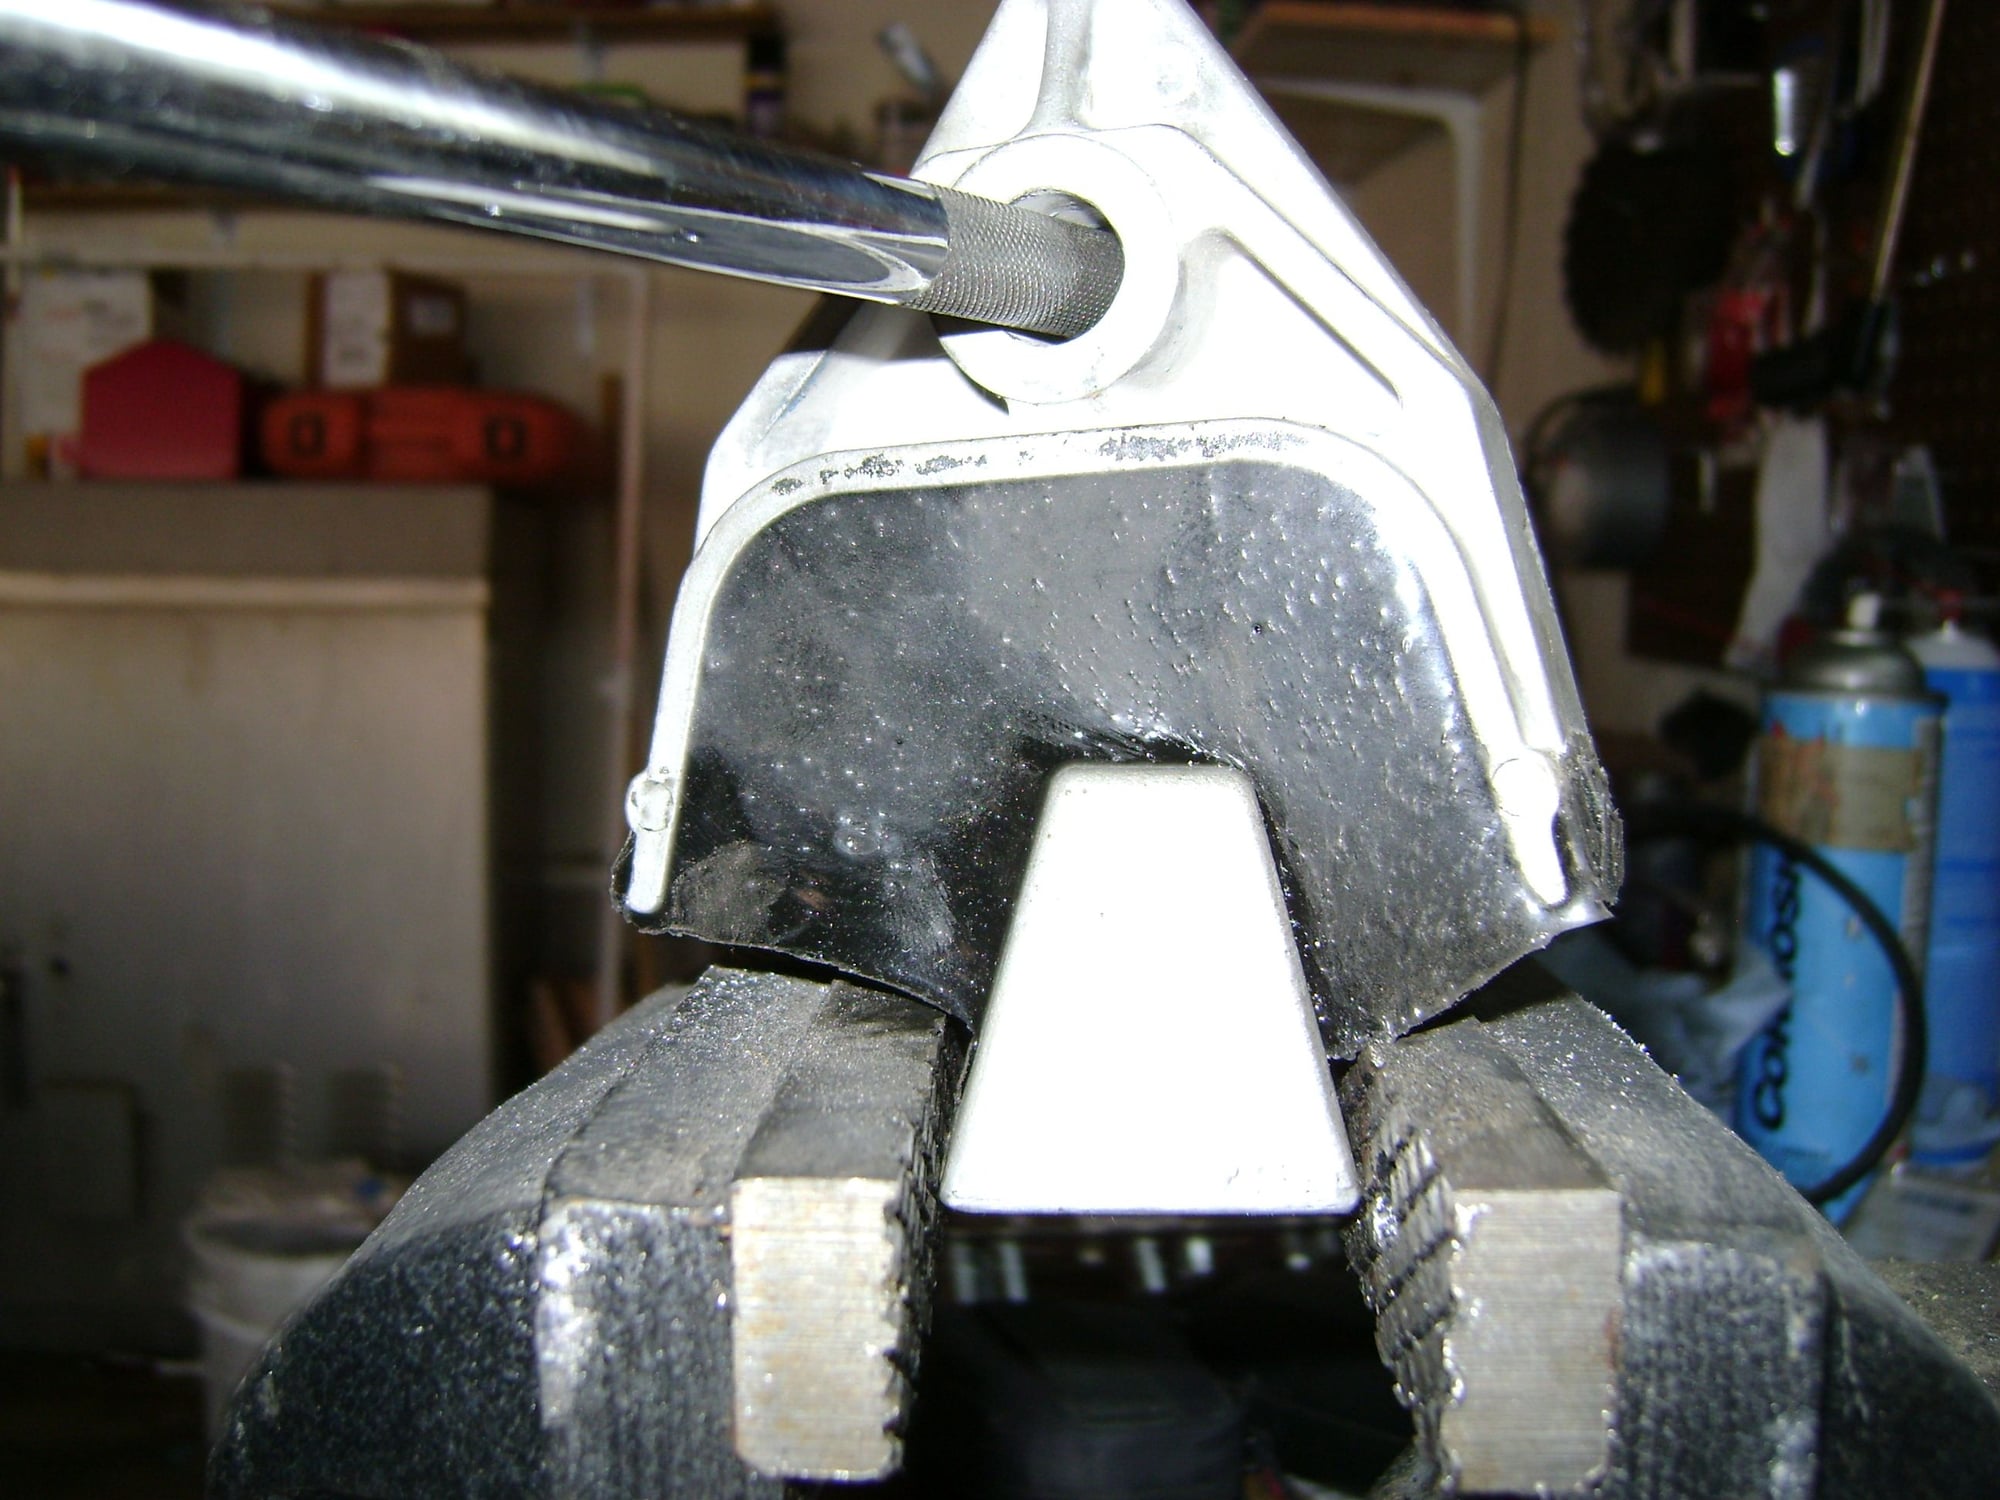
I've had them on a few days now and everything is great so far. No more banging of the tranny when I go over a bump and shifting is much smoother as well. I'll post any updates if they fail, but I doubt they will. Before installing them I clamped the base in a vise, stuck a long socket extension in the bolt hole and started torquing the upper piece to see if I could get them to separate. The poly stayed firmly adhered to the metal. I rotated the top piece about 45 degrees with no issues. Here is a picture of that. I had to take one hand off to take the picture so this isn't quite as far as I rotated it with two hands.
So I hope that gives anyone out there some inspiration to do this themselves. It wasn't hard or expensive, just time consuming to get it right. The polyurethane cost about $34 per mount and the primers (2 of them) were $12 each. If you have any questions, feel free to ask.
The McMaster part numbers are:
8644K24 - Urethane Casting compound, 60A Hardness, 1 lb (1/2 lb per mount so 1 lb is perfect)
8644K32 - Casting compound primer for metal - 4 oz
8644K31 - Casting compound primer for rubber - 4 oz
Clean the metal till there is no rubber left. I cut off all I could with a hack saw, then a razor. I burned off the rest with a blow torch. Then wire wheel in a drill to remove the residue. I sand blasted them just to make them look really good, but I think the wire wheel would have been fine. Then degrease before putting on the primer. The key is to not have any oxidized aluminum on the parts when you prime them or you won't get sufficient adhesion, so you need to prime them as soon as they are clean.
Prime first with the 8644K31, let dry to touch, then prime with 8644K32, let dry to touch. Then place in your mold and pour your poly. The key here is to have a mold that will hold the pieces in the proper orientation. I made mine out of another type of casting rubber, but you could use clay if you are only making two mounts and didn't want to go through the process of making a mold.
I'd be interested in making up some mounts for anyone that wants them. PM me.
I'm with Stan, this is an excellent effort--thanks for posting! Please post how they hold up in the months/years to come. I could definitely see me doing this when my current set fail.
Very nice! Just a suggestion: See if you can get you hands on a vacuum pot and put the rebuilt mounts in them while they cure. This should pull most of the bubbles out of the urethane mix.
Yes, the vacuuming will be in the works. I don't think it will have too much of an effect on the performance since the poly is pretty thin when I pour it, most of the bubbles rise to the top. It would make them look better though. I had made a couple before this set which I destructively tested and there weren't any bubbles in the middle of the pour I could see.
Nice work with these! Part #92837504513 is a nice cheaper alternative for those looking at replacement. These are the larger 78 mounts, used two in my car. Worked great.
I found that having the solid urethane rather than the hollow section makes a significant difference in the noise isolation. My first-cut at a similar "rebuild" used some 60A urethane adhesive in a tube, and the matching primer. The wood fixture I made has reliefs for the **** on the lower metal part, and I used wax paper as the barrier between the fixture and the parts so the urethane wouldn't stick. After trying them and enjoying all the gearbox noises passed into the cabin, I went ahead and installed the new Porsche mounts I had previously purchased. I may try the project mounts again after I drill out the urethane in the top, but for now they are in the project bin and the new mounts are getting the duty.
The mount design is very similar in concept to Mercedes engine mounts from the period. Easy to see where the 928 group found their design inspiration.
That's interesting since I haven't noticed any increase in the vibration level with the rebuilt mounts. Maybe the urethane in the tube behaves differently than the two-part stuff I mixed up even though they are both 60A. Hardness is only one characteristic. I've had them on almost a week now and haven't got any complaints.
What I noticed was the the "filled" mounts offered no significant improvement over the collapsed mount. So the question is whether you noticed a -decrease- in that noise with the rebuilt pieces. On my car, swapping in the new Porsche mounts made things significantly quieter AFA gearbox noises coming through. Note that mine were not collapsed to the point where the gearbox was hitting the crossmember, as your pictures show.
My next effort will include a bit of Teflon inserted to take up that cavity space. Could do it with a bit of wood and wax paper too I guess. Then slide it out after the urethane sets.
Nice work and well researched and executed. I'd suggest obtaining the dimensions of a new mount to replicate the proper height. Your remanufactured mounts appear to be taller than the original mounts (new and uncompressed). The space between the cross member and trans case is greater than stock (I have no idea if this matters).
Dr Bob,
I drove the car for two years without noticing any annoying gearbox noise with the old mounts. What led me to replace them was the banging when I went over a bump and the harsh shifting. The new mounts got rid of that and I still don't notice any gearbox noise. This might be a problem of me just not knowing what "right feels like." But I'm pretty critical so I don't think so. I agree that adding the space would soften them up, but without a lab and vibration testing equipment it would all be anecdotal.
Jon,
I ordered a stock mount on Monday after folks here expressed an interest in having me rebuild theirs. I figured any work I was doing for someone else better be top notch. The next iteration of mounts I make will be the exact same height of the stock mounts. I have two more sets I need to make for myself so I figured it was worth the investment anyway. I'll leave the originals on my first car to see how they hold up compared to the newer design. If it wasn't such a PITA to change them out I'd make a set with the space in them and see how they compare. Maybe I will, if I am really bored, and wrench on them in the vise so see how they behave. I should have Gen II done by Christmas so standby for more pictures. Where are you in NoVA? I'm in Stafford. You can come by a see them in person if you want.

 12-05-2017, 09:48 PM