When you click on links to various merchants on this site and make a purchase, this can result in this site earning a commission. Affiliate programs and affiliations include, but are not limited to, the eBay Partner Network.
It's hard to tell from the pictures but it looks like your center console temperature sensor bezel is cracked on the upper left edge. I have a solution for that. PM me if you are interested.
Thanks all! I really like how it turned out, and how the blue goes with the Dove Blue exterior. Glad you guys like it as well.
@Nicole:
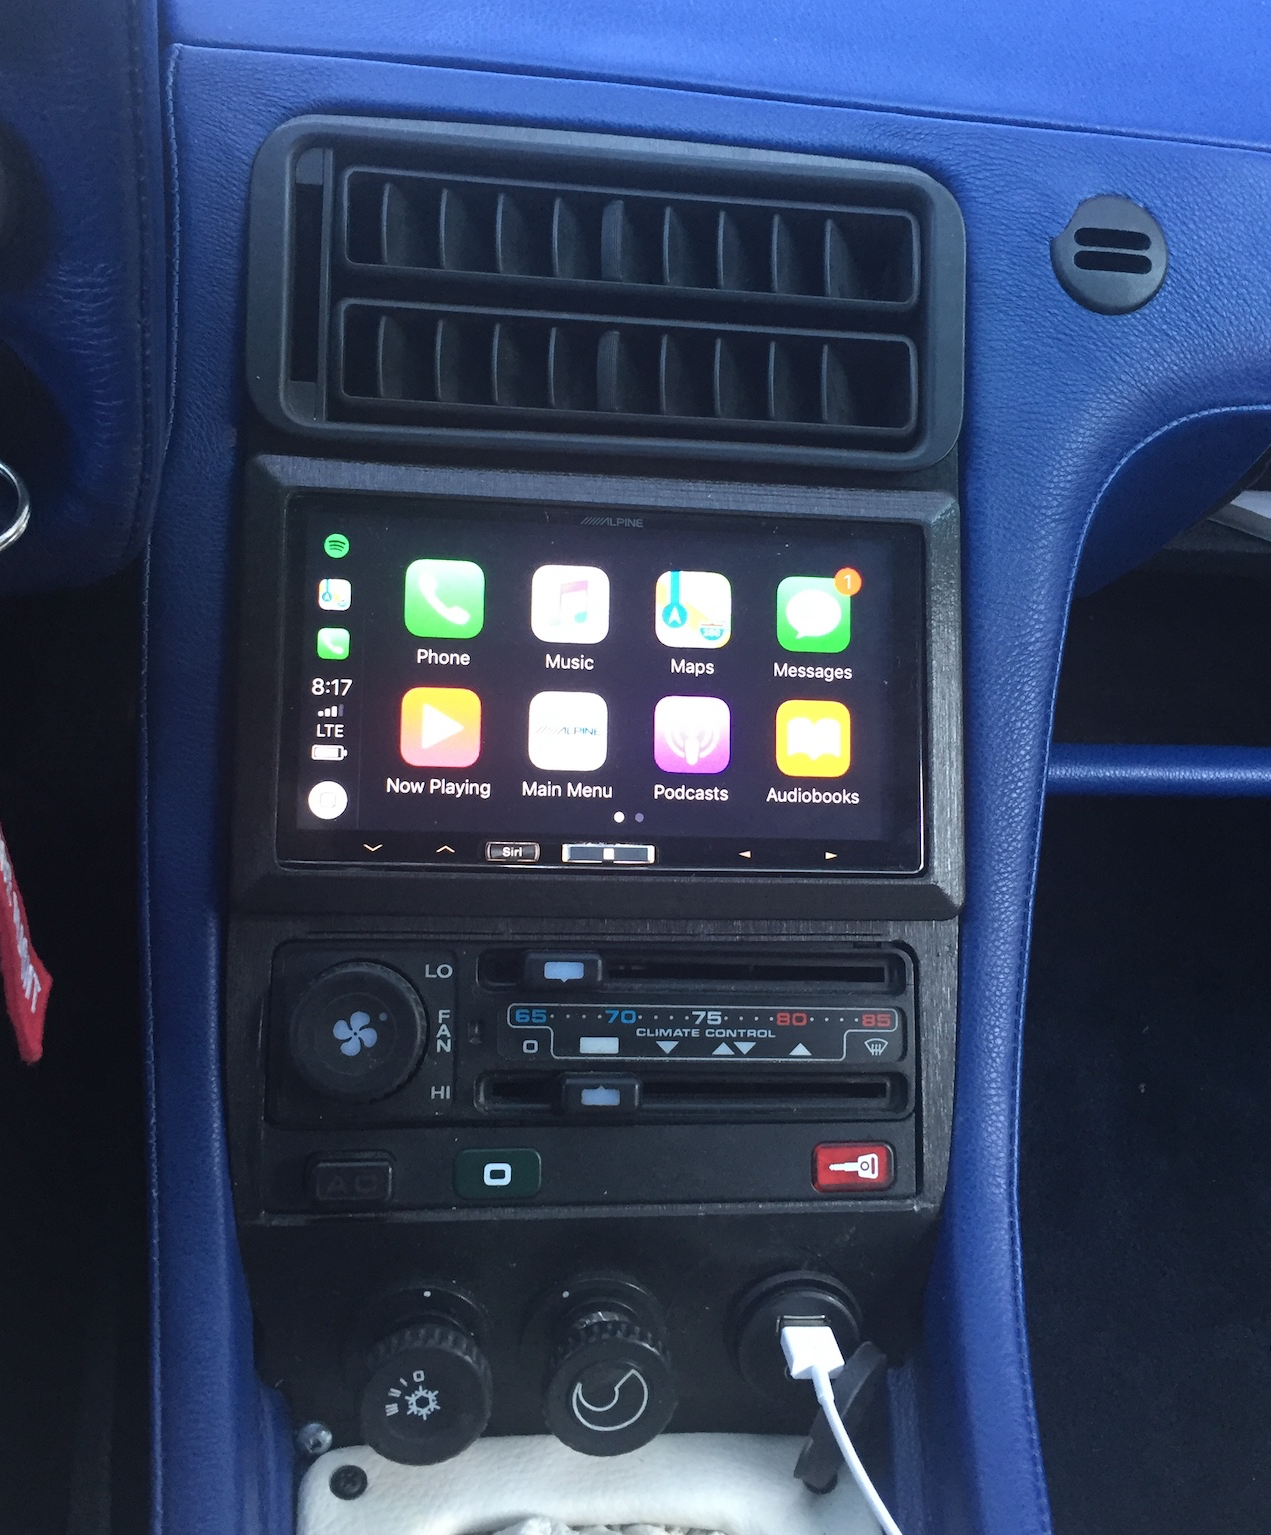
Here's a better pic. Let me know if you want a different/additional view(s). I used BigAl1's DoubleDIN kit, really easy to follow instructions. Before installation, I had it covered in a black aluminum vinyl wrap. My car has rear air, and the controls wouldn't fit if I had mounted them traditionally with the cups inset into the holes on the console, so I cut the cups down with a dremel tool and made washers out of them that were keys correctly and had the right marks for the control indicators. Hindsight is always 20/20 with this stuff, and I didn't take pictures of it. But, you cut the keys part off the bottom of the cup, and the trim ring. I glued the two pieces together and them glued the completed "washers" to the console. On the control installation, I used a nylon washer behind the console to being the control shaft back a bit so the control wouldn't stick out so much. I then cut off about 1/4" of the ***** before fitting them onto the control shafts. I still need to trim a bit off the shafts and the ***** to get a nice flush mount, but I think it's going to work.
@Tony: Good idea. I've already sent a list of parts (mainly the glove box pieces so I can get the door reinstalled), and I'll add it to the list.
@GT6ixer: I'll PM you. It is broken. I had intended to get an aluminum cap from Jager and then have it wrapped the same as the center console. Not sure if that's the best way though.
@drscottsmith: I let the shop handle all of it. All I had to do was provide the leather (I was particular on the color and thickness). I had originally started with Paul Champange doing the covers (he did the door cards, armrests and the rear quarters), but our timelines didn't match up so I had JB Upholstery in Garner finish the rest. Cost-wise, it worked out to be not a whole lot more than ordering all the covers without installation. I was also afraid of exceeding the limits of my skill, and I knew that if I did something wrong, it would drive me up the wall, since I'd see it every time I got in the car. So, I left it to the professionals. JB has done a couple of 928's before, so I had a pretty good idea of what he was capable of.
The car came with 8-way seats, but I bought a set of seats with heat and lumbar from Petza914 and had those recovered and installed. I've got the 8-ways I'll be posting for sale this weekend.
I'm thinking a 930S wheel in cobalt to finish it off. What do you guys think? I also need to figure out what I'm going to do with the shift handle, either dye it or do something else.
Your installation looks very good. I like the alum wrap.
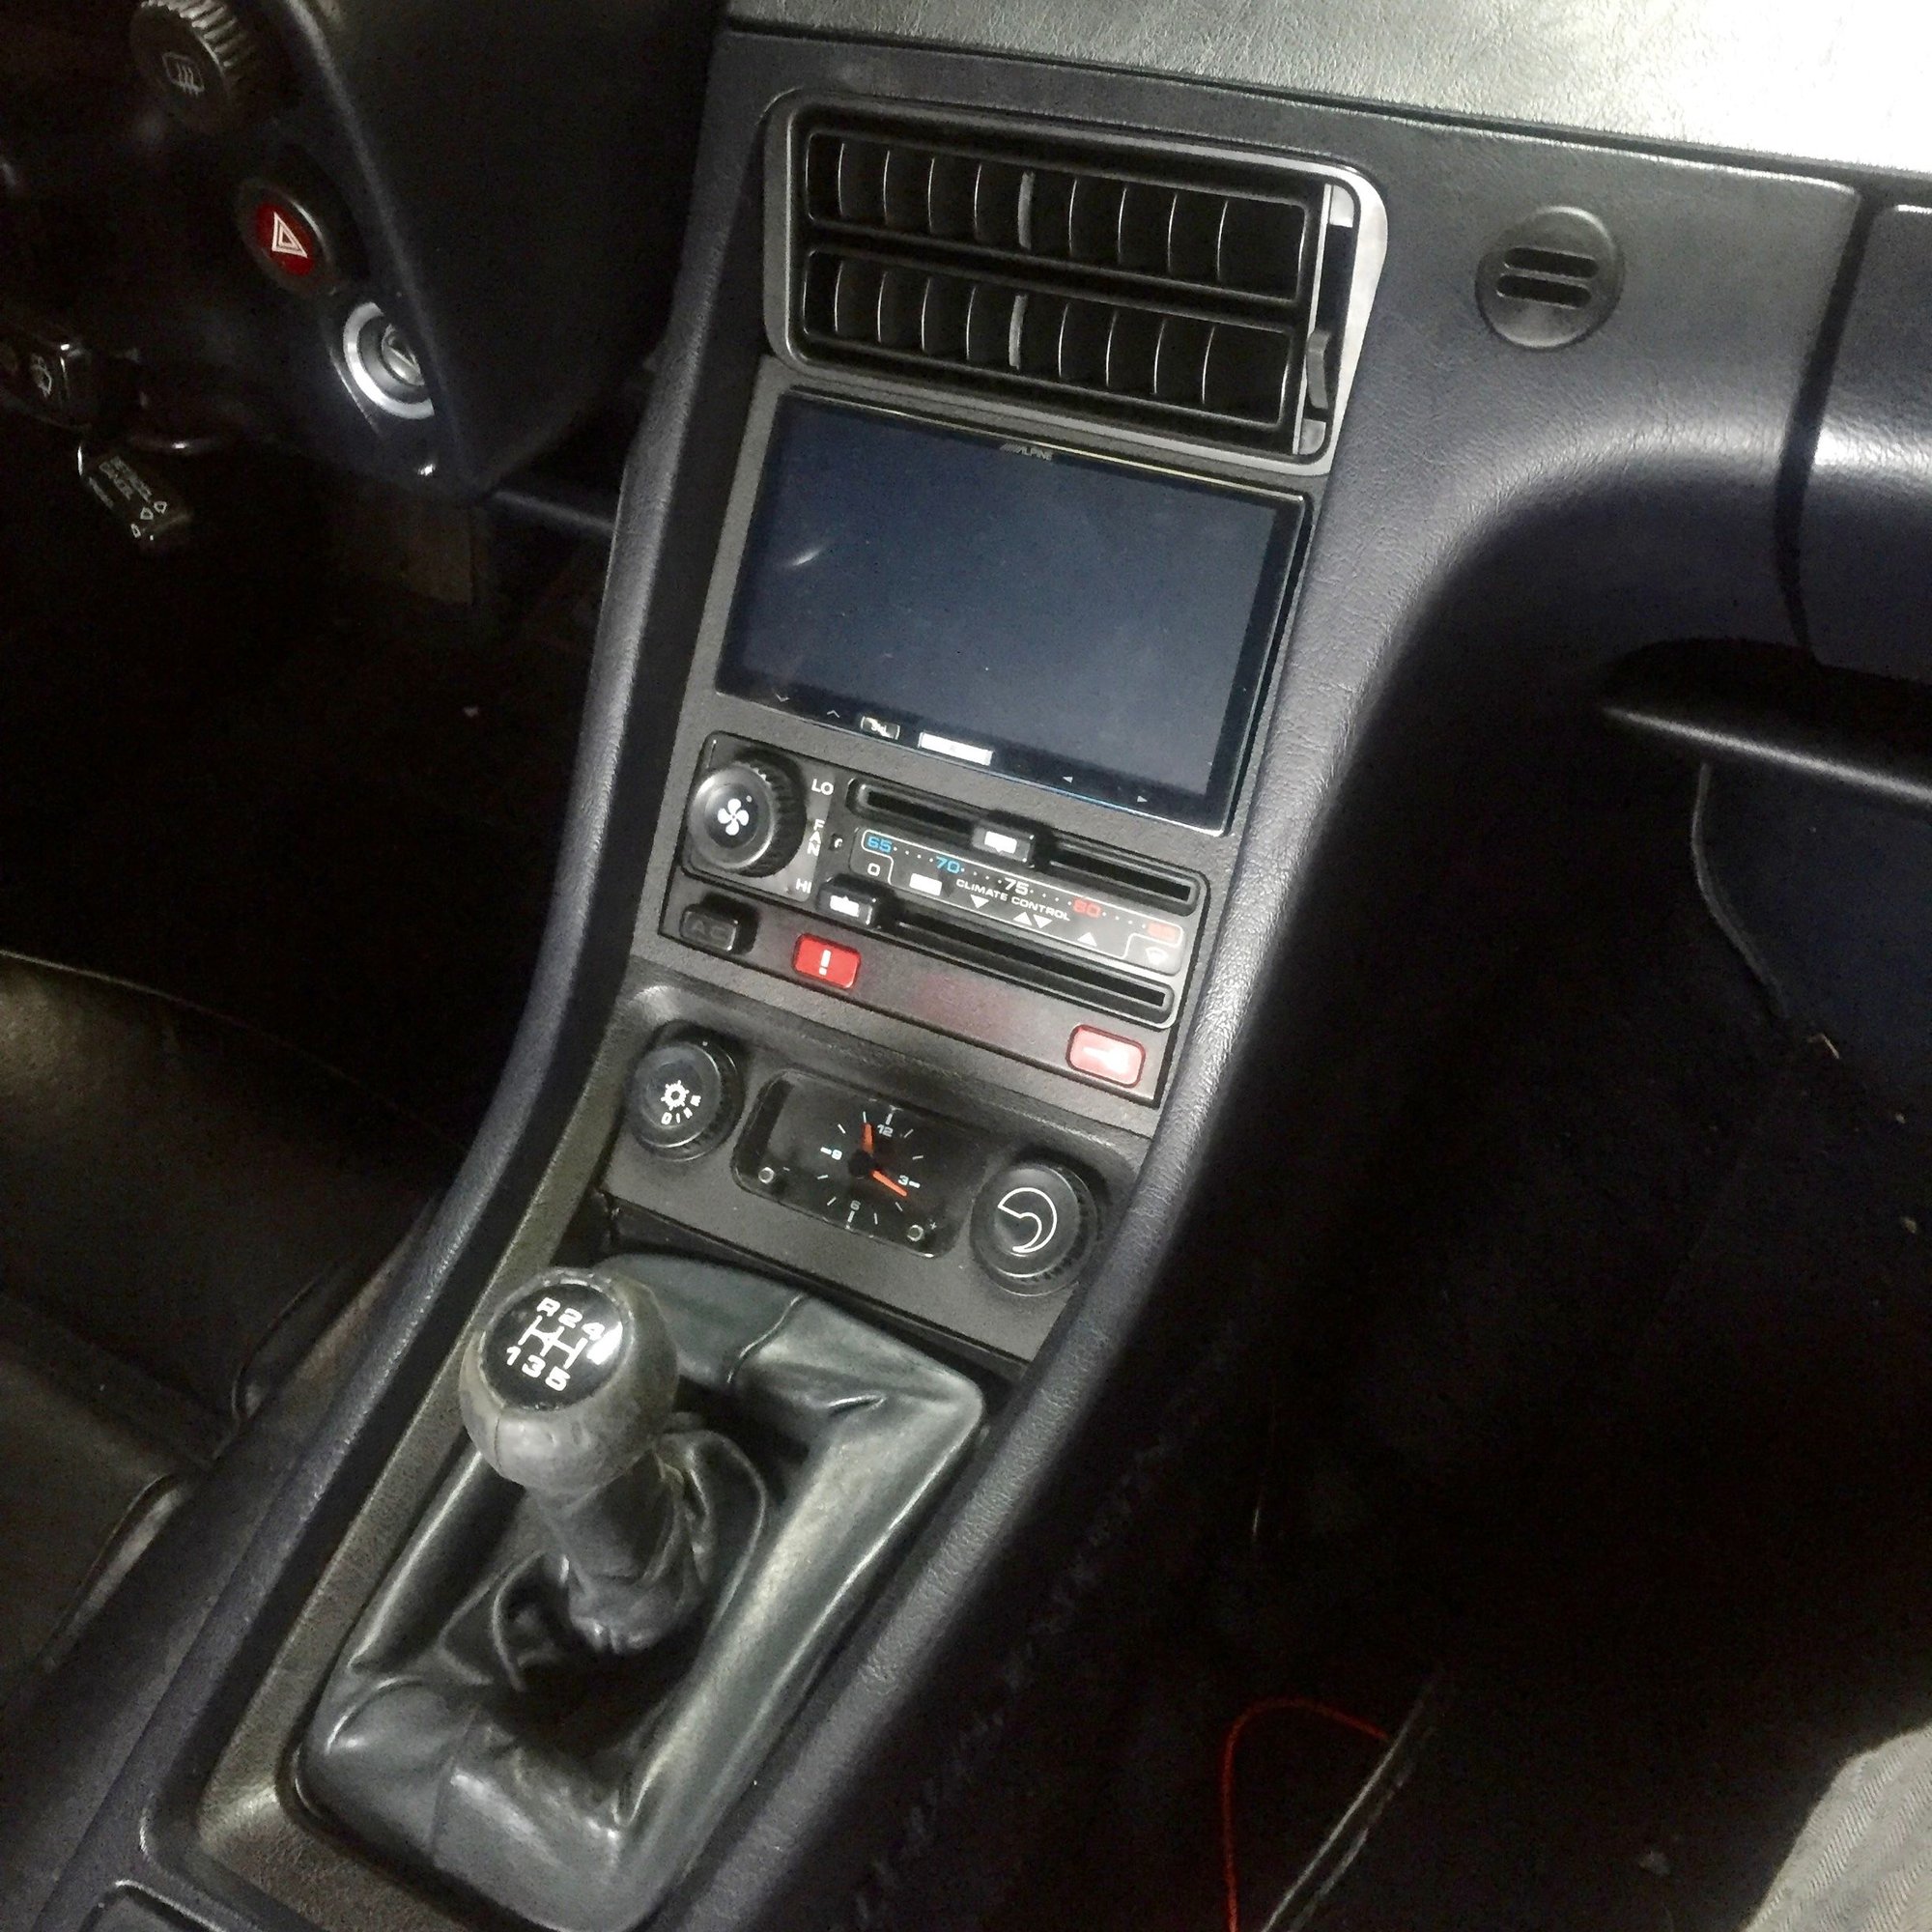
I am curious why you decided to go flush mount versus using the standard recessed look. Was it preferred aesthetics. Normally the thing that drives flush mount is head unit depth, but you are using the Alpine iXL 007 which is half the depth of a standard unit and can be installed using the stock recess. I had that unit in my DD install and chose to stay with the original recessed look. Here is the installation I had, take note of the AC controls for additional inspiration if you you want.
Last edited by Michael Benno; 11-30-2017 at 01:05 PM.
@Michael Benno: Your install looks awesome. I ended up going flush mount mainly because I originally intended to do the bracket part of the center console in the light leather. Once I decided to go with the wrap, I forgot to push it back for a recessed mount, but I liked the look. I still go back and forth on it, and may do a recessed mount later on. Your AC controls are awesome, but I wanted to get rid of the clock (seemed redundant with the radio). I kept all the parts though, and am going to build a stock console with the same blue leather incorporating the clock, stock AC controls and stock radio to swap out if I want. The updated look is cool for now, but I want the option to do a simple swap back to stock later on, especially if I ever decided to sell it (need to find a GT project first though since I think people prefer the stock console and I wanted to provide that option.
@hessank: LOL...you are right. I broke the little control and haven't sourced a new one. Wanted to get the thing back together so I could drive it before I found the part. I'll flip it around when I get home tonight.


 T
T

 11-30-2017, 04:07 AM


 since I think people prefer the stock console and I wanted to provide that option.