When you click on links to various merchants on this site and make a purchase, this can result in this site earning a commission. Affiliate programs and affiliations include, but are not limited to, the eBay Partner Network.
Had a couple of questions about cleaning up my engine and engine bay as well as heads.
I'll start with the heads. I'm aware that most of the seal/gasket kits I've seen for sale come with the engine/head gasket. BUT, my friend who is a professional mechanic and my brother who works on his mustangs and fairlane, say no need to do that. Their logic is that its not worth the time and effort, that unless I was leaking fluids between that maybe. Any thoughts?
If you guys have removed them is it a bitch or easy or hard? I can see the bolts that are holding the heads down. 19mm with angled driver. But just wanting some reassurance.
And last, cleaning engine and bay seems to be natural to do. My friend who is the professional mechanic offered up his water pressure machine with a heater that gets water up to 250*F. He's stating the logical, take up all holes to engine and hoses before doing so. If I do that have any of you had the chance to do it and if so any recommendations?
NO, I just took a pic of how I was able to reach with a socket. I haven't done anything at all other than remove valve cover to see under it. That's why I'm posting to see what recommendations I get.
Your heads need to be completely rebuilt. Your best bet is to buy a complete engine gasket kit which typically includes valve seals. You will also need to separately purchase all the valve guides too, and might as well buy oil-galley plugs and have the passages blown out.
Find a good shop with parts in hand and get it done, the labor will be roughly $500 for both heads.
While waiting for the heads, you'll have LOTS of cleaning to do, including cleaning up threads.
Don't clean the engine bay with a power washer. You run the risk of pushing water and whatever cleaner you use into the wiring through any cracks in the insulation. Instead, put Simple Green cleaner (non-caustic) into a spray bottle and soak down the engine bay. Scrub with nylon bristle brushes. Rinse with hot water from a garden sprayer. Repeat as needed until all the grease and grime is removed. This will help preserve the factory cosmoline corrosion prevention spray as well.
And do the head gaskets while you have the engine out. Depending on the mileage you might also have the heads refreshed but that can be a slippery slope if you need valves, guides, springs, seats, etc. If you don't have the heads milled and the block decked you can prepare the mating surfaces of the aluminum heads and block by scraping them clean with a razor blade held perpendicular to the surface until then are slick and smooth. Make sure you don't gouge the aluminum or you will have to have the surfaces milled. If this is needed you will also need to have the water bridge milled to ensure it seals to the heads correctly.
Okay, I'm back from a few days off the project. So keeping in mind of not cleaning engine with power washer. So for a day or two I was trying to figure out how to clean off the top portion of engine because it was driving me mad figuring out a way to clean it off! I couldn't imagine doing so much work to take out block but not cleaning it off 100%.
SO, I said to myself. Why don't I rotate engine upside down, leave the intake clogged with the blue paper towels, tape them up as well and clean it off that way with Simple Green and a plastic brush. I put a good amount of cardboard not to stain floor and that worked awesome. I'll post pictures.
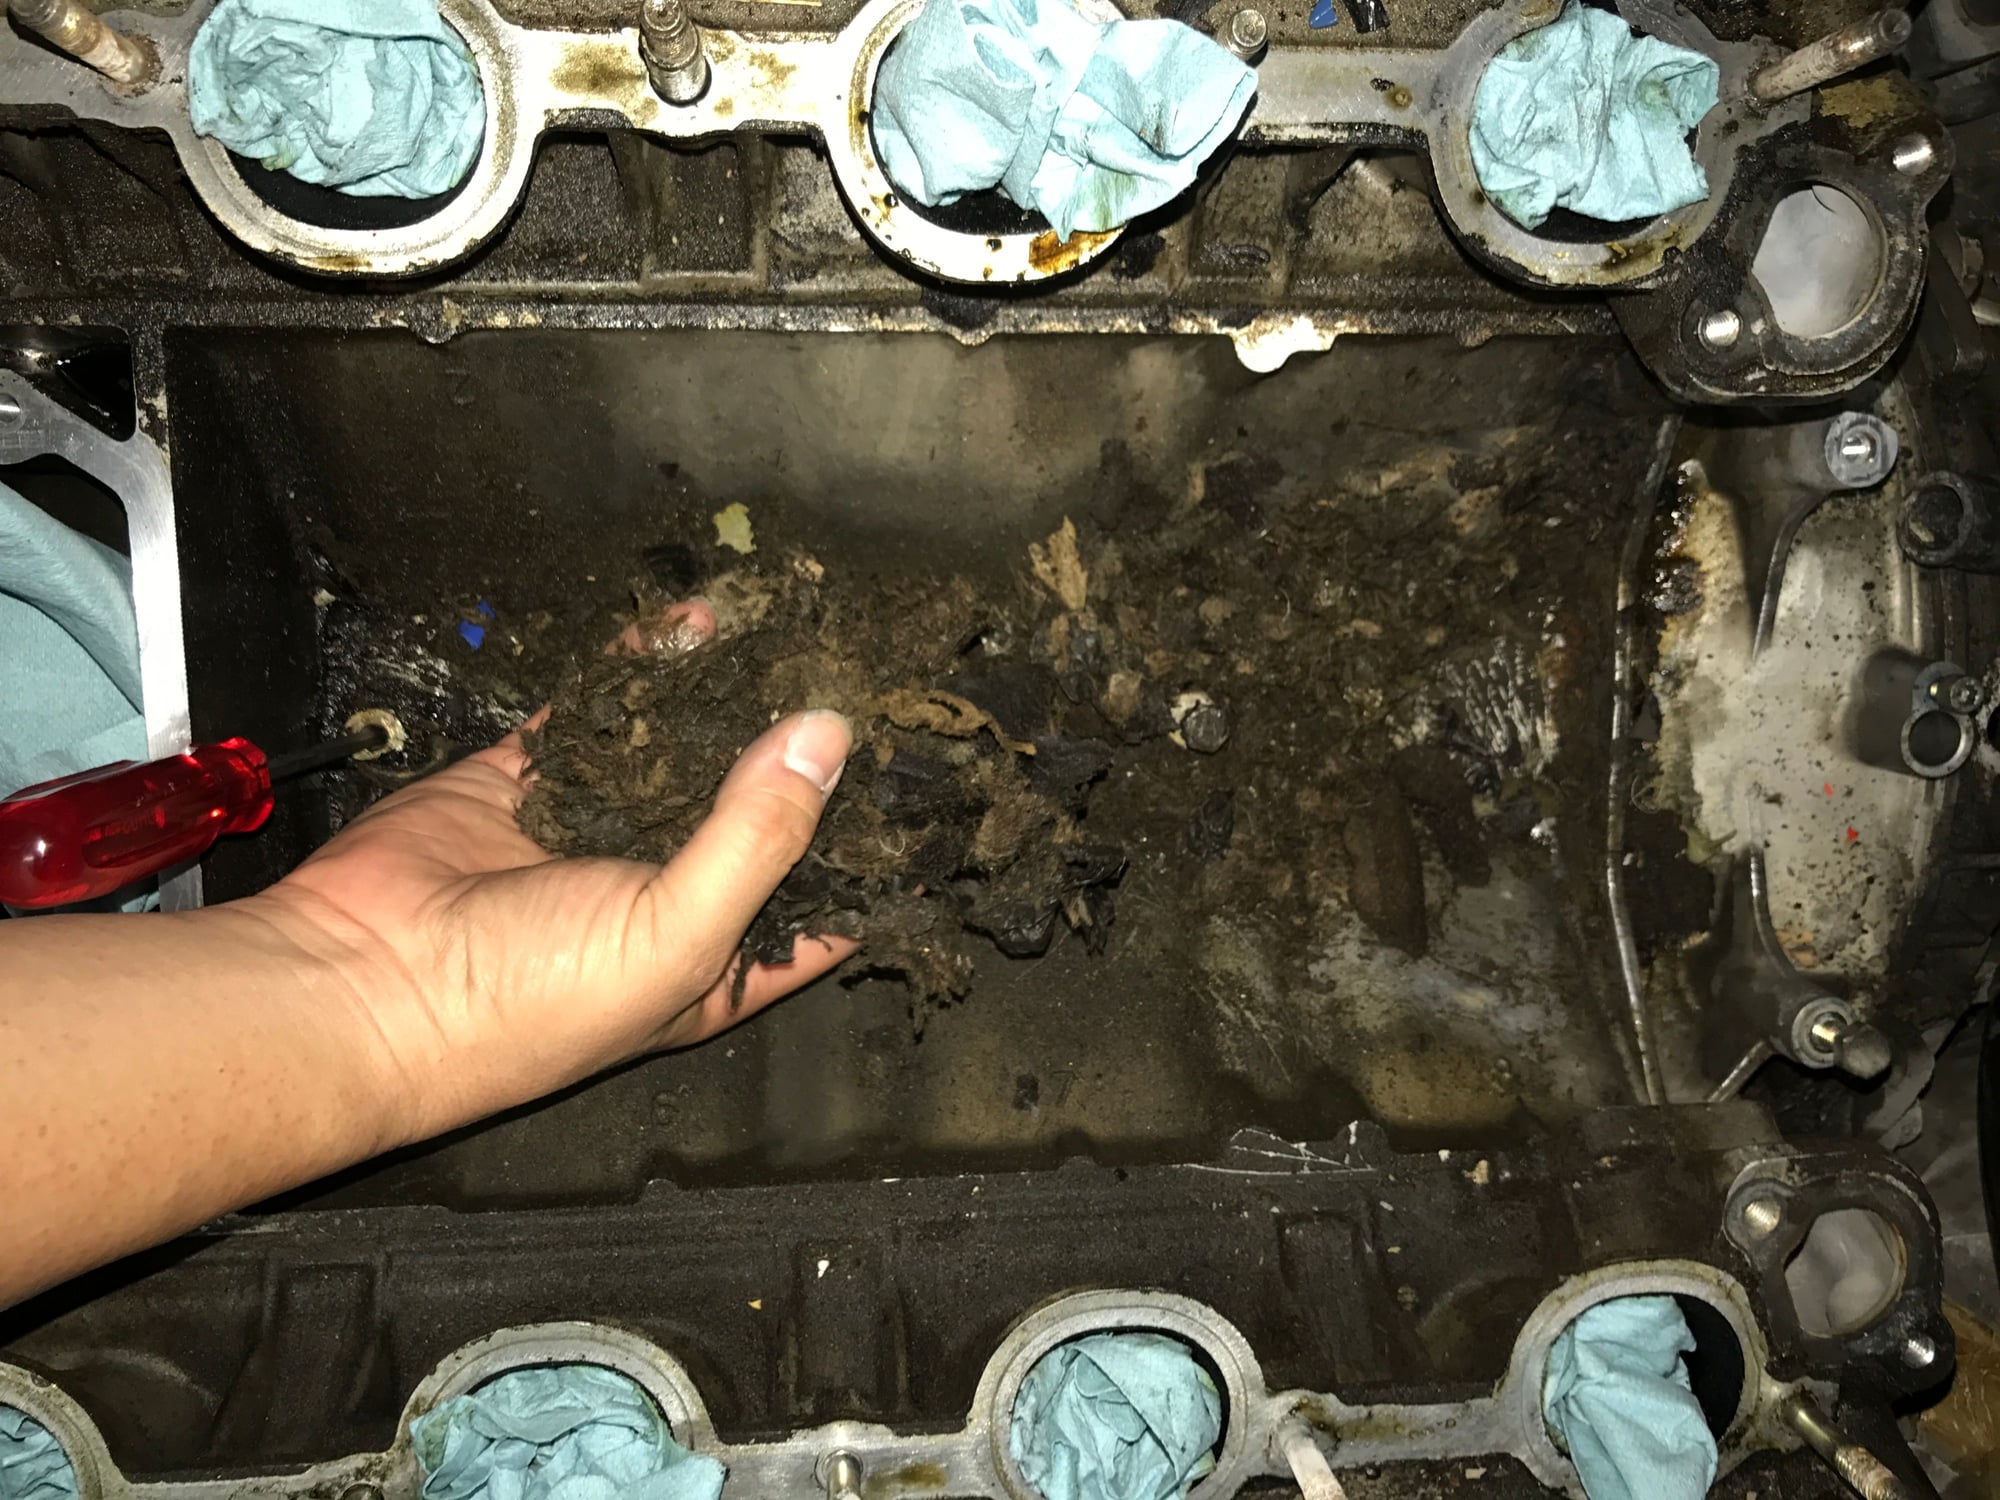
I don't know if I had mentioned that I had a good amount of oil that got into intake which went all the way into the intakes on the heads. I do have a good amount of oil residue and so was concerned of getting gunk into cylinders. But while I was under block with engine upside down I took a towel with some Simple Green and cleaned it very good and didn't get anything in it since it would fall down away from engine.
I do have questions having to do with the bolts that hold hoses on passengers side that are attached along the suspension shock.Do I have to remove the shock? I'll post pictures of that too.
I have an aluminum wall on firewall that is needing replacement, what do you guys recommend?
My headers are raw black metal and was thinking of painting. My friend recommended Jet Hot but anyone have experience with that or other options? I like the finish of the Jet Hot but aren't too sure on options. Thanks.
Also, I will have to post separate postings for each picture, for some reason I can only attach one picture per posting. Sorry.
Okay, I'm back from a few days off the project. So keeping in mind of not cleaning engine with power washer. So for a day or two I was trying to figure out how to clean off the top portion of engine because it was driving me mad figuring out a way to clean it off! I couldn't imagine doing so much work to take out block but not cleaning it off 100%.
SO, I said to myself. Why don't I rotate engine upside down, leave the intake clogged with the blue paper towels, tape them up as well and clean it off that way with Simple Green and a plastic brush. I put a good amount of cardboard not to stain floor and that worked awesome. I'll post pictures.
I don't know if I had mentioned that I had a good amount of oil that got into intake which went all the way into the intakes on the heads. I do have a good amount of oil residue and so was concerned of getting gunk into cylinders. But while I was under block with engine upside down I took a towel with some Simple Green and cleaned it very good and didn't get anything in it since it would fall down away from engine.
I do have questions having to do with the bolts that hold hoses on passengers side that are attached along the suspension shock.Do I have to remove the shock? I'll post pictures of that too.
I have an aluminum wall on firewall that is needing replacement, what do you guys recommend?
My headers are raw black metal and was thinking of painting. My friend recommended Jet Hot but anyone have experience with that or other options? I like the finish of the Jet Hot but aren't too sure on options. Thanks.
Also, I will have to post separate postings for each picture, for some reason I can only attach one picture per posting. Sorry.
The bolts that hold the P-clamps are screwed into nuts welded to the chassis. No need to remove the shock to remove the bolts. As far as replacements go a number of those P-clamps are non-standard widths and/or bolt hole sizes. You can buy standard configuration stainless steel P-clamps with rubber liners from BelMetric . I ended up buying enough clamps of the correct width and length to scavenge the rubber liners and installed them on my original plated P-clamps (after a good cleaning of course.)
IIRC that firewall lining is NLA so a good cleaning is about the best you can do short of buying a good used one from somewhere. Not sure about the headers as I have stock manifolds on my 1990.
OK, its been a while but I've made progress on engine rebuild, or should I say engine removal. I'm at the point that I've taken off pistons, crank and block apart.
So now I have the next phase of having the oil pan, heads, block, lower portion block, valve covers, upper and lower manifold to clean off, sandblast and repaint valve covers, manifold and maybe water bridge.
So.......how would you guys recommend I start?
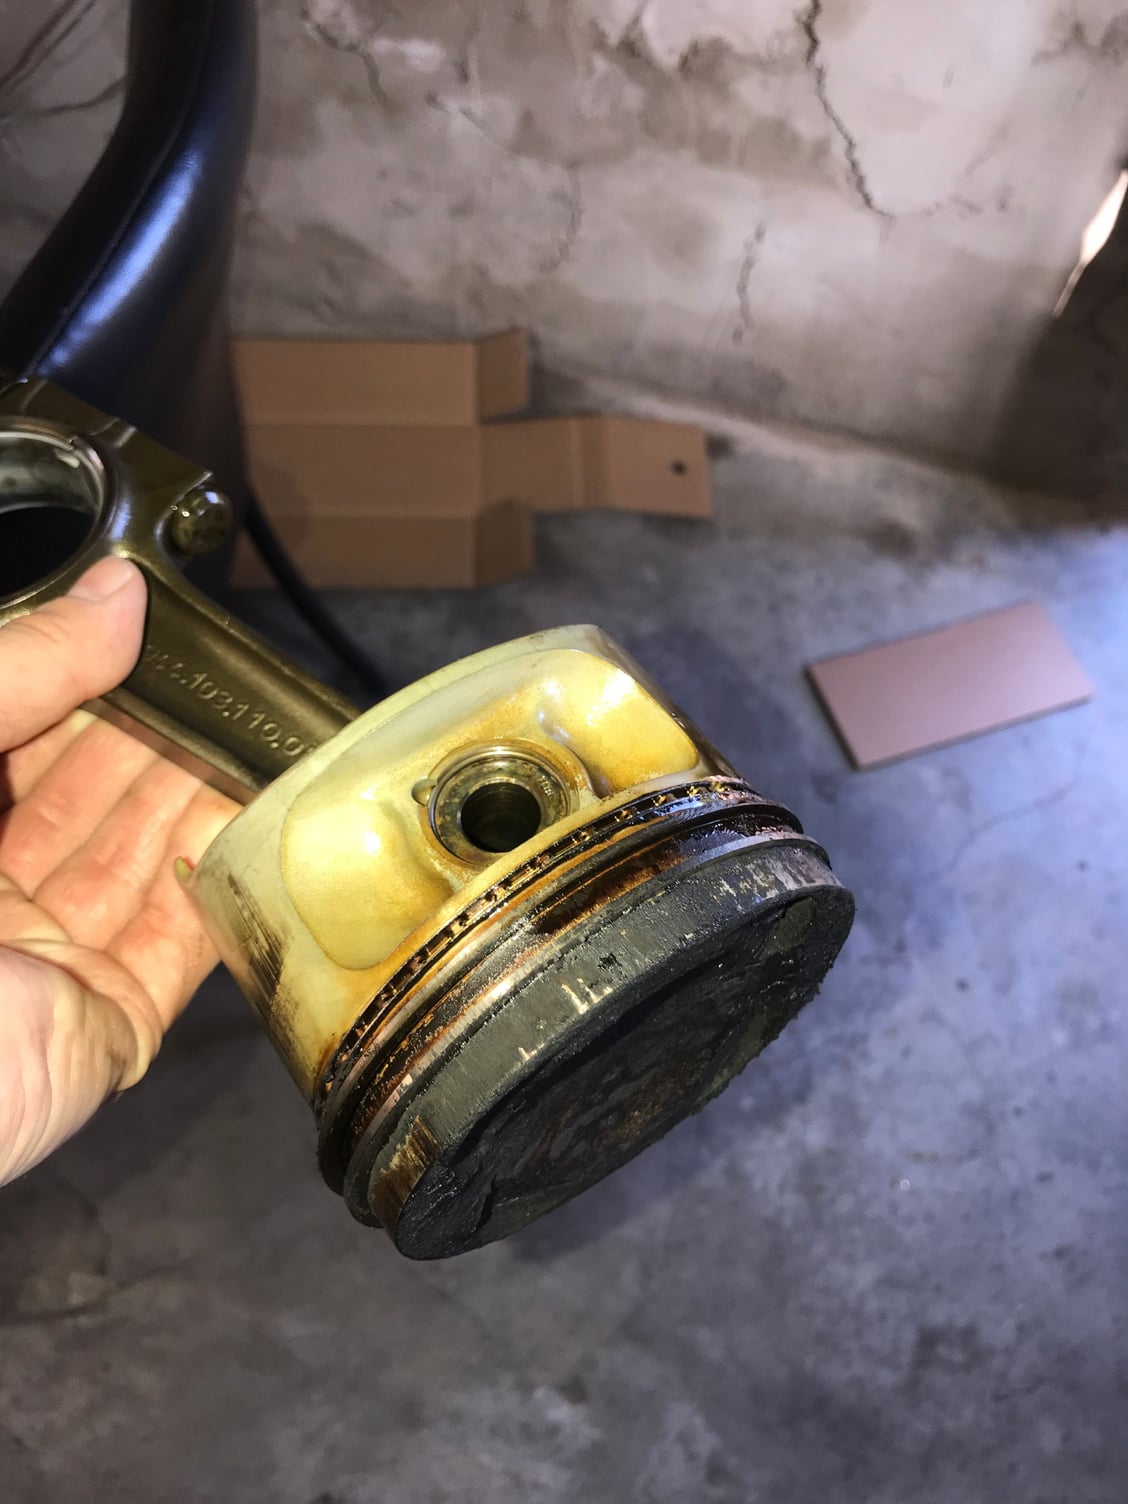
I've already taken piston #4 and dipped it in a mix of Zep Industrial Cleaner and 50% hot water to remove all the carbon residue and it worked great. But the thing that happened is that it kinda got a weird stain on piston. I'll post pics of what I have going so far.
So can someone tell me how to best clean them off?

 09-26-2017, 11:10 PM