Time for a new clutch…
 07-29-2013, 11:37 AM
#16
Proprietoristicly Refined
Rennlist Member
Rennlist Member
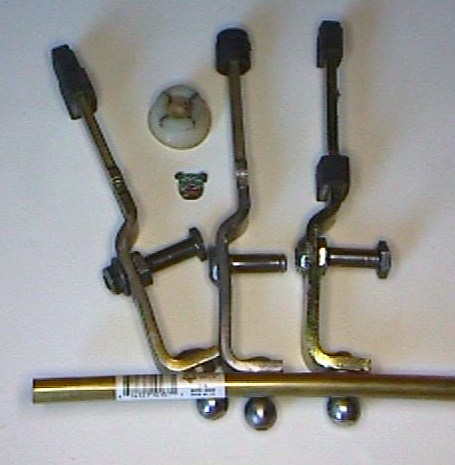
3. while you have the thing apart, it's a convenient time to fix the shift pin - you can use my article, here http://www.wbnoble.com/cars/924-944_...ver_repair.htm as a guide.
I am concerned about drilling the shift rod in the instructions. Done poorly can cause more damage.
FRWilk has a better method for drilling the shift rod if it has a rounded bore and plastic inserts (also available) are not used.
http://www.frwilk.com/the944/shifter.htm
I have done this and in the 20 years of 924S ownership, I have done many "repairs" except the recent www.only944.com repair...
http://only944.com/partscatalog/only/shifter.html
Replacing the shift lever with a good used or new and "fixing" the shift rod hole has been the best repair back to OEM feel if the shift lever is set at WSM specs-85 degrees.
It may never be perfect due to wear on the trans-axle "intermediate" shift lever or a short shift kit is installed on the trans-axle.
J_AZ
 07-29-2013, 12:19 PM
#17
Track Day

Join Date: Jun 2013
Location: Winnipeg, Manitoba, CANADA
Posts: 20
Likes: 0
Received 0 Likes
on
0 Posts
elgy,
I'm most of the way through my first clutch replacement (just need to get the transaxle and exhaust back in). Here are a few notes on what we encountered so far:
- speed and ref sensors were very difficult to remove but with enough pb blaster and gentle twisting with long needle nose pliers, they came free
- the fork pin on ours would NOT come out no matter what. (this step held us up for weeks) We tried to pull it out every which way to no avail. Ended up removing the housing with the pressure plate and clutch as one complete unit by removing the pressure plate bolts through the starter hole and then pounding the pin out by using a punch through the other end. The pin was toast so we got a new one along with new fork bearings.
- we ended up ordering the Sachs clutch and also a new pressure plate/shims/bearing. We also got the flywheel machined. We took the approach that we didn't want to go back in there any time soon so we spent more money to make sure it was all good.
- with enough different extensions, swivels, pb blaster etc, we were able to get all the exhaust bolts and bell housing bolts off without breakage - just being the first time for us it was tough figuring out how to get at everything.
- removing the tranny was easy enough with a regular floor jack (I removed the metal cup and replaced it with a large chuck of wood to balance the tranny on), although there were two of us to balance things as it came off. Getting the tranny back in that way may be more difficult though - we're not there yet!
Good luck!
08-03-2013, 07:38 AM
#18
Rennlist Member
Thread Starter
I have been advancing slowly, when I get discouraged I work on the house for a few hours. Today was productive, I got the transmission out (working alone but with my transmission jack) and pulled back the torque tube. For the torque tube I reinstalled the front bracket that is under the TT, since I didn't like the idea of it possibly falling on me when it came loose. Probablely that isn't possible, but it turns out that the TT sits quite nicely on the bracket.
Good news... the torque tube bearings seem good, the drive shaft turns smoothly and I haven't detected any looseness.
The problem continues to be the sensors, they have been soaking in penetrating oil for several days and so far I have been able to twist one a bit, but it won't come out yet... the other one hasn't moved.
DP-924S - from your handle I take it that you have a 924S too, did you have a heater hose in-line valve placed directly above the sensors that blocks access? I have seen no reference to this pesky part in any of the clutch replacement write-ups, so maybe it is only on our cars (only on MY car)??? It also is in the way of removing the ground straps that are supposed to be on the top of the bell housing... I can't even see them. So next move will be to drain the radiator and remove this fitting which will give me both visibility and a bit of working room.
 08-03-2013, 12:52 PM
#19
Burning Brakes
Join Date: Mar 2004
Location: Calif
Posts: 1,151
Likes: 0
Received 0 Likes
on
0 Posts
I haven't changed a clutch in a few years now, but it seems to me that you can remove the bracket that holds the flywheel sensors by unscrewing it from the back of the engine - there is one (or two?) bolts with 10 mm heads. but if that doesn't work, bending the end of a screw driver into a 90 deg angle to make a pry bar would let you put upward pressure on the sensor as you twist it back and forth. The sensor housing is stainless steel so it shouldn't seize to the aluminum too much.
08-04-2013, 09:21 AM
#21
Proprietoristicly Refined
Rennlist Member
Rennlist Member
....or decide for yourself.
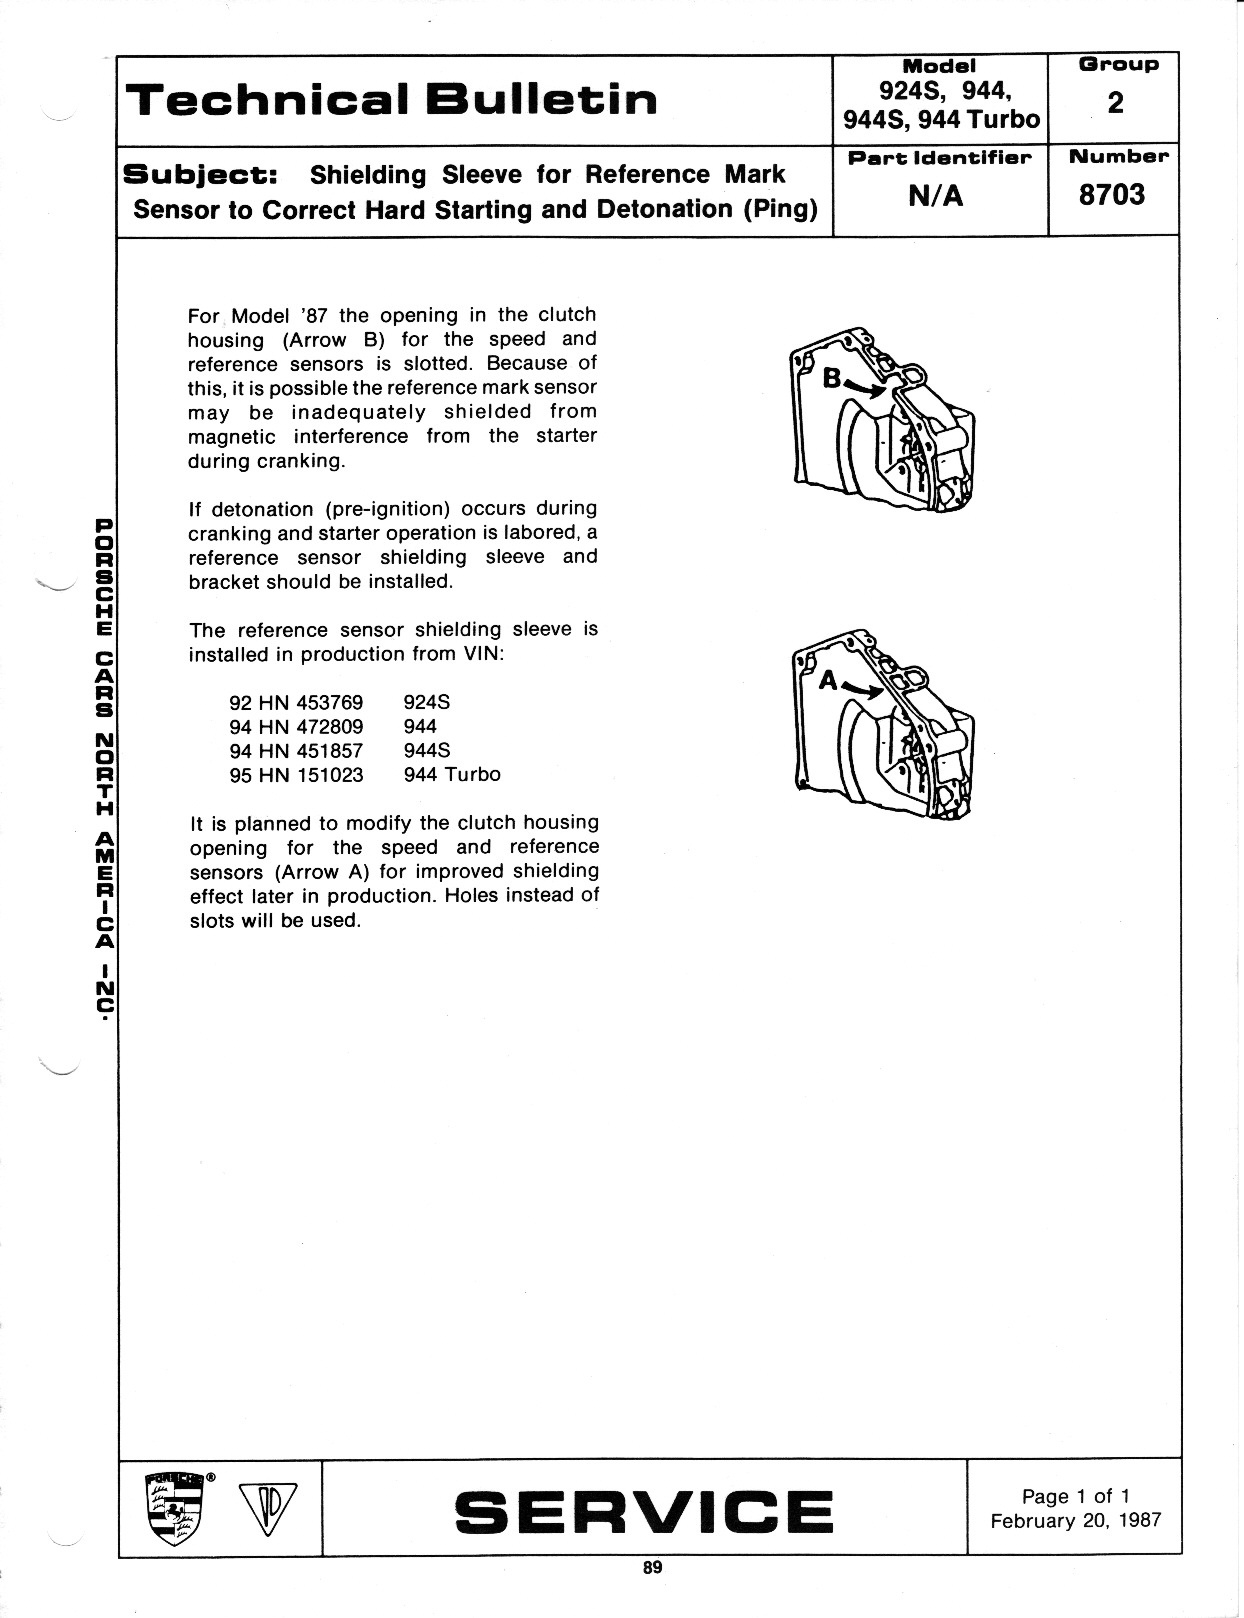
I have done the cut out on the '87. I may decide to replace the bell housing in the future. I have not experienced any "detonation problems.
I do have a sensor bracket with the sensor shield to try if it occurs.
J_AZ
I have done the cut out on the '87. I may decide to replace the bell housing in the future. I have not experienced any "detonation problems.
I do have a sensor bracket with the sensor shield to try if it occurs.
J_AZ
08-14-2013, 06:28 PM
#22
Rennlist Member
Thread Starter
Well people, looks like I've hit a wall. I am ready to remove the bellhousing EXCEPT for the sensors and the clutch fork retaining pin. I am already thinking about leaving the retaining pin in and doing what DP-924S suggested above "... removing the housing with the pressure plate and clutch as one complete unit by removing the pressure plate bolts through the starter hole... "
But the sensors have me stumped... I have been working on them off and on for 2 weeks (not full time evidently... ), at this point both of them turn, but despite pulling hard while twisting with the long, long nose pliers I bought just for this, there is NO upward movement. I have been soaking them in Liquid Wrench and then the acetone/ATF mixture that I mixed up.
Yesterday I decided to remove the bracket that holds the sensors... I was able to get an Allen socket on the "driver's side" (as defined by people who drive on the right hand side of the road) screw that cannot be seen from above. Actually it wasn't too hard working from underneath, but it is in there very solidly and it wouldn't budge with the torque I was able to put on it. It is difficult to keep the socket straight with the universal adaptor and I was afraid to strip the screw if I forced too much. So I have put that idea aside.
Suggestions and moral support accepted...
08-14-2013, 08:38 PM
#23
Proprietoristicly Refined
Rennlist Member
Rennlist Member
You can either get a vice grips and pull until the sensors break in half or come out. Maybe 1 of 2 if you are lucky.
Or you can gently take a chisel and break the sensor bracket.
Here is a caution pic:
https://rennlist.com/forums/10395963-post43.html
Full post-- one of many...
https://rennlist.com/forums/924-931-...one-wrong.html
GL
J_AZ
Or you can gently take a chisel and break the sensor bracket.
Here is a caution pic:
https://rennlist.com/forums/10395963-post43.html
Full post-- one of many...
https://rennlist.com/forums/924-931-...one-wrong.html
GL
J_AZ
08-14-2013, 09:06 PM
#24
Rennlist Member
Thread Starter
You can either get a vice grips and pull until the sensors break in half or come out. Maybe 1 of 2 if you are lucky.
Or you can gently take a chisel and break the sensor bracket.
Here is a caution pic:
https://rennlist.com/forums/10395963-post43.html
Full post-- one of many...
https://rennlist.com/forums/924-931-...one-wrong.html
GL
J_AZ
Or you can gently take a chisel and break the sensor bracket.
Here is a caution pic:
https://rennlist.com/forums/10395963-post43.html
Full post-- one of many...
https://rennlist.com/forums/924-931-...one-wrong.html
GL
J_AZ
The good news is that I have done all sorts of work on the house... successfully completing tasks that have been on my mind for months gives me the boost I need to slide under the Porsche and try again.
 08-21-2013, 09:18 PM
#25
Rennlist Member
Thread Starter
SUCCESS!!! The clutch is out!
But it wasn't easy.
For the sensors, I was never able to get them to budge so attacked the bracket. Ended up stripping the head of the driver side bolt, but the other one came out easily. Next I removed the intake manifold to have some working room and then I was able to get a reciprocating saw on the stripped bolt and I cut the head off. The bracket would not yet come off easily (I think the head of the bolt did not come off as cleanly as I hoped) but I was able to pry it off as the bellhousing moved backwards.
I took the advice of DP-924S and took the pressure plate bolts out through the starter opening and was able to take it all out as a unit, then pounded the pin out from the other side.
I installed a plank on wooden blocks under the bellhousing so that when it came off it wouldn't fall on me... that worked well.
Good news - the clutch plate is finished... so this has not been a waste of time. The rubber is split and the metal pieces that are the backup system are in sad shape. The pressure plate looks good so I will reuse it unless further investigation turns up a problem. The clutch fork is also in very good shape.
One of the sensors is finished, the wire fell out from all the stress put on it during the twisting, the other one looks OK...
I am going to do the cut out modification of the bellhousing suggested above... it will make putting it back together much easier and I don't ever want to have to go through that again if I ever have to go back in there.
So time to order the parts... then start taking the fuel tank out
08-21-2013, 09:32 PM
#26
Instructor

Join Date: May 2010
Location: Elkins Park Pa.
Posts: 117
Likes: 0
Received 0 Likes
on
0 Posts
I am also in the middle of a clutch on my 87 S. Clutch is out, flywheel is off.
I did run into a few issue's, turns out the PP is broken, one of the thin metal
straps between the part that push's on the disc and the part that bolts to the
flywheel is broken and sticking out. So it hits the aluminum housing when it
rotates, this was my noise. Also this is the 2nd clutch and this disc is worn
out, no rubber center, springs. Strange at only 79000 miles...
Seems the last guy messed up the cheese head PP bolts and used a
replacement allen head bolt, this is fine except they were too long and
bottomed out in the flywheel. This messed up the threads and as the bolts
were removed they tore the threads up in the flywheel, time for a S
flywheel..
Also have a issue with the torque tube bearings, not rough like a normal bad
bearing but kinas scratchy when you turn it. I have a spare from a 84 that
I think will work.
Besides the above it looks like I need a couple fuel lines, 4 cv joint boots
and do something with the HEAVY exhust system and the cat may get
gutted oh the rear main is just starting to leak too.. Yeah it's snowballing!!
Steve
08-21-2013, 11:44 PM
#27
Burning Brakes
I too am doing my clutch (engine too). I'm at installing the new throw out bearing in the pressure plate. One queation I had was how many spacers to use. A lot of Info out there, but the best I found was Clark's: The number of spacers installed should not prevent the snap ring from being installed. Also, once the bearing is installed and the snap ring is in place, there should be a small amount of movement between the release bearing and the pressure plate.
Looks like some miss information about resusing the same amount of spacers as the old. Hope that helps. Adios.
Looks like some miss information about resusing the same amount of spacers as the old. Hope that helps. Adios.
08-21-2013, 11:59 PM
#28
Instructor
Join Date: May 2010
Location: Elkins Park Pa.
Posts: 117
Likes: 0
Received 0 Likes
on
0 Posts
Just wondering who has the best deal on parts? Seems I'm a little limited
because the S clutch is different then the more popular 8valve or turbo
clutch..
So far EBay seems to look pretty good..
because the S clutch is different then the more popular 8valve or turbo
clutch..
So far EBay seems to look pretty good..
08-22-2013, 08:17 AM
#29
Rennlist Member
Thread Starter
Have you had a look at Amazon? Yes Amazon sells car parts, see clutch disk from Rennbay earlier in this thread. The 3 part kit for my car is very competitive.
08-22-2013, 09:09 AM
#30
Burning Brakes
I bought the Rennbay disc on Amazon with prime, so free two day shipping. All the other stuff I called up Travis and he ordered everything for me cheaper than Pelican. Saved me like $30k roughly. 
Another note that's clutch related is how to press out the clutch fork bearings. I put a 6" C-Clamp in my vise, and used a really short 9/16 (IIRC) socket to press out the old, and press in the new. Make sure the socket is straight, and go slow. Hope that helps as well.
Another note that's clutch related is how to press out the clutch fork bearings. I put a 6" C-Clamp in my vise, and used a really short 9/16 (IIRC) socket to press out the old, and press in the new. Make sure the socket is straight, and go slow. Hope that helps as well.