Fixing oil cooler gasket - diabolical heat shield
#1
Hey all.
I have pretty big oil leak that appears to originate from the oil cooler when the engine is running (drips just below the OPRV).
So I am replacing the seals. I have all the nuts and screws removed from the heat shield and it's loose, but how do I remove it? I think it has to be removed to get to the top two mounting bolts of the cooler housing.
I read that this job can be done without removing the exhaust manifold, but I am skeptical now. Has anyone done it this way who has a tip or two for me?
Thanks for any thoughts.
#2
I had to remove the exhaust manifold to do it on my car. I tried like the devil to avoid it but in the end just couldn't. Pulling the manifold isn't a huge deal, I have all new studs with antiseize on them, but it still takes time. I probably spent more time futzing around while not removing the manifold than actually removing the manifold and reinstalling it. Of course if your manifold and studs are all rusty and seized up like most street cars ....
#4
For us, solving a Rubik's Cube blindfolded would've proven far easier than manipulating the heat shield out while leaving the exhaust manifold intact...
But, after what seemed like 10 minutes, we prevailed.
Although our '88 is an 8-Valve not an S.
Bon Fortun
But, after what seemed like 10 minutes, we prevailed.
Although our '88 is an 8-Valve not an S.
Bon Fortun
#5
I'll play with it some more, then. I almost wish you'd all said its impossible so I could just get on with removing the exhaust manifold :-)
If I do remove the manifold:
-remove all the bolts that hold the manifold to the head
-I assume I remove all the bolts that hold the other end of the manifold to the exhaust pipe.
-how likely is it that I will break the exhaust manifold studs? I have a a fair amount of experience removing rusted fasteners...
#7
I had an oil leak in the same area on my 89 S2 and it turned out to be the exhaust camshaft seal. It was dripping onto the water pump and onto the oil cooler housing from there. While I was in there I did the timing belts, water pump, etc and re-sealed the oil cooler housing. I removed the heat shield and left the exhaust manifold in place. I don't recall it being that hard, though it was somewhat of a hassle. The heat shield was two pieces, don't know if it is the same on an 88S.
Joe M
1989 944 S2
Joe M
1989 944 S2
Trending Topics
#8
i refurbished one and was able to get it in without any force. believe it or not, both parts will slide right in if you hold them just right. it was obviously made to be removed and reinstalled but they didnt leave any extra room. im not bragging though, it took me quite a few attempts to figure out how to slide it in.
#9
Yeah, S shield is two pieces as well. I moved the PS reservoir and removed the rubber connector from the horizontal heater tube and I got it out fairly easily. Then I had some difficulty getting to the top bolt of the cooler housing, so I checked a manifold bolt just to see what I would be in for if I just gave in and pulled the manifold. No trouble at all, so I loosened them all in preparation. One of the studs broke with very little torque. All the rest were easy. Just takes that one to blow up the whole damn project though.
#10
Ok, oil cooler is out.
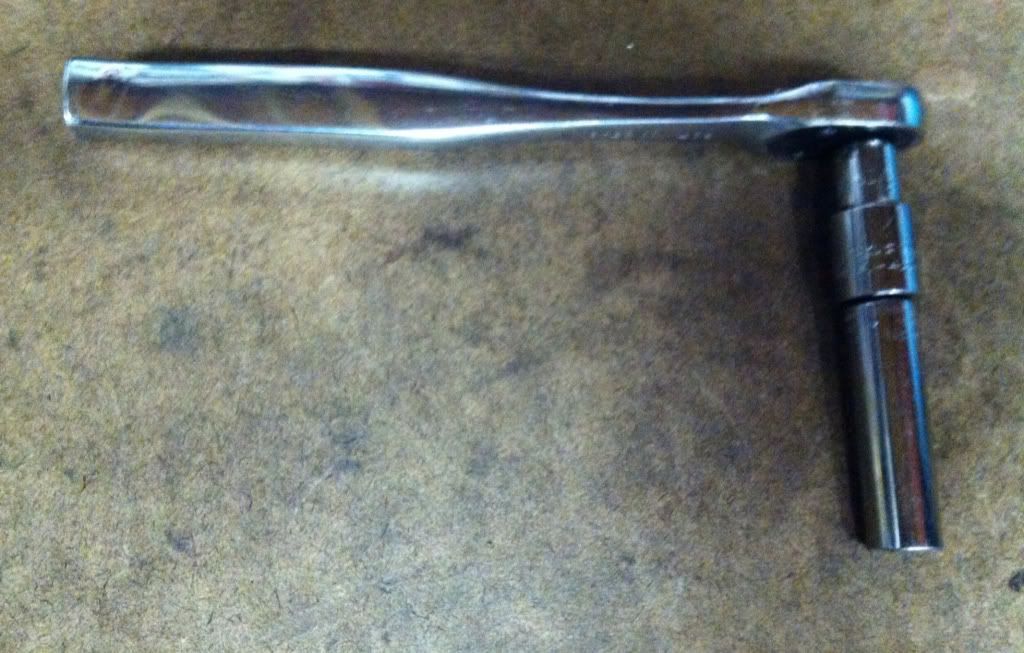
Did it with the header in. Got to the top bolt under the header with this (3/8 ratchet, 3/8 to 1/2 adapter, 1/2 to 3/8 adapter, 13mm deep socket):

Went in from the front near where the oil filter sits, no trouble, and I think I'll be able to use the torque wrench to put it back.
To get it out, I had to drop the PS pump and the sway bar and it's mount.
And loosen the tie down for the PS hard line so I could muscle that out df the way
Also definitely remove the OPRV first so it doesn't hang up on anything.
I could not get the oil pressure sender off even though I had the perfect tool. I'll do that on the bench. Or not.
All in all a total pain. And I still have to fix the broken exhaust stud...
one of those jobs I wish I hadn't decided to do myself.
Did it with the header in. Got to the top bolt under the header with this (3/8 ratchet, 3/8 to 1/2 adapter, 1/2 to 3/8 adapter, 13mm deep socket):

Went in from the front near where the oil filter sits, no trouble, and I think I'll be able to use the torque wrench to put it back.
To get it out, I had to drop the PS pump and the sway bar and it's mount.
And loosen the tie down for the PS hard line so I could muscle that out df the way
Also definitely remove the OPRV first so it doesn't hang up on anything.
I could not get the oil pressure sender off even though I had the perfect tool. I'll do that on the bench. Or not.
All in all a total pain. And I still have to fix the broken exhaust stud...
one of those jobs I wish I hadn't decided to do myself.
#11
Ok, oil cooler is all buttoned up and properly torqued (setup above worked fine with the torque wrench).
Oil cooler came out with 1 shim but needed 3 to meet the 0 +/- 0.25mm spec, which bugs me. *edit* found another shim in my coolant drain pan so shims went from 2 to 3.
I could not find a new copper washer for the oil pressure sender so I lapped the old one on some fine emory cloth until it was perfectly flat and smooth again and reused it.
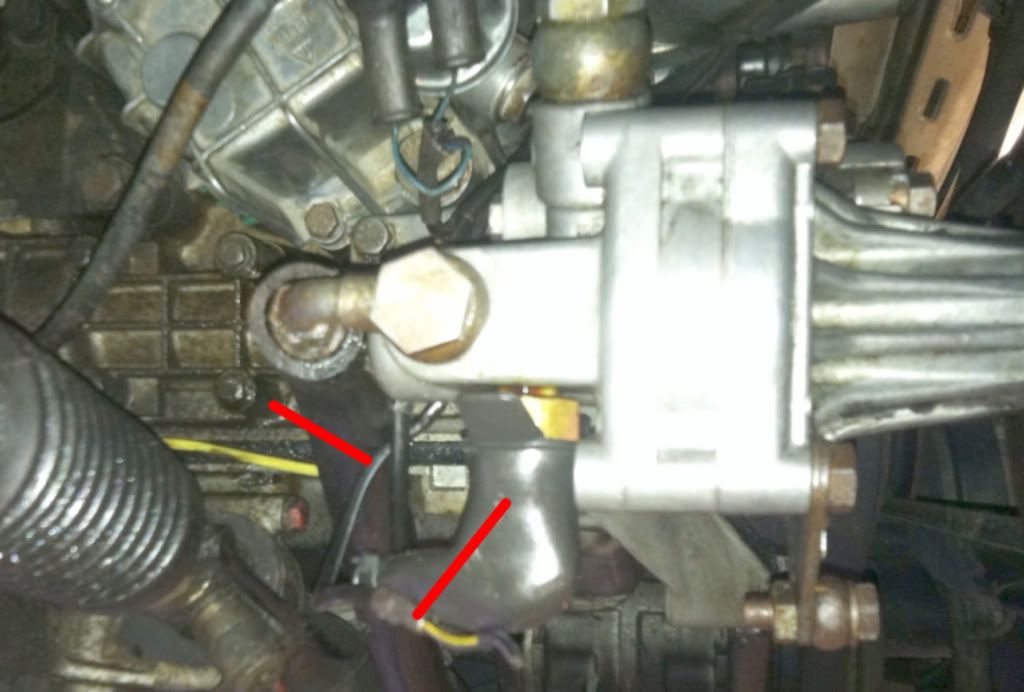
Got the PS pump re-mounted. Anybody know what this wire is (pointed to twice in red)?
It looks like it was tied off with shrink tubing at some point. Under the boot attached to the limit switch on the power steering pump are the two wires that I clipped and carefully insulated a few years back in response to a TSB that says to do so (that harness is unfused and if it shorts, fries the main harness). This wire is something else.

Last edited by gtroth; 09-03-2012 at 05:01 PM.
#12
Yeah, reinstalling the heat shield was every bit as obnoxious as removing it. But it's done. Bled, ran it up to temperature until the oil pressure dropped and the high speed fans kicked on, and beld some more. Everything is behaving as it should. Saw a drip of oil again just below the OPRV so this may have been a wrong turn as far as fixing the leak. The leak did stop, but oil came from somewhere (I was careful to wipe up every drip I could see as I was buttoning up). In any case, it's comforting to know the oil cooler seals are solid now.
No signs of exhaust gasses leaking from the port with the broken/missing stud. Not sure when I'll have to correct this.
Cheers.
No signs of exhaust gasses leaking from the port with the broken/missing stud. Not sure when I'll have to correct this.
Cheers.
#13
I just completed this repair on my 88 NA. I didnt remove the header, it was a real pain but I just took my time. Looking back repositioning the cooler and the gasket correctly was the most PITA part of the job.
#14
I glued the gasket into the housing groove with Curil T so no trouble repositioning for me (this is what FSM said to do).


