

TiAL Wastegate Install - Wish me luck!
 08-03-2012, 11:53 AM
#1
Intermediate
Thread Starter
Join Date: May 2012
Location: Central Texas
Posts: 30
Likes: 0
Received 0 Likes
on
0 Posts
Hey hey rennlisters!
Wish me luck; I'm about to tackle a 38mm TiAL wastegate install, plus some "while I was there" maintenance which includes ICV replacement, vacuum hose replacement/rerouting, gasket replacement, boost solenoid relocation, and flux capacitor recharging.
The beer is chilling and the band-aids are ready...
 08-03-2012, 12:24 PM
#2
Racer
Good luck! Don't forget to post some pics.
I noticed that you have the Koni's. Being an '86 I assume you used the conversion method? Did you change the springs? What level of dampening are you running at? How's the ride? What did you set the rear shocks at?
I noticed that you have the Koni's. Being an '86 I assume you used the conversion method? Did you change the springs? What level of dampening are you running at? How's the ride? What did you set the rear shocks at?
08-03-2012, 01:34 PM
#3
At least you don't have to install old WG back. Most likely some of the old studs will snap.... Post pictures of Tial setup, we are going to make similar installation to son's project 951. Remember flux capacitor recharg need at least 5.3 gigawatts current. Hope you got same kind of lightning available as we had in couple of days ago 
08-13-2012, 05:13 PM
#5
Intermediate
Thread Starter
Join Date: May 2012
Location: Central Texas
Posts: 30
Likes: 0
Received 0 Likes
on
0 Posts
UPDATE:
I had to postpone this project for a bit (broken/damaged parts and other issues). I will provide pics and a walk-through of sorts, however, when the time comes.
I had to postpone this project for a bit (broken/damaged parts and other issues). I will provide pics and a walk-through of sorts, however, when the time comes.
02-12-2013, 07:29 PM
#6
Intermediate
Thread Starter
Join Date: May 2012
Location: Central Texas
Posts: 30
Likes: 0
Received 0 Likes
on
0 Posts
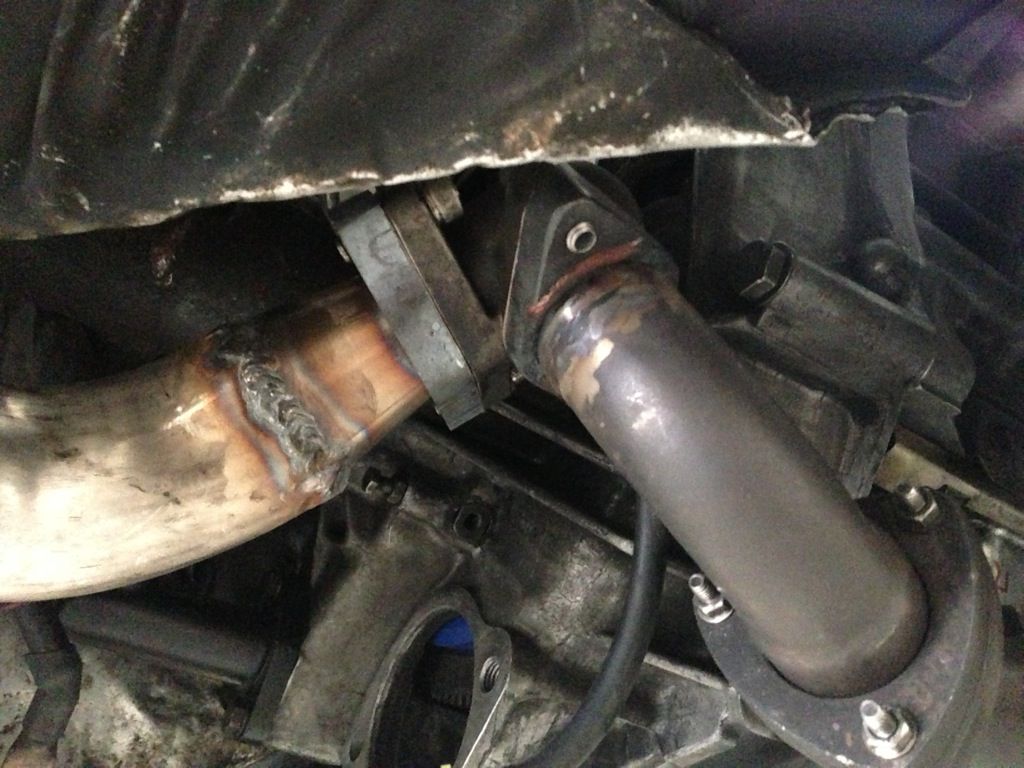
Here we go! The TiAL 38mm Wastegate (with adapter plates) and custom 3" exhaust is now complete.
Note: The oil you see is a healthy dose of penetrating oil (PB Blaster). You most definitely want to do this prior to removing any exhaust component. And, pay no attention to the dirt and smudges on the paint; it's been raining like crazy here.
Note: The oil you see is a healthy dose of penetrating oil (PB Blaster). You most definitely want to do this prior to removing any exhaust component. And, pay no attention to the dirt and smudges on the paint; it's been raining like crazy here.
Last edited by Mancuso; 02-12-2013 at 07:45 PM.
02-12-2013, 07:39 PM
#7
Intermediate
Thread Starter
Join Date: May 2012
Location: Central Texas
Posts: 30
Likes: 0
Received 0 Likes
on
0 Posts
Notice how the TiAL was in the wrong position (inlet and outlet reversed)? That was the only way that the wastegate would fit without modification. Now, there are two problems with installing it this way:
One: It's setup the wrong way.
Two: It's setup the wrong way.
You'll see huge spikes in boost and your car will buck like a bronco. Given that Porsche mechanics even make this mistake, don't be too hard on yourself if you do the same... just fix it! Unlike the stock wastegate, the bottom of the TiAL is the INLET.
Those of you that are considering an install like this need to understand that the modification required on a one-piece exhaust crossover, while not extensive, is most likely beyond the scope of your average home mechanic; this is due to tools, workspace, fabrication machinery, et al.
The guys at Lambs Muffler in Waco, TX did a fantastic job for an extremely reasonable price. No other shops even considered touching the exhaust when they heard the word "Porsche"... these guys are pros.
A custom 3" exhaust (wastegate dump tied in) with Flowmaster and TiAL 38mm Wastegate, and copper gaskets from Lindsey Racing installed for less than 1/2 the cost of many pre-fab exhaust systems? Yes. I'll take two.
Trending Topics
02-13-2013, 09:57 PM
#10
Drifting
Join Date: Aug 2009
Location: Bangkok, Thailand, Milpitas, CA & Weeki Wachee, FL
Posts: 2,239
Likes: 0
Received 2 Likes
on
1 Post
I am not sure why this was so difficult, is the '86 exhaust different? I was able to bolt in a couple hours.
https://rennlist.com/forums/showthre...ferrerid=72025
Just curious...
https://rennlist.com/forums/showthre...ferrerid=72025
Just curious...
02-13-2013, 10:18 PM
#11
Professional Hoon
Rennlist Member
Rennlist Member
Join Date: Jan 2010
Location: Melbourne, Australia
Posts: 7,090
Likes: 0
Received 4 Likes
on
4 Posts
my 86 has a TiAL 38mm and was bolted up with SFR adapter plates. problem with those, they are not stainless steel so they rust 
It came with my car like that so i'm not complaining.. but if i were to change the stock waste gate i would have make it with no adapter plates.
My 3 bolt flange could swivel around so i could place the waste gate where i wanted to
Today i had some time so i cut up (by hand ) the adaptor plates and did what i just said.
It came with my car like that so i'm not complaining.. but if i were to change the stock waste gate i would have make it with no adapter plates.
My 3 bolt flange could swivel around so i could place the waste gate where i wanted to
Today i had some time so i cut up (by hand
) the adaptor plates and did what i just said.
02-13-2013, 10:29 PM
#12
Nordschleife Master
The '86 came with a one piece crossover, so the waste gate pipe was not removable. This makes the install a PITA because you have very little adjustment in how the waste gate lines up with the rest of the exhaust. This crossover also must be removed completely to get the bell housing off, adding about 2-3hrs onto a clutch job.
02-13-2013, 11:04 PM
#13
Drifting
Join Date: Aug 2009
Location: Bangkok, Thailand, Milpitas, CA & Weeki Wachee, FL
Posts: 2,239
Likes: 0
Received 2 Likes
on
1 Post
The '86 came with a one piece crossover, so the waste gate pipe was not removable. This makes the install a PITA because you have very little adjustment in how the waste gate lines up with the rest of the exhaust. This crossover also must be removed completely to get the bell housing off, adding about 2-3hrs onto a clutch job.
