My Rennbay fuel line install experience
 04-30-2008, 07:35 PM
#1
Unbannable
Rennlist Member
Rennlist Member
Thread Starter
There may be other threads on this, but whatever. My turn. 
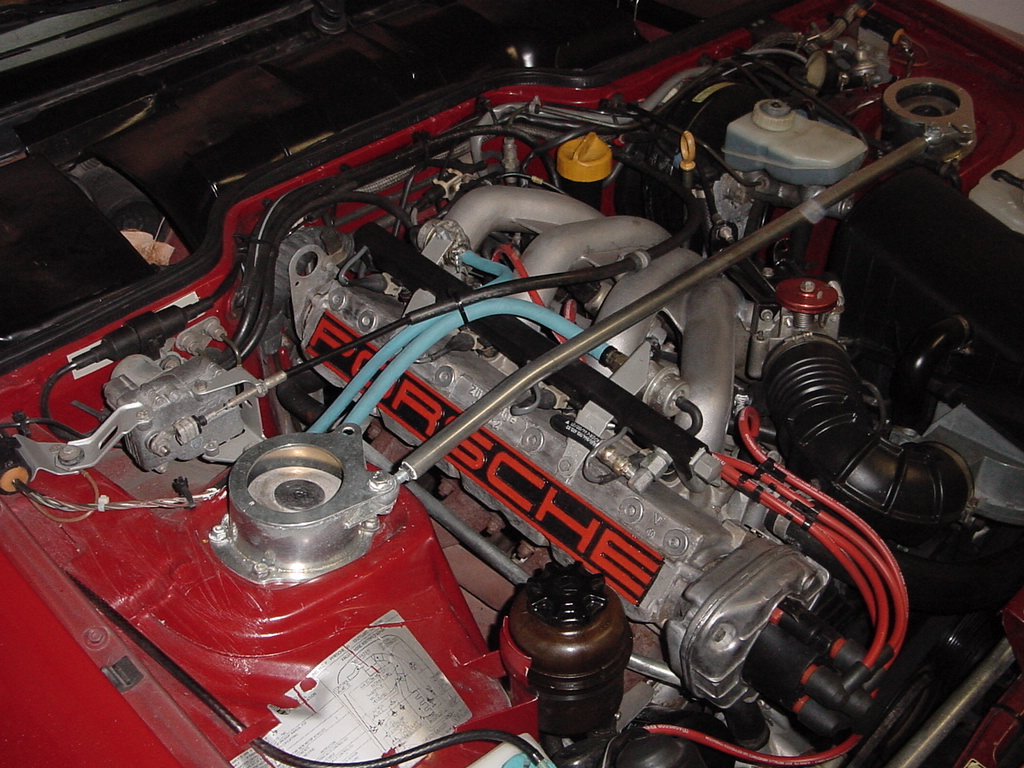
Anyway, my fuel lines were, as near as I can tell, original. They didn't show any signs of leaking but since this is my pride and joy, I saw no reason to run the risk of a carbecue. I weight my options and did some research between the less expensive Rennbay lines versus the braided stainless steel lines and decided to go with the Rennbay ones. I'll be honest, I love the way the stainless lines look (especially compared to the blue Rennbay ones, which really don't match my color scheme if you care about that sort of thing) and almost went with them for that reason alone, but opted against it because the exposed lines would be easier to inspect for cracks and deterioration (not unlike the same issues with the stainless brake lines, but that's another thread).
The install was straight forward and took about 90 minutes to do. I pulled the fuel pump fuse and turned the ignition to (hopefully) get rid of most of the fuel in the lines. I disconnected the two lines at the pressure regulator and damper and they dripped a bit but nothing too bad.
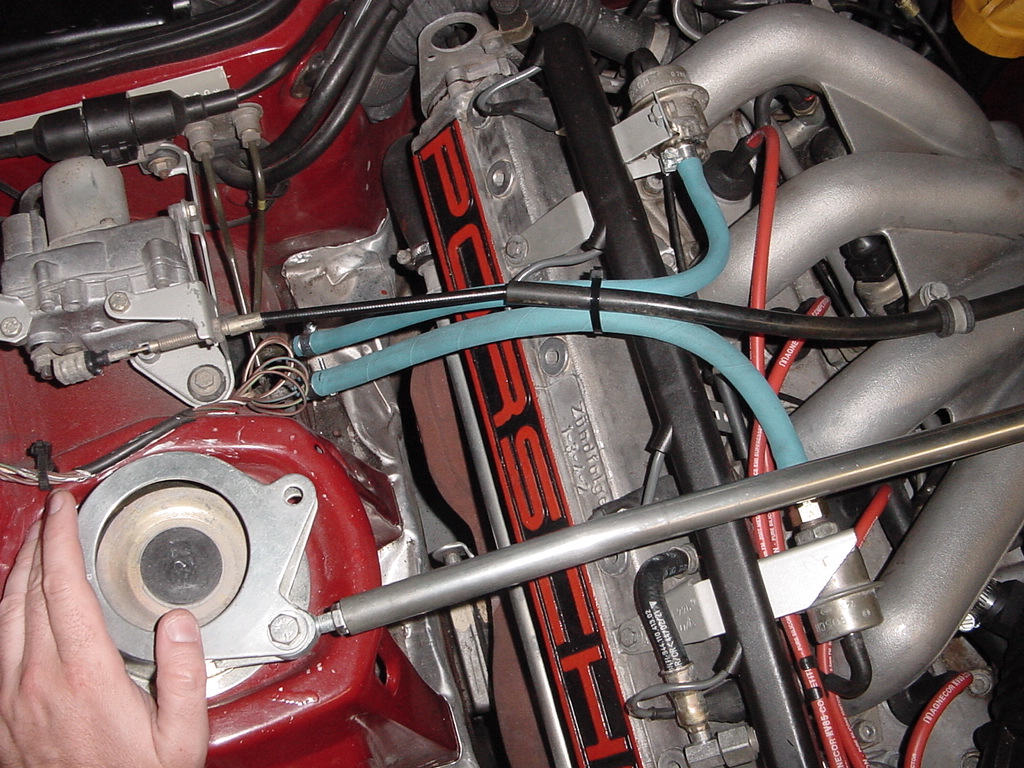
Removing the rubber lines from the hard lines was a bit more time consuming. I placed a towel underneath the lines to catch any spillage and used a dremel tool to cut some lines into the crimped clamps where the rubber attaches to the hard lines. After putting a couple cuts in, I used some needlenose pliers to roll the metal away like a sardine can, until I could pull the lines off. This is a good time to mention that you shouldn't cut the hard lines at all... you NEED the barb on there for the Rennbay lines to seal up against. Also be careful not to cut too deep and gouge the lines.
While removing the lines, I still managed to leave a few nicks in the hard lines where the metal crimps gouged them while trying to pull the rubber lines off. Fortunately, it wasn't too bad and everything seems to be sealing up anyway. I say this as a precaution if you do this... take your time! Also, once I got the first line removed, I put tape over the exposed hard line and wrapped it with a sock to protect it from slipping while I was working with the dremel on the second line.
I compared the Rennbay lines to the OEM ones for length, and also test-fitted them to make sure everything was the same length. Using a Sharpie, I marked where I was going to cut and used a fresh blade on my utility knife to make it. I feel like one of the lines is a little short, but I think that's more my neurosis than anything else.
After making the cut, I cleaned off the hard lines and installed the lines. It took some twisting to get them on, but with a few swear words it's all good to go. I tried to re-use the plastic covers that were on the OEM lines, but they broke while I was removing the old lines, so... oh well.
I got it all back together and fired up the car. Using both my hand and a paper towel, I checked for leaks as the car idled for about ten minutes. No problems, so I'll let it sit for a while and occasionally check it in the garage for leaks.
Anyway, this whole process was pretty simple and no more than a two-beer job. So long as I don't suddenly leak and/or catch fire, I'm happy. Still, though, I wish they weren't blue...
BB.
Anyway, my fuel lines were, as near as I can tell, original. They didn't show any signs of leaking but since this is my pride and joy, I saw no reason to run the risk of a carbecue. I weight my options and did some research between the less expensive Rennbay lines versus the braided stainless steel lines and decided to go with the Rennbay ones. I'll be honest, I love the way the stainless lines look (especially compared to the blue Rennbay ones, which really don't match my color scheme if you care about that sort of thing) and almost went with them for that reason alone, but opted against it because the exposed lines would be easier to inspect for cracks and deterioration (not unlike the same issues with the stainless brake lines, but that's another thread).
The install was straight forward and took about 90 minutes to do. I pulled the fuel pump fuse and turned the ignition to (hopefully) get rid of most of the fuel in the lines. I disconnected the two lines at the pressure regulator and damper and they dripped a bit but nothing too bad.
Removing the rubber lines from the hard lines was a bit more time consuming. I placed a towel underneath the lines to catch any spillage and used a dremel tool to cut some lines into the crimped clamps where the rubber attaches to the hard lines. After putting a couple cuts in, I used some needlenose pliers to roll the metal away like a sardine can, until I could pull the lines off. This is a good time to mention that you shouldn't cut the hard lines at all... you NEED the barb on there for the Rennbay lines to seal up against. Also be careful not to cut too deep and gouge the lines.
While removing the lines, I still managed to leave a few nicks in the hard lines where the metal crimps gouged them while trying to pull the rubber lines off. Fortunately, it wasn't too bad and everything seems to be sealing up anyway. I say this as a precaution if you do this... take your time! Also, once I got the first line removed, I put tape over the exposed hard line and wrapped it with a sock to protect it from slipping while I was working with the dremel on the second line.
I compared the Rennbay lines to the OEM ones for length, and also test-fitted them to make sure everything was the same length. Using a Sharpie, I marked where I was going to cut and used a fresh blade on my utility knife to make it. I feel like one of the lines is a little short, but I think that's more my neurosis than anything else.
After making the cut, I cleaned off the hard lines and installed the lines. It took some twisting to get them on, but with a few swear words it's all good to go. I tried to re-use the plastic covers that were on the OEM lines, but they broke while I was removing the old lines, so... oh well.
I got it all back together and fired up the car. Using both my hand and a paper towel, I checked for leaks as the car idled for about ten minutes. No problems, so I'll let it sit for a while and occasionally check it in the garage for leaks.
Anyway, this whole process was pretty simple and no more than a two-beer job. So long as I don't suddenly leak and/or catch fire, I'm happy. Still, though, I wish they weren't blue...
BB.
 04-30-2008, 08:03 PM
#2
Rennlist Member
cool! thanks for the write-up. I'll be doing this soon myself!
I have a red and black engine bay too. I'm thinking I might buy some sleeving for the lines for protection and to cover up the blue.
I have a red and black engine bay too. I'm thinking I might buy some sleeving for the lines for protection and to cover up the blue.
04-30-2008, 09:51 PM
#5
Burning Brakes
Yeah, sleaving is the answer - either some black fiberglass or silver heat-shield tubing over them will give you what you need.
BTW, Travis, why are they blue again ?
BTW, Travis, why are they blue again ?
04-30-2008, 09:52 PM
#6
Unbannable
Rennlist Member
Rennlist Member
Thread Starter
I suppose at some point it'll be worth chasing down some sleaves, although in all honesty I'll likely just end up leaving "well enough" alone. I'm lazy like that. Plus, it'll probably make it difficult to inspect the lines, which is the main reason I went with these. 
BB.
BB.
Trending Topics
05-01-2008, 05:21 AM
#8
Drifting
hmm, looks good, but the transition point being right over the header and just a clamp holding the fuel line on makes me a bit nervous. What if there is a pressure increase in the line and it blows off? maybe I'm just too paranoid.
I also don't really like the light blue color of the rennbay lines but that's not a big deal, the real issue is how safe they are as a fuel leak would be a disaster.
I'm going to install the rennbay lines soon with the compression fittings, not sure if these are safer but I like the idea of the transition point being inside the fender, plus the rennbay stainless steel lines look nicer.
05-01-2008, 07:51 AM
#9
Unbannable
Rennlist Member
Rennlist Member
Thread Starter
BB.
05-01-2008, 10:16 AM
#10
Rennlist Member
Nice work! 

I don't think I've heard that one before
Seems like you could rig up a flat piece of insulation and/or reflective material underneath the fuel lines to reduce the heat on the lines, mounted maybe on the inside of the wheel well in the area here:
Originally Posted by BeerBurner
carbecue
I don't think I've heard that one before
Seems like you could rig up a flat piece of insulation and/or reflective material underneath the fuel lines to reduce the heat on the lines, mounted maybe on the inside of the wheel well in the area here:
09-06-2010, 01:26 PM
#12
Defending the Border
Rennlist Member
Rest In Peace
Rennlist Member
Rest In Peace
the transition point being right over the header and just a clamp holding the fuel line on makes me a bit nervous. What if there is a pressure increase in the line and it blows off? maybe I'm just too paranoid.
Last edited by ibkevin; 08-01-2013 at 01:05 PM.
09-06-2010, 03:07 PM
#13
Rennlist Member
Forgive my ignorance, but if you cut the crimp sleeves off, can't you use standard high pressure hose with screw clamps at both ends? Is the hose ID at the damper different than at the hard line connection? I can get Aeroquip or Gates h.p. hose locally.
