When you click on links to various merchants on this site and make a purchase, this can result in this site earning a commission. Affiliate programs and affiliations include, but are not limited to, the eBay Partner Network.
Cargo blind fix, no new parts, except 3 pop rivets.
Originally Posted by Spock 951
I've tried the hemostat method, and while it does work I found it much easier if you remove both end caps. Remove the shade from the metal tube. Then simply place the new end cap on the end of the shade with the spring, wind it up with the cap, then carefully slide the metal tube back in place. If you have an assistant, you can easily check the tension to see if it is correct before you rivet everything back in place.
Keith
Hi, I'm new to this forum, but have found the above advice very useful.
My 944 cargo blind suddenly stopped winding back in. I read this thread and watched a youtube clip on straight forward blind replacement.
Ebay prices for used blinds were �145-ish. Even a none working one was �80.
I've just fixed mine. This is what I found.
The 2 retaining screws are long crosspoint/philips screws. I removed the blind. Drilled out the 3 pop rivets on the non-pivot end cap i.e. left handside.
The 2 rivets on the flat part of the end cap are slightly larger (wider) than other single rivet.
I took the blind out of the cover. Then gently slid the blind itself out of the metal tube's groove via the pivot end.
Both plastic end caps were fine, no problems.
The blind mechanism did not turn. I poured in WD40 to the spring mechanism end. It freed off and turned OK.
I slid the blind itself gently back into the metal tube's groove. I wound the blind back on tightly. I held the tube and using the non-pivot end cap, wound up the spring.
I read some where it should be 9 turns, I think I used 11/12. I then slid the blind and tube back inside the main cover, locating the tube on the pivot.
Note: there was 3 (shim) washers on the actual pivot bar. I then held the non-pivot cap in place and riveted it up, using standard DIY store pop rivets.
Black felt tip on the pop rivet on show. Job done.
Here's what I've found...
There are two different types of rolling hatch covers. The end caps are also different. (Because, of course there are)
There exists 3D printable models of the end caps but that's for a different post. You just need to use the proper filament... ASA should work.
You CAN take one version apart. It's a bit time consuming and fiddly.
Drilled out the rivets on the end caps and took the cover out of the mounting tube. On this version, there is a round pin at one end and a flat pin at the other.
The other version has a hole for the pin in the end cap and a flat pin on the other. I have not figured out how to disassemble that version... yet.
The round pin and seat will easily slide out of the end of the tube. The opposite side has the flat pin where the mechanism has tension. You'll need to
remove the flat pin from the mechanism. It will come out with some work. Oddly, the flat pin had been glued into the end cap and had come free from the mechanism.
There are two metal tabs that hold mechanism into the tube. With a little work, you can release those tabs. I found a jewelers screwdriver can get under them.
The mechanism will slide out of the tube. My spring was broken in 2 places, leaving a piece of the spring that was about 2/3 the original size.
On either side of the inner mechanism you can see where the spring is attached. The spring is more pliable than i would have expected. You can
release the spring from the retaining clips fairly easily. Manipulating the shortened spring back into those retaining areas was challenging but I got it done.
Once it was rebuilt, sliding it back into it's proper place was a challenge. You need a pole of sorts to force the mechanism down the tube and work it back into place.
Using the pole, i was able to tap the flat pin back into the mechanism. I had tension. It worked... until it didn't. The spring snapped again.
Apparently, 35 years makes a spring brittle. My excitement outweighed all logic. The challenge now is finding a replacement spring.
If memory serves, the mechanism is about 15 or 16 inches long. The spring is about 14-15" long and is flat wound.
Someone somewhere has to make a replacement or something that will work as a replacement.
When I disassemble again, I'll take pictures and try to create a tutorial.
The opposite side has the flat pin where the mechanism has tension. You'll need to
remove the flat pin from the mechanism. It will come out with some work. Oddly, the flat pin had been glued into the end cap and had come free from the mechanism.
There are two metal tabs that hold mechanism into the tube. With a little work, you can release those tabs. I found a jewelers screwdriver can get under them.
The mechanism will slide out of the tube. My spring was broken in 2 places, leaving a piece of the spring that was about 2/3 the original size.
On either side of the inner mechanism you can see where the spring is attached. The spring is more pliable than i would have expected. You can
release the spring from the retaining clips fairly easily. Manipulating the shortened spring back into those retaining areas was challenging but I got it done.
Once it was rebuilt, sliding it back into it's proper place was a challenge. You need a pole of sorts to force the mechanism down the tube and work it back into place.
Using the pole, i was able to tap the flat pin back into the mechanism. I had tension. It worked... until it didn't. The spring snapped again.
.
I've got the same problem, but can't get the spring mechanism out of the tube. You mention 2 metal tabs that hold the mechanism into place in the tube - where are they? I can't see anything from the outside as the cover is heat welded to the tube, and so the outside of the metal tube cannot be seen. Do I need to remove the plastic end cap? I've tried, using pliers, but have started to damage it and so stopped before I destroyed it as it's almost certainly irreplaceable.
Any suggestions / information welcome!
Hi itstimupnorth,
That appears to be the same one i fixed. It's been almost 2 months. I'll have to go back and take a look at my work.
Unroll the cover. you'll see the tabs underneath the material. You can pull the material back a little bit.
I do remember being somewhat surprised when it finally submitted.
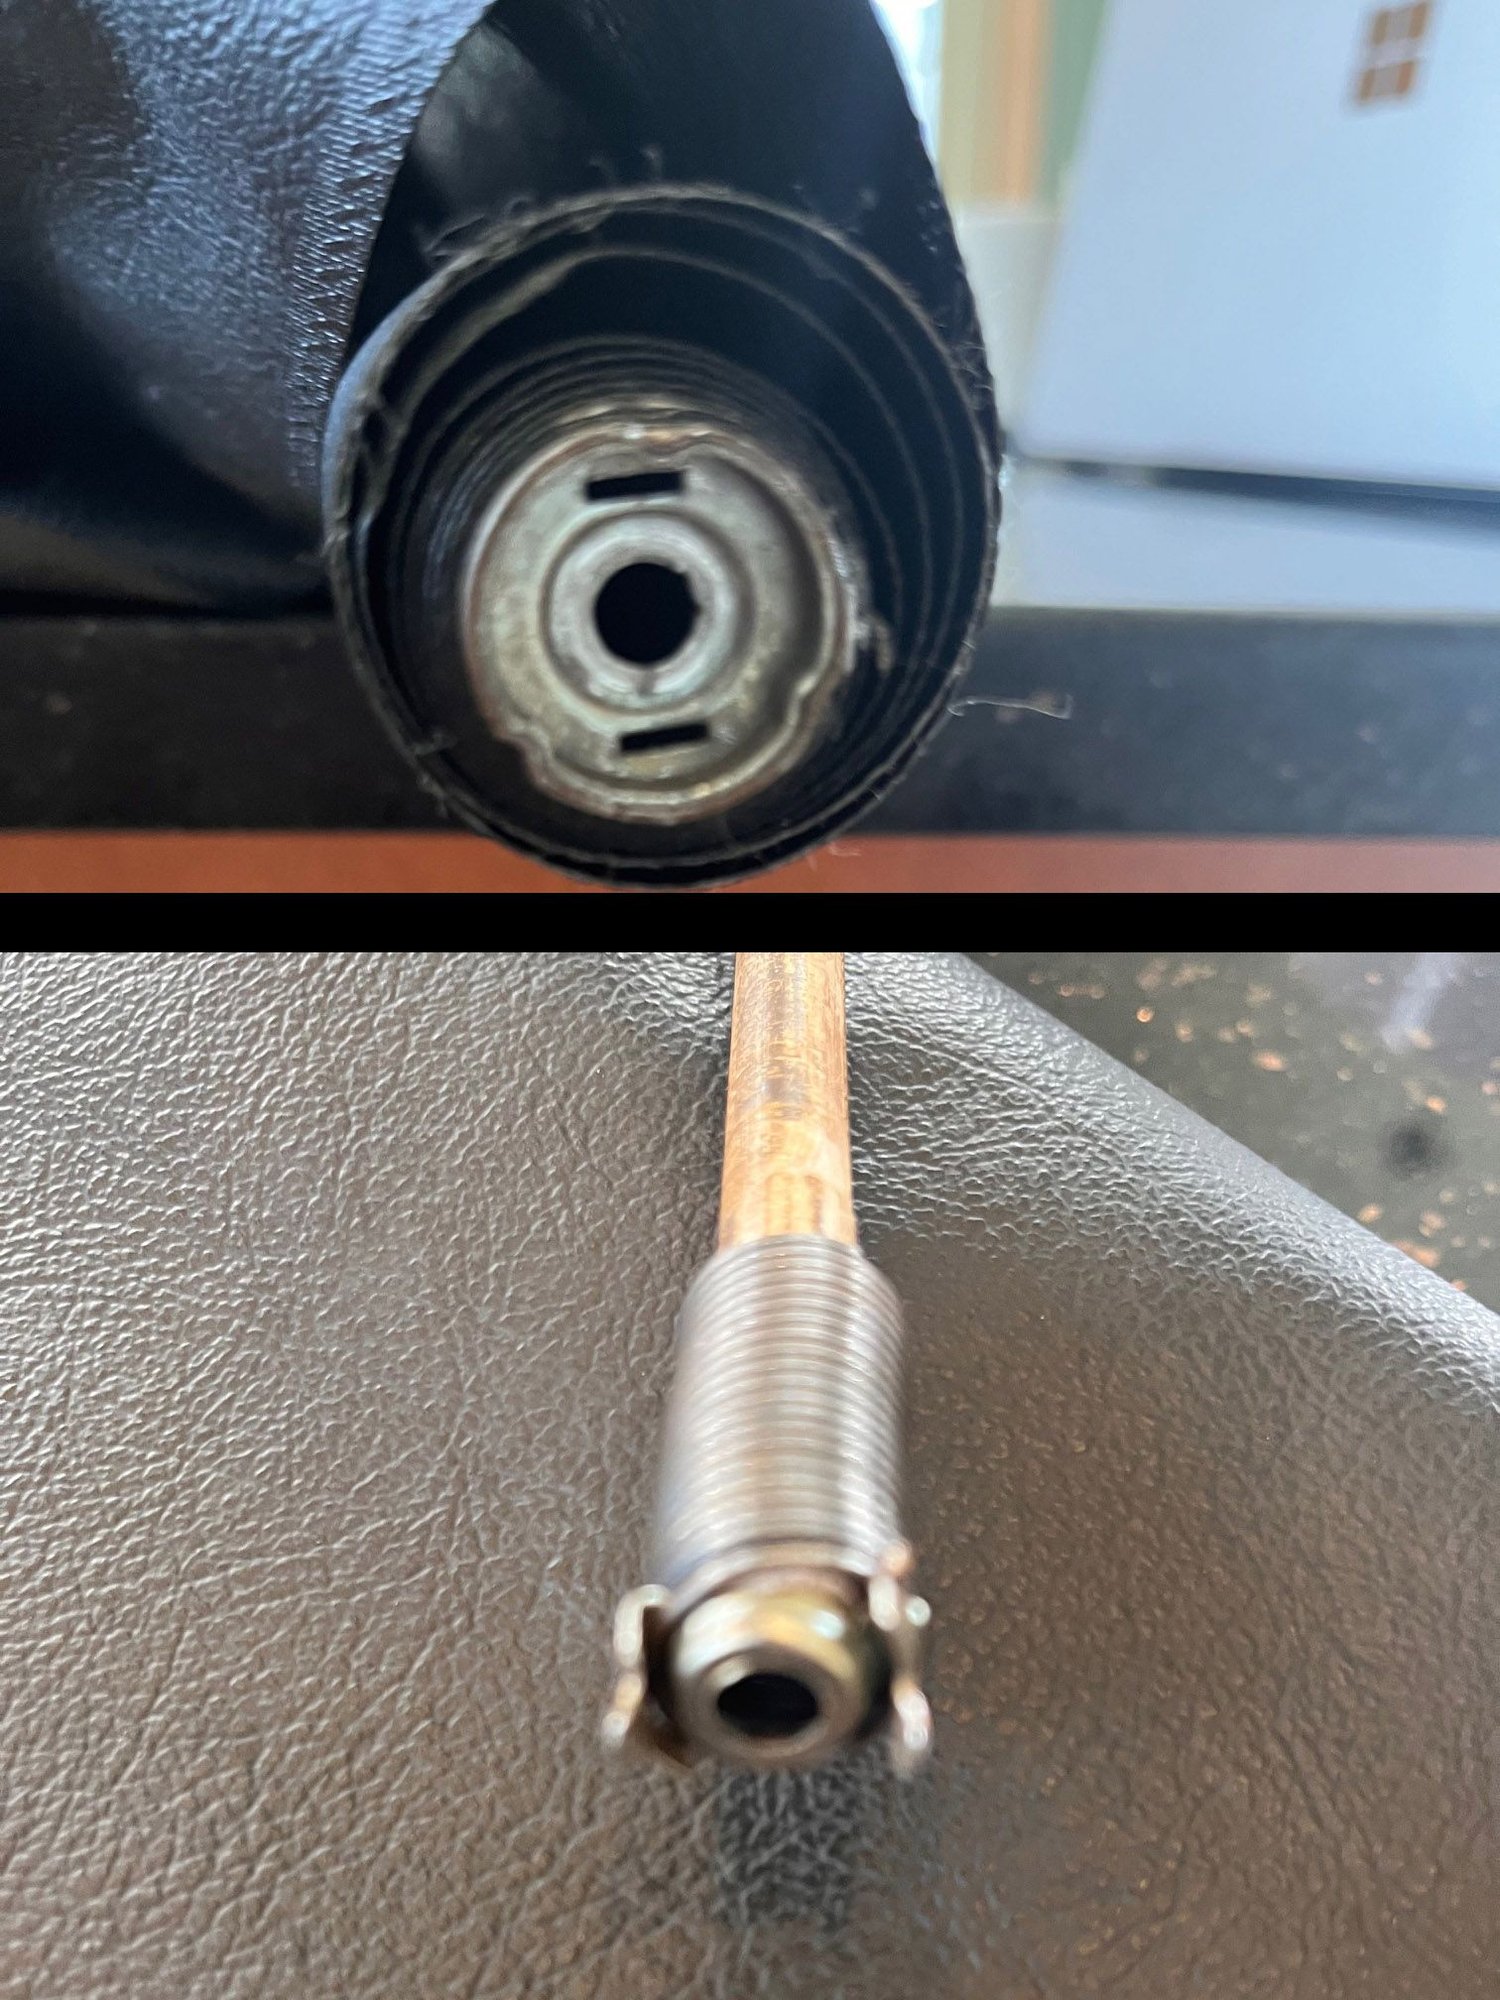
Many thanks for that info. I'm now down to bare metal. Does this look like yours? There's one on the other side as well.
Just welcome some reassurance that I'm on the right lines! The indentations don't appear to be very deep, but it's still showing extreme reluctance to release. The fit is so tight I can't see how I could get a feeler gauge in there, let alone a small screwdriver. I'm wondering whether just to try and knock it out from the other end with a long metal drift.
The other version has a round pin in black plastic on one end.
The other end has 2 pretty obvious tabs that are crimped to hold the mechanism in place.

 04-29-2019, 11:36 AM